5.2.6 模型推理
功能介绍
本章节介绍模型推理功能的使用,输入一张本地图片进行推理,得到渲染后的图片并保存在本地。
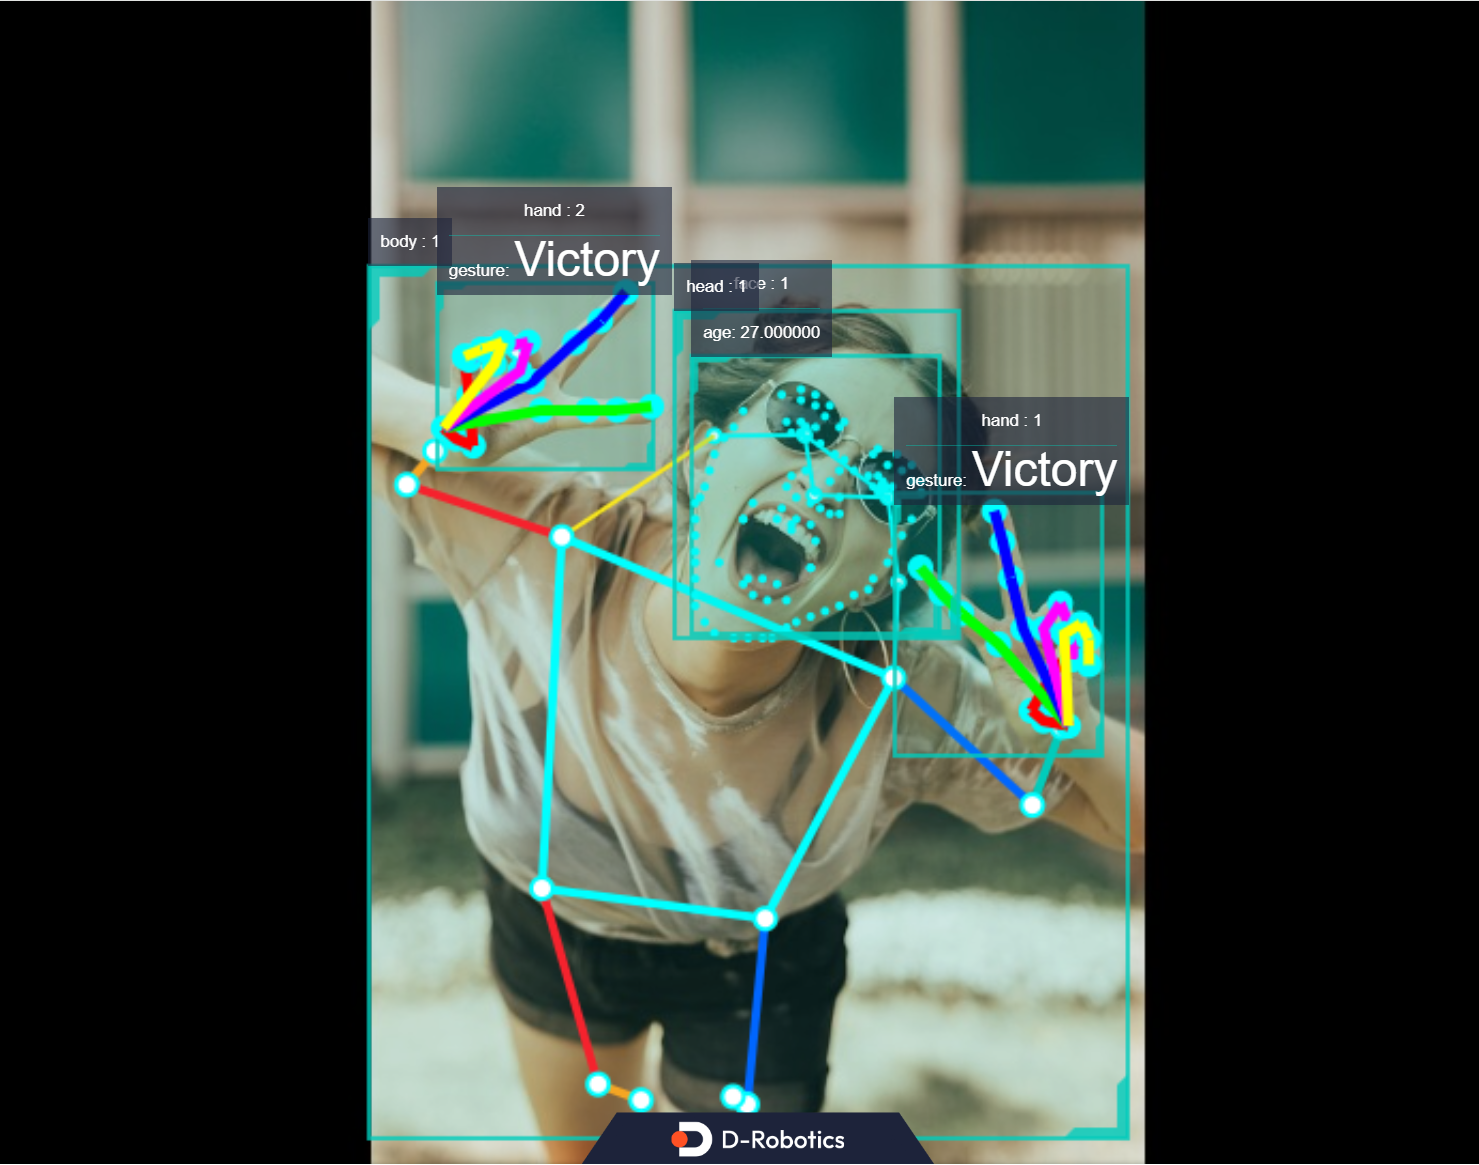
最后展示TROS应用算法中的人体检测和跟踪、人脸年龄检测、人脸关键点检测、人手关键点检测、手势识别的算法同时推理和融合后的效果。示例使用MIPI/USB摄像头/本地回灌输入,通过WEB展示推理渲染结果。
代码仓库:https://github.com/D-Robotics/hobot_dnn
支持平台
| 平台 | 运行方式 |
|---|---|
| RDK X3, RDK X3 Module | Ubuntu 20.04 (Foxy), Ubuntu 22.04 (Humble) |
| RDK X5, RDK X5 Module | Ubuntu 22.04 (Humble) |
| X86 | Ubuntu 20.04 (Foxy) |
RDK S100和RDK Ultra平台的模型推理功能体验参考Boxs算法仓库。
准备工作
RDK平台
-
RDK已烧录好Ubuntu 20.04/Ubuntu 22.04系统镜像。
-
RDK已成功安装TogetheROS.Bot。
X86平台
- 确认X86平台系统为Ubuntu 20.04,且已成功安装tros.b。
使用介绍
使用hobot_dnn配置文件中的本地JPEG格式图片和模型(FCOS目标检测模型,支持的目标检测类型包括人、动物、水果、交通工具等共80种类型),通过回灌进行推理,并存储渲染后的图片。
- Foxy
- Humble
# 配置tros.b环境
source /opt/tros/setup.bash
# 配置tros.b环境
source /opt/tros/humble/setup.bash
# 从tros.b的安装路径中拷贝出运行示例需要的配置文件。config中为example使用的模型,回灌使用的本地图片
cp -r /opt/tros/${TROS_DISTRO}/lib/dnn_node_example/config/ .

# 使用本地jpg格式图片进行回灌预测,并存储渲染后的图片
ros2 launch dnn_node_example dnn_node_example_feedback.launch.py dnn_example_config_file:=config/fcosworkconfig.json dnn_example_image:=config/target.jpg
运行成功后,在运行路径下自动保存渲染后的图片,命名方式为render_feedback_0_0.jpeg,使用ctrl+c退出程序。
运行命令中的参数说明,以及如何订阅并使用从camera发布的图片进行算法推理的运行方法参考dnn_node_example package源码中的README.md。
结果分析
在运行终端输出如下信息:
[example-1] [INFO] [1679901151.612290039] [ImageUtils]: target size: 6
[example-1] [INFO] [1679901151.612314489] [ImageUtils]: target type: couch, rois.size: 1
[example-1] [INFO] [1679901151.612326734] [ImageUtils]: roi.type: couch, x_offset: 83 y_offset: 265 width: 357 height: 139
[example-1] [INFO] [1679901151.612412454] [ImageUtils]: target type: potted plant, rois.size: 1
[example-1] [INFO] [1679901151.612426522] [ImageUtils]: roi.type: potted plant, x_offset: 379 y_offset: 173 width: 131 height: 202
[example-1] [INFO] [1679901151.612472961] [ImageUtils]: target type: book, rois.size: 1
[example-1] [INFO] [1679901151.612497709] [ImageUtils]: roi.type: book, x_offset: 167 y_offset: 333 width: 67 height: 22
[example-1] [INFO] [1679901151.612522859] [ImageUtils]: target type: vase, rois.size: 1
[example-1] [INFO] [1679901151.612533487] [ImageUtils]: roi.type: vase, x_offset: 44 y_offset: 273 width: 26 height: 45
[example-1] [INFO] [1679901151.612557172] [ImageUtils]: target type: couch, rois.size: 1
[example-1] [INFO] [1679901151.612567740] [ImageUtils]: roi.type: couch, x_offset: 81 y_offset: 265 width: 221 height: 106
[example-1] [INFO] [1679901151.612606444] [ImageUtils]: target type: potted plant, rois.size: 1
[example-1] [INFO] [1679901151.612617518] [ImageUtils]: roi.type: potted plant, x_offset: 138 y_offset: 314 width: 45 height: 38
[example-1] [WARN] [1679901151.612652352] [ImageUtils]: Draw result to file: render_feedback_0_0.jpeg
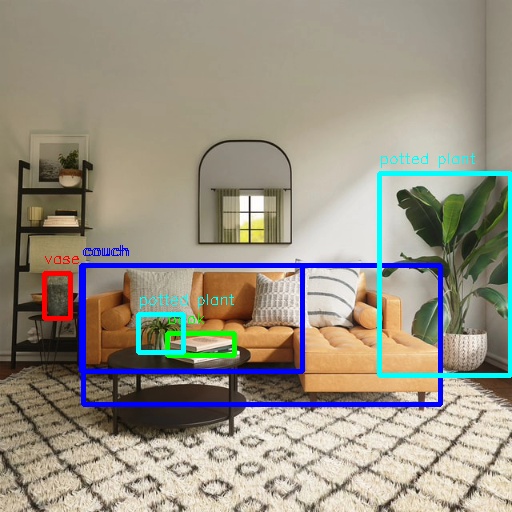
输出log显示,算法使用输入的图片推理出6个目标,并输出了每个目标的类别(target type)和检测框坐标(检测框左上位置的x坐标x_offset和y坐标y_offset,检测框的宽width和高height)。存储的渲染图片文件名为render_feedback_0_0.jpeg。
渲染后的图片render_feedback_0_0.jpeg:
多算法推理
本节介绍多个算法同时推理,融合推理结果后在WEB端展示算法效果。
使用MIPI/USB摄像头发布图片
# 配置tros.b环境
source /opt/tros/humble/setup.bash

# 从tros.b的安装路径中拷贝出运行示例需要的配置文件。
cp -r /opt/tros/${TROS_DISTRO}/lib/mono2d_body_detection/config/ .
cp -r /opt/tros/${TROS_DISTRO}/lib/hand_lmk_detection/config/ .
cp -r /opt/tros/${TROS_DISTRO}/lib/hand_gesture_detection/config/ .

# 配置MIPI摄像头
export CAM_TYPE=mipi
# 使用USB摄像头的配置命令: export CAM_TYPE=usb

# 启动launch文件
ros2 launch hand_gesture_detection hand_gesture_fusion.launch.py
使用本地图片回灌
# 配置tros.b环境
source /opt/tros/humble/setup.bash
# 从tros.b的安装路径中拷贝出运行示例需要的配置文件。
cp -r /opt/tros/${TROS_DISTRO}/lib/mono2d_body_detection/config/ .
cp -r /opt/tros/${TROS_DISTRO}/lib/hand_lmk_detection/config/ .
cp -r /opt/tros/${TROS_DISTRO}/lib/hand_gesture_detection/config/ .

# 配置本地回灌图片
export CAM_TYPE=fb

# 启动launch文件
ros2 launch hand_gesture_detection hand_gesture_fusion.launch.py publish_image_source:=config/person_face_hand.jpg publish_image_format:=jpg publish_output_image_w:=960 publish_output_image_h:=544 publish_fps:=30
在PC端的浏览器输入http://IP:8000 即可查看图像和算法渲染效果(IP为RDK的IP地址):