YOLO
功能介绍
YOLO目标检测算法示例使用图片作为输入,利用BPU进行算法推理,发布包含目标类别和检测框的算法msg。目前支持YOLOv2、YOLOv3、Ultralytics YOLOv5、YOLOv5x、Ultralytics YOLOv8、YOLOv10、YOLOv11、YOLOv12等版本。
模型使用COCO数据集进行训练,支持的目标检测类型包括人、动物、水果、交通工具等共80种类型。
也可以使用Ultralytics软件包来进行自定义数据集的训练. (https://docs.ultralytics.com/zh/modes/train)
代码仓库: (https://github.com/D-Robotics/hobot_dnn)
应用场景:YOLO系列作为单阶段目标检测中的代表算法,具有速度快,泛化性好的优点,可实现垃圾识别、车辆检测等功能,主要应用于自动驾驶、智能家居等领域。
车辆检测案例: (https://github.com/JunshengFu/vehicle-detection)
摔倒检测案例: (https://github.com/xiaobin1231/Fall-Detection-By-YOLOV3-and-LiteFlowNet)
支持平台
| 平台 | 运行方式 | 支持算法 | 示例功能 |
|---|---|---|---|
| RDK X3, RDK X3 Module | Ubuntu 20.04 (Foxy), Ubuntu 22.04 (Humble) | yolov2/yolov3/yolov5 | · 启动MIPI/USB摄像头,并通过web展示推理渲染结果 · 使用本地回灌,渲染结果保存在本地 |
| RDK X5, RDK X5 Module | Ubuntu 22.04 (Humble) | yolov2/yolov3/yolov5/yolov8/yolov10/yolov11/yolov12/yolo26 | · 启动MIPI/USB摄像头,并通过web展示推理渲染结果 · 使用本地回灌,渲染结果保存在本地 |
| RDK Ultra | Ubuntu 20.04 (Foxy) | yolov5x | · 启动MIPI/USB摄像头,并通过web展示推理渲染结果 · 使用本地回灌,渲染结果保存在本地 |
| RDK S100, RDK S100P | Ubuntu 22.04 (Humble) | yolov2/yolov3/yolov5/yolov8/yolov10/yolov11/yolov12 | · 启动MIPI/USB摄像头,并通过web展示推理渲染结果 · 使用本地回灌,渲染结果保存在本地 |
| X86 | Ubuntu 20.04 (Foxy) | yolov2/yolov3 | · 使用本地回灌,渲染结果保存在本地 |
算法信息
| 模型 | 平台 | 输入尺寸 | 推理帧率(fps) |
|---|---|---|---|
| yolov2 | X3 | 1x608x608x3 | 12.60 |
| yolov3 | X3 | 1x416x416x3 | 11.71 |
| yolov5 | X3 | 1x512x512x3 | 32.62 |
| yolov2 | X5 | 1x608x608x3 | 38.33 |
| yolov3 | X5 | 1x416x416x3 | 31.28 |
| yolov5 | X5 | 1x512x512x3 | 10.37 |
| yolov8n | X5 | 1x3x640x640 | 140.46 |
| yolov10n | X5 | 1x3x640x640 | 36.47 |
| yolov11m | X5 | 1x3x640x640 | 28.95 |
| yolov12m | X5 | 1x3x640x640 | 74 |
| yolo26n | X5 | 1x3x640x640 | 67.48 |
| yolov2 | S100 | 1x3x608x608 | 226.19 |
| yolov3 | S100 | 1x3x416x416 | 212.55 |
| yolov5 | S100 | 1x3x672x672 | 62.24 |
| yolov8n | S100 | 1x3x640x640 | 506.57 |
| yolov10n | S100 | 1x3x640x640 | 494.10 |
| yolov11m | S100 | 1x3x640x640 | 162.46 |
| yolo12n | S100 | 1x3x640x640 | 42.66 |
准备工作
RDK平台
-
RDK已烧录好Ubuntu 20.04/Ubuntu 22.04系统镜像。
-
RDK已成功安装TogetheROS.Bot。
-
RDK已安装MIPI或者USB摄像头,无摄像头的情况下通过回灌本地JPEG/PNG格式图片或�者MP4、H.264和H.265的视频方式体验算法效果。
-
确认PC机能够通过网络访问RDK。
X86平台
-
X86环境已配置好Ubuntu 20.04系统镜像。
-
X86环境系统已成功安装tros.b。
使用介绍
RDK平台
使用MIPI摄像头发布图片
YOLOv2目标检测算法示例订阅MIPI摄像头发布的图片,经过算法推理后发布算法msg,通过websocket package实现在PC端浏览器上渲染显示发布的图片和对应的算法结果。
- Foxy
- Humble
# 配置tros.b环境
source /opt/tros/setup.bash
# 配置tros.b环境
source /opt/tros/humble/setup.bash
# 配置MIPI摄像头
export CAM_TYPE=mipi

# 启动launch文件
ros2 launch dnn_node_example dnn_node_example.launch.py dnn_example_config_file:=config/yolov2workconfig.json dnn_example_image_width:=1920 dnn_example_image_height:=1080
使用USB摄像头发布图片
YOLOv2目标检测算法示例订阅USB摄像头发布的图片,经过算法推理后发布算法msg,通过websocket package实现在PC端浏览器上渲染显示发布的图片和对应的算法结果。
- Foxy
- Humble
# 配置tros.b环境
source /opt/tros/setup.bash
# 配置tros.b环境
source /opt/tros/humble/setup.bash
# 配置USB摄像头
export CAM_TYPE=usb

# 启动launch文件
ros2 launch dnn_node_example dnn_node_example.launch.py dnn_example_config_file:=config/yolov2workconfig.json dnn_example_image_width:=1920 dnn_example_image_height:=1080
使用本地图片回灌
YOLOv2目标检测算法示例使用本地JPEG/PNG格式图片回灌,经过推理后将算法结果渲染后的图片存储在本地的运行路径下。
- Foxy
- Humble
# 配置tros.b环境
source /opt/tros/setup.bash
# 配置tros.b环境
source /opt/tros/humble/setup.bash
# 启动launch文件
ros2 launch dnn_node_example dnn_node_example_feedback.launch.py dnn_example_config_file:=config/yolov2workconfig.json dnn_example_image:=config/target.jpg
除了YOLOv2算法,还支持YOLO系列其他算法。启动命令中使用参数config_file切换算法,如使用YOLOv3算法的�启动配置为dnn_example_config_file:="config/yolov3workconfig.json",使用YOLOv5算法的启动配置为dnn_example_config_file:="config/yolov5workconfig.json",使用YOLOv8算法的启动配置为dnn_example_config_file:="config/yolov8workconfig.json",使用YOLOv10算法的启动配置为dnn_example_config_file:="config/yolov10workconfig.json",使用YOLOv11算法的启动配置为dnn_example_config_file:="config/yolov11workconfig.json",使用YOLOv12算法的启动配置为dnn_example_config_file:="config/yolov12workconfig.json",使用YOLO26算法的启动配置为dnn_example_config_file:="config/yolo26workconfig.json"。
RDK Ultra平台
使用MIPI摄像头发布图片
YOLOv5x目标检测算法示例订阅MIPI摄像头发布的图片,经过算法推理后发布算法msg,通过websocket package实现在PC端浏览器上渲染显示发布的图片和对应的算法结果。
- Foxy
- Humble
# 配置tros.b环境
source /opt/tros/setup.bash
# 配置tros.b环境
source /opt/tros/humble/setup.bash
# 配置MIPI摄像头
export CAM_TYPE=mipi

# 启动launch文件
ros2 launch dnn_node_example dnn_node_example.launch.py dnn_example_config_file:=config/yolov5xworkconfig.json dnn_example_image_width:=672 dnn_example_image_height:=672
使用USB摄像头发布图片
YOLOv5x目标检测算法示例订阅USB摄像头发布的图片,经过算法推理后发布算法msg,通过websocket package实现在PC端浏览器上渲染显示发布的图片和对应的算法结果。
- Foxy
- Humble
# 配置tros.b环境
source /opt/tros/setup.bash
# 配置tros.b环境
source /opt/tros/humble/setup.bash
# 配置USB摄像头
export CAM_TYPE=usb

# 启动launch文件
ros2 launch dnn_node_example dnn_node_example.launch.py dnn_example_config_file:=config/yolov5xworkconfig.json dnn_example_image_width:=672 dnn_example_image_height:=672
使用本地图片回灌
YOLOv5x目标检测算法示例使用本地JPEG/PNG格式图片回灌,经过推理后将算法结果渲染后的图片存储在本地的运行路径下。
- Foxy
- Humble
# 配置tros.b环境
source /opt/tros/setup.bash
# 配置tros.b环境
source /opt/tros/humble/setup.bash
# 启动launch文件
ros2 launch dnn_node_example dnn_node_example_feedback.launch.py dnn_example_config_file:=config/yolov5xworkconfig.json dnn_example_image:=config/target.jpg
X86平台
使用本地图片回灌
YOLOv2目标检测算法示例使用本地JPEG/PNG格式图片回灌,经过推理后将算法结果渲染后的图片存储在本地的运行路径下。
# 配置tros.b环境
source /opt/tros/setup.bash

# 启动launch文件
ros2 launch dnn_node_example dnn_node_example_feedback.launch.py dnn_example_config_file:=config/yolov2workconfig.json dnn_example_image:=config/target.jpg
除了YOLOv2算法,还支持YOLOv3算法,YOLOv5算法暂不支持。启动命令中使用参数config_file切换算法,如使用YOLOv3算法的启动配置为dnn_example_config_file:="config/yolov3workconfig.json"。
结果分析
使用摄像头发布图片
在运行终端输出如下信息:
[example-3] [WARN] [1655095347.608475236] [example]: Create ai msg publisher with topic_name: hobot_dnn_detection
[example-3] [WARN] [1655095347.608640353] [example]: Create img hbmem_subscription with topic_name: /hbmem_img
[example-3] [WARN] [1655095348.709411619] [img_sub]: Sub img fps 12.95
[example-3] [WARN] [1655095348.887570945] [example]: Smart fps 12.10
[example-3] [WARN] [1655095349.772225728] [img_sub]: Sub img fps 11.30
[example-3] [WARN] [1655095349.948913662] [example]: Smart fps 11.31
[example-3] [WARN] [1655095350.834951431] [img_sub]: Sub img fps 11.30
[example-3] [WARN] [1655095351.011915729] [example]: Smart fps 11.30
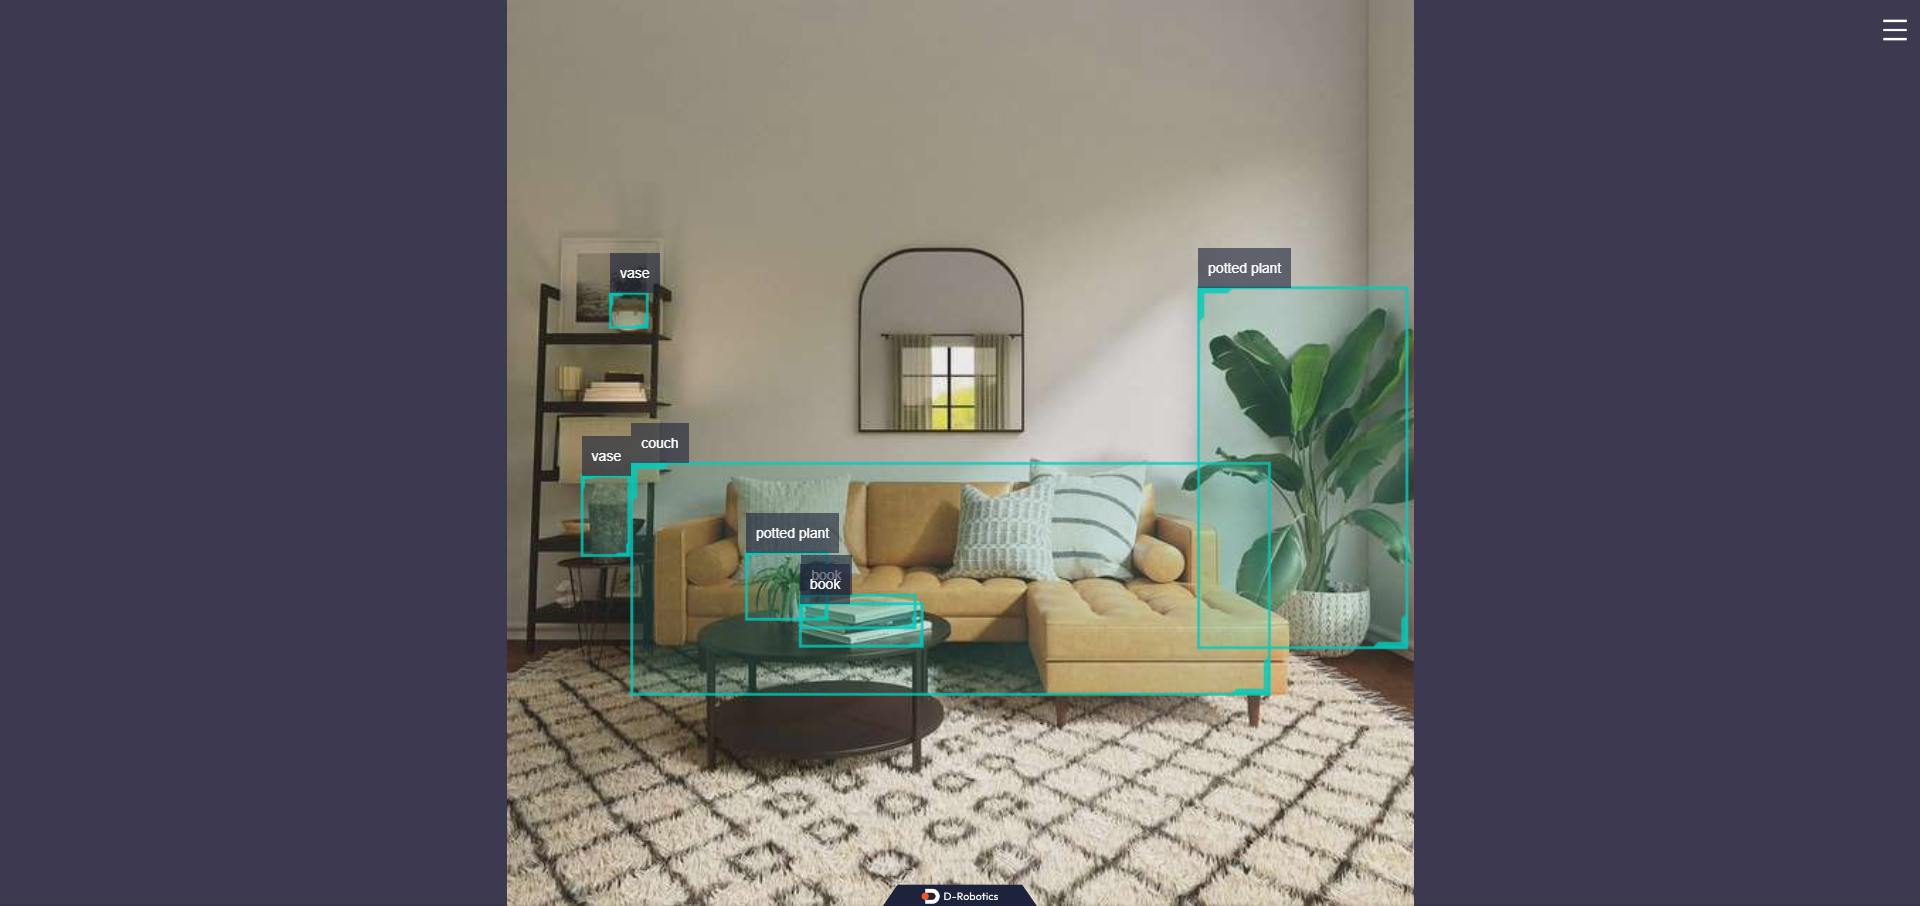
输出log显示,发布算法推理结果的topic为hobot_dnn_detection,订阅图片的topic为/hbmem_img。
在PC端的浏览器输入http://IP:8000 即可查看图像和算法渲染效果(IP为RDK的IP地址):
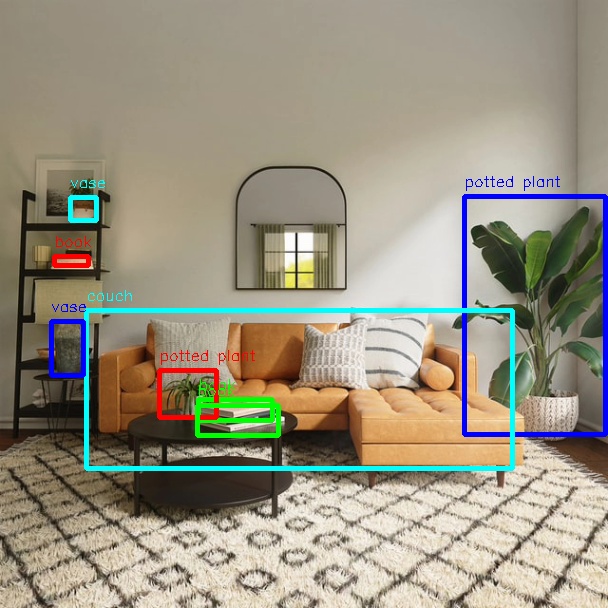
使用本地图片回灌
在运行终端输出如下信息:
[example-1] [INFO] [1654925067.952159234] [PostProcessBase]: out box size: 8
[example-1] [INFO] [1654925067.952227232] [PostProcessBase]: det rect: 464.03 196.145 605.525 434.865, det type: potted plant, score:0.813219
[example-1] [INFO] [1654925067.952319229] [PostProcessBase]: det rect: 86.5421 310.158 512.542 468.201, det type: couch, score:0.669208
[example-1] [INFO] [1654925067.952392268] [PostProcessBase]: det rect: 198.968 399.91 273.841 421.767, det type: book, score:0.539755
[example-1] [INFO] [1654925067.952465182] [PostProcessBase]: det rect: 159.861 370.656 217.685 417.746, det type: potted plant, score:0.480698
[example-1] [INFO] [1654925067.952533221] [PostProcessBase]: det rect: 51.2147 321.047 84.0969 375.842, det type: vase, score:0.433644
[example-1] [INFO] [1654925067.952607802] [PostProcessBase]: det rect: 70.0548 197.381 96.1826 221.062, det type: vase, score:0.399885
[example-1] [INFO] [1654925067.952675924] [PostProcessBase]: det rect: 197.706 405.271 278.929 435.743, det type: book, score:0.384268
[example-1] [INFO] [1654925067.952743463] [PostProcessBase]: det rect: 54.0955 256.68 88.6269 266.159, det type: book, score:0.307426
输出log显示,算法使用输入的图片推理出8个目标,并输出了目标检测框坐标(输出的坐标顺序分别是人体框的左上的x和y坐标,和右下的x和y坐标)和类别。存储的渲染图片文件名为render_feedback_0_0.jpeg,渲染图片效果: