3.3.6 CenterNet Example Introduction
Example Overview
The CenterNet object detection example is a Python interface development code sample located in /app/pydev_demo/11_centernet_sample/, demonstrating how to use the CenterNet model for efficient object detection tasks. CenterNet is an object detection algorithm based on center point prediction. Compared to traditional anchor-based methods, it has a simpler architecture and higher detection accuracy, making it particularly suitable for scenarios requiring precise localization and recognition of small objects.
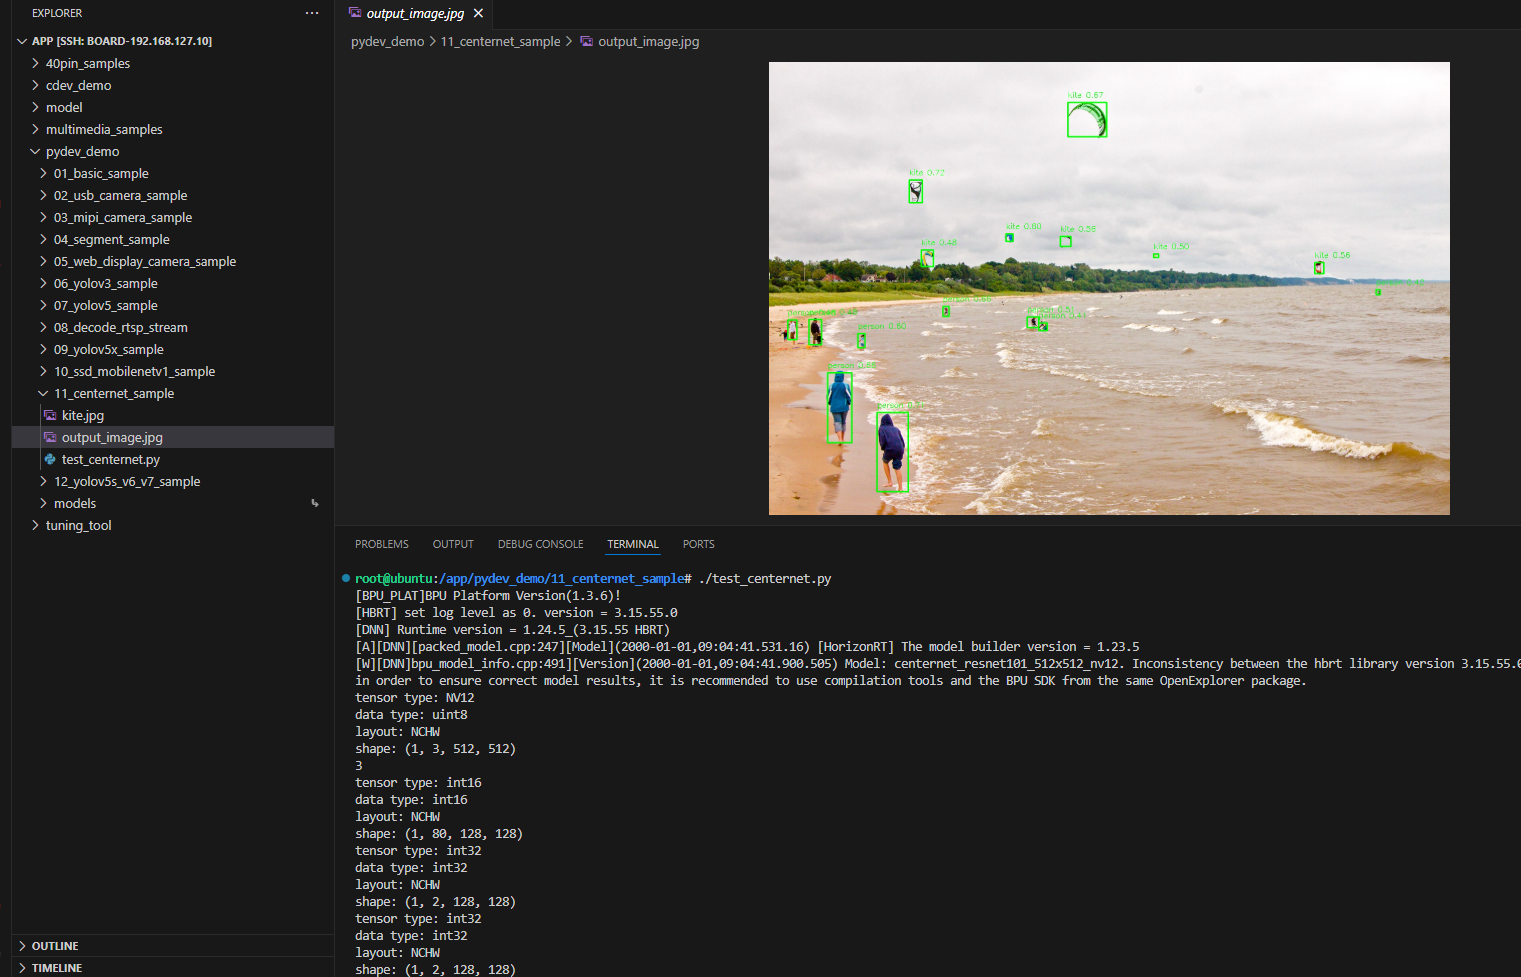
Result Display
Hardware Preparation
Hardware Connection
This example only requires the RDK development board itself, without any additional peripheral connections. Ensure the development board is properly powered and the system is booted.
Quick Start
Code and Board Location
Navigate to the /app/pydev_demo/11_centernet_sample/ directory. The CenterNet example contains the following files:
root@ubuntu:/app/pydev_demo/11_centernet_sample# tree
.
├── kite.jpg
└── test_centernet.py
Compilation and Execution
The Python example does not require compilation and can be run directly:
python3 test_centernet.py
Execution Result
After running, the program will load the pre-trained CenterNet model, perform object detection on the kite.jpg image, and generate a result image output_image.jpg with detection boxes.
root@ubuntu:/app/pydev_demo/11_centernet_sample# ./test_centernet.py
[BPU_PLAT]BPU Platform Version(1.3.6)!
[HBRT] set log level as 0. version = 3.15.55.0
[DNN] Runtime version = 1.24.5_(3.15.55 HBRT)
[A][DNN][packed_model.cpp:247][Model](2000-01-01,09:04:41.531.16) [HorizonRT] The model builder version = 1.23.5
[W][DNN]bpu_model_info.cpp:491][Version](2000-01-01,09:04:41.900.505) Model: centernet_resnet101_512x512_nv12. Inconsistency between the hbrt library version 3.15.55.0 and the model build version 3.15.47.0 detected, in order to ensure correct model results, it is recommended to use compilation tools and the BPU SDK from the same OpenExplorer package.
tensor type: NV12
data type: uint8
layout: NCHW
shape: (1, 3, 512, 512)
3
tensor type: int16
data type: int16
layout: NCHW
shape: (1, 80, 128, 128)
tensor type: int32
data type: int32
layout: NCHW
shape: (1, 2, 128, 128)
tensor type: int32
data type: int32
layout: NCHW
shape: (1, 2, 128, 128)
inferece time is : 0.038387179374694824
postprocess time is : 0.008000016212463379
bbox: [535.099487, 518.289795, 552.85321, 533.168884], score: 0.411767, id: 0, name: person
bbox: [1205.362183, 452.914368, 1213.579956, 462.972992], score: 0.416783, id: 0, name: person
bbox: [37.22504, 512.7771, 55.708, 551.758057], score: 0.479478, id: 0, name: person
bbox: [302.082428, 373.24588, 326.903992, 406.137909], score: 0.481639, id: 33, name: kite
bbox: [79.558655, 511.698425, 104.828987, 561.18573], score: 0.483801, id: 0, name: person
bbox: [763.340332, 381.275391, 773.633484, 388.304504], score: 0.49954, id: 33, name: kite
bbox: [512.4505, 506.076019, 535.645386, 527.521606], score: 0.50862, id: 0, name: person
bbox: [1083.63208, 398.408325, 1101.694458, 420.525391], score: 0.560764, id: 33, name: kite
bbox: [578.292786, 346.042908, 599.692627, 366.190063], score: 0.561831, id: 33, name: kite
bbox: [470.628357, 341.963165, 484.707916, 356.737732], score: 0.599044, id: 33, name: kite
bbox: [176.473038, 539.143616, 190.889175, 567.11084], score: 0.602763, id: 0, name: person
bbox: [116.152634, 617.276489, 164.758057, 756.843872], score: 0.655859, id: 0, name: person
bbox: [345.088379, 485.373199, 357.569305, 505.430756], score: 0.656233, id: 0, name: person
bbox: [593.67334, 80.689156, 670.185425, 148.085022], score: 0.668426, id: 33, name: kite
bbox: [214.575424, 696.642883, 276.78363, 853.193604], score: 0.709791, id: 0, name: person
bbox: [278.955109, 234.4608, 304.618103, 279.500824], score: 0.716334, id: 33, name: kite
draw result time is : 0.036167144775390625
det.size(): 16root@ubuntu:/app/pydev_demo/11_centernet_sample#
Detailed Introduction
Example Program Parameter Options
The CenterNet object detection example does not require command-line parameters and can be run directly. The program will automatically load the kite.jpg image in the same directory for detection processing.
Software Architecture Description
-
The software architecture of the CenterNet object detection example includes the following core parts:
-
Model Loading: Use the pyeasy_dnn module to load the pre-trained CenterNet-ResNet101 model
-
Image Preprocessing: Convert the input image to the NV12 format and specified size (512x512) required by the model
-
Model Inference: Call the model for forward computation to generate heatmaps, size, and offset predictions
-
Post-processing: Use the libpostprocess library to parse the model outputs and generate detection results
-
Result Visualization: Draw detection boxes and category information on the original image
-
Result Saving: Save the visualized result as an image file

API Flow Description
-
Model Loading: models = dnn.load('../models/centernet_resnet101_512x512_nv12.bin')
-
Image Preprocessing: Resize the image and convert it to NV12 format
-
Model Inference: outputs = models[0].forward(nv12_data)
-
Post-processing Configuration: Set post-processing parameters (size, threshold, etc.)
-
Result Parsing: Call the post-processing library to parse the output tensors
-
Result Visualization: Draw detection boxes and label information on the original image
-
Result Saving: Save the result as an image file

FAQ
Q: What is the difference between CenterNet and YOLO?
A: CenterNet uses center point prediction instead of anchor boxes, offering a simpler architecture and more precise localization capabilities, especially suitable for small object detection.
Q: What should I do if I encounter a "No module named 'hobot_dnn'" error when running the example?
A: Please ensure that the RDK Python environment is correctly installed, including the hobot_dnn module and other official dedicated inference libraries.
Q: How can I change the test image?
A: Place the new image file in the example directory and modify the code: img_file = cv2.imread('your_image_path').
Q: What should I do if the detection results are inaccurate?
A: The CenterNet model is trained on the COCO dataset. For specific scenarios, fine-tuning or using a more suitable model may be necessary.
Q: How can I adjust the detection threshold?
A: Modify the value of centernet_postprocess_info.score_threshold in the code. For example, changing it to 0.5 can increase detection sensitivity.
Q: Can real-time video stream processing be implemented?
A: The current example is designed for single images, but the code can be modified to achieve real-time object detection for video streams.
Q: What advantages does CenterNet have in handling small objects?
A: Through center point prediction and fine offset adjustments, CenterNet can more accurately locate small objects, avoiding the mismatch issue between anchor boxes and small objects in anchor-based methods.
Q: How can detection accuracy be further improved?
A: You can try using larger input sizes (if supported by the model), fine-tuning the model for specific scenarios, or adjusting post-processing parameters to optimize detection results.