EfficientNet_Det
Feature Introduction
The EfficientNet_Det object detection algorithm example takes images as input, performs inference on the BPU, and publishes algorithm messages containing detected object classes and bounding boxes.
EfficientNet_Det is an ONNX model obtained from (https://github.com/HorizonRobotics-Platform/ModelZoo/tree/master/EfficientDet), trained on the COCO dataset. It supports detecting 80 object categories, including people, animals, fruits, vehicles, and more.
Code repository: (https://github.com/D-Robotics/hobot_dnn)
Application scenarios: EfficientNet_Det can be used for vehicle detection and similar tasks, primarily applied in autonomous driving, smart homes, and related fields.
Smoke detection example: (https://github.com/abg3/Smoke-Detection-using-Tensorflow-2.2)
Supported Platforms
| Platform | Runtime Environment | Example Features |
|---|---|---|
| RDK X3, RDK X3 Module | Ubuntu 20.04 (Foxy), Ubuntu 22.04 (Humble) | · Launch MIPI/USB camera and display inference results via web browser · Use local image/video replay; rendered results saved locally |
Algorithm Details
| Model | Platform | Input Size | Inference FPS |
|---|---|---|---|
| EfficientNet | X3 | 1x3x512x512 | 54.58 |
Prerequisites
RDK Platform
- The RDK has been flashed with Ubuntu 20.04 or Ubuntu 22.04 system image.
- TogetheROS.Bot has been successfully installed on the RDK.
- An MIPI or USB camera is installed on the RDK. If no camera is available, you can test the algorithm by replaying local JPEG/PNG images or MP4, H.264, and H.265 video files.
- Ensure your PC can access the RDK over the network.
Usage Guide
RDK Platform
Publishing Images Using MIPI Camera
The EfficientNet_Det object detection example subscribes to images published by the sensor package, performs inference, and then publishes algorithm messages. Results are rendered and displayed in a web browser on the PC via the websocket package.
- Foxy
- Humble
# Set up tros.b environment
source /opt/tros/setup.bash

# Configure MIPI camera
export CAM_TYPE=mipi

# Launch the launch file
ros2 launch dnn_node_example dnn_node_example.launch.py dnn_example_config_file:=config/efficient_det_workconfig.json dnn_example_image_width:=480 dnn_example_image_height:=272
# Set up tros.b environment
source /opt/tros/humble/setup.bash

# Configure MIPI camera
export CAM_TYPE=mipi

# Launch the launch file
ros2 launch dnn_node_example dnn_node_example.launch.py dnn_example_config_file:=config/efficient_det_workconfig.json dnn_example_image_width:=480 dnn_example_image_height:=272
Publishing Images Using USB Camera
- Foxy
- Humble
# Set up tros.b environment
source /opt/tros/setup.bash

# Configure USB camera
export CAM_TYPE=usb

# Launch the launch file
ros2 launch dnn_node_example dnn_node_example.launch.py dnn_example_config_file:=config/efficient_det_workconfig.json dnn_example_image_width:=480 dnn_example_image_height:=272
# Set up tros.b environment
source /opt/tros/humble/setup.bash

# Configure USB camera
export CAM_TYPE=usb

# Launch the launch file
ros2 launch dnn_node_example dnn_node_example.launch.py dnn_example_config_file:=config/efficient_det_workconfig.json dnn_example_image_width:=480 dnn_example_image_height:=272
Replaying Local Images
The EfficientNet_Det object detection example replays local JPEG/PNG images, performs inference, and saves the rendered result images to the current working directory.
- Foxy
- Humble
# Set up tros.b environment
source /opt/tros/setup.bash

# Launch the launch file
ros2 launch dnn_node_example dnn_node_example_feedback.launch.py dnn_example_config_file:=config/efficient_det_workconfig.json dnn_example_image:=config/target.jpg
# Set up tros.b environment
source /opt/tros/humble/setup.bash

# Launch the launch file
ros2 launch dnn_node_example dnn_node_example_feedback.launch.py dnn_example_config_file:=config/efficient_det_workconfig.json dnn_example_image:=config/target.jpg
Result Analysis
Using Camera to Publish Images
The terminal output shows the following logs:
[example-3] [WARN] [1655093196.041759782] [example]: Create ai msg publisher with topic_name: hobot_dnn_detection
[example-3] [WARN] [1655093196.041878985] [example]: Create img hbmem_subscription with topic_name: /hbmem_img
[example-3] [WARN] [1655093197.405840936] [img_sub]: Sub img fps 8.57
[example-3] [WARN] [1655093197.687361687] [example]: Smart fps 8.04
[example-3] [WARN] [1655093198.559784569] [img_sub]: Sub img fps 6.94
[example-3] [WARN] [1655093198.891958094] [example]: Smart fps 6.64
[example-3] [WARN] [1655093199.735312707] [img_sub]: Sub img fps 6.81
[example-3] [WARN] [1655093200.013067298] [example]: Smart fps 7.14
[example-3] [WARN] [1655093200.890569474] [img_sub]: Sub img fps 6.93
[example-3] [WARN] [1655093201.175239677] [example]: Smart fps 6.88
[example-3] [WARN] [1655093202.011887441] [img_sub]: Sub img fps 7.14
[example-3] [WARN] [1655093202.302124315] [example]: Smart fps 7.10
The log indicates that the algorithm publishes inference results on the topic hobot_dnn_detection and subscribes to images from the topic /hbmem_img.
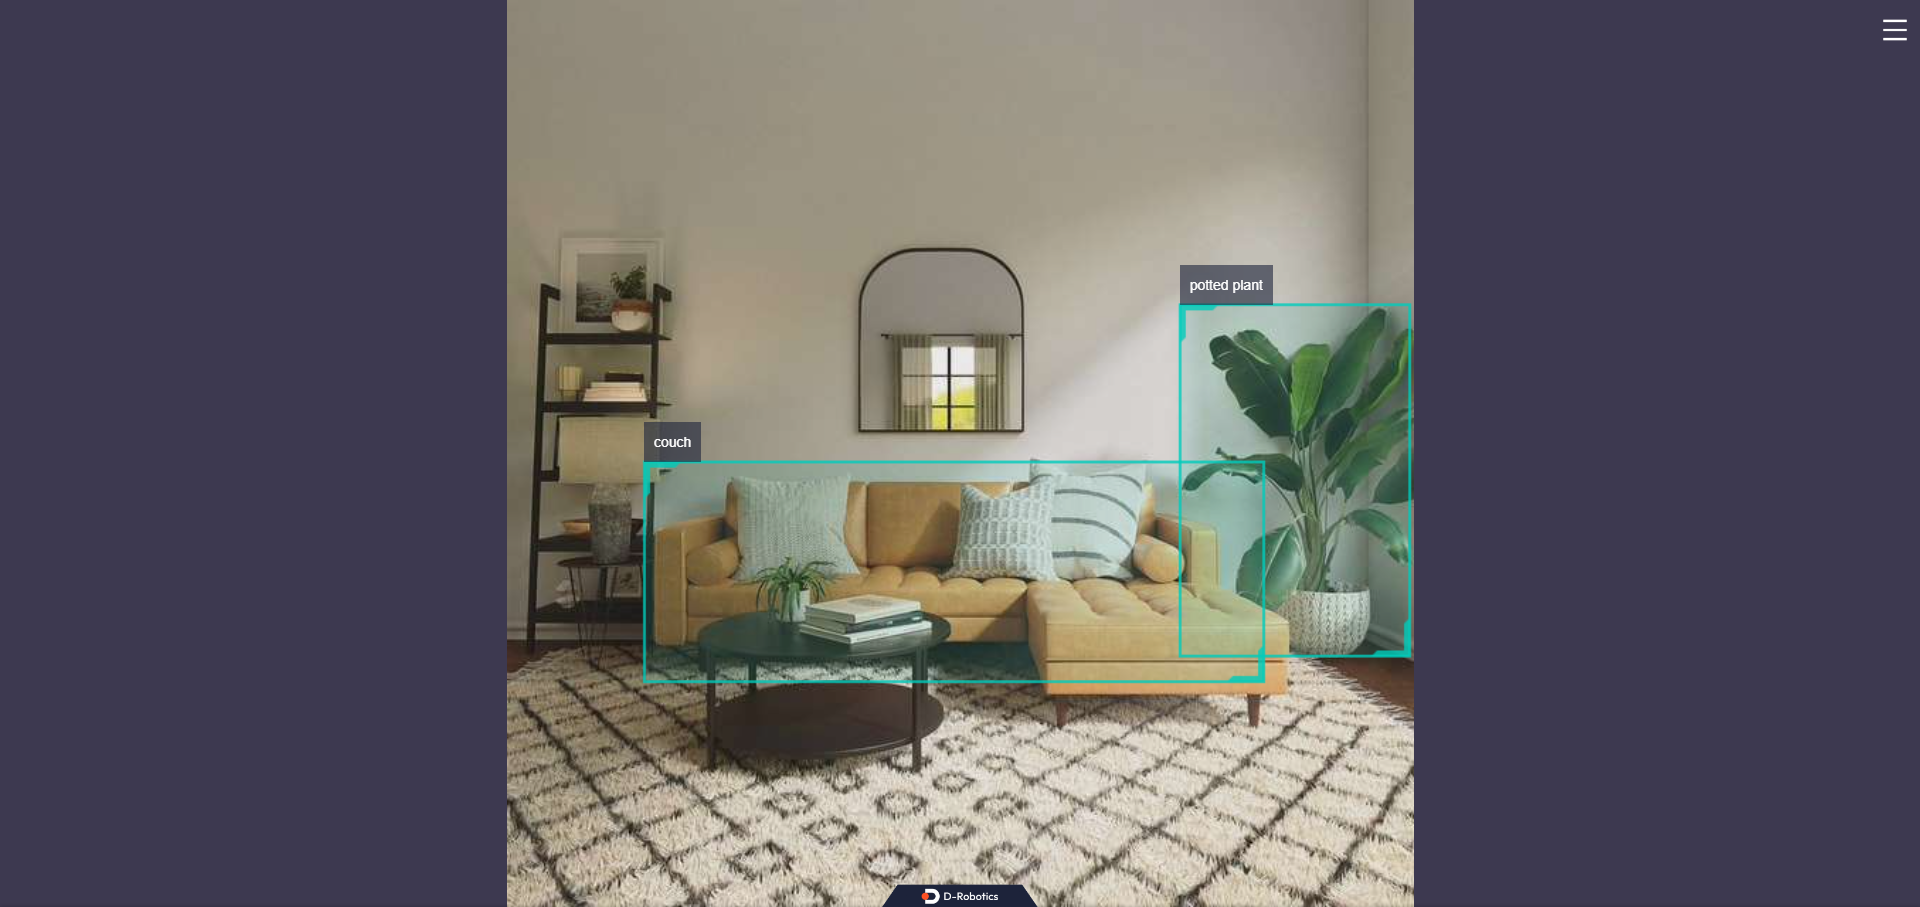
Open a browser on your PC and navigate to http://IP:8000 to view the rendered image and algorithm results (replace "IP" with the RDK's IP address):
Replaying Local Images
The terminal output shows the following logs:
[example-1] [INFO] [1654931461.278066695] [example]: Output from image_name: config/target.jpg, frame_id: feedback, stamp: 0.0
[example-1] [INFO] [1654931461.278186816] [PostProcessBase]: outputs size: 10
[example-1] [INFO] [1654931461.278231981] [PostProcessBase]: out box size: 2
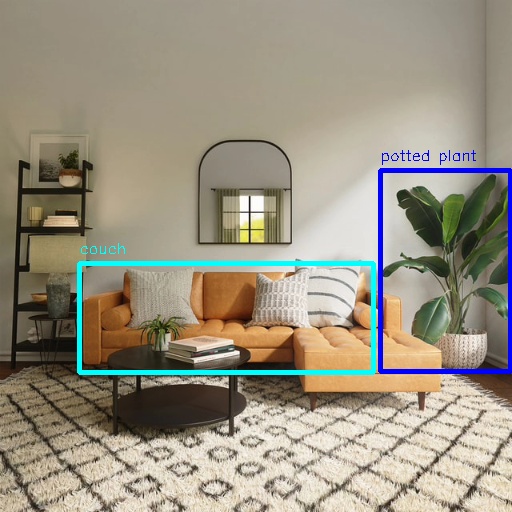
[example-1] [INFO] [1654931461.278303520] [PostProcessBase]: det rect: 380.107 170.888 511.048 372.511, det type: potted plant, score:1.16971
[example-1] [INFO] [1654931461.278396934] [PostProcessBase]: det rect: 79.3884 263.497 373.645 372.554, det type: couch, score:1.0287
The log shows that the algorithm detected two objects from the input image, outputting their bounding box coordinates (in the order of top-left x, top-left y, bottom-right x, bottom-right y) and corresponding class labels. The rendered image is saved as render_feedback_0_0.jpeg, with the following visualization: