5.2.1 Data Acquisition
USB Image Acquisition
Feature Introduction
To enable environmental perception capabilities, robotic products typically integrate cameras to capture image data. USB cameras are easy to obtain, simple to use, and highly compatible. TogetheROS.Bot adds support for USB cameras and provides compatibility with standard ROS2 image messages.
Code repository: https://github.com/D-Robotics/hobot_usb_cam.git
Supported Platforms
| Platform | Runtime Environment |
|---|---|
| RDK X3, RDK X3 Module | Ubuntu 20.04 (Foxy), Ubuntu 22.04 (Humble) |
| RDK X5, RDK X5 Module | Ubuntu 22.04 (Humble) |
| RDK S100, RDK S100P | Ubuntu 22.04 (Humble) |
Prerequisites
RDK Platform
-
Ensure your USB camera functions properly and connect it to an RDK USB port.
-
Confirm that the RDK has been flashed with either Ubuntu 20.04 or Ubuntu 22.04 system image.
-
Verify that tros.b has been successfully installed on the RDK.
-
Ensure your PC can access the RDK over the network.
Usage (Default usb_pixel_format is mjpeg)
Usage is identical on both RDK and X86 platforms; the following example uses the RDK platform:
-
Log into the RDK via SSH and confirm the USB camera device name (e.g.,
/dev/video8). -
Launch the USB camera using the command below:
- Foxy
- Humble
# Configure tros.b environment
source /opt/tros/setup.bash
# Configure tros.b environment
source /opt/tros/humble/setup.bash# Launch via launch file:
ros2 launch hobot_usb_cam hobot_usb_cam.launch.py usb_video_device:=/dev/video8 -
If the program outputs the following log messages, the node has started successfully:
[INFO] [launch]: All log files can be found below /root/.ros/log/2024-01-18-19-44-39-419588-ubuntu-3951
[INFO] [launch]: Default logging verbosity is set to INFO
[INFO] [hobot_usb_cam-1]: process started with pid [3953]
[hobot_usb_cam-1] [WARN] [1705578280.808870437] [hobot_usb_cam]: framerate: 30
[hobot_usb_cam-1] [WARN] [1705578280.809851560] [hobot_usb_cam]: pixel_format_name: mjpeg
[hobot_usb_cam-1] [WARN] [1705578280.936697507] [hobot_usb_cam]: This devices supproted formats:
[hobot_usb_cam-1] [WARN] [1705578280.936858791] [hobot_usb_cam]: Motion-JPEG: 640 x 480 (30 Hz)
[hobot_usb_cam-1] [WARN] [1705578280.936912830] [hobot_usb_cam]: Motion-JPEG: 1920 x 1080 (30 Hz)
[hobot_usb_cam-1] [WARN] [1705578280.936960328] [hobot_usb_cam]: Motion-JPEG: 320 x 240 (30 Hz)
[hobot_usb_cam-1] [WARN] [1705578280.937007285] [hobot_usb_cam]: Motion-JPEG: 800 x 600 (30 Hz)
[hobot_usb_cam-1] [WARN] [1705578280.937053241] [hobot_usb_cam]: Motion-JPEG: 1280 x 720 (30 Hz)
[hobot_usb_cam-1] [WARN] [1705578280.937098906] [hobot_usb_cam]: Motion-JPEG: 1024 x 576 (30 Hz)
[hobot_usb_cam-1] [WARN] [1705578280.937144528] [hobot_usb_cam]: YUYV 4:2:2: 640 x 480 (30 Hz)
[hobot_usb_cam-1] [WARN] [1705578280.937190068] [hobot_usb_cam]: YUYV 4:2:2: 1920 x 1080 (5 Hz)
[hobot_usb_cam-1] [WARN] [1705578280.937235858] [hobot_usb_cam]: YUYV 4:2:2: 320 x 240 (30 Hz)
[hobot_usb_cam-1] [WARN] [1705578280.937282064] [hobot_usb_cam]: YUYV 4:2:2: 800 x 600 (20 Hz)
[hobot_usb_cam-1] [WARN] [1705578280.937328020] [hobot_usb_cam]: YUYV 4:2:2: 1280 x 720 (10 Hz)
[hobot_usb_cam-1] [WARN] [1705578280.937373518] [hobot_usb_cam]: YUYV 4:2:2: 1024 x 576 (15 Hz) -
View the USB camera feed in a web browser by opening another terminal:
- Foxy
- Humble
# Configure tros.b environment
source /opt/tros/setup.bash
# Configure tros.b environment
source /opt/tros/humble/setup.bash
# Launch websocket
ros2 launch websocket websocket.launch.py websocket_image_topic:=/image websocket_only_show_image:=true
- On your PC, open a browser (
Chrome/Firefox/Edge), navigate toIP:8000(replaceIPwith the RDK’s IP address), and click the "Web Display" button in the top-left corner to view the live USB camera feed.
Usage Method 2 (usb_pixel_format set to yuyv2rgb)
Usage is identical on both RDK and X86 platforms; the following example uses the RDK platform:
-
Log into the RDK via SSH and confirm the USB camera device name (e.g.,
/dev/video8). -
Launch the USB camera using the command below:
- Foxy
- Humble
# Configure tros.b environment
source /opt/tros/setup.bash
# Configure tros.b environment
source /opt/tros/humble/setup.bash# Launch via launch file:
ros2 launch hobot_usb_cam hobot_usb_cam.launch.py usb_video_device:=/dev/video8 usb_pixel_format:=yuyv2rgb usb_image_width:=640 usb_image_height:=480 -
If the program outputs the following log messages, the node has started successfully:
[INFO] [launch]: All log files can be found below /root/.ros/log/2024-01-18-19-44-39-419588-ubuntu-3951
[INFO] [launch]: Default logging verbosity is set to INFO
[INFO] [hobot_usb_cam-1]: process started with pid [3953]
[hobot_usb_cam-1] [WARN] [1705578280.808870437] [hobot_usb_cam]: framerate: 30
[hobot_usb_cam-1] [WARN] [1705578280.809851560] [hobot_usb_cam]: pixel_format_name: yuyv2rgb
[hobot_usb_cam-1] [WARN] [1705578280.936697507] [hobot_usb_cam]: This devices supproted formats:
[hobot_usb_cam-1] [WARN] [1705578280.936858791] [hobot_usb_cam]:        Motion-JPEG: 640 x 480 (30 Hz)
[hobot_usb_cam-1] [WARN] [1705578280.936912830] [hobot_usb_cam]:        Motion-JPEG: 1920 x 1080 (30 Hz)
[hobot_usb_cam-1] [WARN] [1705578280.936960328] [hobot_usb_cam]:        Motion-JPEG: 320 x 240 (30 Hz)
[hobot_usb_cam-1] [WARN] [1705578280.937007285] [hobot_usb_cam]:        Motion-JPEG: 800 x 600 (30 Hz)
[hobot_usb_cam-1] [WARN] [1705578280.937053241] [hobot_usb_cam]:        Motion-JPEG: 1280 x 720 (30 Hz)
[hobot_usb_cam-1] [WARN] [1705578280.937098906] [hobot_usb_cam]:        Motion-JPEG: 1024 x 576 (30 Hz)
[hobot_usb_cam-1] [WARN] [1705578280.937144528] [hobot_usb_cam]:        YUYV 4:2:2: 640 x 480 (30 Hz)
[hobot_usb_cam-1] [WARN] [1705578280.937190068] [hobot_usb_cam]:        YUYV 4:2:2: 1920 x 1080 (5 Hz)
[hobot_usb_cam-1] [WARN] [1705578280.937235858] [hobot_usb_cam]:        YUYV 4:2:2: 320 x 240 (30 Hz)
[hobot_usb_cam-1] [WARN] [1705578280.937282064] [hobot_usb_cam]:        YUYV 4:2:2: 800 x 600 (20 Hz)
[hobot_usb_cam-1] [WARN] [1705578280.937328020] [hobot_usb_cam]:        YUYV 4:2:2: 1280 x 720 (10 Hz)
[hobot_usb_cam-1] [WARN] [1705578280.937373518] [hobot_usb_cam]: YUYV 4:2:2: 1024 x 576 (15 Hz) -
Encode the output to MJPEG using hobot codec:
- Foxy
- Humble
# Configure the tros.b environment
source /opt/tros/setup.bash
# Configure the tros.b environment
source /opt/tros/humble/setup.bash
# Launch via launch file:
ros2 launch hobot_codec hobot_codec_encode.launch.py codec_in_mode:=ros codec_in_format:=rgb8 codec_out_mode:=ros codec_sub_topic:=/image codec_pub_topic:=/image_mjpeg
- View the USB camera image on the web browser. Open another terminal:
- Foxy
- Humble
# Configure the tros.b environment
source /opt/tros/setup.bash
# Configure the tros.b environment
source /opt/tros/humble/setup.bash
# Launch websocket
ros2 launch websocket websocket.launch.py websocket_image_topic:=/image_mjpeg websocket_only_show_image:=true
- On your PC, open a browser (Chrome/Firefox/Edge) and navigate to
http://IP:8000(replace IP with the RDK's IP address). Click the "Web Display" button in the top-left corner to view the real-time USB camera feed.
Notes
- The USB camera must be calibrated, and the path to the camera calibration file must be configured. Otherwise, camera intrinsic parameters cannot be published (though other functionalities remain unaffected).
- To set the path for the camera calibration file, follow these steps:
- Foxy
- Humble
# Configure the tros.b environment
source /opt/tros/setup.bash
# Configure the tros.b environment
source /opt/tros/humble/setup.bash
# Launch via launch file
ros2 launch hobot_usb_cam hobot_usb_cam.launch.py usb_camera_calibration_file_path:=(absolute path to the actual calibration file)
-
For x86 platforms, if Ubuntu 20.04 is running inside a virtual machine, you must set the USB Compatibility of the USB Controller in the VM settings to USB 3.1.
-
Changing the
pixel_formatconfigurationhobot_usb_camsupports the following pixel format configurations:
"mjpeg","mjpeg2rgb","rgb8","yuyv","yuyv2rgb","uyvy","uyvy2rgb","m4202rgb","mono8","mono16","y102mono8"Launch the USB camera with default parameters to query the hardware-supported formats of the device, as shown in the log below:
[hobot_usb_cam-1] [WARN] [1705548544.174669672] [hobot_usb_cam]: This device supported formats:
[hobot_usb_cam-1] [WARN] [1705548544.174844917] [hobot_usb_cam]:        Motion-JPEG: 640 x 480 (30 Hz)
[hobot_usb_cam-1] [WARN] [1705548544.174903166] [hobot_usb_cam]:        Motion-JPEG: 1920 x 1080 (30 Hz)
[hobot_usb_cam-1] [WARN] [1705548544.174950581] [hobot_usb_cam]:        Motion-JPEG: 320 x 240 (30 Hz)
[hobot_usb_cam-1] [WARN] [1705548544.174996788] [hobot_usb_cam]:        Motion-JPEG: 800 x 600 (30 Hz)
[hobot_usb_cam-1] [WARN] [1705548544.175043412] [hobot_usb_cam]:        Motion-JPEG: 1280 x 720 (30 Hz)
[hobot_usb_cam-1] [WARN] [1705548544.175089161] [hobot_usb_cam]:        Motion-JPEG: 1024 x 576 (30 Hz)
[hobot_usb_cam-1] [WARN] [1705548544.175135035] [hobot_usb_cam]:        YUYV 4:2:2: 640 x 480 (30 Hz)
[hobot_usb_cam-1] [WARN] [1705548544.175180325] [hobot_usb_cam]:        YUYV 4:2:2: 1920 x 1080 (5 Hz)
[hobot_usb_cam-1] [WARN] [1705548544.175226449] [hobot_usb_cam]:        YUYV 4:2:2: 320 x 240 (30 Hz)
[hobot_usb_cam-1] [WARN] [1705548544.175272365] [hobot_usb_cam]:        YUYV 4:2:2: 800 x 600 (20 Hz)
[hobot_usb_cam-1] [WARN] [1705548544.175318697] [hobot_usb_cam]:        YUYV 4:2:2: 1280 x 720 (10 Hz)
[hobot_usb_cam-1] [WARN] [1705548544.175365195] [hobot_usb_cam]:        YUYV 4:2:2: 1024 x 576 (15 Hz)
a. Query the image formats supported by the USB camera. As shown in the log above, the device supports MJPEG and YUYV.
b. Therefore, only "mjpeg", "mjpeg2rgb", "yuyv", and "yuyv2rgb" can be configured; otherwise, the hobot_usb_cam program will exit.
MIPI Image Capture
Feature Overview
To enable environmental perception capabilities, robotic products typically integrate sensors such as cameras and ToF modules. To reduce sensor integration and usage costs for users, TogetherROS.Bot encapsulates various commonly used sensors into the hobot_sensor module, which supports standard ROS image messages. When the configured sensor parameters do not match the connected camera, the program automatically adapts to the correct sensor type. The currently supported MIPI sensor types are listed below:
| No. | Name | Illustration | Resolution | Supported Platforms | Reference Link |
|---|---|---|---|---|---|
| 1 | F37 |  | 2MP | RDK X3, RDK X3 Module | F37 |
| 2 | GC4663 | 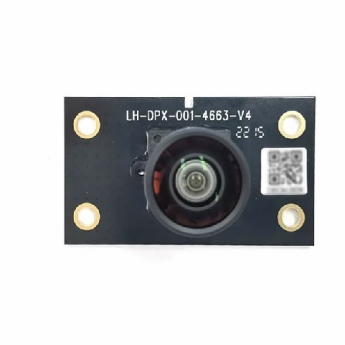 | 4MP | RDK X3, RDK X3 Module | GC4663 |
| 3 | IMX219 | 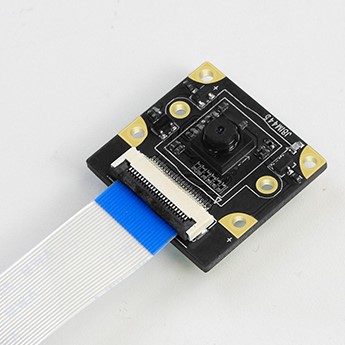 | 8MP | RDK X3, RDK X3 Module, RDK X5, RDK X5 Module, RDK S100 | IMX219 |
| 4 | IMX477 | 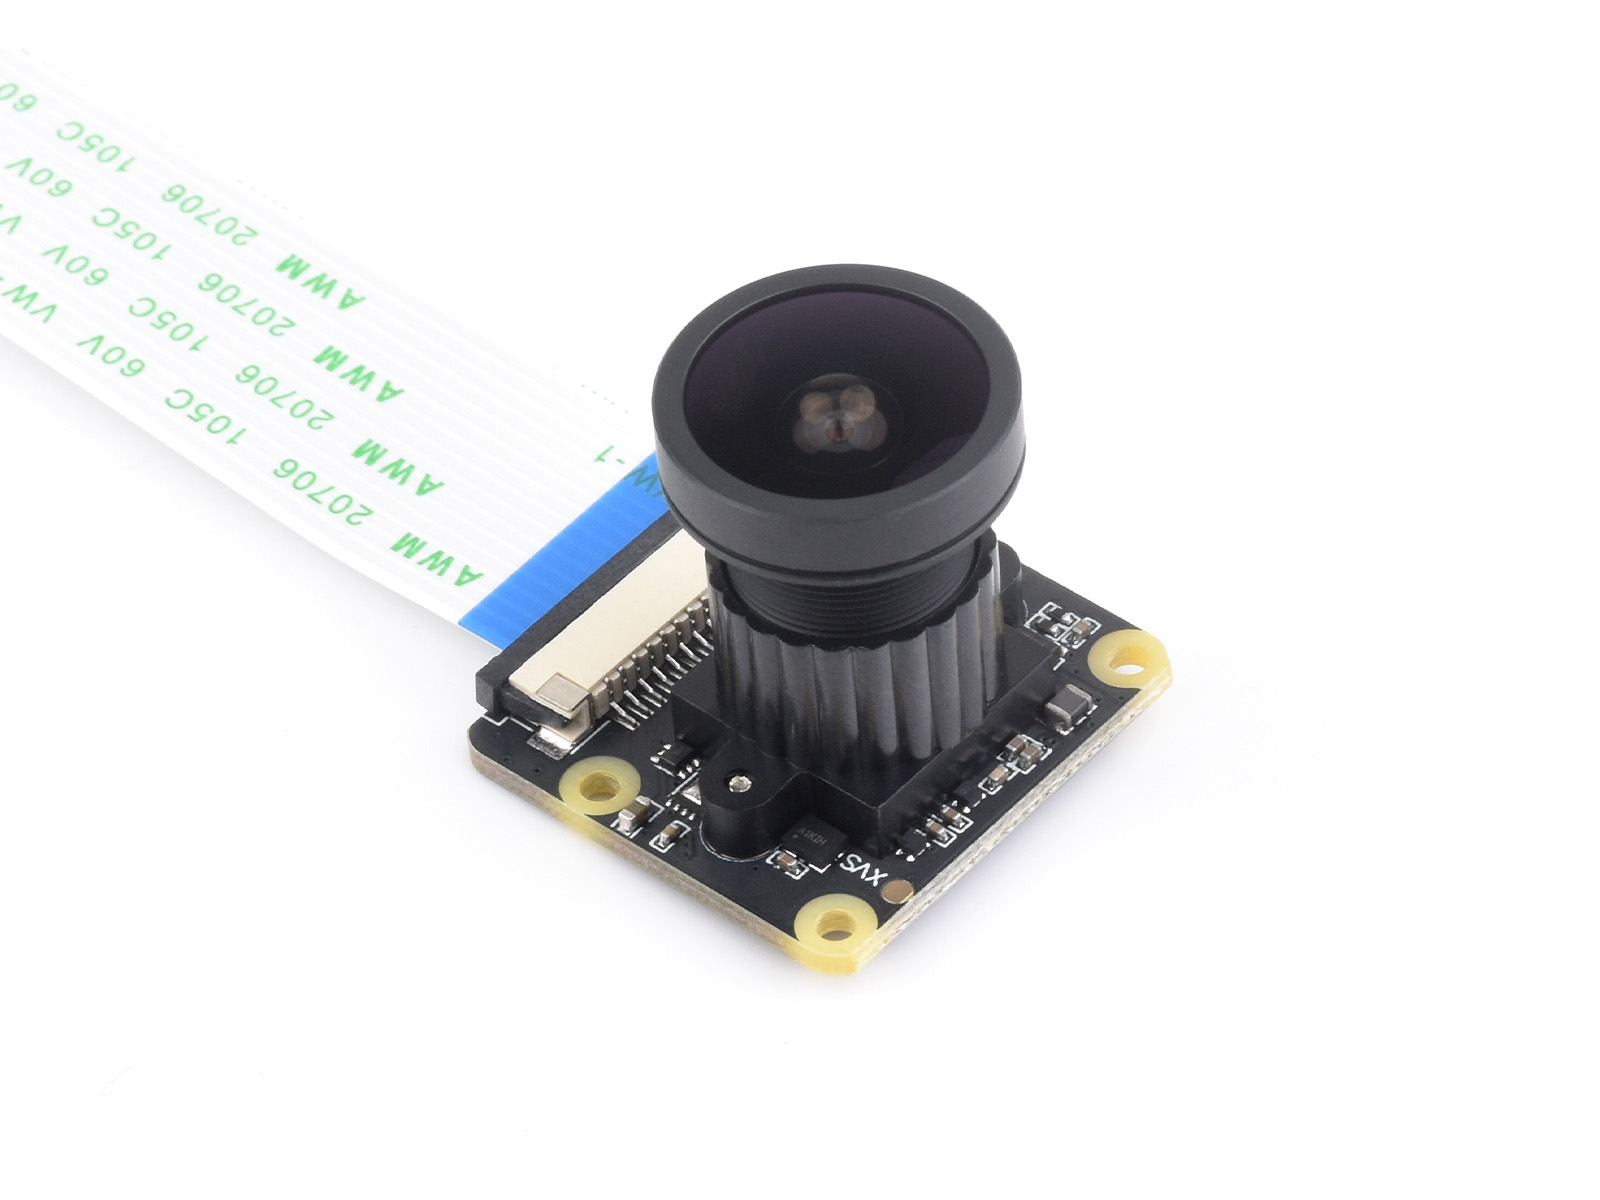 | 12.3MP | RDK X3, RDK X3 Module | IMX477 |
| 5 | OV5647 | 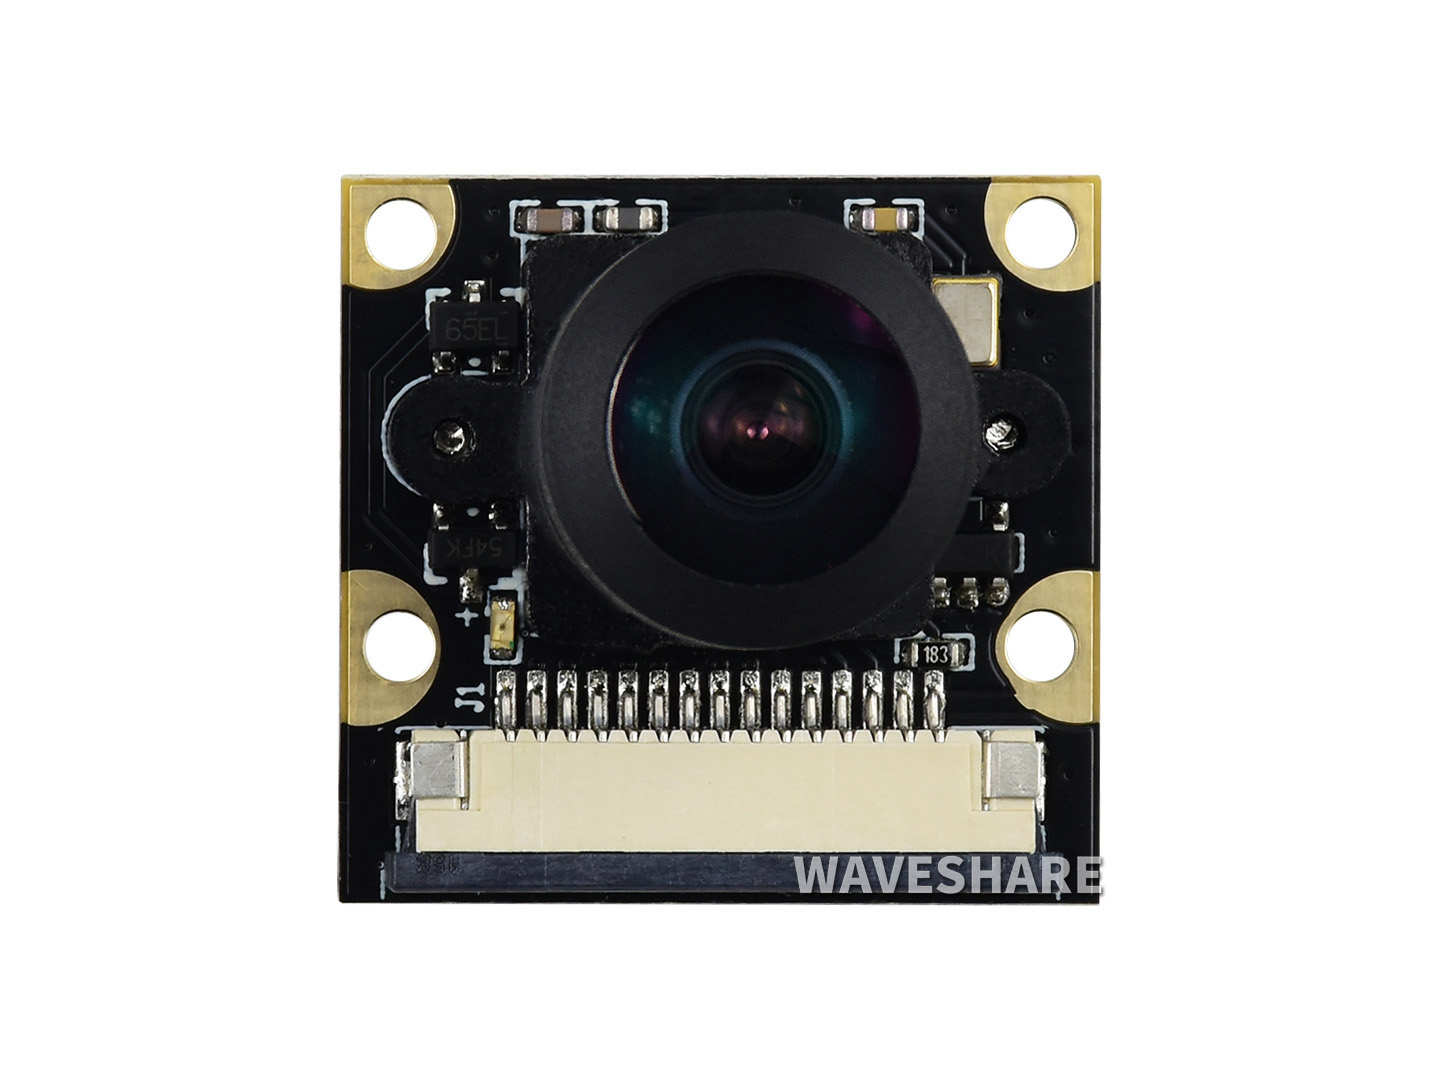 | 5MP | RDK X3, RDK X3 Module, RDK X5, RDK X5 Module | OV5647 |
| 6 | IMX415 | 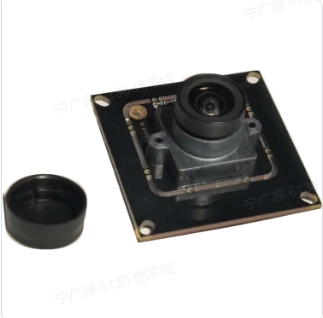 | 8MP | RDK X5, RDK X5 Module | IMX415 |
Code repository: https://github.com/D-Robotics/hobot_mipi_cam.git
Prerequisites
RDK Platform
-
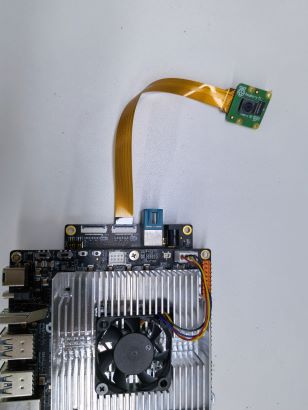
Ensure the camera is correctly connected to the RDK. For example, the F37 camera connected to the RDK X3 is shown below:
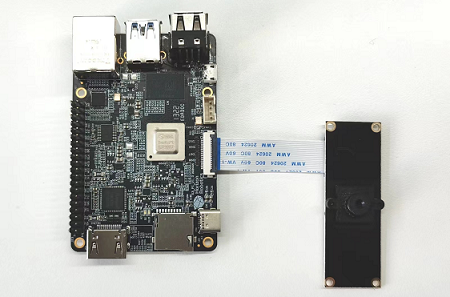
The IMX219 camera connected to the RDK S100 is shown below:
-
The RDK has been flashed with an Ubuntu 20.04 or Ubuntu 22.04 system image.
-
tros.b has been successfully installed on the RDK.
-
Confirm that your PC can access the RDK over the network.
Usage Instructions
RDK Platform
The following describes how to capture and preview camera data:
-
Log in to the RDK via SSH.
-
Start the
hobot_sensornode using the commands below:
- Foxy
- Humble
# Configure the tros.b environment
source /opt/tros/setup.bash
# Configure the tros.b environment
source /opt/tros/humble/setup.bash
# Launch via launch file
ros2 launch mipi_cam mipi_cam.launch.py
- If the program outputs messages similar to the following, the node has started successfully:
[INFO] [launch]: All log files can be found below /root/.ros/log/2022-06-11-15-16-13-641715-ubuntu-8852
[INFO] [launch]: Default logging verbosity is set to INFO
[INFO] [mipi_cam-1]: process started with pid [8854]
...
- To view the F37 camera image on the web: since raw data is published, JPEG encoding is required. Open two additional terminals—one to subscribe to MIPI data and encode it into JPEG, and another to publish it via a web service.
- Foxy
- Humble
# Configure the tros.b environment
source /opt/tros/setup.bash
# Configure the tros.b environment
source /opt/tros/humble/setup.bash
# Start encoding
ros2 launch hobot_codec hobot_codec_encode.launch.py

# Open another terminal and configure the tros.b environment
# Start websocket
ros2 launch websocket websocket.launch.py websocket_image_topic:=/image_jpeg websocket_only_show_image:=true
-
On your PC, open a browser (Chrome/Firefox/Edge) and enter
http://IP:8000(replace IP with the RDK's IP address). Click the "Web Display" button in the upper-left corner to view the real-time video stream output from the F37 camera.

-
Query the camera intrinsic parameters on your PC (use the actual values from your camera calibration file). The command and its output are as follows:
- Foxy
- Humble
root@ubuntu:~# source /opt/ros/foxy/setup.bash
root@ubuntu:~# source /opt/ros/humble/setup.bash
root@ubuntu:~# ros2 topic echo /camera_info
    header:
stamp:
    sec: 1662013622
    nanosec: 672922214
frame_id: default_cam
height: 1080
width: 1920
distortion_model: plumb_bob
d:
- 0.169978
- -0.697303
- -0.002944
- -0.004961
- 0.0
k:
- 1726.597634
- 0.0
- 904.979671
- 0.0
- 1737.359551
- 529.123375
- 0.0
- 0.0
- 1.0
r:
- 1.0
- 0.0
- 0.0
- 0.0
- 1.0
- 0.0
- 0.0
- 0.0
- 1.0
p:
- 1685.497559
- 0.0
- 881.6396
- 0.0
- 0.0
- 1756.460205
- 526.781147
- 0.0
- 0.0
- 0.0
- 1.0
- 0.0
binning_x: 0
binning_y: 0
roi:
x_offset: 0
y_offset: 0
height: 0
width: 0
do_rectify: false
Notes
-
The
mipi_campackage provides calibration files for two camera models: F37 and GC4663. By default, it loads the F37 calibration fileF37_calibration.yaml. If you are using the GC4663 camera, you must change the calibration file path accordingly. Follow these steps:- Foxy
- Humble
# Configure the tros.b environment
source /opt/tros/setup.bash
# Configure the tros.b environment
source /opt/tros/humble/setup.bash# Launch via launch file
ros2 launch mipi_cam mipi_cam.launch.py mipi_video_device:=GC4663 mipi_camera_calibration_file_path:=/opt/tros/${TROS_DISTRO}/lib/mipi_cam/config/GC4663_calibration.yaml -
Camera Plugging/Unplugging Precautions
Never plug or unplug the camera while the development board is powered on—this can easily damage the camera module.
-
If you encounter issues starting the
hobot_sensornode, follow these troubleshooting steps:- Check hardware connections.
- Verify that the tros.b environment has been properly sourced.
- Confirm that all parameters are correct; refer to README.md for details.
-
When two image streams publish to the same topic simultaneously, image conflicts may occur. Therefore, when launching a second camera stream, you must remap the topic. Use one of the following commands to start the second camera (applicable only to X5 and S100):
- Foxy
- Humble
# Configure the tros.b environment
source /opt/tros/setup.bash# Configure the tros.b environment
source /opt/tros/humble/setup.bash# Launch via run command
ros2 run mipi_cam mipi_cam --ros-args --remap /image_raw:=/image_raw_alias
# Or launch via launch file
ros2 launch mipi_cam mipi_cam_topic_remap.launch.py
Stereo MIPI Image Capture
Feature Overview
To enable stereo perception of the environment, robotic products often integrate stereo cameras, ToF sensors, or similar devices. To reduce sensor integration and usage costs for developers, TogetherROS.Bot encapsulates multiple commonly used sensors into the abstracted hobot_sensor module, which supports standard ROS image messages. When the configured sensor parameters do not match the connected camera, the program automatically adapts to the correct sensor type. Currently supported MIPI sensor types include:
| Type | Model | Resolution | Supported Platforms |
|---|---|---|---|
| Camera | SC230ai | 2MP | RDK X5, RDK X5 Module, RDK S100, RDK S100P |
| Camera | SC132gs | 2MP | RDK X5, RDK X5 Module, RDK S100, RDK S100P |
Repository: https://github.com/D-Robotics/hobot_mipi_cam.git
Supported Platforms
| Platform | OS Version |
|---|---|
| RDK X5, RDK X5 Module | Ubuntu 22.04 (Humble) |
| RDK S100, RDK S100P | Ubuntu 22.04 (Humble) |
Prerequisites
RDK Platform
-
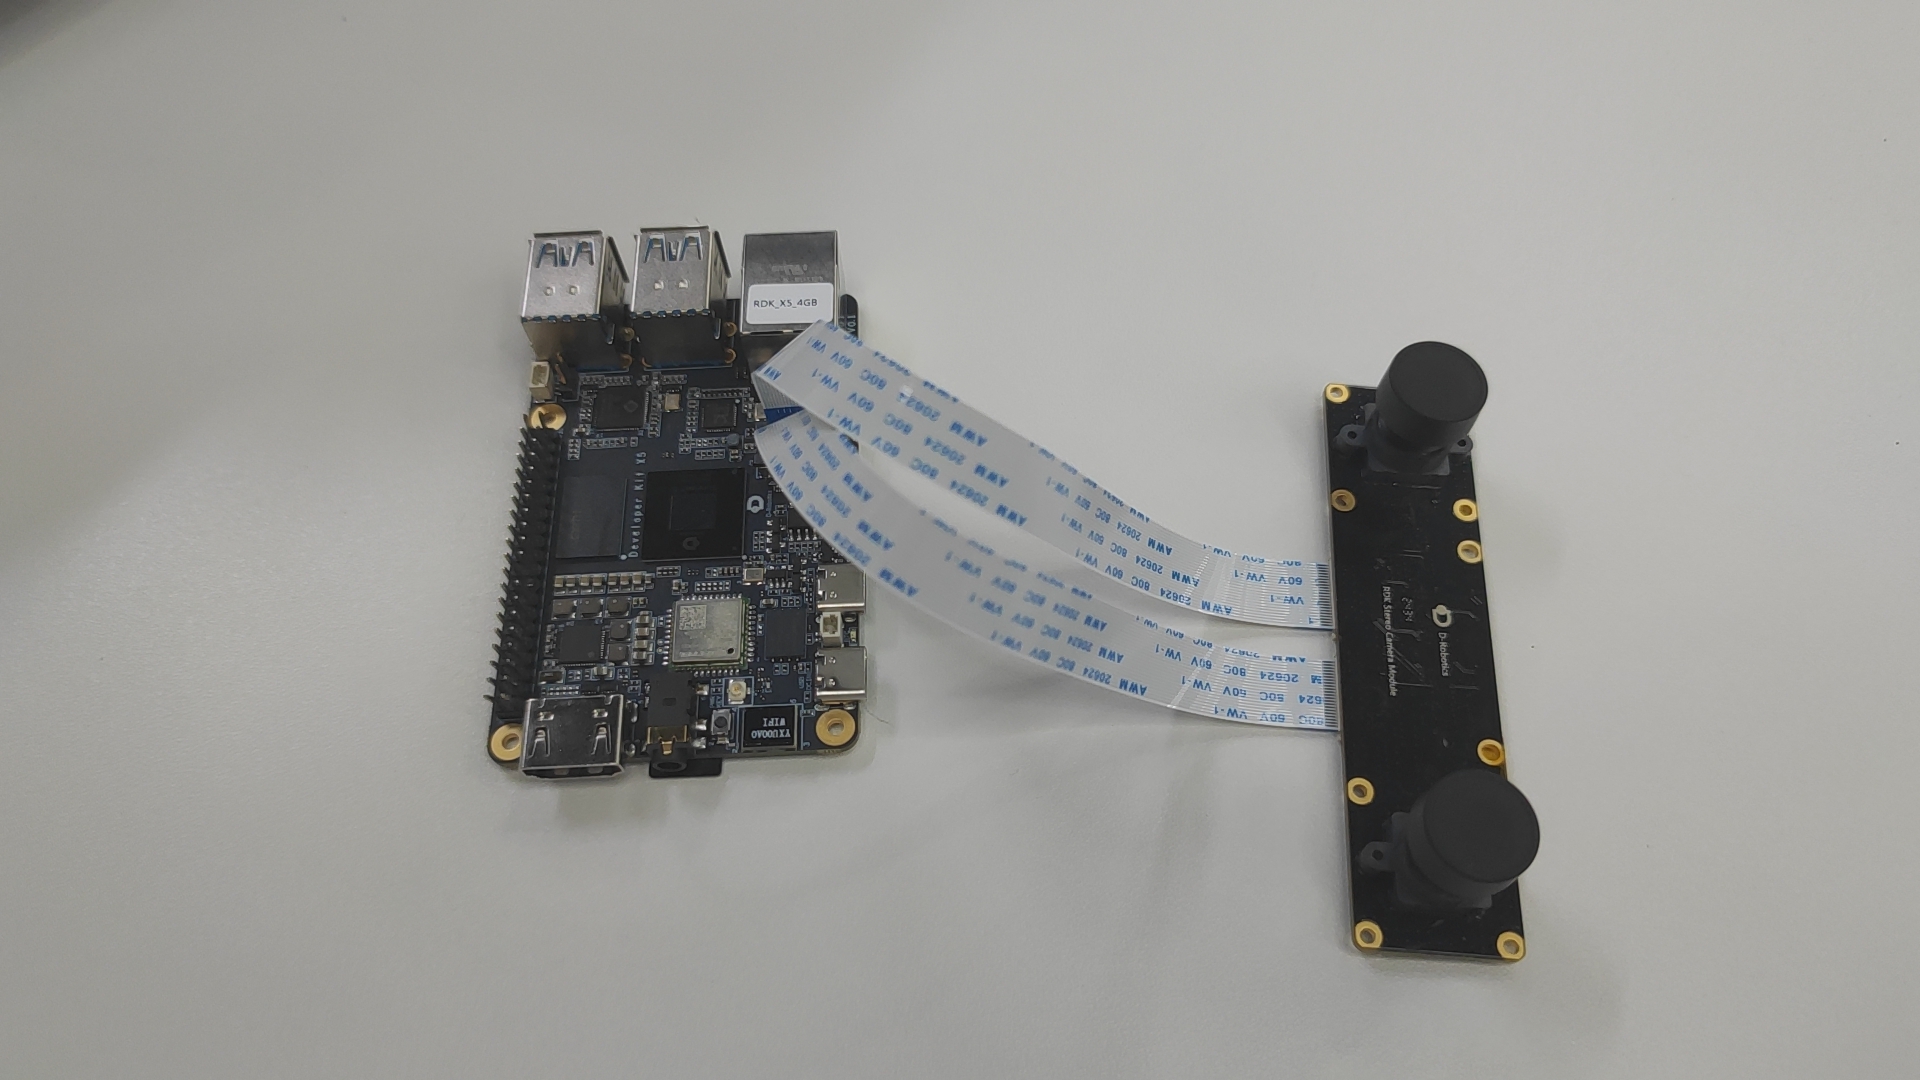
Confirm that the camera is correctly connected to the RDK. For example, the connection method for the SC230ai stereo camera to the RDK X5 and RDK X5 Module is shown in the figure below:
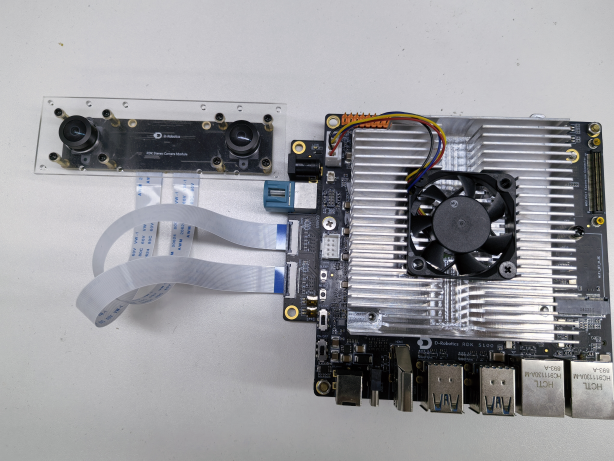
The connection method for the SC230ai stereo camera to the S100 is shown in the figure below:
-
The RDK has already been flashed with the Ubuntu 22.04 system image.
-
tros.b has been successfully installed on the RDK.
-
Confirm that the PC can access the RDK over the network.
Usage Instructions
RDK Platform
The following example uses the SC230ai camera to illustrate how to acquire and preview camera data:
-
Log in to the RDK via SSH and confirm the camera model (using
SC230aias an example). -
Start the hobot_sensor node using the command below:
- Humble
# Configure the tros.b environment
source /opt/tros/humble/setup.bash
# Launch using launch file
ros2 launch mipi_cam mipi_cam_dual_channel.launch.py -
If the program outputs information similar to the following, it indicates that the node has started successfully:
[INFO] [launch]: All log files can be found below /root/.ros/log/2024-09-18-19-15-26-160110-ubuntu-3931
[INFO] [launch]: Default logging verbosity is set to INFO
config_file_path is /opt/tros/humble/lib/mipi_cam/config/
Hobot shm pkg enables zero-copy with fastrtps profiles file: /opt/tros/humble/lib/hobot_shm/config/shm_fastdds.xml
Hobot shm pkg sets RMW_FASTRTPS_USE_QOS_FROM_XML: 1
env of RMW_FASTRTPS_USE_QOS_FROM_XML is 1 , ignore env setting
[INFO] [mipi_cam-1]: process started with pid [3932]
[mipi_cam-1] [WARN] [1726658126.449994704] [mipi_node]: frame_ts_type value: sensor
[mipi_cam-1] [ERROR] [1726658126.455022356] [mipi_factory]: This is't support device type(), start defaule capture.
[mipi_cam-1]
[mipi_cam-1] [WARN] [1726658126.456074125] [mipi_cam]: this board support mipi:
[mipi_cam-1] [WARN] [1726658126.456274529] [mipi_cam]: host 0
[mipi_cam-1] [WARN] [1726658126.456333567] [mipi_cam]: host 2
[mipi_cam-1] [WARN] [1726658128.722451045] [mipi_cam]: [init]->cap default init success.
[mipi_cam-1]
... -
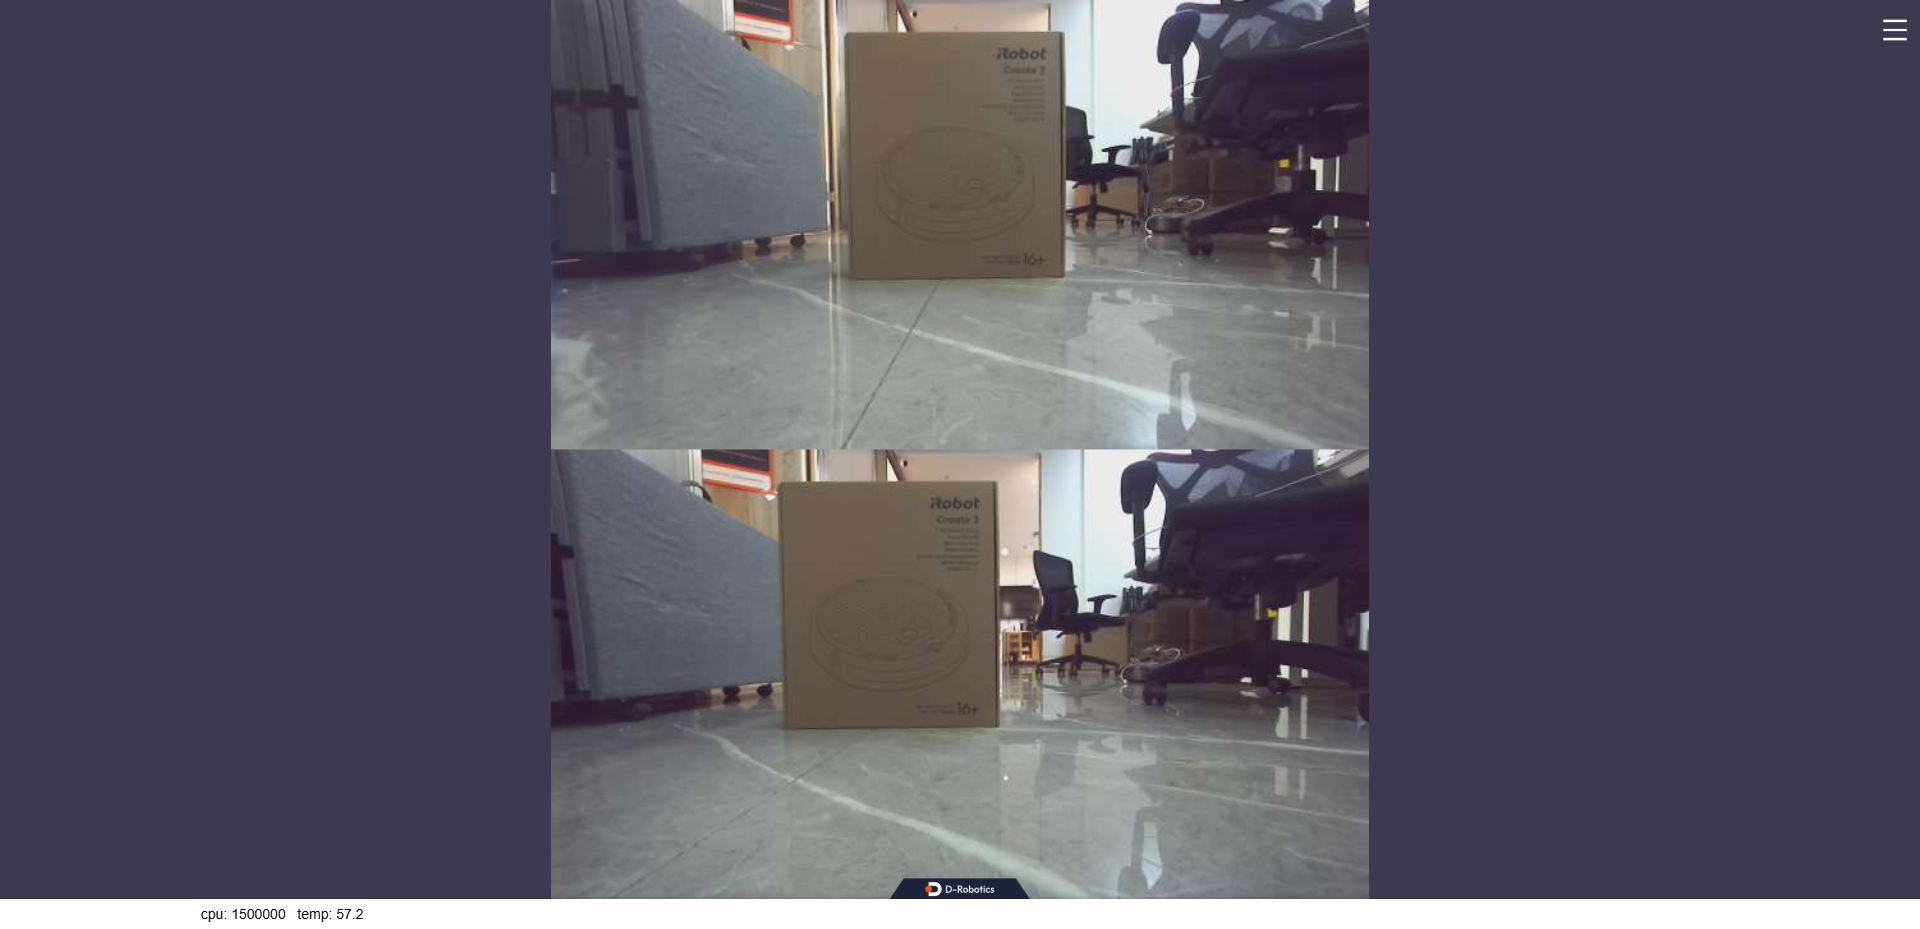
To view stereo camera images on a web browser, since raw data is published, you need a node to encode JPEG images and another node to publish them via a web service. Use the following command to launch:
- Humble
# Configure the tros.b environment
source /opt/tros/humble/setup.bash# Launch using launch file
ros2 launch mipi_cam mipi_cam_dual_channel_websocket.launch.py -
On your PC, open a browser (Chrome/Firefox/Edge), enter
http://IP:8000(replace IP with the RDK's IP address), and click the "Web Display" button in the top-left corner to view the real-time stereo output.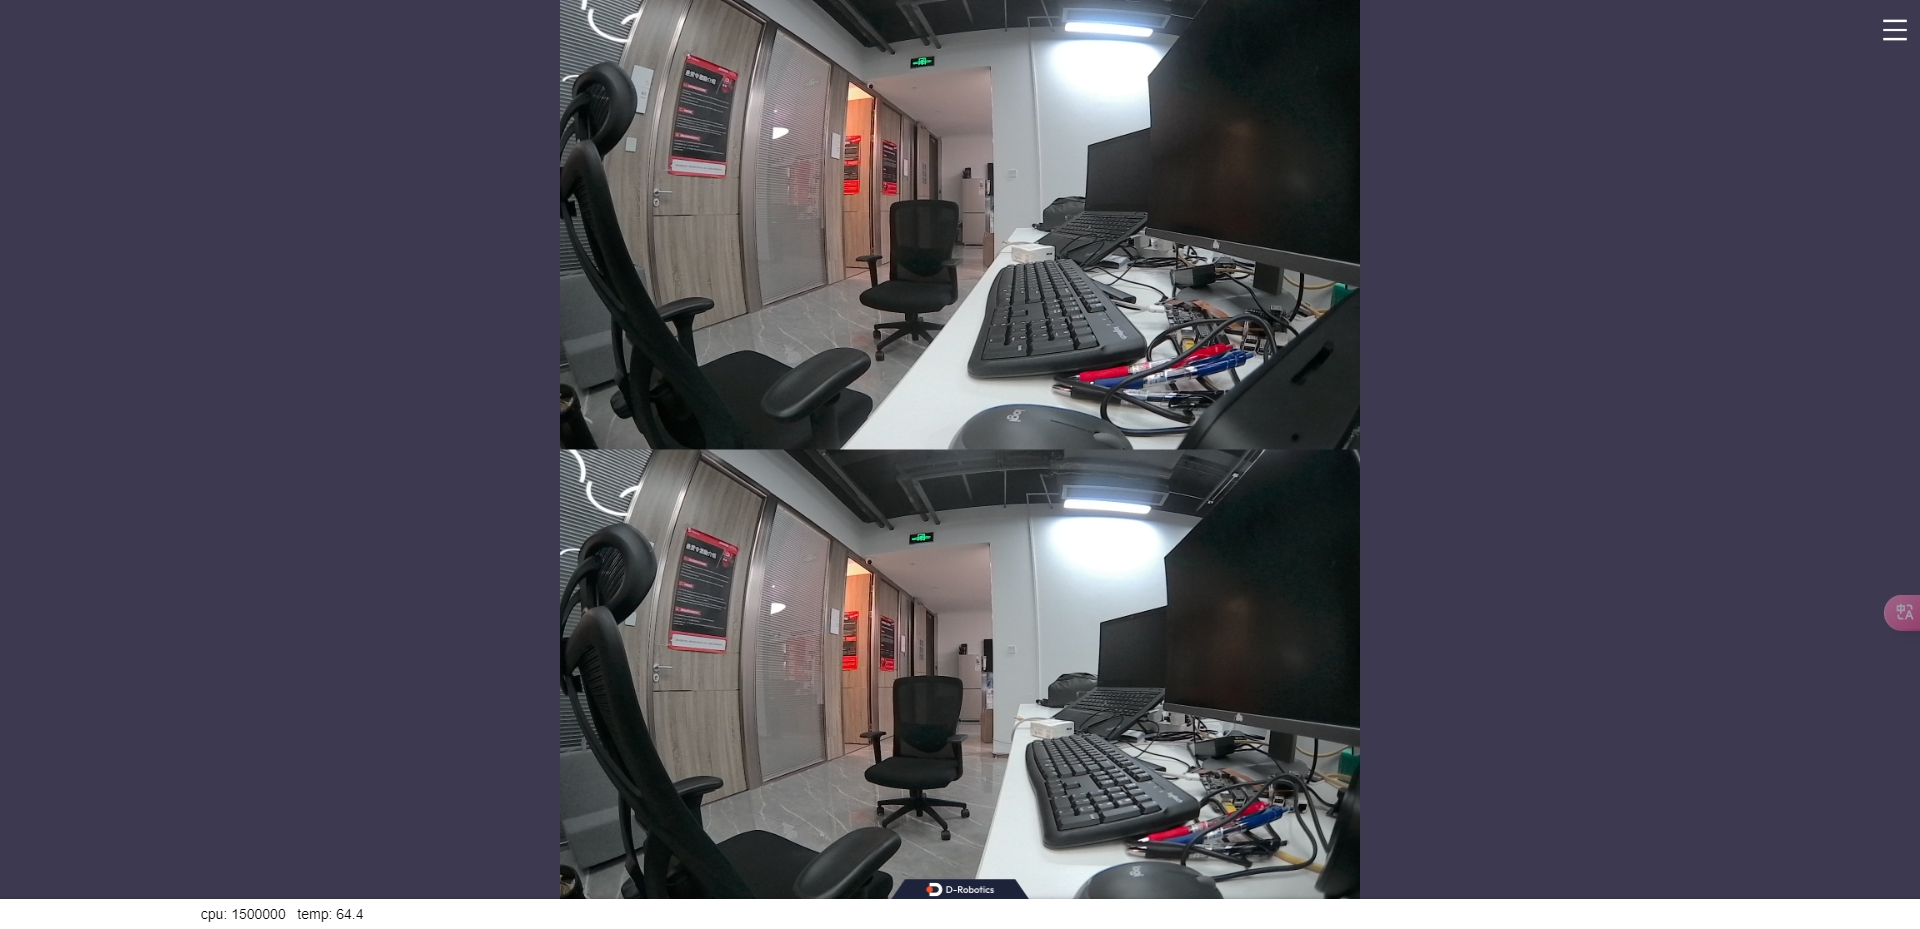
Notes
-
Camera Insertion/Removal Precautions
Never plug or unplug the camera while the development board is powered on; otherwise, the camera module may easily be damaged.
-
If you encounter issues when starting the hobot_sensor node, follow these troubleshooting steps:
- Check hardware connections.
- Verify that the tros.b environment has been properly configured.
- Ensure parameters are correct; refer to README.md for details.
RGBD Image Capture
Feature Overview
To enable environmental perception capabilities, robotic products typically integrate sensors such as cameras and ToF devices. To reduce users' sensor integration and usage costs, TogetherROS.Bot encapsulates various commonly used sensors into the hobot_sensor module, supporting standard ROS image messages, custom image message outputs, and publishing of camera calibration data. Currently supported RGBD sensor types include:
| Type | Model | Specification | Supported Platforms |
|---|---|---|---|
| Camera | CP3AM | 2MP | RDK X3 |
Code repository: https://github.com/D-Robotics/hobot_rgbd_cam.git
Supported Platforms
| Platform | Runtime Environment | Example Functionality |
|---|---|---|
| RDK X3 | Ubuntu 20.04 (Foxy), Ubuntu 22.04 (Humble) | Launch RGBD camera and preview RGB and depth images on PC via rviz2 |
Note: Only RDK X3 is supported; RDK X3 Module is not currently supported.
Prerequisites
RDK Platform
-
Confirm that the camera is correctly connected to the RDK. The connection method for the RGBD module to the RDK X3 is shown below:

Note: The RGBD module requires an additional adapter board to connect to the RDK X3.
-
The RDK has already been flashed with either Ubuntu 20.04 or Ubuntu 22.04 system image.
-
tros.b has been successfully installed on the RDK.
-
Confirm that the PC can access the RDK over the network.
-
Install ROS 2 Foxy and rviz2 on the PC using the following command:
sudo apt install ros-foxy-rviz-common ros-foxy-rviz-default-plugins ros-foxy-rviz2
Usage Instructions
RDK Platform
The following example uses the CP3AM camera to illustrate how to acquire and preview camera data:
-
Log in to the RDK via SSH and start the hobot_sensor node using the commands below:
- Foxy
- Humble
# Configure the tros.b environment
source /opt/tros/setup.bash
# Configure the tros.b environment
source /opt/tros/humble/setup.bashcp -r /opt/tros/${TROS_DISTRO}/lib/rgbd_sensor/parameter .
# Launch using launch file
ros2 launch rgbd_sensor rgbd_sensor.launch.py -
If the program outputs information similar to the following, it indicates that the node has started successfully:
[WARN] [1654573498.706920307] [example]: [wuwl]->This is rgbd!
sh: 1: echo: echo: I/O error
pipeId[1], mipiIdx[1], vin_vps_mode[3]
[ERROR]["LOG"][irs2381c_utility.c:192] 2381 enter sensor_init_setting
[ERROR]["LOG"][irs2381c_utility.c:200] start write 2381c reg
camera read reg: 0xa001 val:0x7
...
[ERROR]["LOG"][irs2381c_utility.c:207] end write 2381c reg
HB_MIPI_InitSensor end
HB_MIPI_SetDevAttr end
pstHbVideoDev->vin_fd = 29
sensorID: 634-2362-2676-68d0
find local calib_file

find local calib_file

SDK Version: V4.4.35 build 20220525 09:27:53.
read file(./calib-0634-2362-2676-68d0.bin), ok, file_len=132096, read_len=132096.......
module config file(user custom) is: ./parameter/T00P11A-17.ini.
parse calib data, data len:132096...
sunny_degzip2 decode_len=155575.
calib data with crc.
parse calib data, ok.
max roi (firstly): (0, 224, 0, 128).
cur roi (firstly): (0, 224, 0, 128).
HB_MIPI_InitSensor end
HB_MIPI_SetDevAttr end
pstHbVideoDev->vin_fd = 55
vencChnAttr.stRcAttr.enRcMode=11
mmzAlloc paddr = 0x1a6e6000, vaddr = 0x917e1000
camera read reg: 0x9400 val:0x1
...

[wuwl-StartCamera]->camT=3, ret=0.
camera read reg: 0x3e val:0x40
[ERROR]["vio_devop"][utils/dev_ioctl.c:121] [499334.399304]dev_node_dqbuf_ispoll[121]: failed to ioctl: dq (14 - Bad address)
[ERROR]["vio_devop"][utils/dev_ioctl.c:189] [499334.399355]entity_node_dqbuf_ispoll[189]: dev type(9) dq failed

[ERROR]["vio_core"][commom_grp/binding_main.c:1034] [499334.399371]comm_dq_no_data[1034]: G1 MIPI_SIF_MODULE module chn0 dq failed! maybe framedrop error_detail -14

[wuwl-StartCamera]->camT=1, ret=0.
[INFO] [1654573500.226606117] [rclcpp]: [childStart]-> ret=0 !

[INFO] [1654573500.226831567] [rclcpp]: [StartStream]->pthread create sucess

[INFO] [1654573500.226963854] [rclcpp]: <========>[doCapStreamLoop]->Start.

[WARN] [1654573500.226998103] [rgbd_node]: [RgbdNode]->mipinode init sucess.

[WARN] [1654573500.227352507] [example]: [wuwl]->rgbd init!
[WARN] [1654573500.228502174] [example]: [wuwl]->rgbd add_node!

[INFO] [1662723985.860666547] [rgbd_node]: publish camera info.
[INFO] [1662723985.866077156] [rgbd_node]: [pub_ori_pcl]->pub pcl w:h=24192:1,nIdx-24192:sz=24192.
[INFO] [1662723985.876428980] [rgbd_node]: [timer_ros_pub]->pub dep w:h=224:129,sz=982464, infra w:h=224:108, sz=24192.

[INFO] [1662723985.946767230] [rgbd_node]: publish camera info.
[INFO] [1662723985.951415418] [rgbd_node]: [pub_ori_pcl]->pub pcl w:h=24192:1,nIdx-24192:sz=24192.
[INFO] [1662723985.960161280] [rgbd_node]: [timer_ros_pub]->pub dep w:h=224:129,sz=982464, infra w:h=224:108, sz=24192.
... -
Query current topics on the PC. The query command and its output are as follows:
- Foxy
- Humble
source /opt/ros/foxy/setup.bash
source /opt/ros/humble/setup.bash
ros2 topic list
Output:
/rgbd_CP3AM/depth/image_rect_raw

/rgbd_CP3AM/depth/color/points

/rgbd_CP3AM/color/camera_info

/rgbd_CP3AM/aligned_depth_to_color/color/points

/rgbd_CP3AM/infra/image_rect_raw

/rgbd_CP3AM/color/image_rect_raw

/parameter_events

/rosout
- Subscribe to topics on the PC and preview camera data
- Foxy
- Humble
source /opt/ros/foxy/setup.bash
source /opt/ros/humble/setup.bash
ros2 run rviz2 rviz2
In the rviz2 interface, click the "Add" button and add the topics published by the rgbd_sensor (refer to the rgbd_CP3AM-related topics listed in Section 3). To visualize point cloud data, change the "Fixed Frame" option under Global Options in rviz2 configuration to "depth". Then, in the point cloud topic configuration, select "points" as the point type.
- Query camera intrinsic parameters on the PC
- Foxy
- Humble
source /opt/ros/foxy/setup.bash
source /opt/ros/humble/setup.bash
ros2 topic echo /rgbd_CP3AM/color/camera_info
The output is as follows:
header:
stamp:
    sec: 119811
    nanosec: 831645108
frame_id: color
height: 1080
width: 1920
distortion_model: plumb_bob
d:
- -0.32267
- 0.083221
- 0.000164
- -0.002134
- 0.0
k:
- 1066.158339
- 0.0
- 981.393777
- 0.0
- 1068.659998
- 545.569587
- 0.0
- 0.0
- 1.0
r:
- 1.0
- 0.0
- 0.0
- 0.0
- 1.0
- 0.0
- 0.0
- 0.0
- 1.0
p:
- 741.315308
- 0.0
- 968.865379
- 0.0
- 0.0
- 969.43042
- 546.524343
- 0.0
- 0.0
- 0.0
- 1.0
- 0.0
binning_x: 0
binning_y: 0
roi:
x_offset: 0
y_offset: 0
height: 0
width: 0
do_rectify: false
Notes
If the hobot_sensor node fails to start, follow the steps below for troubleshooting:
- Check hardware connections.
- Verify whether the tros.b environment has been set up.
- Whether the parameters are correct; for details, please refer to Hobot_Sensors README.md
RealSense Image Acquisition
Feature Introduction
Stereo cameras are commonly used sensors in robotics development and often serve as the robot's "eyes." Their applications on robots cover multiple aspects, such as navigation and obstacle avoidance, object recognition, 3D reconstruction, and human-robot interaction. The RDK platform also supports widely available stereo cameras on the market, including RealSense, Orbbec, ZED, and other series.
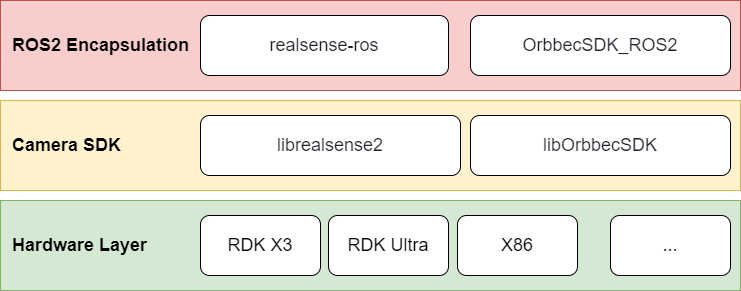
Currently, the usage of RealSense and Orbbec stereo cameras on ROS follows the architecture shown below: first, SDK library files compiled for specific hardware platforms are required. The camera SDK provides APIs for camera initialization, configuration, and other functionalities. On top of this, a ROS wrapper is implemented to enable ROS-based camera control.
Therefore, the general installation procedure for stereo camera ROS packages is as follows: first install the camera’s SDK library files, then install the corresponding ROS wrapper package.
This section describes how to use RealSense cameras on the RDK platform.
Supported Platforms
| Platform | Operating System |
|---|---|
| RDK X3, RDK X3 Module | Ubuntu 20.04 (Foxy), Ubuntu 22.04 (Humble) |
| RDK X5, RDK X5 Module | Ubuntu 22.04 (Humble) |
| RDK Ultra | Ubuntu 20.04 (Foxy) |
Prerequisites
RDK Platform
- Confirm that your RealSense camera functions properly, and connect it to an RDK USB port using a USB cable.
- The RDK has been flashed with an Ubuntu 20.04 or Ubuntu 22.04 system image.
- tros.b has been successfully installed on the RDK.
- Ensure your PC can access the RDK over the network.
Usage Instructions
After installing RealSense SDK 2.0 and the RealSense ROS wrapper via apt, you can directly use RealSense series cameras on the RDK platform.
Below are the GitHub repositories for RealSense SDK 2.0 and the RealSense ROS wrapper. This tutorial is based on these repositories; users can refer to them for more detailed instructions.
- RealSense SDK 2.0: https://github.com/IntelRealSense/librealsense
- RealSense ROS wrapper: https://github.com/IntelRealSense/realsense-ros/tree/ros2-development
1. Log into the RDK via serial console or SSH and confirm the ROS distribution
- Foxy
- Humble
# Set up the tros.b environment
source /opt/tros/setup.bash
# Print the ROS distribution environment variable
echo $ROS_DISTRO
# Set up the tros.b environment
source /opt/tros/humble/setup.bash
# Print the ROS distribution environment variable
echo $ROS_DISTRO
2. Install RealSense SDK 2.0 and RealSense ROS2 wrapper via apt
# Install RealSense SDK 2.0
sudo apt-get install ros-$ROS_DISTRO-librealsense2* -y
# Install RealSense ROS2 wrapper
sudo apt-get install ros-$ROS_DISTRO-realsense2-* -y
3. Launch the RealSense Camera
After installation, launch the RealSense camera using the following ROS command:
ros2 launch realsense2_camera rs_launch.py
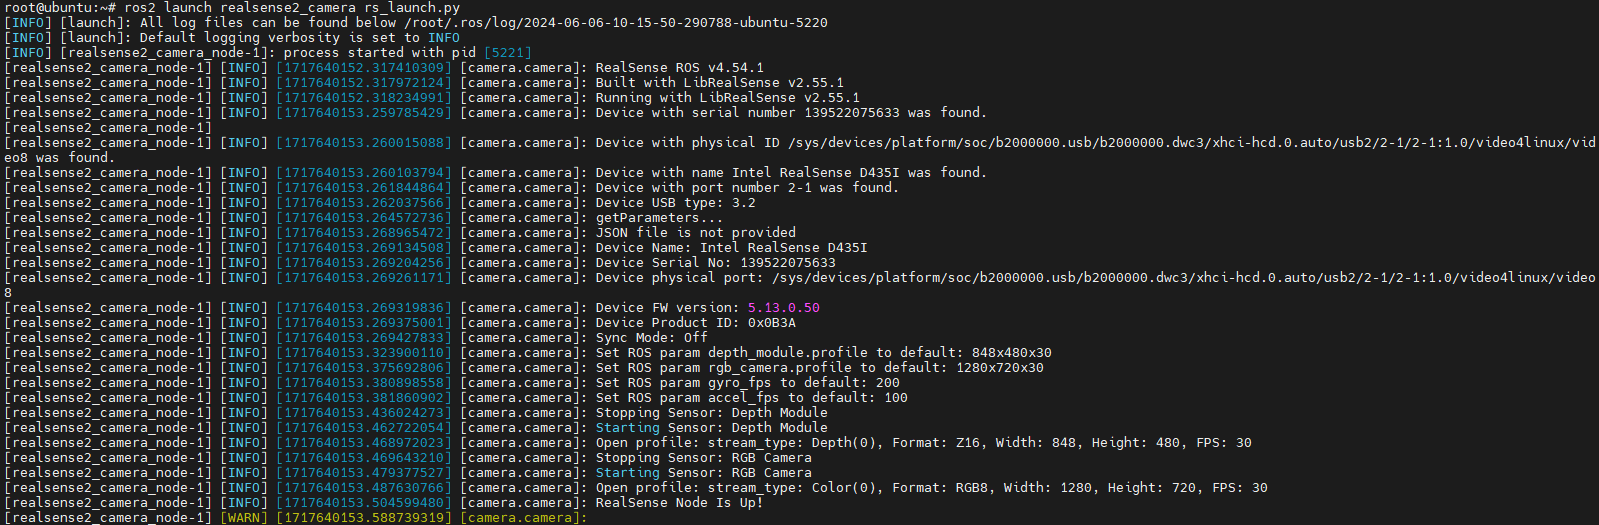
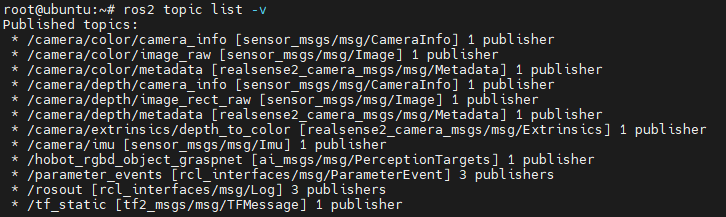
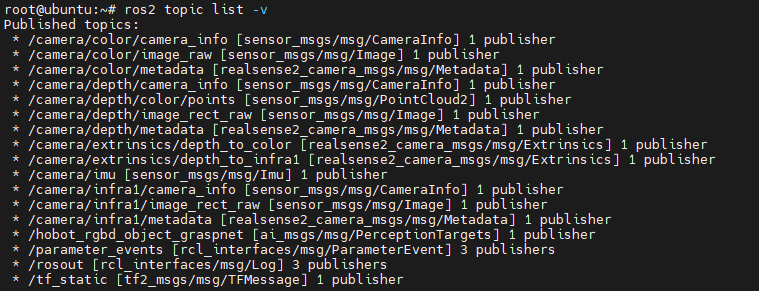
You can use ros2 topic list to view topics published by RealSense. By default, launching the camera with default parameters only enables the depth and RGB data streams.
The RealSense ROS wrapper offers many configurable parameters. For example, setting enable_infra1:=true and pointcloud.enable:=true will enable the left IR stream and point cloud stream:
ros2 launch realsense2_camera rs_launch.py enable_infra1:=true pointcloud.enable:=true

Additionally, RealSense exposes several services, which you can list using ros2 service list. For instance, you can query the camera’s serial number, firmware version, and other information via a service call:
ros2 service call /camera/device_info realsense2_camera_msgs/srv/DeviceInfo
For more details about available topics and services, please refer to the RealSense ROS wrapper GitHub repository.
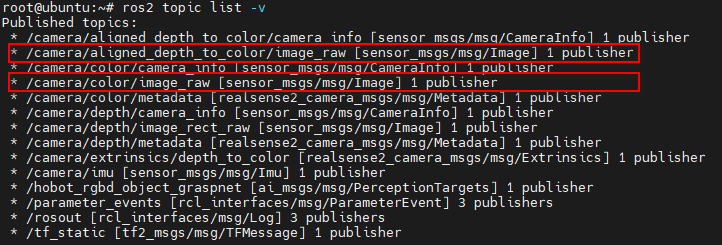
4. Depth-to-RGB Alignment
In practical applications, it is often necessary to align the depth map with the color image. RealSense provides a dedicated launch option for this purpose:
ros2 launch realsense2_camera rs_launch.py enable_rgbd:=true enable_sync:=true align_depth.enable:=true enable_color:=true enable_depth:=true

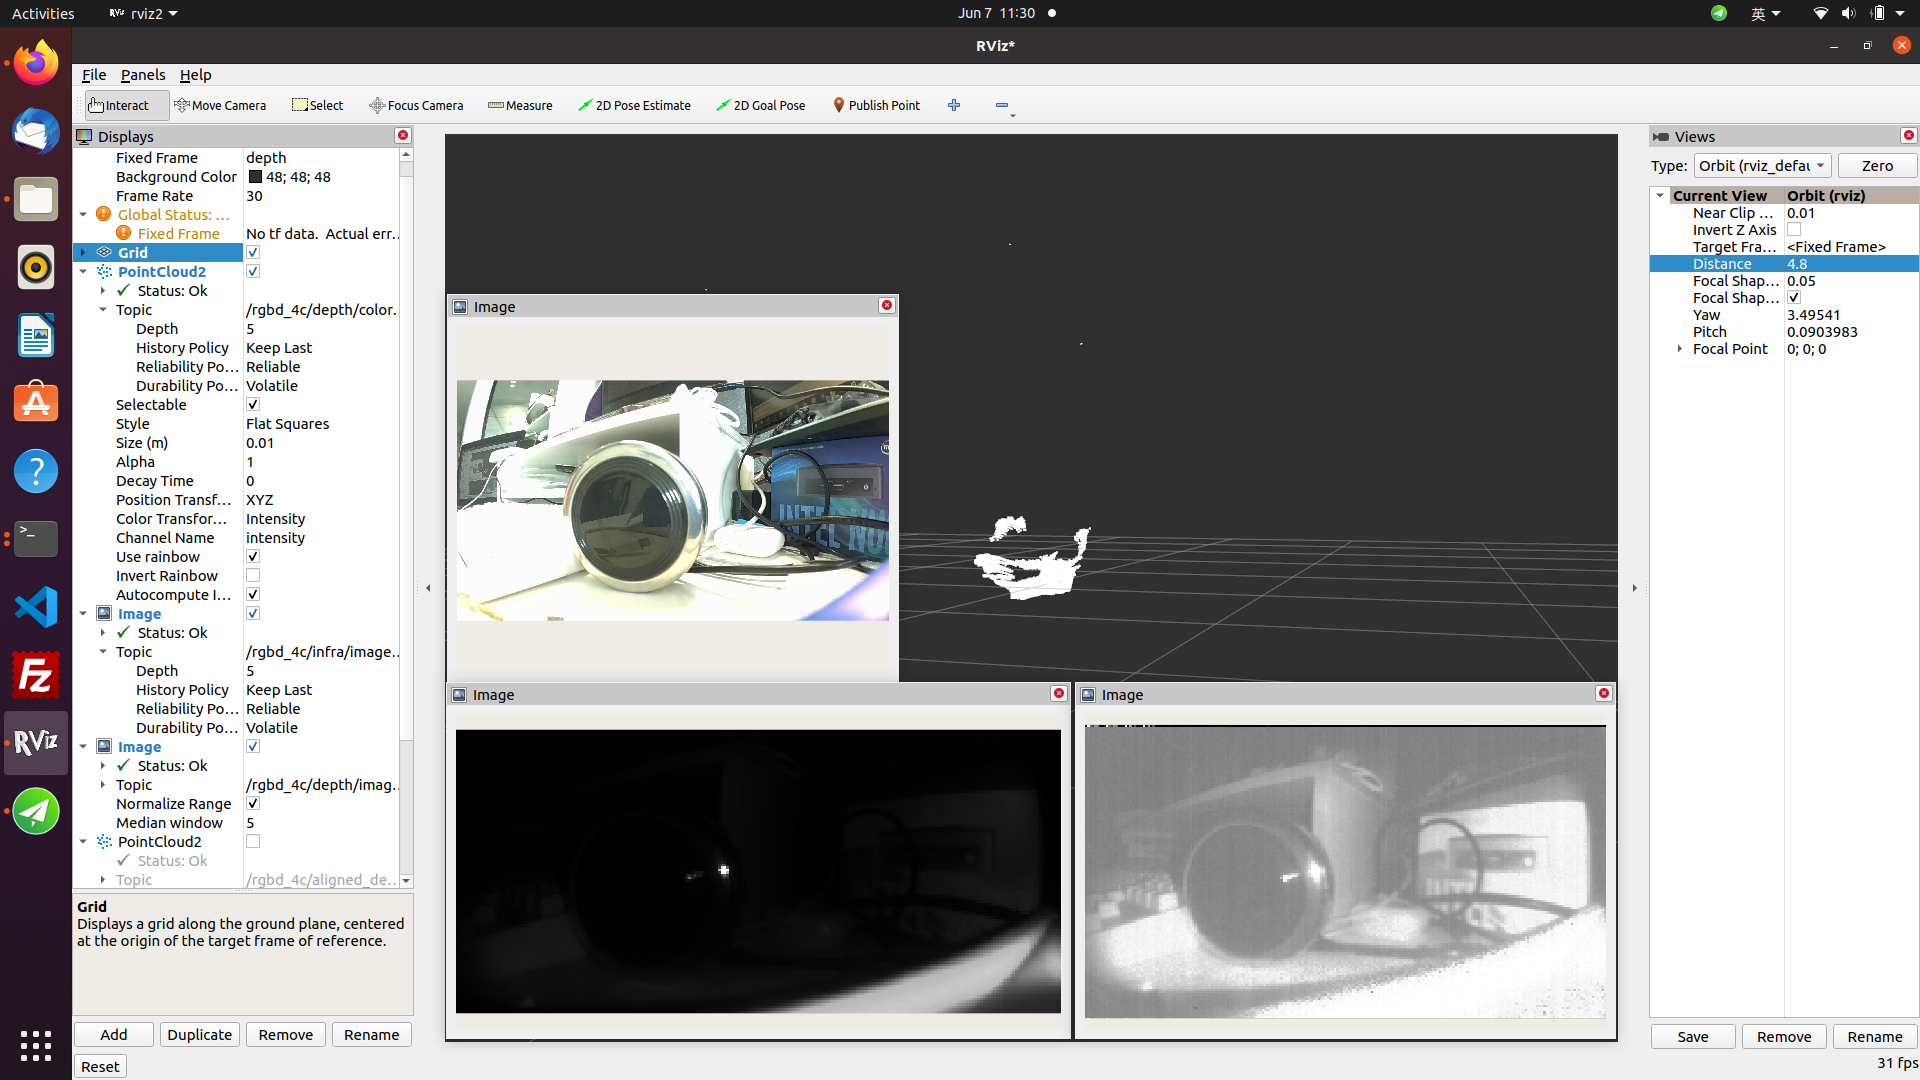
5. Displaying Images and Point Clouds
There are multiple ways to visualize RealSense images and point clouds. Please refer to Section 5.2.2 Data Visualization. For example, you can use rviz2 on your PC to display the data. This method requires your PC to have network access to the RDK. However, since data is transmitted over the network, high bandwidth usage may cause lag or stuttering.
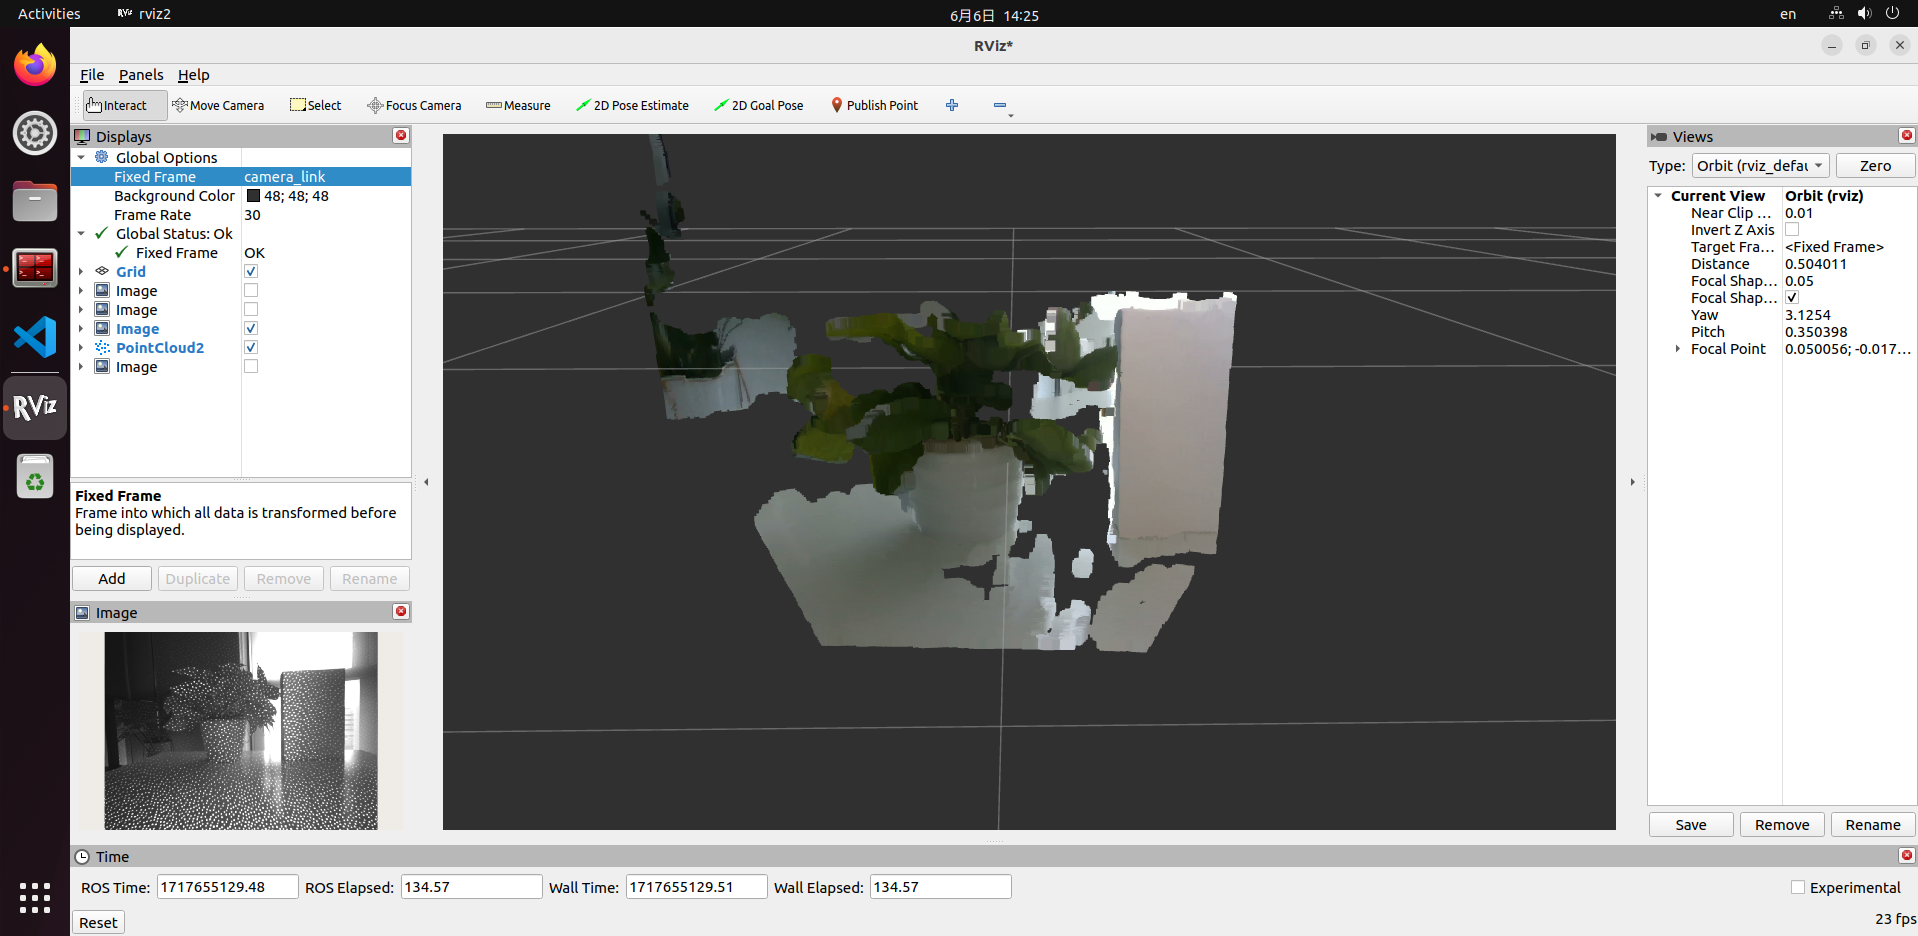
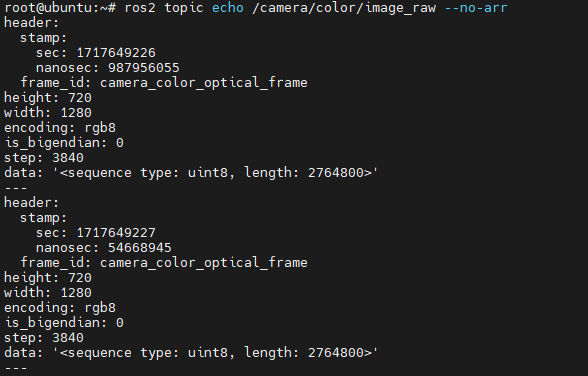
We recommend directly reading the data on the RDK to verify whether the data streams are functioning correctly. You can either print data using ros2 topic echo <topic_name> or write code to subscribe to the relevant topics.
Orbbec Camera Image Acquisition
Feature Introduction
Stereo cameras are commonly used sensors in robotics development and often serve as the robot's "eyes." Their applications on robots cover multiple aspects, such as navigation and obstacle avoidance, object recognition, 3D reconstruction, and human-robot interaction. The RDK platform also supports widely available stereo cameras on the market, including RealSense, Orbbec, ZED, and other series.
Currently, the usage of RealSense and Orbbec stereo cameras on ROS follows the architecture shown below: first, SDK library files compiled for specific hardware platforms are required. The camera SDK provides APIs for camera initialization, configuration, and other functionalities. On top of this, a ROS wrapper is implemented to enable ROS-based camera control.
Therefore, the general installation procedure for stereo camera ROS packages is as follows: first install the camera’s SDK library files, then install the corresponding ROS wrapper package.
This section describes how to use Orbbec cameras on the RDK platform.
Supported Platforms
| Platform | Operating System |
|---|---|
| RDK X3, RDK X3 Module | Ubuntu 20.04 (Foxy), Ubuntu 22.04 (Humble) |
| RDK X5, RDK X5 Module | Ubuntu 22.04 (Humble) |
Prerequisites
RDK Platform
- Confirm that your Orbbec camera functions properly, and connect it to an RDK USB 3.0 port (currently, USB 2.0 ports may cause startup failures).
- The RDK has been flashed with an Ubuntu 20.04 or Ubuntu 22.04 system image.
- tros.b has been successfully installed on the RDK.
- Ensure your PC can access the RDK over the network.
Usage Instructions
Currently, Orbbec cameras do not support direct installation of the SDK library and ROS wrapper package via apt. You must download the source code and compile it before running on the RDK platform.
Below are the GitHub repositories for the Orbbec SDK and Orbbec ROS2 wrapper. This tutorial is based on these repositories; users can refer to them for more detailed instructions.
- Orbbec SDK: https://github.com/orbbec/OrbbecSDK
- Orbbec ROS2 wrapper: https://github.com/orbbec/OrbbecSDK_ROS2
1. Log into the RDK via serial console or SSH and confirm the ROS distribution
- Foxy
- Humble
# Set up the tros.b environment
source /opt/tros/setup.bash
# Print the ROS distribution environment variable
echo $ROS_DISTRO
# Set up the tros.b environment
source /opt/tros/humble/setup.bash
# Print the ROS distribution environment variable
echo $ROS_DISTRO
2. Download and compile the Orbbec ROS2 wrapper source code
# First, create a ROS workspace
mkdir -p tros_ws/src
cd tros_ws/src

# Download the Orbbec ROS2 wrapper source code into the tros_ws/src directory
git clone https://github.com/orbbec/OrbbecSDK_ROS2.git
Note: The OrbbecSDK_ROS2 repository already includes the SDK library files for Orbbec cameras, located under OrbbecSDK_ROS2/orbbec_camera/SDK. The RDK platform compilation process depends on the arm64 version of these libraries.
After downloading the source code, proceed with compilation. However, compiling this program requires at least 4 GB of RAM. On the RDK platform, insufficient memory may cause the compilation to fail.
There are two solutions:
- Set up a swap space to act as temporary memory.
- Use cross-compilation: compile on a PC and run on the RDK.
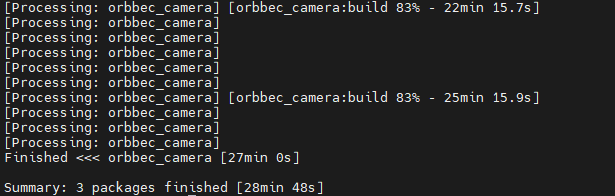
Solution 1 is straightforward and allows direct compilation on the RDK platform. However, due to the limited performance of the RDK platform, compilation is relatively slow—for example, it takes about 30 minutes on the RDK X3 platform. Solution 2 offers faster compilation but involves a more complex setup for the cross-compilation environment. This tutorial covers implementing Solution 1; for Solution 2, please refer to the guide: Cross-compilation Environment Setup.
Below is how to configure swap space:
# Create a 4GB swap file at /swapfile
sudo dd if=/dev/zero of=/swapfile bs=1M count=4096
# For security reasons, set permissions so only root can read and write to the swap file
sudo chmod 600 /swapfile
# Format the file as swap space using mkswap
sudo mkswap /swapfile
# Enable the swap file using swapon
sudo swapon /swapfile

After setting up the swap space, you can check its current usage with commands such as swapon --show, free -h, or htop. For instance, using htop:

This configuration is temporary—it will be lost after a reboot. To persistently enable the swap file after system restarts, either re-execute sudo swapon /swapfile manually or add it to the /etc/fstab file.
# Open /etc/fstab with vim
sudo vim /etc/fstab
# Add the following line, then save and exit
/swapfile none swap sw 0 0
# Run sync to flush caches and ensure all data is properly written to disk
sync

To remove the swap space later, execute the following commands:
# Disable the swap file using swapoff
sudo swapoff /swapfile
# Delete the swap file
sudo rm -rf /swapfile
# If you added an entry for the swap file in /etc/fstab, remove that line:
sudo vim /etc/fstab
# Delete the following line:
/swapfile none swap sw 0 0
After enabling swap space as described above, you can proceed with compilation.
# Return to the ROS workspace
cd tros_ws
# Execute colcon build (this takes a while—please be patient)
colcon build
Compilation result on the RDK X3 platform:
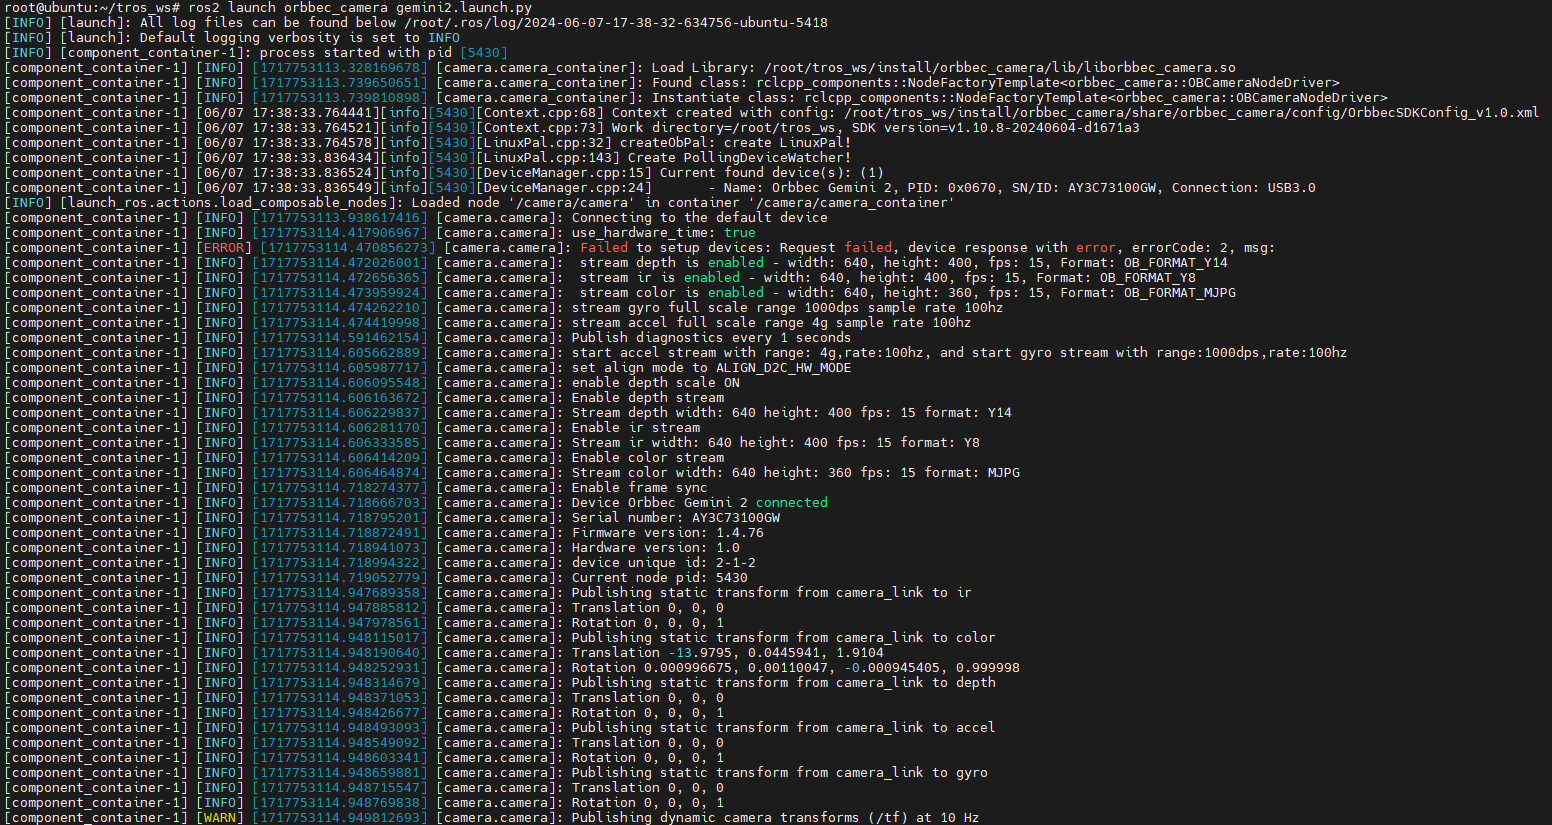
3. Launching the Orbbec Camera
Once compilation finishes, you can launch the Orbbec camera via ROS commands. The OrbbecSDK_ROS2 package includes launch files for all Orbbec camera series, including Astra, Dabai, and Gemini. Simply use the corresponding launch file to start your camera. This tutorial uses the Gemini2 camera as an example.
cd tros_ws
source ./install/setup.bash
ros2 launch orbbec_camera gemini2.launch.py
You can use ros2 topic list to view topics published by the Gemini2 camera. By default, launching the Gemini2 camera enables depth, RGB, IR, and point cloud data streams.
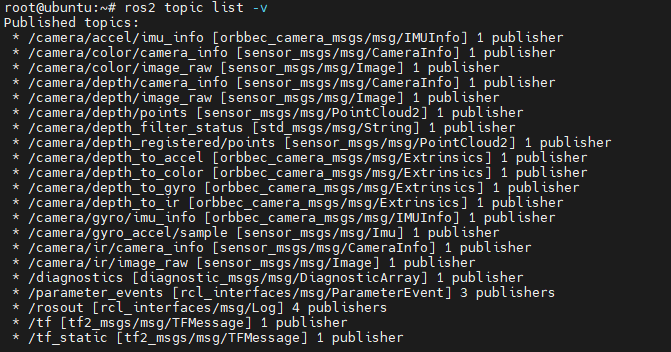
The Orbbec ROS2 wrapper provides many configurable parameters. For example, setting enable_point_cloud:=false and enable_colored_point_cloud:=false disables the point cloud data stream.
Additionally, the Orbbec camera exposes several services, which you can inspect using ros2 service list. These services allow querying the SDK version, retrieving or setting exposure time and gain, enabling/disabling the laser emitter, etc. Examples:
# Query SDK version
ros2 service call /camera/get_sdk_version orbbec_camera_msgs/srv/GetString '{}'
# Disable color camera auto-exposure
ros2 service call /camera/set_color_auto_exposure std_srvs/srv/SetBool '{data: false}'
# Enable laser
ros2 service call /camera/set_laser_enable std_srvs/srv/SetBool '{data: true}'
For more details about available topics and services, please refer to the Orbbec ROS2 wrapper GitHub repository.
4. Depth and RGB Alignment
In practical applications, it's often necessary to align the depth map from a stereo camera with the RGB image. Orbbec provides a dedicated launch option for this purpose.
cd tros_ws
source ./install/setup.bash
ros2 launch orbbec_camera gemini2.launch.py depth_registration:=true

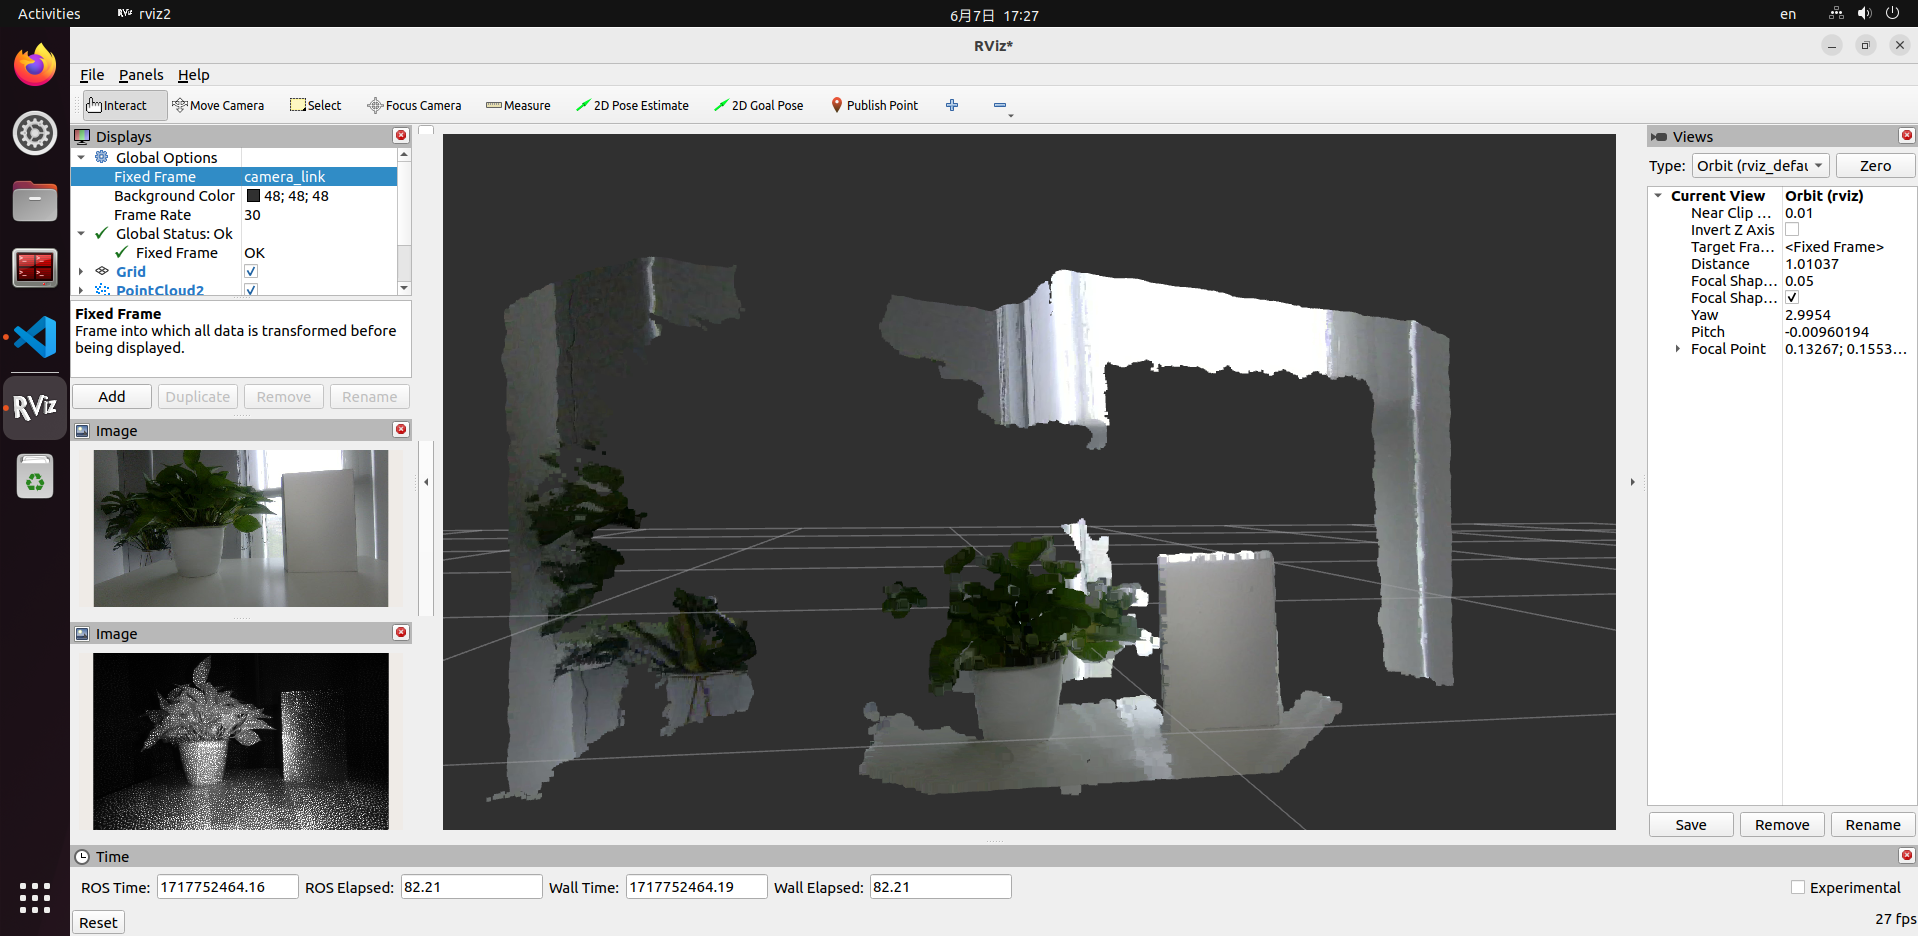
5. Displaying Images and Point Clouds
There are multiple ways to visualize images and point clouds from the Orbbec camera. Please refer to Section 5.2.2: Data Visualization. For example, you can use rviz2 on a PC to display the data. This approach requires ensuring that your PC can access the RDK over the network. However, since data is transmitted over the network, this method may introduce noticeable latency or stuttering.
We recommend directly reading the data on the RDK itself to verify whether the streams are functioning correctly. You can print data using ros2 topic echo <topic_name> or write custom code to subscribe to relevant topics.

ZED Camera Image Acquisition
Feature Overview
Stereo cameras are commonly used sensors in robotics development, often serving as the "eyes" of a robot. Applications of stereo cameras in robotics include navigation and obstacle avoidance, object recognition, 3D reconstruction, human-robot interaction, and more. The RDK platform supports popular stereo cameras on the market, such as RealSense, Orbbec, and ZED series.
Code repository: https://github.com/D-Robotics/hobot_zed_cam
This section describes how to use the ZED camera on the RDK platform.
Supported Platforms
| Platform | Runtime Environment |
|---|---|
| RDK X5, RDK X5 Module | Ubuntu 22.04 (Humble) |
Prerequisites
RDK Platform
- Ensure your ZED camera works properly and connect it to an RDK USB port via a USB cable.
- Confirm that the RDK has been flashed with the Ubuntu 22.04 system image.
- Verify that tros.b has been successfully installed on the RDK.
- Ensure your PC can access the RDK over the network.
Usage Instructions
- Log into the RDK via SSH and launch the ZED camera using the following commands:
# Source the tros.b environment
source /opt/tros/humble/setup.bash

# Launch the ZED camera and publish stereo image data
ros2 launch hobot_zed_cam pub_stereo_imgs.launch.py need_rectify:=true
- If the program outputs messages similar to the following, the node has launched successfully:
[anypub_stereo_imgs-1] [INFO] [0946684888.710715101] [pub_stereo_imgs_nv12_node]: => connected to camera sn: 38085162[/dev/video0]
[anypub_stereo_imgs-1] [INFO] [0946684888.779280740] [pub_stereo_imgs_nv12_node]: => calibration file found. Loading...
[anypub_stereo_imgs-1] [INFO] [0946684888.831008271] [pub_stereo_imgs_nv12_node]: => camera Matrix L:
[anypub_stereo_imgs-1] [514.5878861678406, 0, 665.3764572143555, 0;
[anypub_stereo_imgs-1]  0, 514.5878861678406, 320.3872646755642, 0;
[anypub_stereo_imgs-1]  0, 0, 1, 0]
[anypub_stereo_imgs-1] [INFO] [0946684888.831235937] [pub_stereo_imgs_nv12_node]: => camera Matrix R:
[anypub_stereo_imgs-1] [514.5878861678406, 0, 665.3764572143555, 61695.48427422668;
[anypub_stereo_imgs-1]  0, 514.5878861678406, 320.3872646755642, 0;
[anypub_stereo_imgs-1]  0, 0, 1, 0]
[anypub_stereo_imgs-1] [INFO] [0946684888.831287187] [pub_stereo_imgs_nv12_node]: => rectified fx: 514.587886, fy: 514.587886, cx: 665.376457, cy: 320.387265, base_line: 0.119893
[anypub_stereo_imgs-1] [INFO] [0946684888.831357562] [pub_stereo_imgs_nv12_node]: => camera_fx:=514.587886 camera_fy:=514.587886 camera_cx:=665.376457 camera_cy:=320.387265 base_line:=0.119893
[anypub_stereo_imgs-1] [INFO] [0946684888.851400416] [pub_stereo_imgs_nv12_node]: => raw img size: [1280, 720]
[anypub_stereo_imgs-1] [INFO] [0946684888.883419384] [pub_stereo_imgs_nv12_node]: => rectify img size: [1280, 640]
- On your PC, open a browser (Chrome/Firefox/Edge), navigate to
IP:8000(replace IP with the RDK’s actual IP address), and click the Web Display button in the top-left corner to view the live ZED camera feed.