5.2.2 Data Display
Web Display
Feature Overview
Web Display is used to preview camera images (in JPEG format) and algorithm results. It transmits images and algorithm outputs over the network to a PC browser for rendering and display. This display client also supports showing video only, without rendering intelligent analysis results.
Code repository: https://github.com/D-Robotics/hobot_websocket
Supported Platforms
| Platform | Operating System | Example Functionality |
|---|---|---|
| RDK X3, RDK X3 Module | Ubuntu 20.04 (Foxy), Ubuntu 22.04 (Humble) | Launch MIPI camera and display images via Web |
| RDK X5, RDK X5 Module, RDK S100 | Ubuntu 22.04 (Humble) | Launch MIPI camera and display images via Web |
| RDK Ultra | Ubuntu 20.04 (Foxy) | Launch MIPI camera and display images via Web |
| X86 | Ubuntu 20.04 (Foxy) | Launch USB camera and display images via Web |
Prerequisites
RDK Platforms
- Confirm that the F37 camera is properly connected to the RDK.
- Ensure the PC can access the RDK over the network.
- Verify that TogetherROS.Bot has been successfully installed.
X86 Platform
- Confirm that the X86 system runs Ubuntu 20.04 and that tros.b has been successfully installed.
- Ensure the USB camera is plugged into a USB port on the host machine and is correctly recognized.
Usage Instructions
RDK Platforms
-
Log in to the RDK via SSH and launch the required onboard programs:
a. Launch
mipi_cam- Foxy
- Humble
# Configure tros.b environment
source /opt/tros/setup.bash
# Configure tros.b environment
source /opt/tros/humble/setup.bashros2 launch mipi_cam mipi_cam.launch.py mipi_video_device:=F37b. Launch encoder
- Foxy
- Humble
# Configure tros.b environment
source /opt/tros/setup.bash# Configure tros.b environment
source /opt/tros/humble/setup.bashros2 launch hobot_codec hobot_codec_encode.launch.pyc. Launch websocket
- Foxy
- Humble
# Configure tros.b environment
source /opt/tros/setup.bash# Configure tros.b environment
source /opt/tros/humble/setup.bashros2 launch websocket websocket.launch.py websocket_image_topic:=/image_jpeg websocket_only_show_image:=true -
Open a PC browser (Chrome/Firefox/Edge) and navigate to
http://IP:8000to view the image stream, where IP is the RDK's IP address.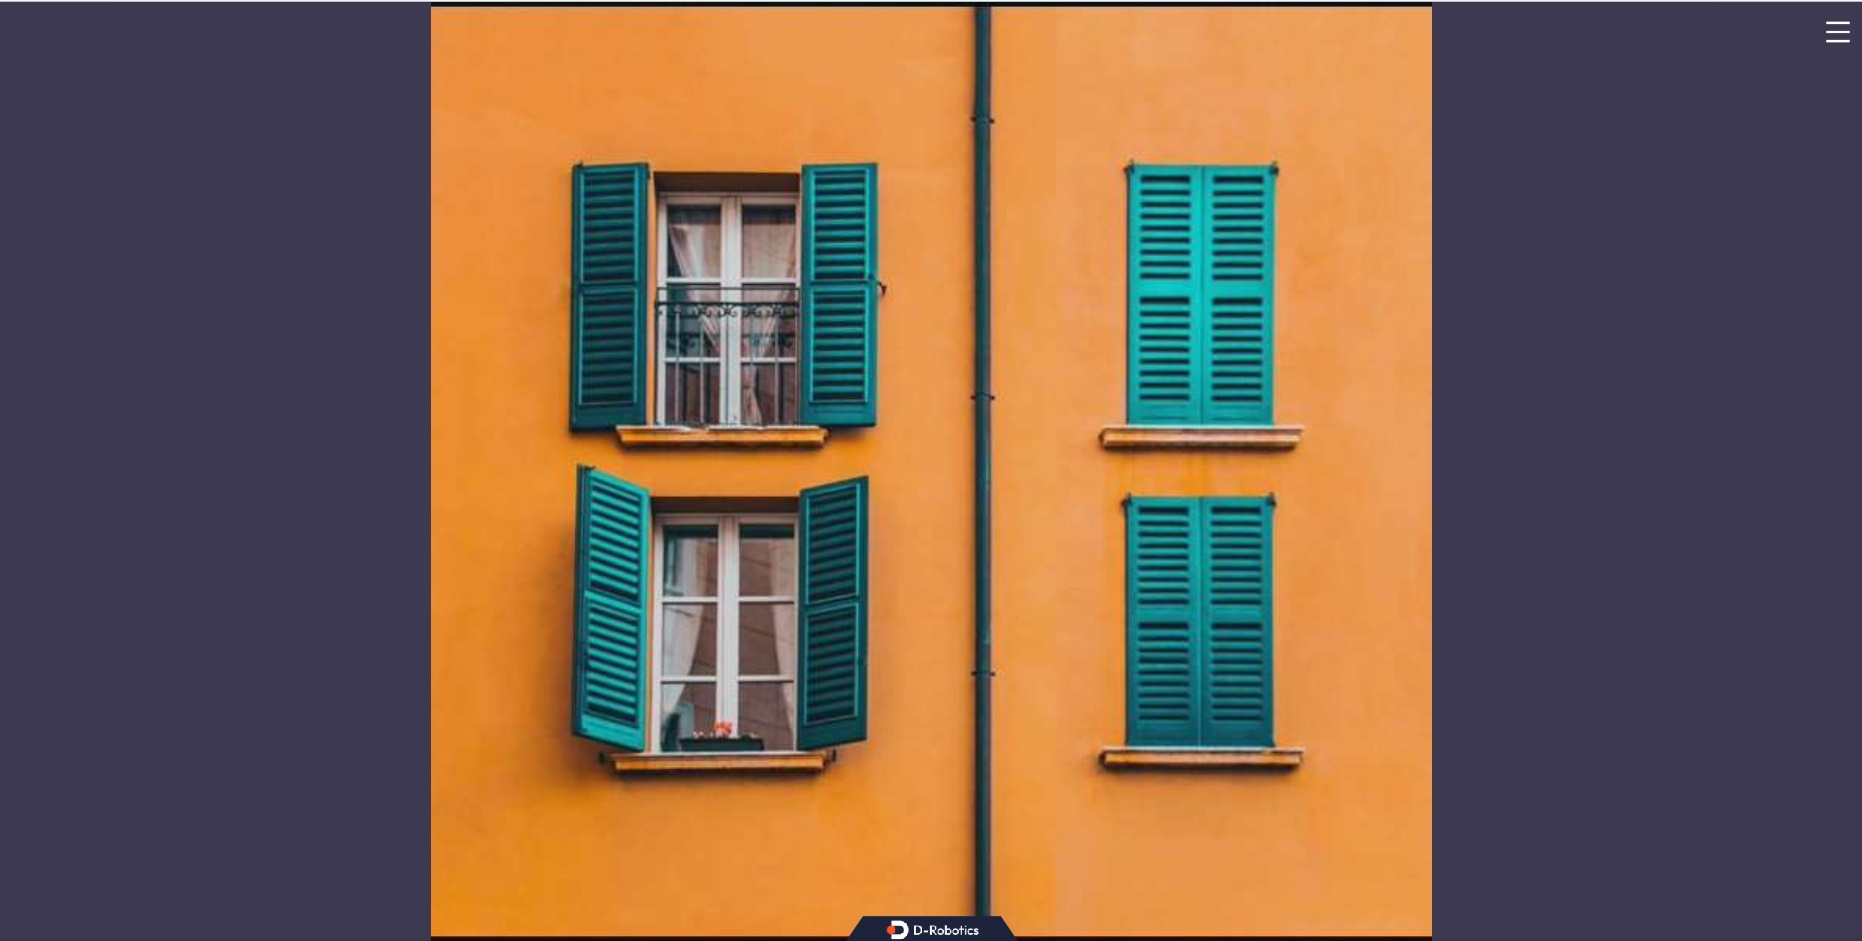
X86 Platform
-
Launch the
hobot_usb_camnode- Foxy
- Humble
# Configure tros.b environment
source /opt/tros/setup.bash# Configure tros.b environment
source /opt/tros/humble/setup.bash# Replace usb_video_device with the actual video device node of your USB camera
ros2 launch hobot_usb_cam hobot_usb_cam.launch.py usb_image_width:=1280 usb_image_height:=720 usb_video_device:=/dev/video0 -
Launch the websocket node
- Foxy
- Humble
# Configure tros.b environment
source /opt/tros/setup.bash# Configure tros.b environment
source /opt/tros/humble/setup.bashros2 launch websocket websocket.launch.py websocket_image_topic:=/image websocket_only_show_image:=true -
Open a PC browser (Chrome/Firefox/Edge) and navigate to
http://IP:8000to view the image stream. Here, IP refers to the PC’s IP address; if accessing locally, you may uselocalhost.
Notes
- The websocket service requires port 8000. If this port is already in use, the service will fail to start. To resolve this:
- Use the command
lsof -i:8000to identify the process occupying port 8000, then terminate it usingkill <PID>. Afterward, restart the websocket service. - If the user does not wish to stop the service currently occupying port 8000, they can modify the
listenport number in the/opt/tros/${TROS_DISTRO}/lib/websocket/webservice/conf/nginx.confconfiguration file to an unused port number greater than 1024. After changing the port number, the URL used on the browser side must also be updated accordingly.
- Use the command
HDMI Display
Feature Introduction
This section describes how to display camera NV12 images via HDMI. By connecting the RDK to a monitor through HDMI, real-time image display can be achieved, which corresponds to the hobot_hdmi package.
Code repository: https://github.com/D-Robotics/hobot_hdmi
Supported Platforms
| Platform | Runtime Environment | Example Functionality |
|---|---|---|
| RDK X3, RDK X3 Module | Ubuntu 20.04 (Foxy), Ubuntu 22.04 (Humble) | Launch MIPI camera and display images via HDMI |
| RDK X5, RDK X5 Module | Ubuntu 22.04 (Humble) | Launch MIPI camera and display images via HDMI |
End-of-Life (EOL) notice for HDMI display:
- Support for the
RDK X3andRDK X3 Moduleplatforms ends at version2.1.0, corresponding to TROS version2.2.0 (2024-04-11). - Support for the
RDK X5andRDK X5 Moduleplatforms ends at version2.4.2, corresponding to TROS version2.3.1 (2024-11-20).
Prerequisites
RDK Platform
-
The RDK has been flashed with an Ubuntu 20.04 or Ubuntu 22.04 system image.
-
TogetheROS.Bot has been successfully installed on the RDK.
-
The RDK is connected to a monitor via HDMI.
Usage Instructions
RDK Platform
Log into the development board via SSH and launch the relevant onboard programs:
- Foxy
- Humble
# Configure the tros.b environment
source /opt/tros/setup.bash
# Configure the tros.b environment
source /opt/tros/humble/setup.bash
When using the RDK X5, you additionally need to run the following commands:
# Stop the desktop display service
sudo systemctl stop lightdm
# Copy runtime dependencies
cp -r /opt/tros/${TROS_DISTRO}/lib/hobot_hdmi/config/ .
# Render images via HDMI
ros2 launch hobot_hdmi hobot_hdmi.launch.py device:=F37
Result Analysis
The terminal output after running the command will look like this:
[INFO] [launch]: All log files can be found below /root/.ros/log/2022-07-27-15-27-26-362299-ubuntu-13432
[INFO] [launch]: Default logging verbosity is set to INFO
[INFO] [mipi_cam-1]: process started with pid [13434]
[INFO] [hobot_hdmi-2]: process started with pid [13436]
The image displayed on the monitor will appear as follows:

RViz2 Display
Feature Introduction
TogetheROS.Bot is compatible with ROS 2 Foxy and Humble distributions. For convenient previewing of image output, images can be visualized using RViz2.
Supported Platforms
| Platform | Runtime Environment |
|---|---|
| RDK X3, RDK X3 Module | Ubuntu 20.04 (Foxy), Ubuntu 22.04 (Humble) |
| RDK X5, RDK X5 Module, RDK S100 | Ubuntu 22.04 (Humble) |
| RDK Ultra | Ubuntu 20.04 (Foxy) |
Prerequisites
RDK Platform
-
The RDK has been flashed with an Ubuntu 20.04 or Ubuntu 22.04 system image.
-
tros.b has been successfully installed on the RDK.
-
The PC has Ubuntu 20.04 or Ubuntu 22.04 installed, along with the ROS 2 Foxy/Humble desktop version and the RViz2 visualization tool. The PC must be on the same network segment as the RDK (i.e., the first three parts of their IP addresses must match).
Usage Instructions
RDK Platform
-
Log into the development board via SSH and launch the relevant onboard programs:
- Foxy
- Humble
# Configure the tros.b environment
source /opt/tros/setup.bash# Configure the tros.b environment
source /opt/tros/humble/setup.bash# Launch the F37 camera and publish images in BGR8 format
ros2 launch mipi_cam mipi_cam.launch.py mipi_out_format:=bgr8 mipi_image_width:=480 mipi_image_height:=272 mipi_io_method:=ros mipi_video_device:=F37Note: Do not arbitrarily change
mipi_out_format; RViz2 only supports image formats such as RGB8, RGBA8, BGR8, and BGRA8. -
If the program outputs the following information, it indicates that the node has started successfully:
[INFO] [launch]: All log files can be found below /root/.ros/log/2022-08-19-03-53-54-778203-ubuntu-2881662
[INFO] [launch]: Default logging verbosity is set to INFO
[INFO] [mipi_cam-1]: process started with pid [2881781] -
Open a new terminal window on the RDK and run the following command to list topics:
- Foxy
- Humble
# Configure the tros.b environment
source /opt/tros/setup.bash# Configure the tros.b environment
source /opt/tros/humble/setup.bash# List topics
ros2 topic listOutput:
/camera_info
/image_raw
/parameter_events
/rosout -
On the PC, query the current topics using the following command and observe the output:
- Foxy
- Humble
source /opt/ros/foxy/setup.bash
source /opt/ros/humble/setup.bash
# Configure ROS2 environment
ros2 topic list
Output:
/camera_info
/image_raw
/parameter_events
/rosout
- Subscribe to the topic on the PC and preview camera data;
- Foxy
- Humble
source /opt/ros/foxy/setup.bash
source /opt/ros/humble/setup.bash
# Configure ROS2 environment
ros2 run rviz2 rviz2
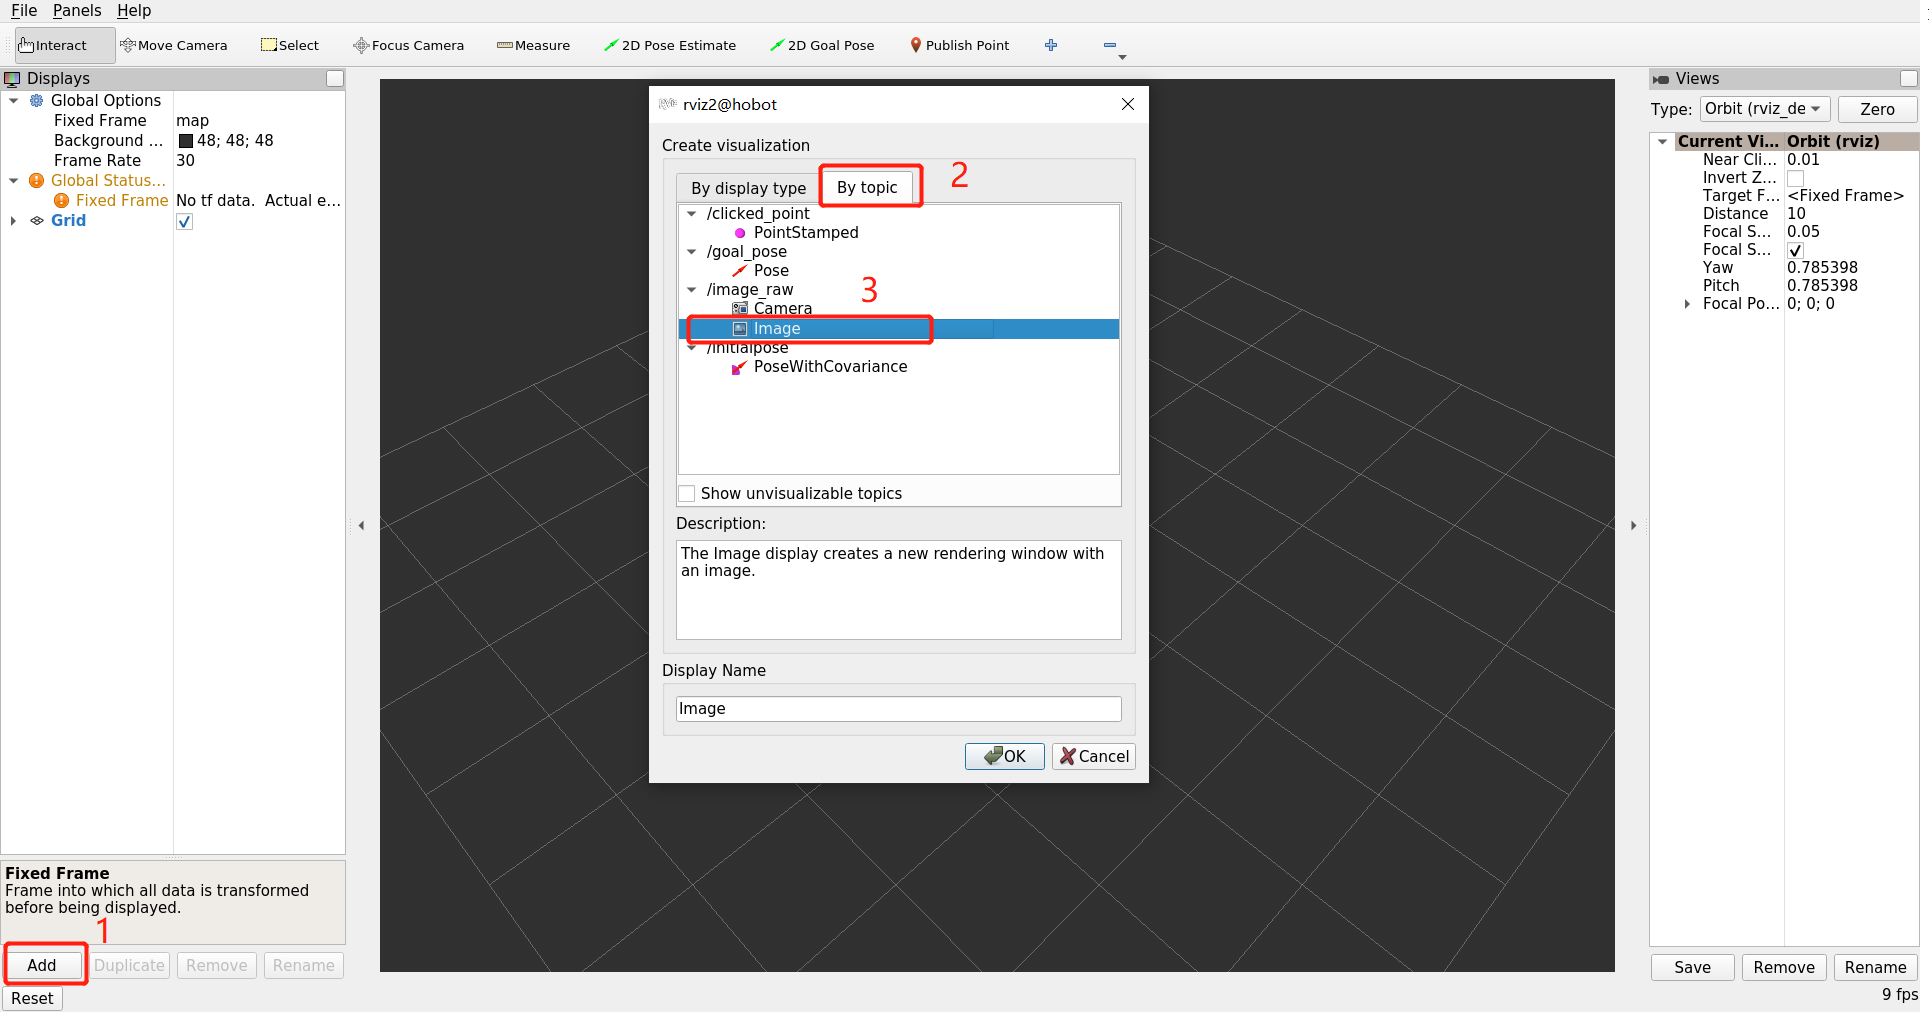
In the RViz2 interface, first click the Add button, then select the published image topic—in this example, /image_raw—and finally click Image:
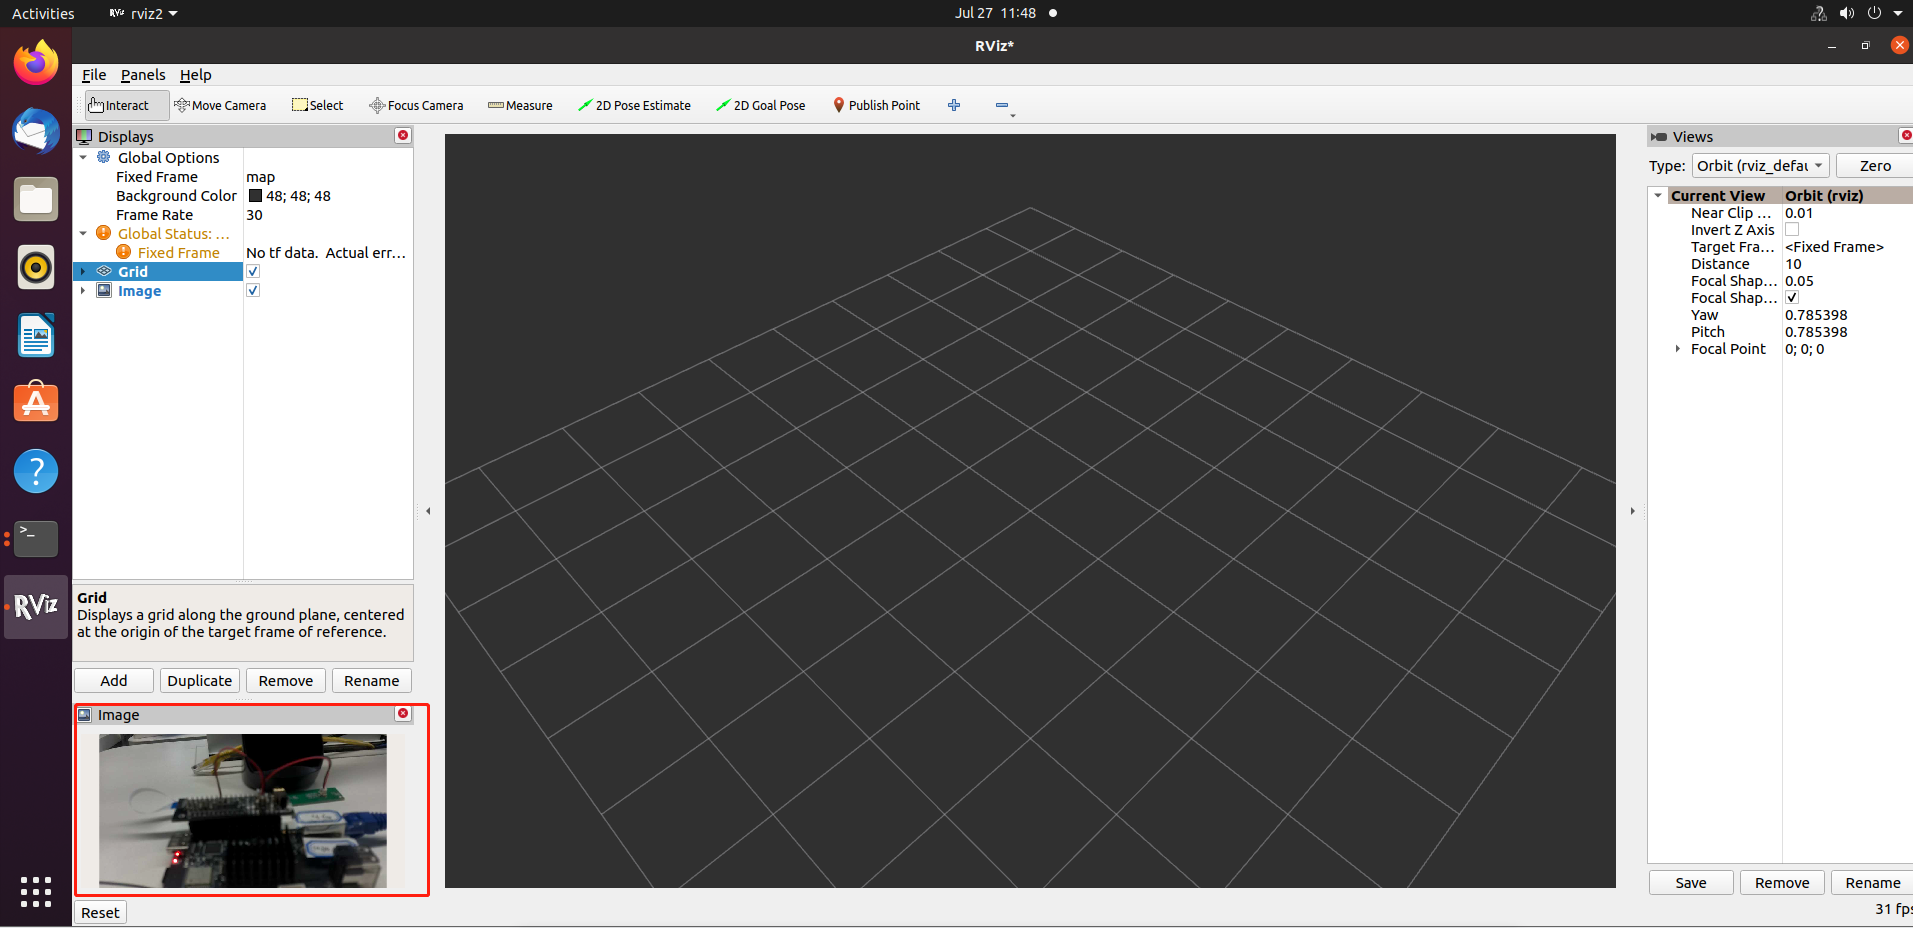
The resulting image preview is shown below:
Notes
-
If the camera topics do not appear when running
ros2 topic liston the PC, troubleshoot as follows:-
Verify that the RDK is correctly publishing images.
- Foxy
- Humble
# Configure tros.b environment
source /opt/tros/setup.bash# Configure tros.b environment
source /opt/tros/humble/setup.bashros2 topic listOutput:
/camera_info
/image_raw
/parameter_events
/rosout -
Check whether the PC and RDK can ping each other.
-
Ensure the first three segments of the IP addresses of the PC and RDK are identical.
-
RQt Visualization
Feature Overview
TogetheROS.Bot is compatible with ROS 2 Foxy and supports previewing compressed-format images via RQt, significantly reducing network bandwidth consumption.
Supported Platforms
| Platform | Operating System | Example Functionality |
|---|---|---|
| RDK X3, RDK X3 Module, RDK Ultra | Ubuntu 20.04 (Foxy), Ubuntu 22.04 (Humble) | Launch MIPI camera to capture images and preview them using RQt on PC |
Prerequisites
RDK Platform
-
The RDK has been flashed with Ubuntu 20.04 or Ubuntu 22.04 system image.
-
tros.b has been successfully installed on the RDK.
-
The PC has Ubuntu 20.04/Ubuntu 22.04 installed, along with ROS 2 Foxy/Humble Desktop and the RQt visualization tool, and is on the same subnet as the RDK (i.e., the first three segments of their IP addresses match).
Usage Instructions
RDK Platform
-
Log into the development board via SSH and launch the required nodes.
a. Start the F37 camera:
- Foxy
- Humble
# Configure tros.b environment
source /opt/tros/setup.bash# Configure tros.b environment
source /opt/tros/humble/setup.bashros2 launch mipi_cam mipi_cam.launch.py mipi_image_width:=640 mipi_image_height:=480 mipi_video_device:=F37b. Launch
hobot_codecto publish images in compressed format:- Foxy
- Humble
# Configure tros.b environment
source /opt/tros/setup.bash# Configure tros.b environment
source /opt/tros/humble/setup.bashros2 launch hobot_codec hobot_codec_encode.launch.py codec_out_format:=jpeg codec_pub_topic:=/image_raw/compressed -
If the following messages appear in the output, the nodes have started successfully:
[INFO] [launch]: All log files can be found below /root/.ros/log/2023-05-15-17-08-02-144621-ubuntu-4755
[INFO] [launch]: Default logging verbosity is set to INFO
[INFO] [mipi_cam-1]: process started with pid [4757]
[mipi_cam-1] This is version for optimizing camera timestamp[INFO] [launch]: All log files can be found below /root/.ros/log/2023-05-15-17-08-17-960398-ubuntu-4842
[INFO] [launch]: Default logging verbosity is set to INFO
[INFO] [hobot_codec_republish-1]: process started with pid [4844] -
Subscribe to the topic on your PC and preview the camera data:
- Foxy
- Humble
source /opt/ros/foxy/setup.bash
source /opt/ros/humble/setup.bash
# Configure ROS2 environment
ros2 run rqt_image_view rqt_image_view
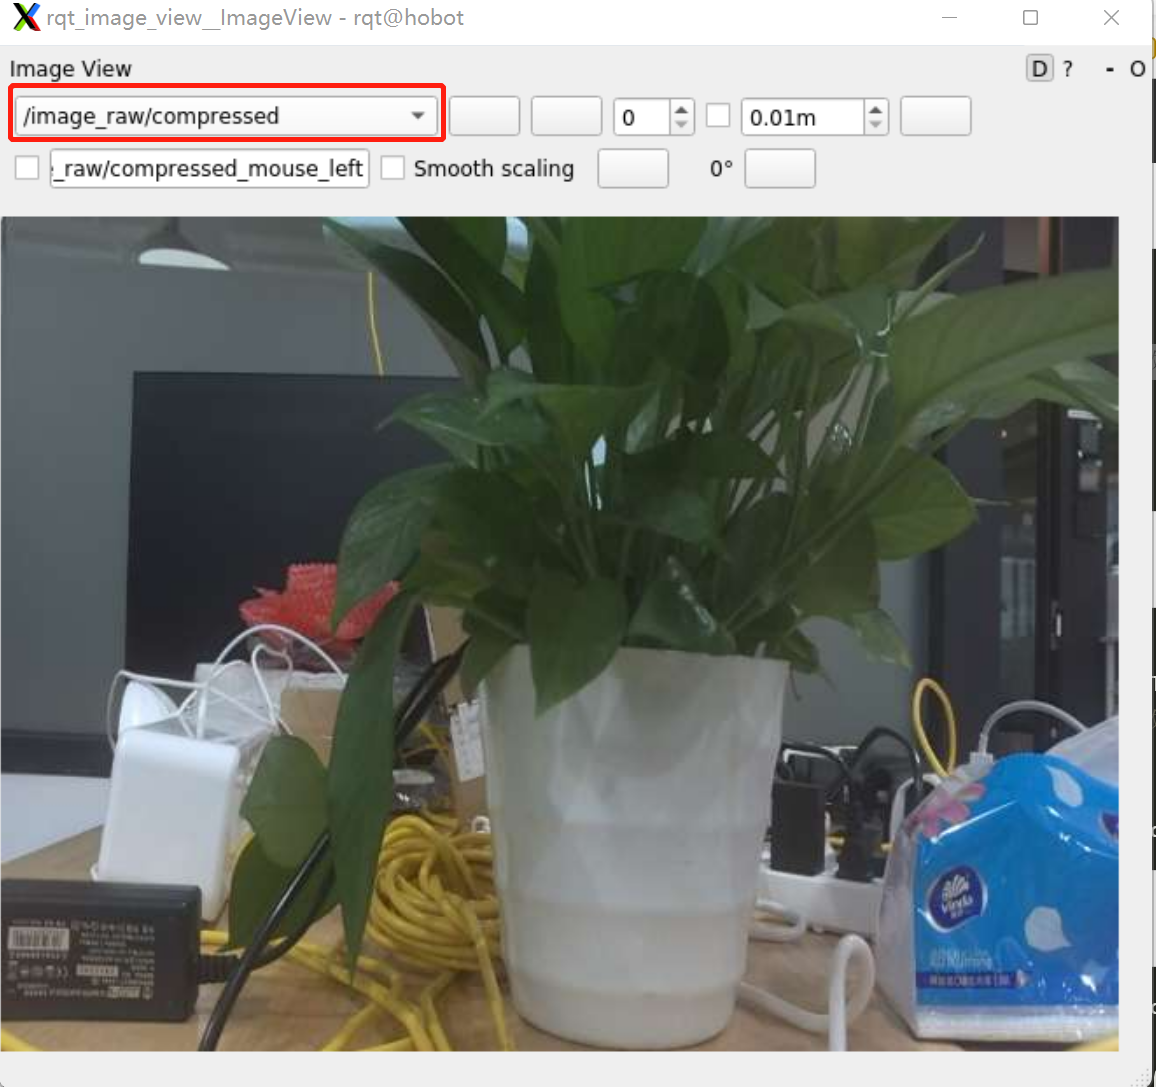
Select the topic /image_raw/compressed. The resulting image is shown below:
Notes
-
If the camera topic does not appear in
ros2 topic liston your PC, perform the following checks:-
Verify that the RDK is publishing images correctly.
- Foxy
- Humble
# Configure tros.b environment
source /opt/tros/setup.bash# Configure tros.b environment
source /opt/tros/humble/setup.bashros2 topic listOutput:
/camera_info
/hbmem_img000b0c26001301040202012020122406
/image_raw
/image_raw/compressed
/parameter_events
/rosout -
Check whether the PC and RDK can ping each other.
-
Ensure that the first three octets of the IP addresses of the PC and RDK are identical.
-
Foxglove Demonstration
Feature Overview
Foxglove is an open-source toolkit available both online and offline, designed to simplify the development and debugging of robotic systems. It provides a suite of features for building robot applications.
This section primarily leverages Foxglove's data recording and playback capabilities: Foxglove allows recording ROS2 topic data into files for later playback and analysis. This is extremely useful for system diagnostics, performance optimization, and algorithm debugging.
In this demonstration, we use the hobot_visualization package developed with TogetheROS to convert intelligent inference results into ROS2-renderable topic messages.
Code repository: https://github.com/D-Robotics/hobot_visualization
Supported Platforms
| Platform | Runtime Environment |
|---|---|
| RDK X3, RDK X3 Module | Ubuntu 20.04 (Foxy), Ubuntu 22.04 (Humble) |
| RDK X5, RDK X5 Module, RDK S100 | Ubuntu 22.04 (Humble) |
| X86 | Ubuntu 20.04 (Foxy) |
Prerequisites
RDK Platform
- Confirm that camera F37 is properly connected to the RDK.
- Confirm that the PC can access the RDK over the network.
- Confirm that TogetheROS.Bot has been successfully installed.
X86 Platform
- Confirm that the X86 platform runs Ubuntu 20.04 and that tros.b has been successfully installed.
Usage Instructions
RDK Platform / X86 Platform
- Log in to the RDK platform via SSH and launch the onboard programs:
- Foxy
- Humble
# Configure tros.b environment
source /opt/tros/setup.bash
# Configure tros.b environment
source /opt/tros/humble/setup.bash
export CAM_TYPE=fb
cp -r /opt/tros/${TROS_DISTRO}/lib/dnn_node_example/config/ .
ros2 launch hobot_visualization hobot_vis_render.launch.py dnn_example_config_file:=config/yolov2workconfig.json
Meanwhile, log in via SSH to another terminal and record topic data on the board:
- Foxy
- Humble
# Configure tros.b environment
source /opt/tros/setup.bash
# Configure tros.b environment
source /opt/tros/humble/setup.bash
# Record rosbag data; the bag file will be generated in the current working directory
ros2 bag record -a
- Play back the rosbag data using Foxglove Studio online:
-
Open a browser on your PC (Chrome/Firefox/Edge) and navigate to https://foxglove.dev/studio to access the Foxglove website.
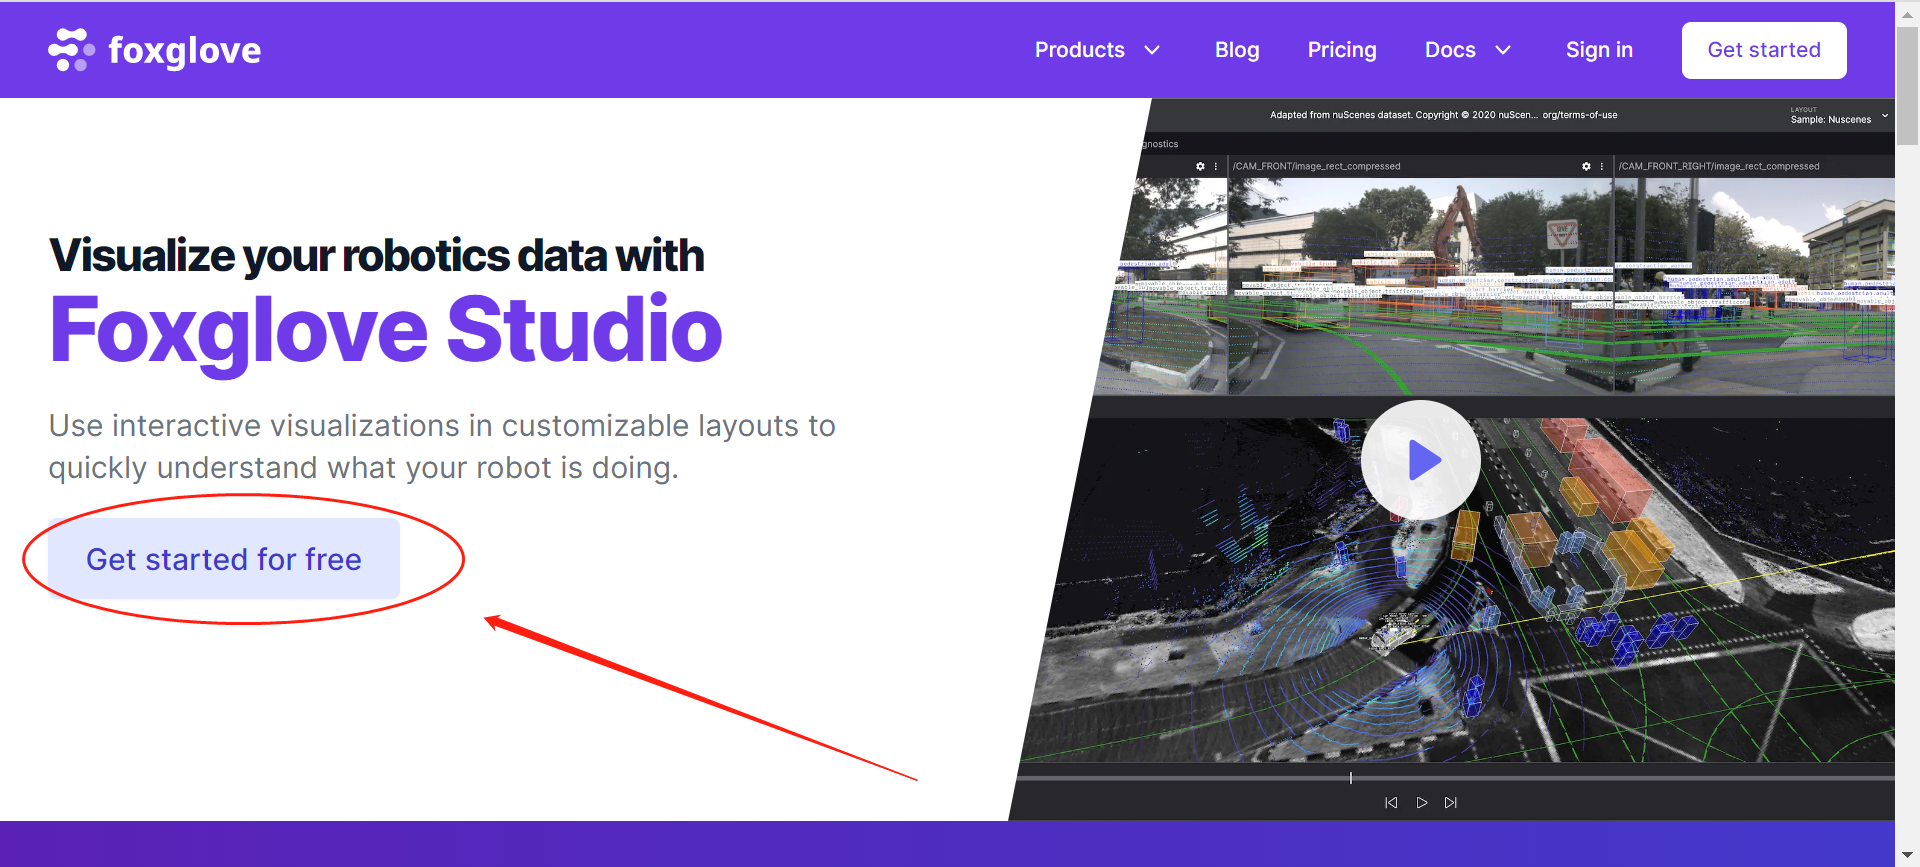
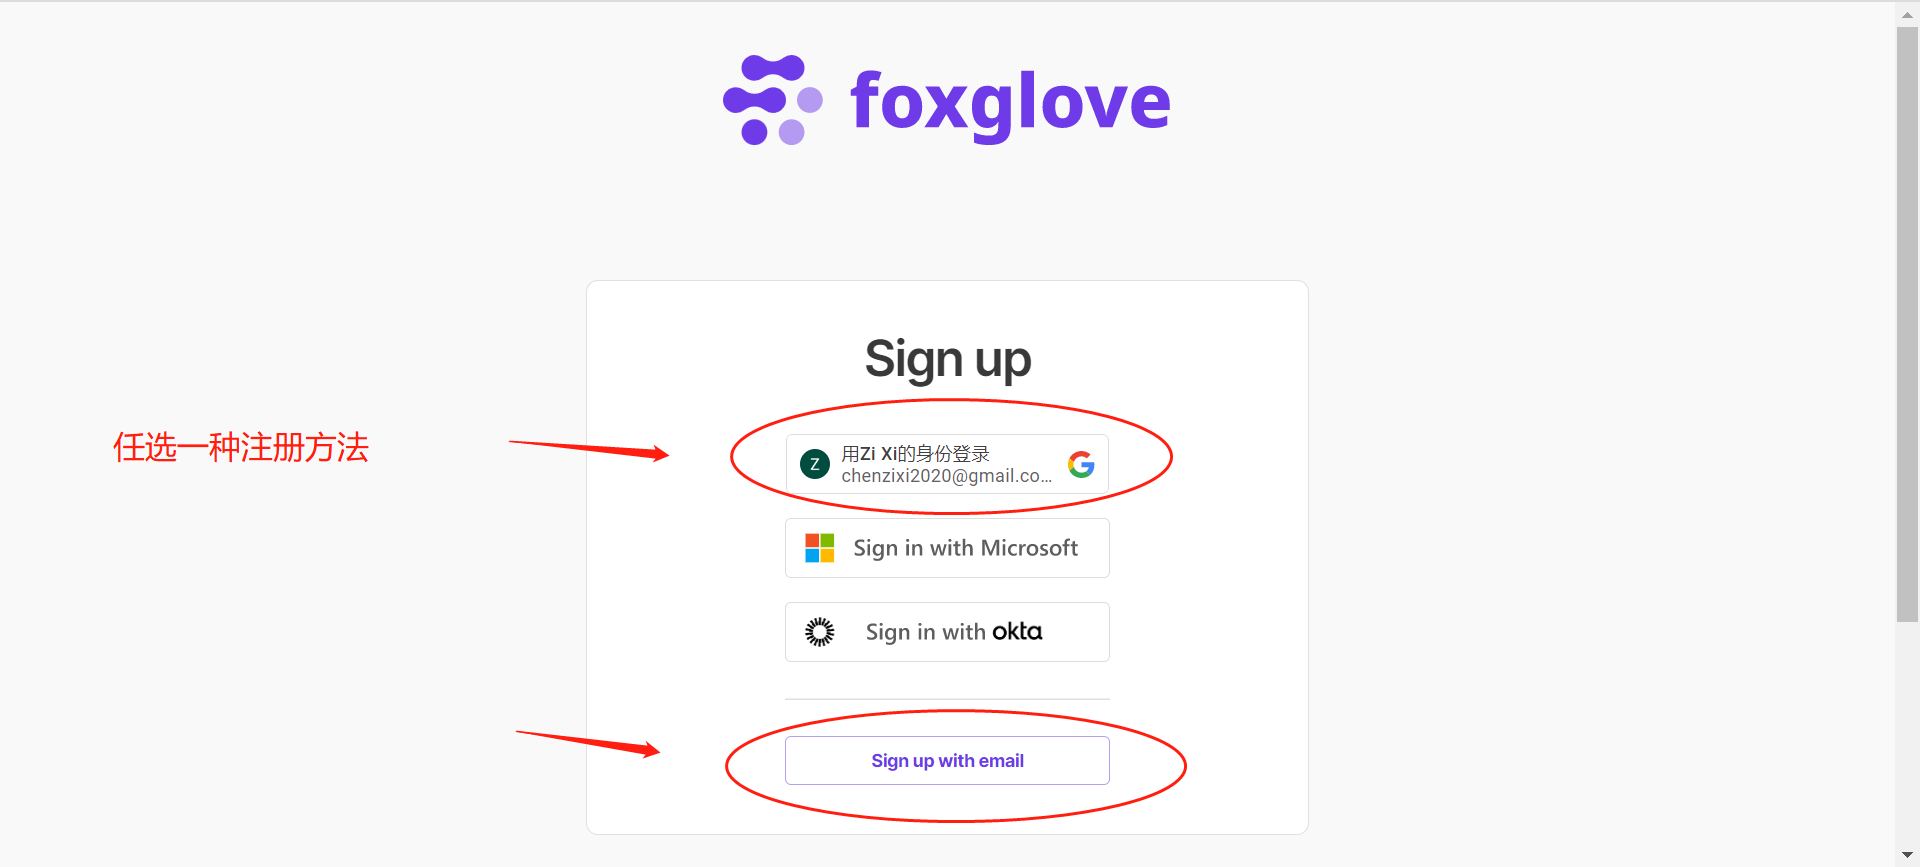
Note: First-time users need to register—sign-up is supported via Google account or third-party email.
-
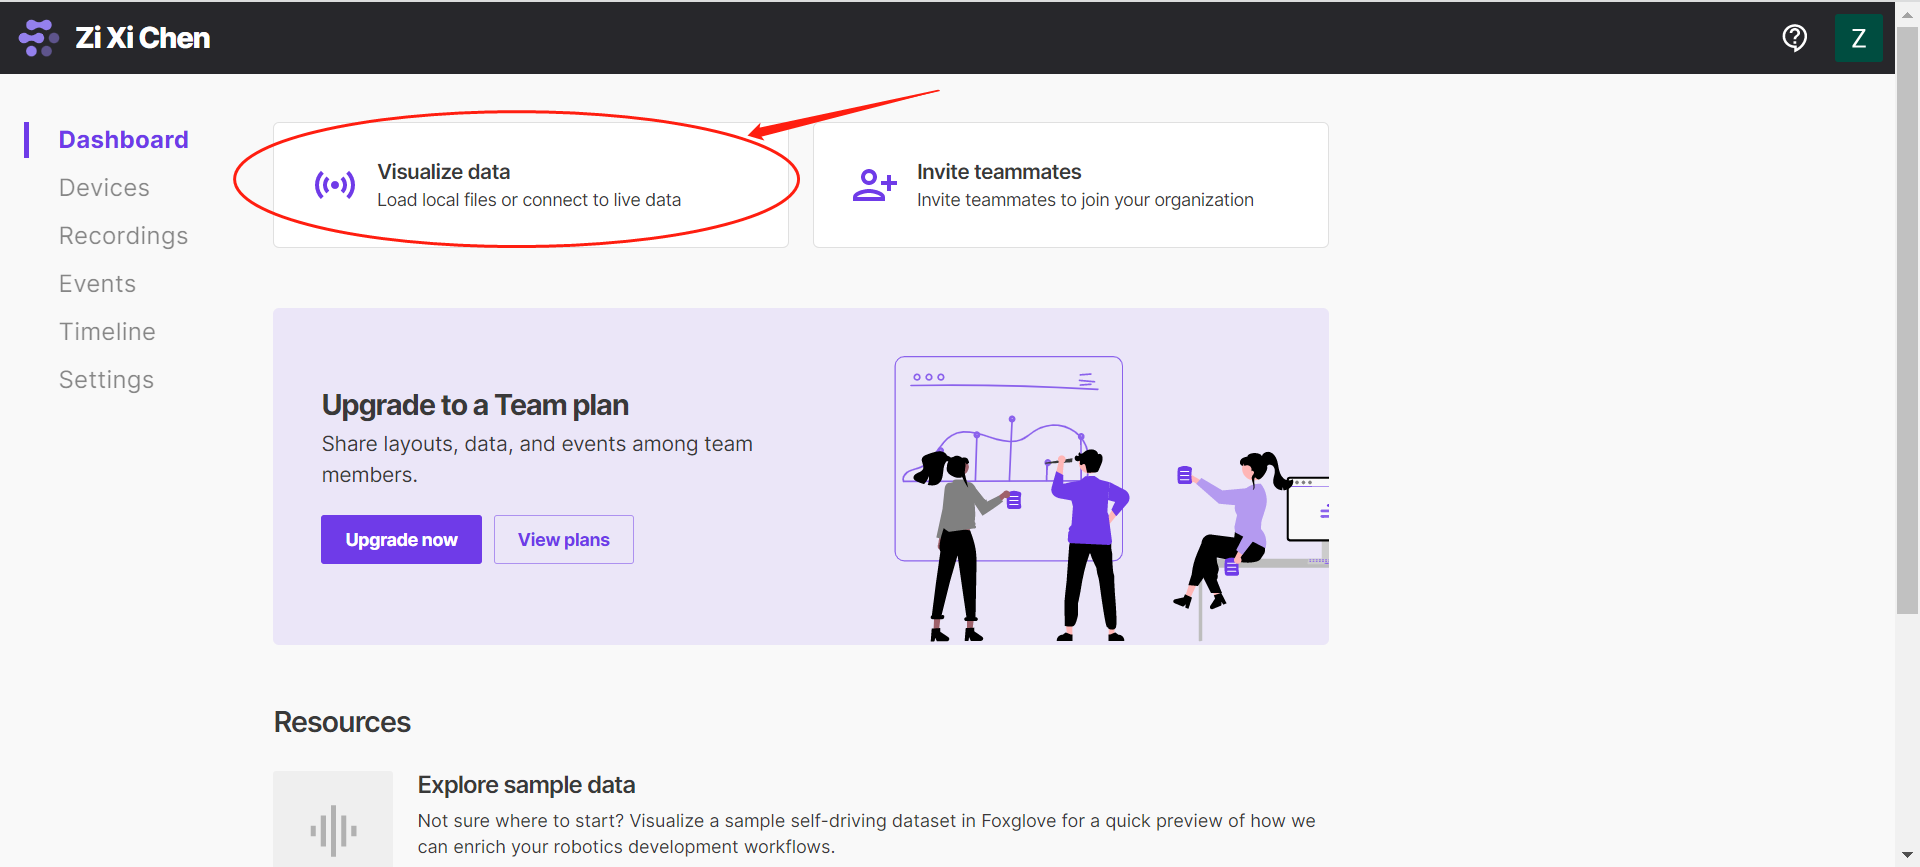
Enter the visualization interface.
-
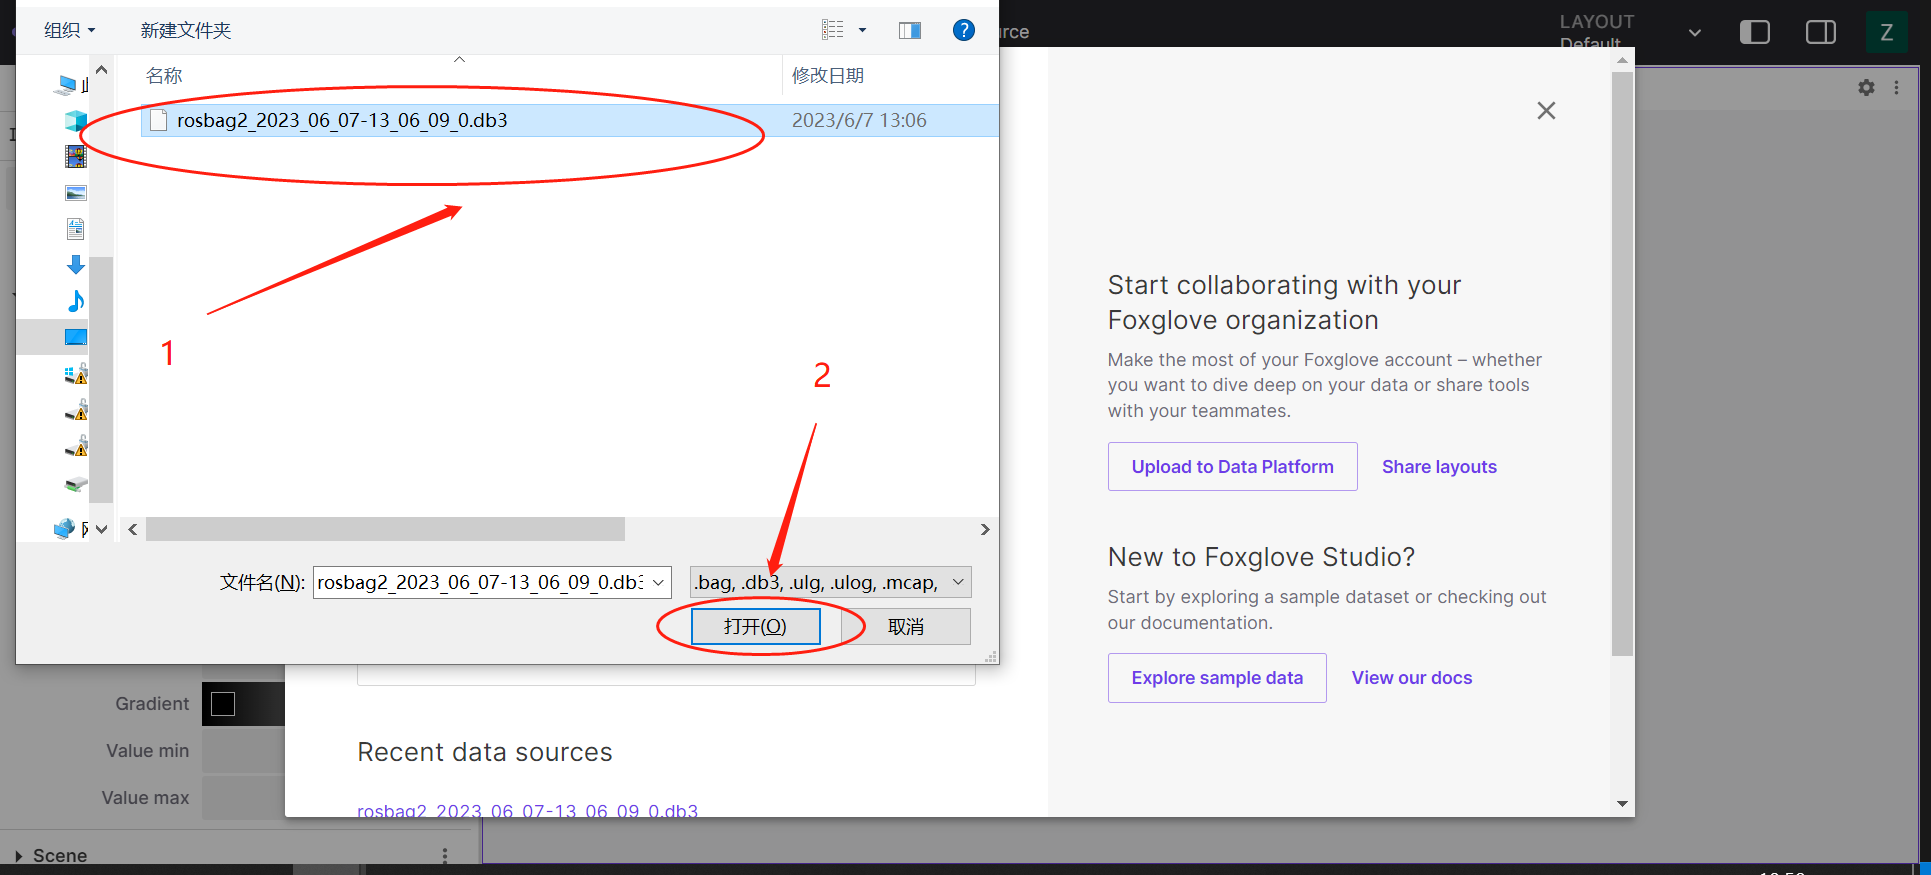
Click to select your local rosbag file.
-
Open the layout panel. In the top-right corner of the layout interface, click Settings, select the icon, and enable the "Play marker rendering messages" feature.
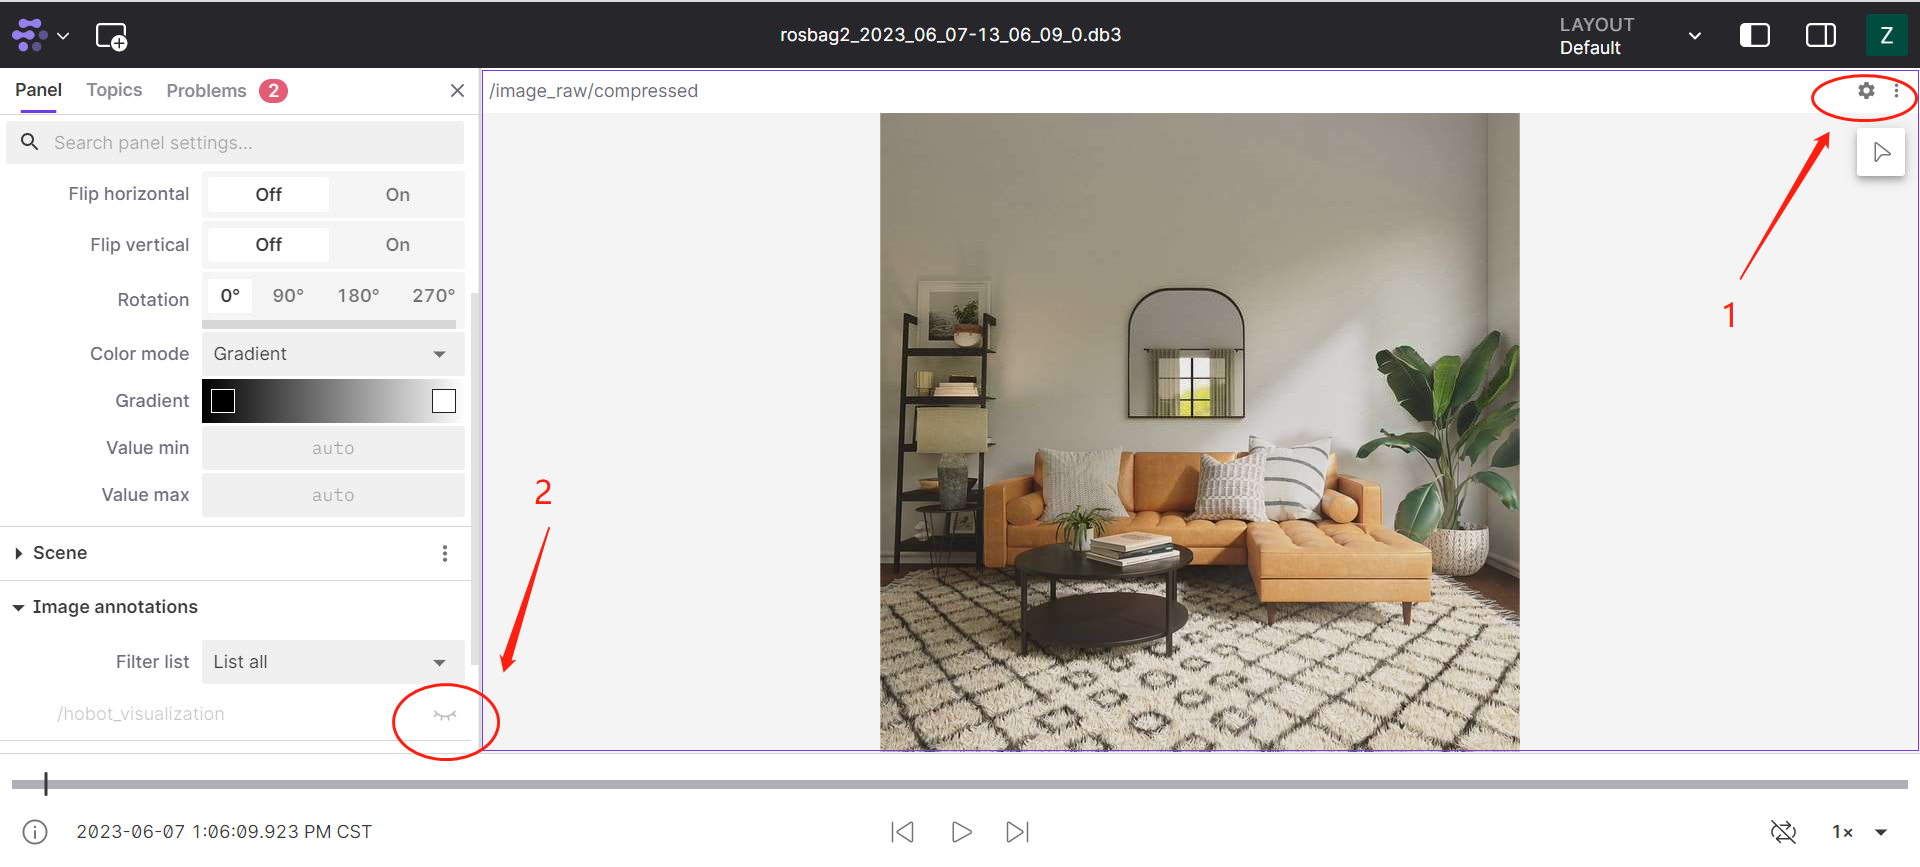
-
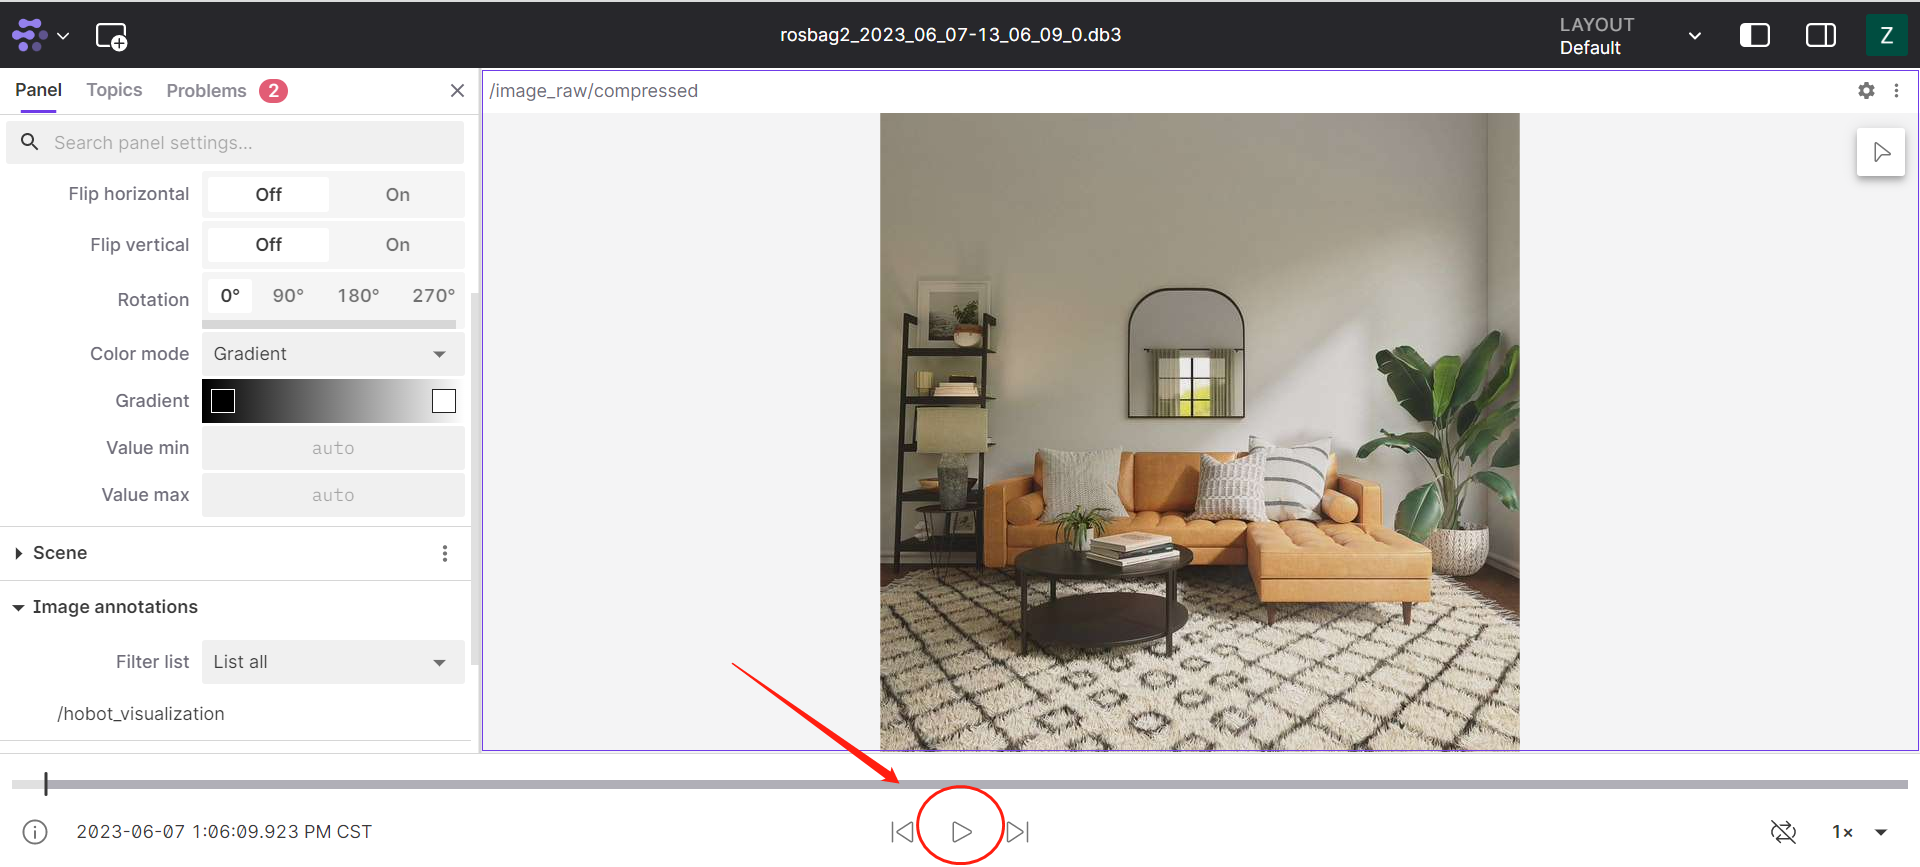
Click Play.
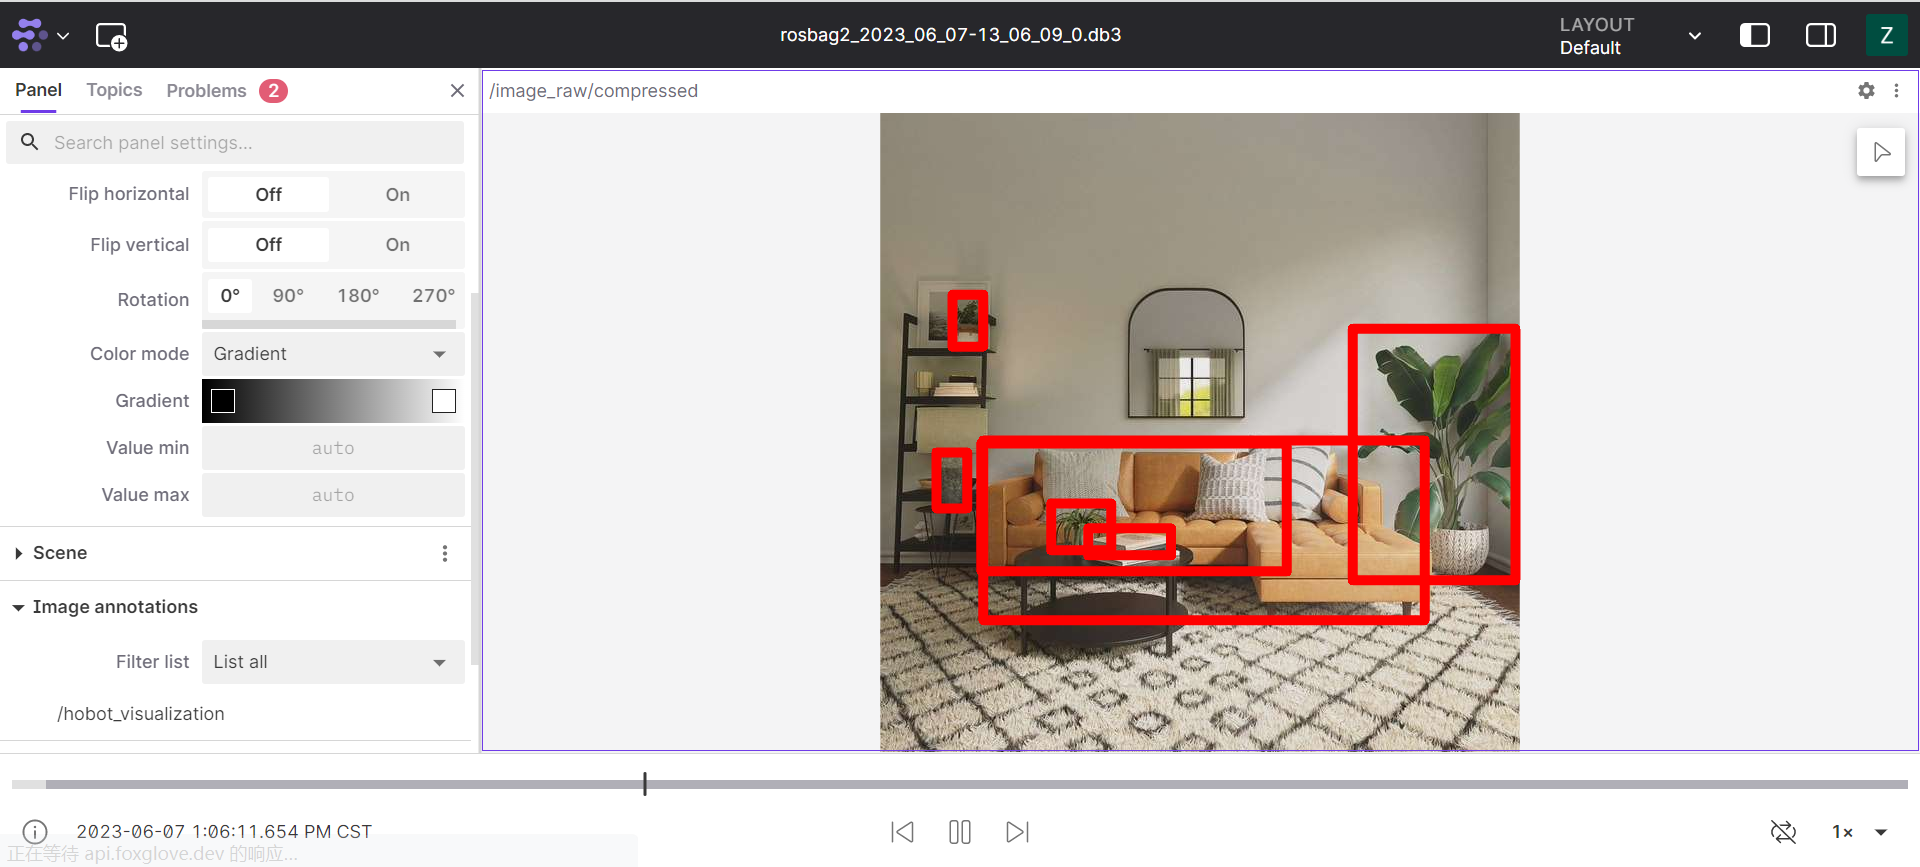
-
View the data.
Notes
-
To visualize image data in Foxglove, you must use the official ROS 2 message format and an image encoding format supported by Foxglove. For details, see (https://foxglove.dev/docs/studio/panels/image).
-
When recording messages with rosbag, topics from other devices might also be captured. To ensure clean rosbag data, you can set the ROS domain ID using a command such as
export ROS_DOMAIN_ID=xxx(e.g.,export ROS_DOMAIN_ID=1).