5.2.4 Image Processing Acceleration
Gaussian Filtering
Introduction
Realize the function of Gaussian filtering. The acceleration types are BPU acceleration and NEON acceleration. BPU acceleration currently only supports the int16 format, and NEON acceleration currently only supports the int16 and uint16 formats.
Code repository: (https://github.com/D-Robotics/hobot_cv)
Supported Platforms
| Platform | System | Function |
|---|---|---|
| RDK X3, RDK X3 Module | Ubuntu 20.04 (Foxy), Ubuntu 22.04 (Humble) | Read ToF images and perform Gaussian filtering |
Preparation
RDK
-
RDK has burned D-Robotics's provided Ubuntu 20.04/22.04 system image.
-
RDK has successfully installed TogetheROS.Bot.
Usage
BPU Acceleration
The current version supports the following parameter ranges:
-
Filtering type: Gaussian filtering
-
Supported data types: int16
-
Supported resolution: 320x240.
-
Filtering kernel: 3x3 Gaussian
-
sigmax: 0
-
sigmay: 0
NEON Acceleration
The current version supports the following parameter ranges:
-
Filtering type: Gaussian filtering- Supported data types: int16, uint16
-
Filter kernel: Gaussian 3x3, 5x5
-
sigmax: 0
-
sigmay: 0
The package provides a simple test program that takes a local ToF image and uses the interface in hobot_cv to implement Gaussian filtering. For more detailed interface information, please refer to the README.md file in the hobot_cv package.
RDK
- Foxy
- Humble
# Configure the tros.b environment
source /opt/tros/setup.bash
# Configure the tros.b environment
source /opt/tros/humble/setup.bash
# Copy the models and configuration files needed for running the examples from the installation path of tros.b.
cp -r /opt/tros/${TROS_DISTRO}/lib/hobot_cv/config/ .

# Launch the BPU acceleration test program package
ros2 launch hobot_cv hobot_cv_gaussian_blur.launch.py

# Launch the NEON acceleration test program package
ros2 launch hobot_cv hobot_cv_neon_blur.launch.py
Result Analysis
BPU
Output:
===================
image name :images/frame1_4.png
infe cost time:1314
guss_time cost time:2685
hobotcv save rate:0.510615

analyse_result start
---------GaussianBlur
out_filter type:2,cols:320,rows:240,channel:1
cls_filter type:2,cols:320,rows:240,channel:1
out_filter minvalue:96,max:2363
out_filter min,x:319,y:115
out_filter max,x:147,y:239
cls_filter minvalue:96,max:2364
cls_filter min,x:319,y:115
cls_filter max,x:147,y:239
```diff diff diff
mat_diff minvalue:0,max:2
mat_diff min,x:2,y:0
mat_diff max,x:110,y:14

error sum:8.46524e+06,max:2,mean_error:0.439232
analyse_result,time_used_ms_end:2
analyse_result end
infe cost time:1314 // Indicates the time cost of Gaussian filtering accelerated by hobotcv, 1314 microseconds.
guss_time cost time:2685 // Indicates the time cost of Gaussian filtering by OpenCV, 2685 microseconds.
hobotcv save rate = (guss_time cost time - infe cost time) / guss_time cost time = 0.510615
According to the above comparison results, the performance is improved by 50% after being accelerated by hobot_cv.
error sum:8.46524e+06,max:2,mean_error:0.439232 // The total error for a single image is: 8.46524e+06, the maximum error for a single pixel is: 2, and the average error is: 0.439232
Average error = sum / (width * height) = 8.46524e+06 / (320 * 240)
The performance comparison results between hobot_cv Gaussian filtering accelerated by BPU and OpenCV Gaussian filtering are as follows:
| Interface type | Kernel | Time cost (ms) | Single core CPU occupation (%) |
|---|---|---|---|
| Hobotcv gaussian | Size(3,3) | 1.10435 | 15.9 |
| Opencv gaussian | Size(3,3) | 2.41861 | 49.7 |
NEON
Output:
[neon_example-1] ===================
[neon_example-1] image name: config/tof_images/frame1_4.png
[neon_example-1] hobotcv mean cost time: 674
[neon_example-1] opencv mean cost time: 1025
[neon_example-1] hobotcv mean save rate: 0.342439
[neon_example-1]
[neon_example-1] analyse_result start
[neon_example-1] ---------Mean_Blur
[neon_example-1] error sum: 8.43744e+06, max: 1, mean_error: 0.430833
[neon_example-1]
[neon_example-1] hobotcv gaussian cost time: 603
[neon_example-1] opencv gaussian cost time: 2545[neon_example-1] hobotcv gaussian save rate:0.763065
[neon_example-1]
[neon_example-1] analyse_result start
[neon_example-1] ---------Gaussian_Blur
[neon_example-1] error sum:9.13206e+06, max:1, mean_error:0.466302
[neon_example-1]
[neon_example-1] -------------------------
hobotcv gaussian cost time:603 //hobotcv gaussian filtering with neon acceleration took 603 microseconds. opencv gaussian cost time:2545 //opencv gaussian filtering took 2545 microseconds. hobotcv gaussian save rate = (opencv cost time - hobotcv cost time) / opencv cost time = 0.763065 From the above comparison, after the acceleration of hobotcv, the performance of Gaussian filtering has improved by 76%.
The comparison results between hobot_cv Gaussian filtering with NEON acceleration and opencv Gaussian filtering are as follows:
| Interface Type | Kernel | Time(ms) | Single Core CPU Usage (%) |
|---|---|---|---|
| Hobotcv Gaussian | Size(3,3) | 0.430284 | 27.1 |
| Opencv Gaussian | Size(3,3) | 2.42225 | 47 |
| Hobotcv Gaussian | Size(5,5) | 0.854871 | 39.1 |
| Opencv Gaussian | Size(5,5) | 3.15647 | 99.8 |
Mean Filtering
Introduction
Implementation of Mean Filtering using NEON acceleration, currently only supporting int16 and uint16 formats.
Code repository: (https://github.com/D-Robotics/hobot_cv)
Supported Platforms
| Platform | System | Function |
|---|---|---|
| RDK X3, RDK X3 Module | Ubuntu 20.04 (Foxy), Ubuntu 22.04 (Humble) | Read ToF images, perform Mean Filtering |
Preparation
RDK
-
RDK has flashed the Ubuntu 20.04/22.04 system image provided by D-Robotics.
-
RDK has successfully installed TogetheROS.Bot.
Usage Guide
The mean filtering supports the following parameter range:
-
Data Type: int16, uint16
-
Kernel: 3x3, 5x5
The package provides a simple test program. The input is a offline ToF image, and the hobot_cv interface is called to perform mean filtering. For detailed interface information, please refer to README.md in the hobot_cv package for further understanding.
RDK
- Foxy
- Humble
# Configure the tros.b environment
source /opt/tros/setup.bash
# Configure the tros.b environment
source /opt/tros/humble/setup.bash
# Copy the required configuration files from the installation path of TogetheROS.
cp -r /opt/tros/${TROS_DISTRO}/lib/hobot_cv/config/ .

# Launch the test program pkg
ros2 launch hobot_cv hobot_cv_neon_blur.launch.py
Result Analysis
Output:
[neon_example-1] ===================
[neon_example-1] image name :config/tof_images/frame1_4.png
[neon_example-1] hobotcv mean cost time:674
[neon_example-1] opencv mean cost time:1025
[neon_example-1] hobotcv mean save rate:0.342439
[neon_example-1]
[neon_example-1] analyse_result start
[neon_example-1] ---------Mean_Blur
[neon_example-1] error sum:8.43744e+06,max:1,mean_error:0.430833
[neon_example-1]
[neon_example-1] -------------------------
Mean filtering cost time:674 // The hobot_cv mean filtering with neon acceleration interface took 674 microseconds. opencv mean cost time:1025 // Indicates the mean filtering time of opencv is 1025 microseconds. hobotcv mean save rate = (opencv cost time - hobotcv cost time) / opencv cost time = 0.342439 From the above comparison, the mean filtering performance is improved by 34% after acceleration by hobot_cv.
error sum:8.43744e+06,max:1,mean_error:0.430833 // The total error of mean filtering for a single image is: 8.43744e+06, the maximum error of a single pixel is: 1, and the average error is: 0.430833 Mean filtering average error = sum / (width x height) = 8.43744e+06 / (320 x 240)
Comparison of hobot_cv and opencv processing performance
| Interface Type | Kernel | Time Consumption (ms) | CPU Usage (%) |
|---|---|---|---|
| Hobotcv mean | Size(3,3) | 0.466397 | 31.8 |
| Opencv mean | Size(3,3) | 0.676677 | 40.2 |
| Hobotcv mean | Size(5,5) | 0.737171 | 47.7 |
| Opencv mean | Size(5,5) | 0.798177 | 52.9 |
crop
Introduction
Implement the image cropping function, currently only supports NV12 format.
Code repository: (https://github.com/D-Robotics/hobot_cv)
Platform Support
| Platform | System | Function |
|---|---|---|
| RDK X3, RDK X3 Module | Ubuntu 20.04 (Foxy), Ubuntu 22.04 (Humble) | Read an image and crop it |
| RDK X5, RDK X5 Module | Ubuntu 22.04 (Humble) | Read an image and crop it |
Preparation
RDK Platform
-
RDK has already burned D-Robotics's provided Ubuntu 20.04/22.04 system image.
-
RDK has successfully installed TogetheROS.Bot.
Instruction
RDK
- Foxy
- Humble
# Configure the tros.b environment
source /opt/tros/setup.bash
# Configure the tros.b environment
source /opt/tros/humble/setup.bash
# Copy the required models and configuration files from the installation path of tros.b.
cp -r /opt/tros/${TROS_DISTRO}/lib/hobot_cv/config/ .

# Launch the launch file
ros2 launch hobot_cv hobot_cv_crop.launch.py
Result Analysis
[INFO] [launch]: Default logging verbosity is set to INFO
[INFO] [crop_example-1]: process started with pid [3064]
[crop_example-1] [INFO] [1655951627.255477663] [example]: crop image to 960x540 pixels, time cost: 1 ms
[crop_example-1] [INFO] [1655951627.336889080] [example]: crop image to 960x540 pixels, time cost: 1 ms[INFO] [crop_example-1]: process has finished cleanly [pid 3064]
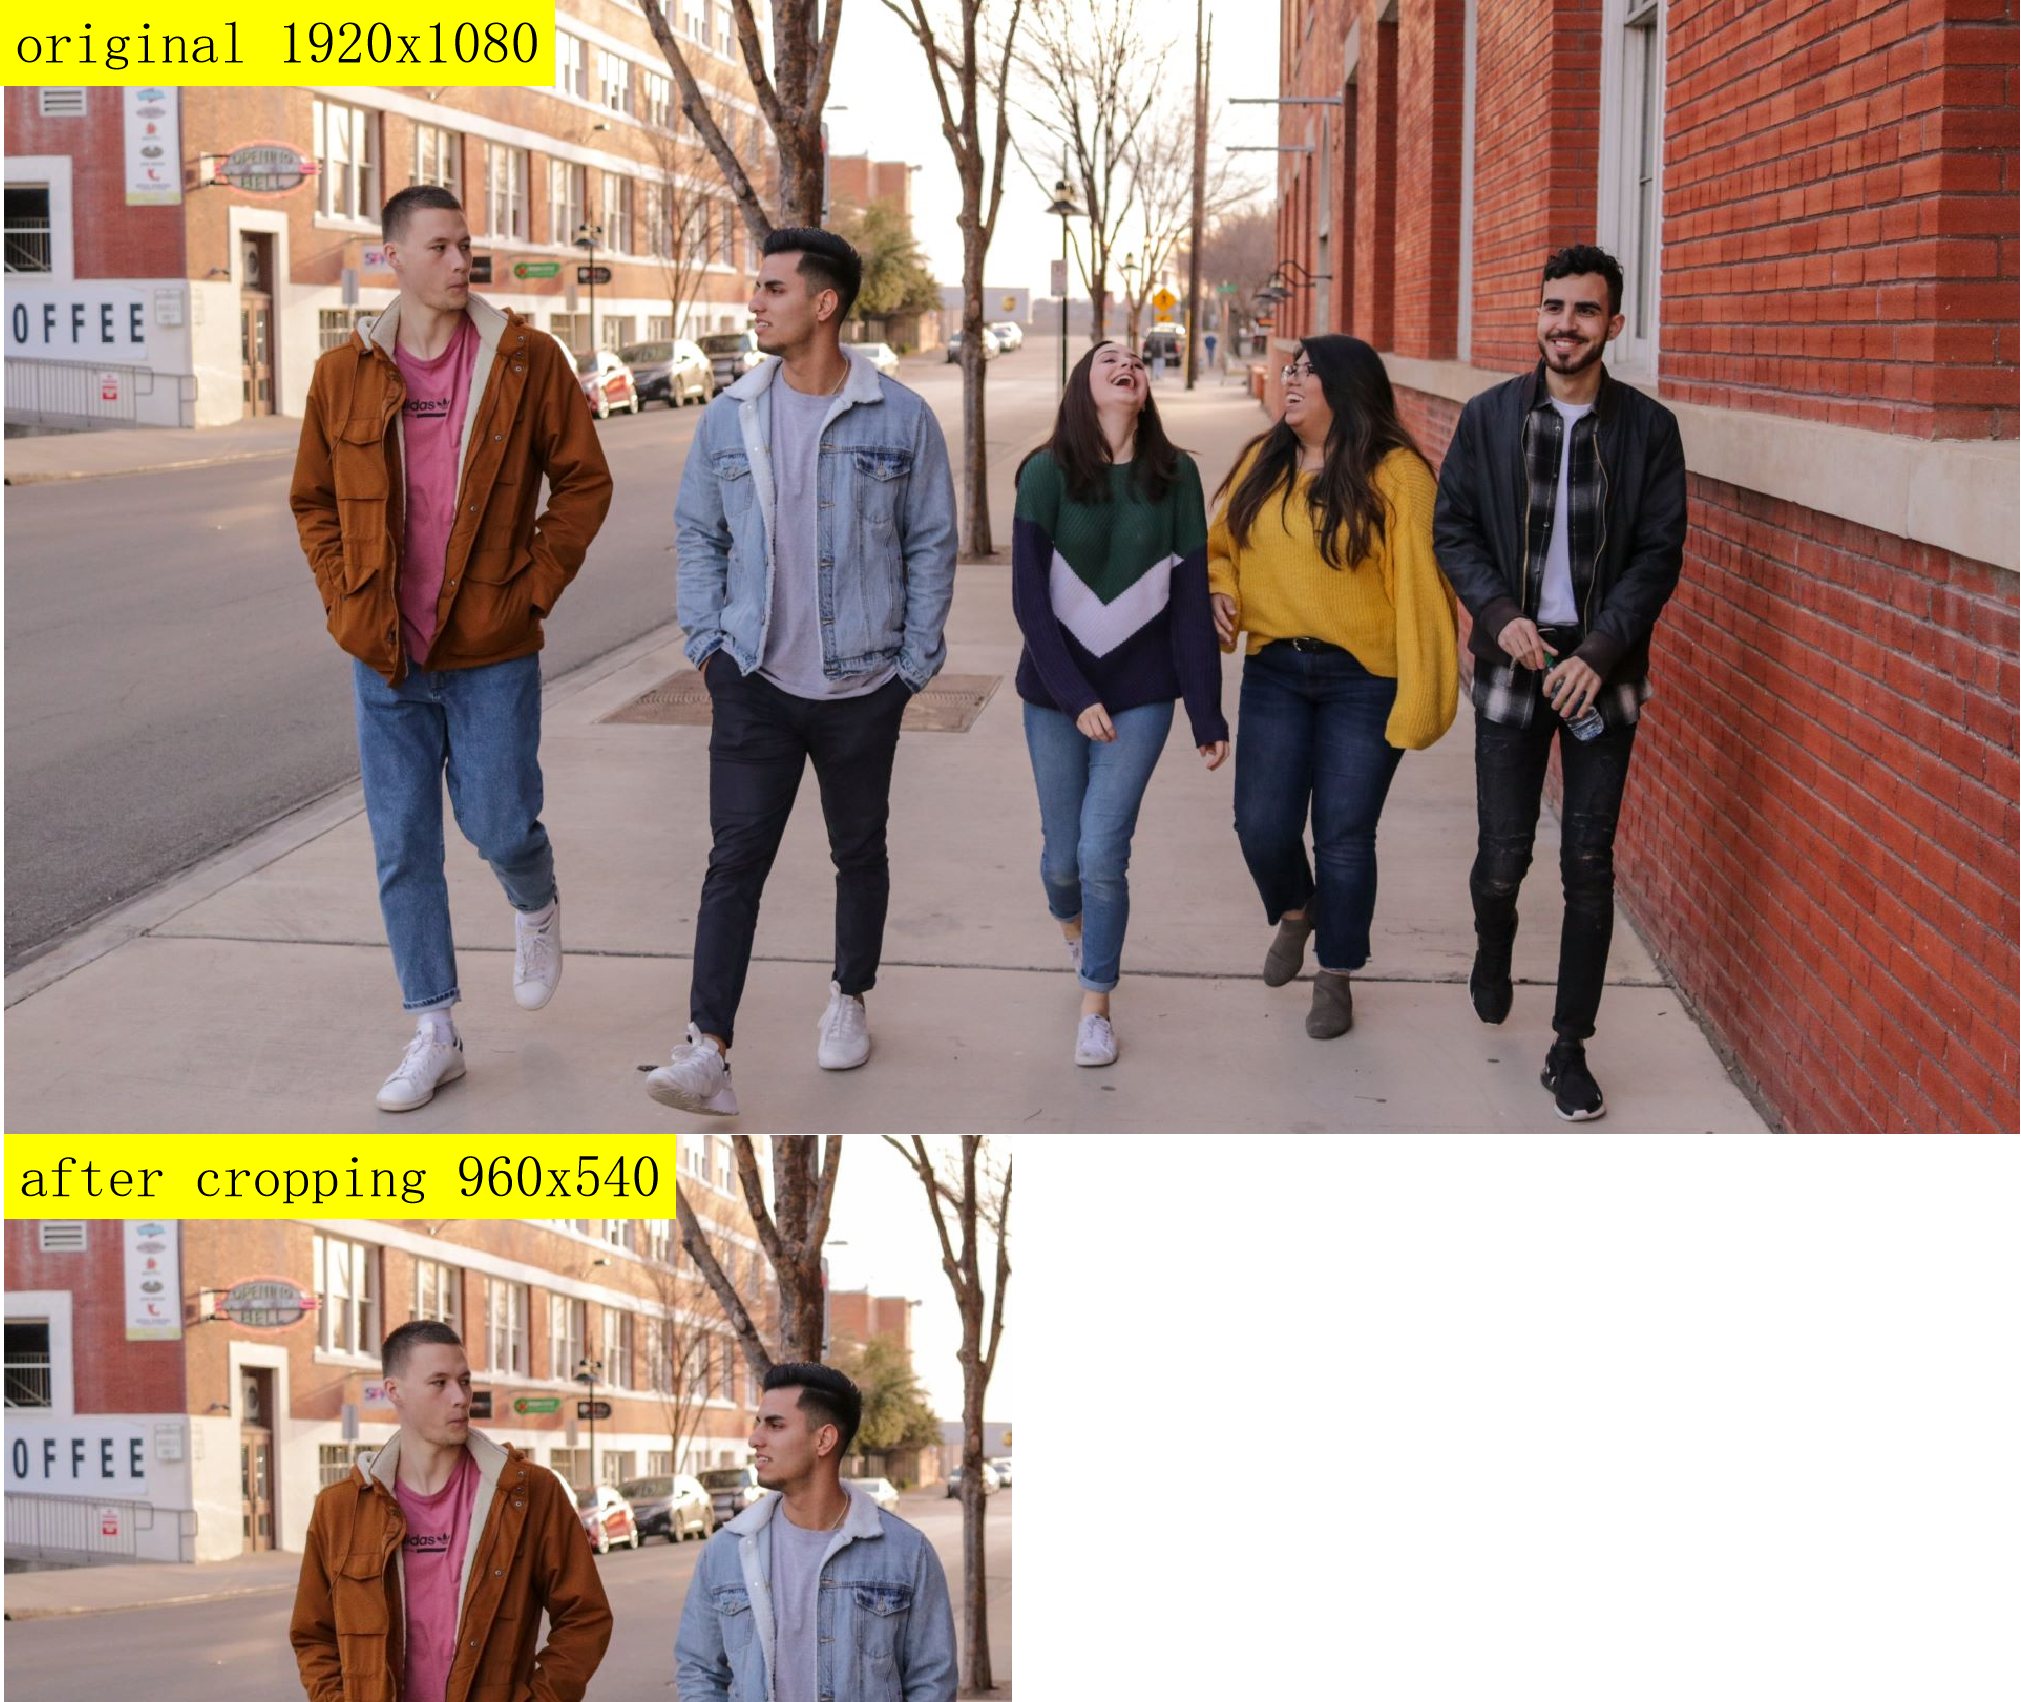
According to the log, the test program has finished processing the local 1920x1080 resolution image crop, and the time consumed is as follows:
| Image Processing | Runtime |
|---|---|
| Crop 1920x1080 to 960x540 | 1ms |
The original image is 1920x1080, and the top left corner of the image is cropped to a 960x540 region. The resulting image is shown below:

Resize
Introduction
Implement image scaling function, currently only supports NV12 format.
Code repository: (https://github.com/D-Robotics/hobot_cv)
Platform Support
| Platform | System | Function |
|---|---|---|
| RDK X3, RDK X3 Module | Ubuntu 20.04 (Foxy), Ubuntu 22.04 (Humble) | Read image and resize |
| RDK X5, RDK X5 Module, RDK S100 | Ubuntu 22.04 (Humble) | Read image and resize |
Preparation
RDK
-
The RDK has been burned with the Ubuntu 20.04/22.04 system image provided by D-Robotics.
-
TogetheROS.Bot has been successfully installed on the RDK.
Usage
RDK
- Foxy
- Humble
# Configure the tros.b environment
source /opt/tros/setup.bash
# Configure the tros.b environment
source /opt/tros/humble/setup.bash
# Copy the required models and configuration files from the TogetheROS installation path.
cp -r /opt/tros/${TROS_DISTRO}/lib/hobot_cv/config/ .

# Launch the file
ros2 launch hobot_cv hobot_cv_resize.launch.py
Result Analysis
RDK
[INFO] [launch]: Default logging verbosity is set to INFO
[INFO] [resize_example-1]: process started with pid [3083]
[resize_example-1] [INFO] [1655951649.930987924] [example]:
[resize_example-1] source image config/test.jpg is 1920x1080 pixels
[resize_example-1] [INFO] [1655951649.931155799] [example]: resize image to 960x540 pixels, time cost: 297 ms
[resize_example-1] [INFO] [1655951650.039223757] [example]: resize image to 960x540 pixels, time cost: 15 ms
[INFO] [resize_example-1]: process has finished cleanly [pid 3083]
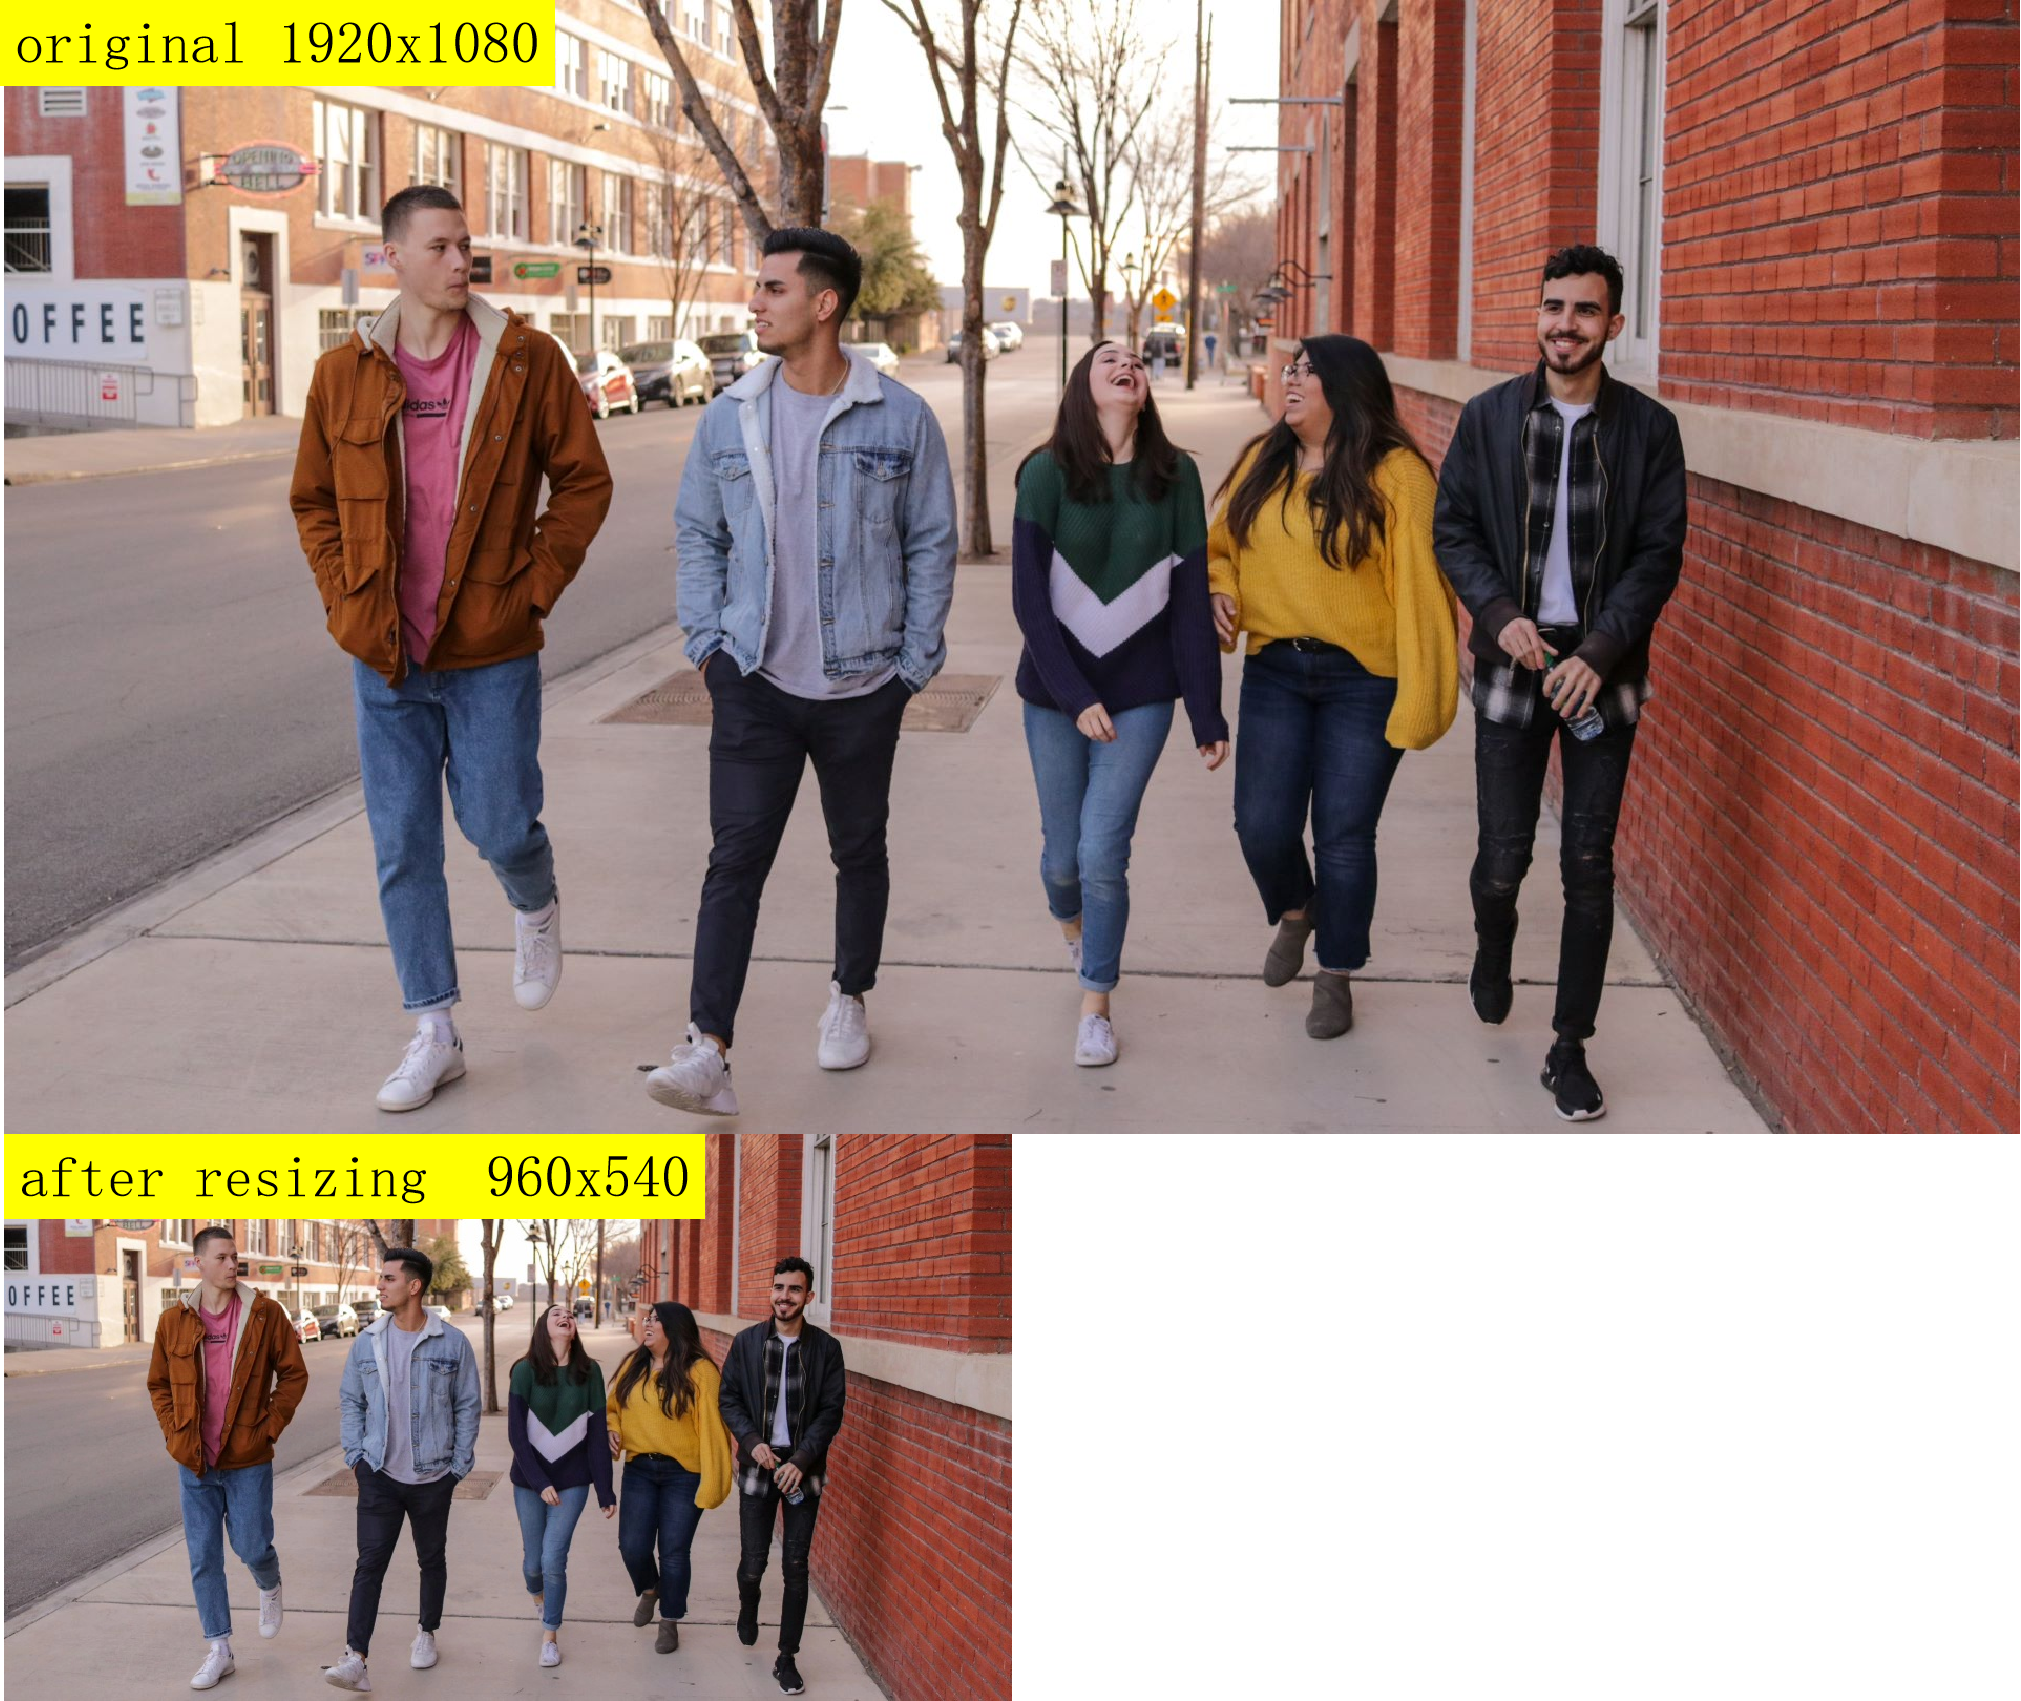
According to the log, the test program has completed the resize processing of a local 1920x1080 resolution image. The interface is called twice, and the time costs for each run are as follows.
| Image Processing | Time Cost for First Run | Time Cost for Second Run |
|---|---|---|
| 1920x1080 resized to 960x540 | 297 ms | 15 ms |
The first run requires configuration of the hardware, so it takes more time. If there are no changes to the hardware configuration properties and the hardware directly processes the image, the time cost will be significantly reduced.
The original image (1920x1080) and the resized image (960x540) are shown below:

RDK performance comparison
Use the top command to check CPU usage, which represents the CPU percentage used by the test process.
The time cost is in milliseconds, and the average value is taken after looping 1000 times.
CPU frequency is locked during testing:
sudo bash -c 'echo performance > /sys/devices/system/cpu/cpufreq/policy0/scaling_governor'
| src wxh | dst wxh | Configuration of Hardware Cost | Configuration of Hardware CPU Usage | BPU Time Cost | BPU Interface CPU Usage | OpenCV Time Cost | OpenCV Processing CPU Usage |
|---|---|---|---|---|---|---|---|
| 512x512 | 128x128 | 1.53789 | 25.9 | 1.11054 | 89 | 1.71119 | 100.3 |
| 640x640 | 320x320 | 2.48536 | 28.5 | 1.82232 | 88 | 1.82384 | 338.9 |
| 896x896 | 384x384 | 4.54422 | 24.6 | 2.81954 | 79.7 | 7.84396 | 273.1 |
| 1024x1024 | 512x512 | 6.01103 | 25.2 | 3.89325 | 81.7 | 2.55761 | 381.7 |
| 1920x1088 | 512x512 | 11.0406 | 20.6 | 5.8513 | 71.1 | 8.19324 | 380.1 |
| 1920x1080 | 960x544 | 11.1562 | 22.3 | 7.09085 | 77.7 | 15.2978 | 382.4 |
rotate
Introduction
The rotate function implements image rotation, currently only supporting images in NV12 format. The supported rotation angles are 90, 180, and 270.
Code repository: (https://github.com/D-Robotics/hobot_cv)
Supported Platforms
| Platform | System | Function |
|---|---|---|
| RDK X3, RDK X3 Module | Ubuntu 20.04 (Foxy), Ubuntu 22.04 (Humble) | Read and rotate images |
Preparation
RDK Platform
-
RDK has been flashed with the Ubuntu 20.04/22.04 system image provided by the D-Robotics team.
-
The TogetheROS.Bot has been successfully installed on the RDK.
User Guide
RDK
- Foxy
- Humble
source /opt/tros/setup.bash
source /opt/tros/humble/setup.bash
# Copy the required models and configuration files from the installation path of tros.b.
cp -r /opt/tros/${TROS_DISTRO}/lib/hobot_cv/config/ .

# Launch the launch file
ros2 launch hobot_cv hobot_cv_rotate.launch.py
Result Analysis
[INFO] [launch]: Default logging verbosity is set to INFO
[INFO] [rotate_example-1]: process started with pid [3096]
[rotate_example-1] [INFO] [1655951661.173422471] [example]: rotate image 180 , time cost: 415 ms
[rotate_example-1]
[rotate_example-1] [INFO] [1655951661.416188013] [example]: second rotate image 180 , time cost: 40 ms
[rotate_example-1]
[INFO] [rotate_example-1]: process has finished cleanly [pid 3096]
According to the log, the test program has completed the rotation of a local image with a resolution of 1920x1080. The interface was called twice, and the time taken for each rotation is as follows.
| Image Processing | First Run Time | Second Run Time |
|---|---|---|
| 1920x1080 Rotate 180 degrees | 415ms | 40ms |
The first run takes longer because the hardware needs to be configured. If there are no further changes to the hardware configuration, the hardware will process the images directly and the processing time will be significantly reduced.
The original image size is 1920x1080, and the size after rotation is also 1920x1080:


Performance comparison of hobot_cv and OpenCV
CPU usage is measured using the top command and represents the percentage of CPU usage by the test process. The processing time is measured in milliseconds, with an average value taken from 1000 iterations. To ensure stable performance, the CPU frequency is locked during the test:
sudo bash -c 'echo performance > /sys/devices/system/cpu/cpufreq/policy0/scaling_governor'
| src wxh | Rotation | hobot_cv Time | hobot_cv CPU Usage | OpenCV Time | OpenCV CPU Usage |
|---|---|---|---|---|---|
| 1920x1080 | 90 degrees | 37.6568ms | 61.6 | 55.8886ms | 100.0 |
| 640x640 | 180 degrees | 7.3133ms | 66.8 | 5.1806ms | 100.0 |
| 896x896 | 270 degrees | 14.7723ms | 62.5 | 13.6497ms | 100.0 |
Pyramid
Introduction
This function implements image pyramid scaling and currently supports NV12 format.
Code repository: (https://github.com/D-Robotics/hobot_cv)
Supported Platforms
| Platform | System | Function |
|---|---|---|
| RDK X3, RDK X3 Module | Ubuntu 20.04 (Foxy), Ubuntu 22.04 (Humble) | Read image and perform image pyramid scaling |
Preparation
RDK Platform
-
The RDK is pre-loaded with Ubuntu 20.04/22.04 system image.
-
TogetheROS.Bot has been successfully installed on the RDK.
RDK
- Foxy
- Humble
source /opt/tros/setup.bash
source /opt/tros/humble/setup.bash
# Copy the necessary models and configuration files for running the example from the installation path of tros.b
cp -r /opt/tros/${TROS_DISTRO}/lib/hobot_cv/config/ .

# Launch the launch file
ros2 launch hobot_cv hobot_cv_pyramid.launch.py
Result Analysis
[INFO] [launch]: Default logging verbosity is set to INFO
[INFO] [pyramid_example-1]: process started with pid [3071]
[pyramid_example-1] [INFO] [1655951639.110992960] [example]: pyramid image , time cost: 299 ms
[pyramid_example-1]
[pyramid_example-1] [INFO] [1655951639.432398919] [example]: pyramid image , time cost: 19 ms
[pyramid_example-1]
[INFO] [pyramid_example-1]: process has finished cleanly [pid 3071]
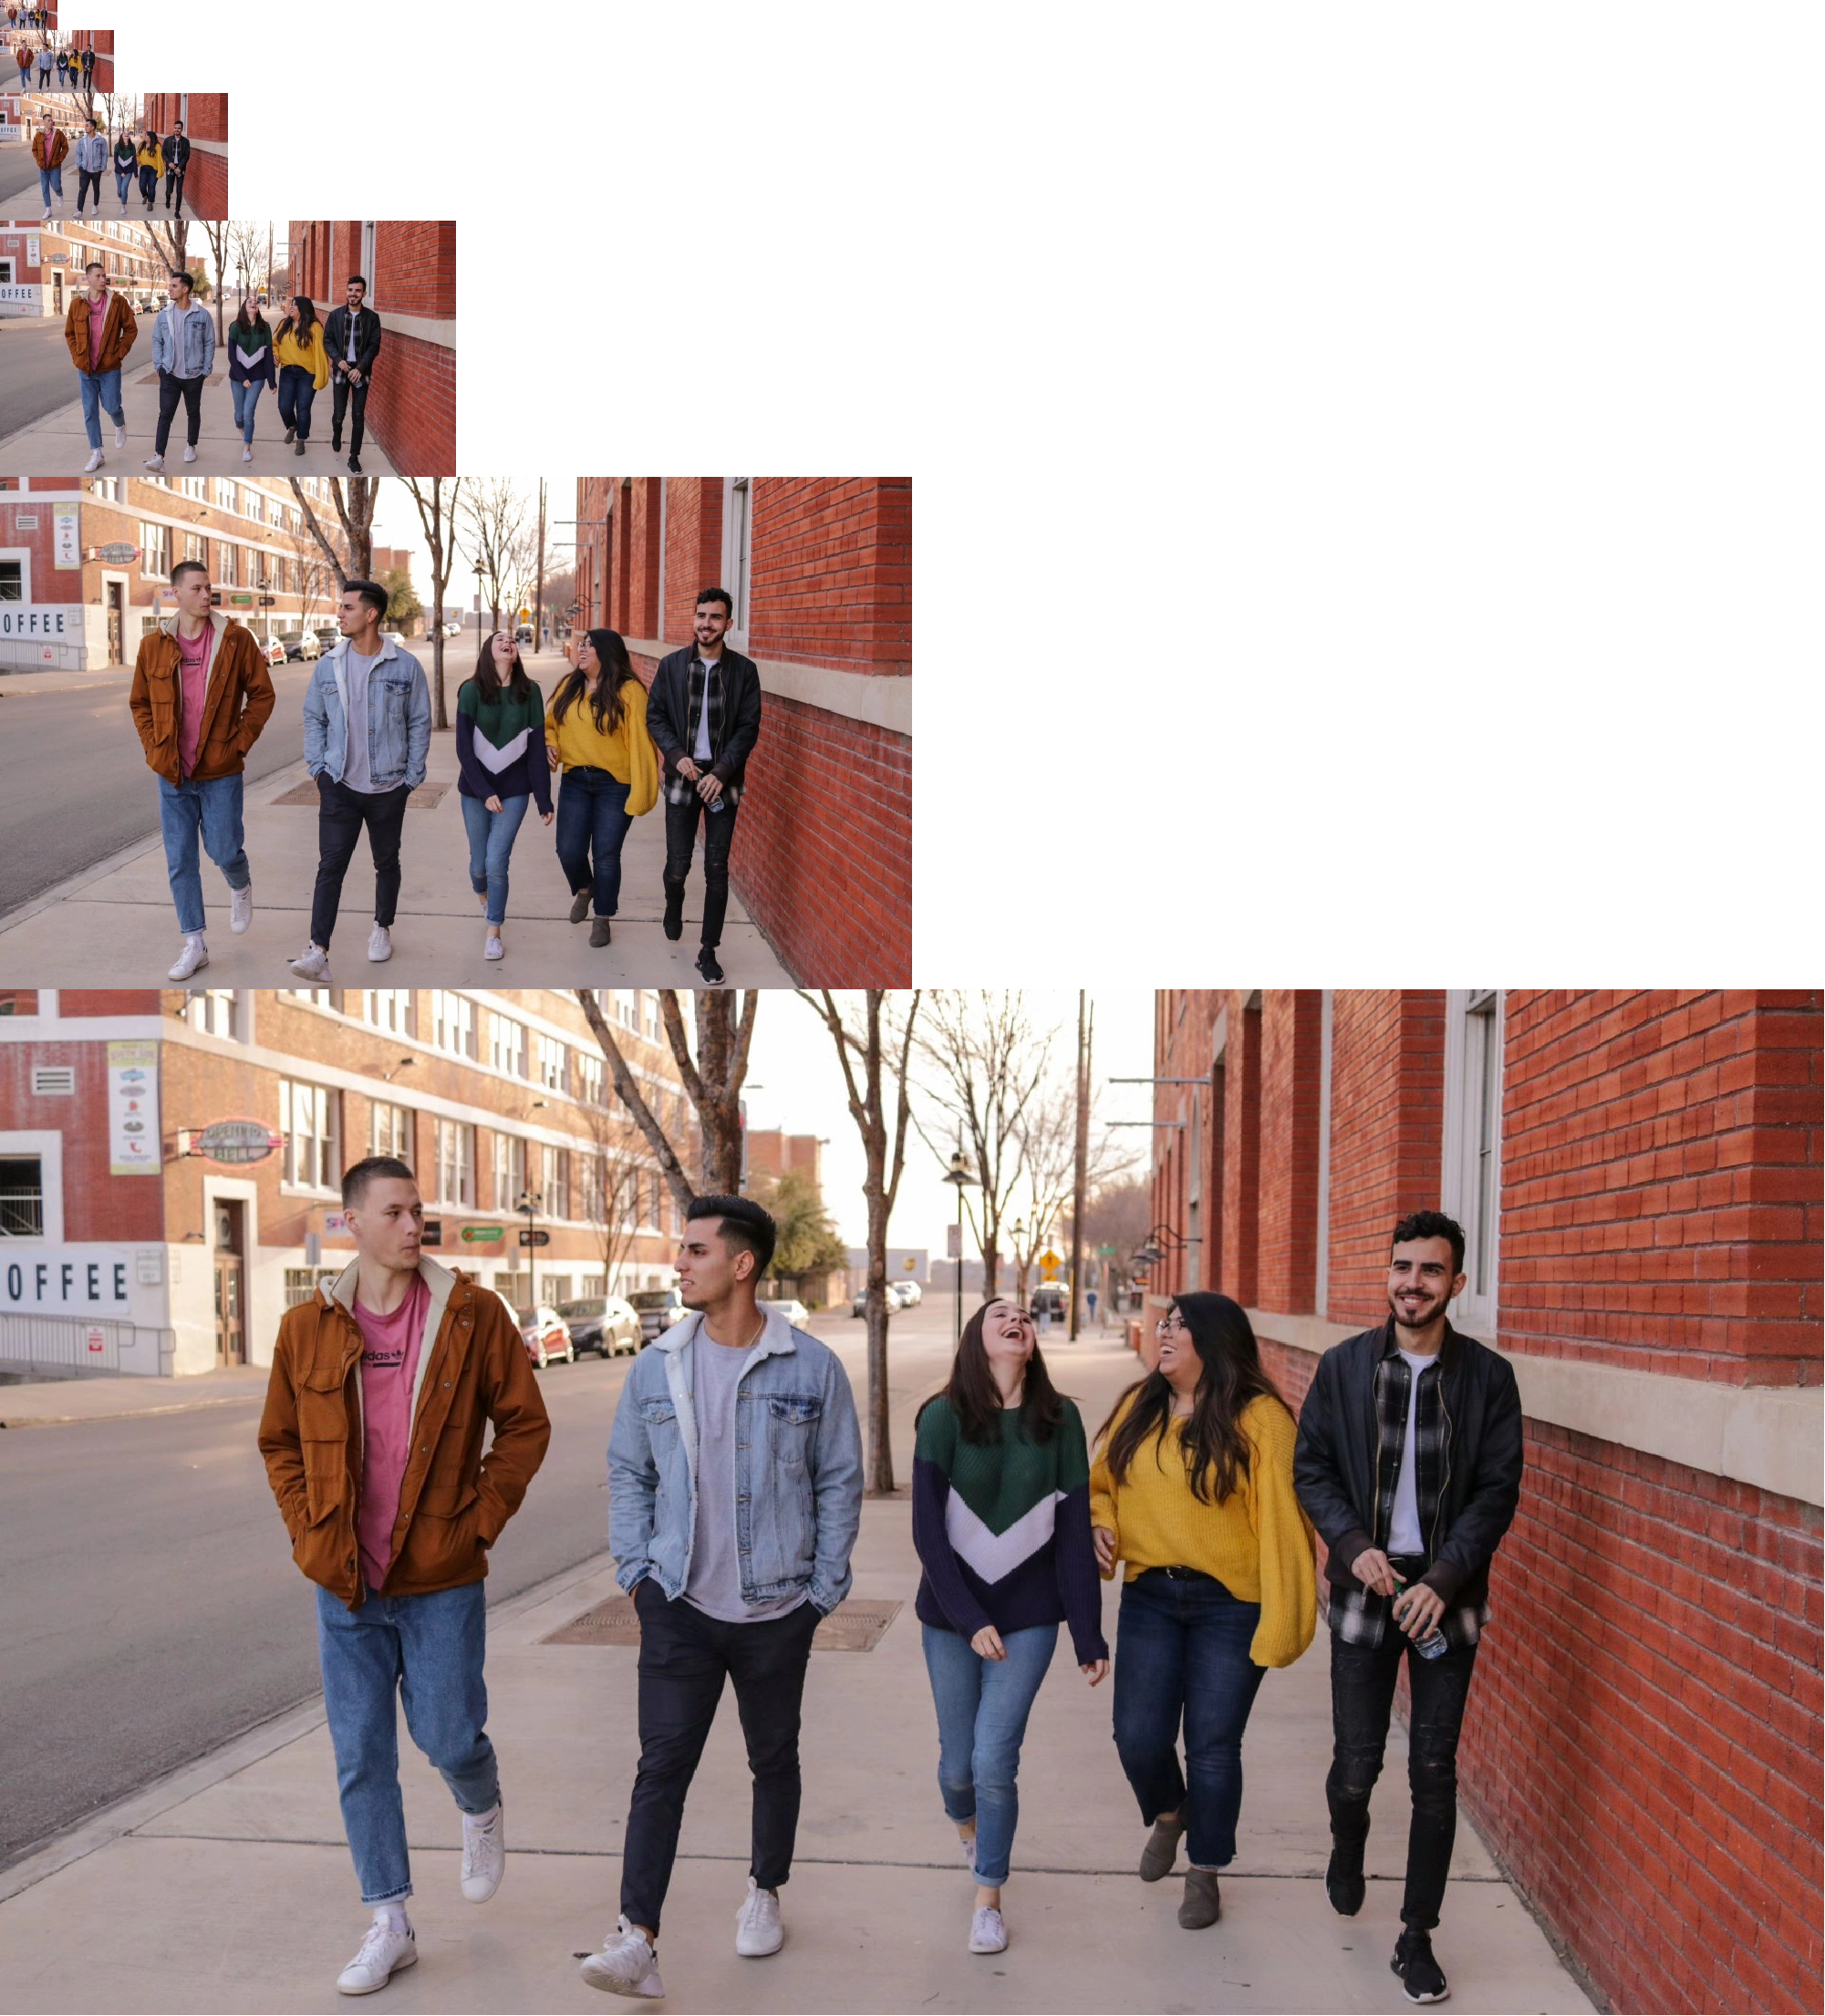
According to the log, the test program has completed the pyramid scaling process for a local image with a resolution of 1920x1080. The interface is called twice, with the following time costs for each run.
| Image Processing | Time Cost for First Run | Time Cost for Second Run |
|---|---|---|
| 1920x1080 six-layer base layer output | 299ms | 19ms |
Because the first run requires hardware configuration, it takes more time. If the hardware configuration attributes are not changed and the hardware is used directly for processing, the time will be significantly reduced.
The original 1920x1080 image and the pyramid-scaled image are as follows:

Outputting six base layers, each layer's size is half of the previous layer's size.
Performance Comparison
With an input image of 1920x1080, we obtain output images with resolutions of 960x540, 480x270, 240x134, 120x66, 60x32 by generating 5 layers. We compare the efficiency between OpenCV and HobotCV, with the following results:
| HobotCV Cost | HobotCV CPU Usage | OpenCV Cost | OpenCV CPU Usage |
|---|---|---|---|
| 19ms | 42.5 | 56 | 100 |
| 19ms | 42.5 | 56 | 100 |
CPU usage as a percentage (single-core), and time statistics in ms.
Color
Introduction
Color Space Conversion between NV12 and BGR24.
Code repository: (https://github.com/D-Robotics/hobot_cv)
Platform Support
| Platform | System | Function |
|---|---|---|
| RDK X5, RDK X5 Module, RDK S100 | Ubuntu 22.04 (Humble) | Read image and resize |
Preparation
RDK
-
The RDK has been burned with the Ubuntu 22.04 system image provided by D-Robotics.
-
TogetheROS.Bot has been successfully installed on the RDK.
Usage
RDK
- Humble
# Configure the tros.b environment
source /opt/tros/humble/setup.bash
# Copy the required models and configuration files from the TogetheROS installation path.
cp -r /opt/tros/${TROS_DISTRO}/lib/hobot_cv/config/ .

# Launch the file
ros2 launch hobot_cv hobot_cv_conversion.launch.py
Result Analysis
RDK
[INFO] [launch]: All log files can be found below /root/.ros/log/2025-03-25-14-50-55-535138-ubuntu-4139
[INFO] [launch]: Default logging verbosity is set to INFO
[INFO] [test_conersion-1]: process started with pid [4140]
[test_conersion-1] [INFO] [1742885455.683144151] [hobot_cv]: bgr24_to_nv12 opencv time cost: 4 ms
[test_conersion-1] [INFO] [1742885455.685469463] [hobot_cv]: nv12_to_bgr24 neon 1 time cost: 2 ms
[test_conersion-1] [INFO] [1742885455.836798125] [hobot_cv]: nv12_to_bgr24 neon 2 time cost: 2 ms
[test_conersion-1] [INFO] [1742885455.992973665] [hobot_cv]: bgr24_to_nv12 neon 1 time cost: 1 ms
[test_conersion-1] [INFO] [1742885455.997803043] [hobot_cv]: nv12_to_bgr24 opencv time cost: 4 ms
[test_conersion-1] [INFO] [1742885456.156813423] [hobot_cv]: bgr24_to_nv12 neon 2 time cost: 1 ms
[test_conersion-1] [INFO] [1742885456.161413872] [hobot_cv]: nv12_to_bgr24 opencv time cost: 4 ms
[INFO] [test_conersion-1]: process has finished cleanly [pid 4140]