Intelligent Voice
Feature Overview
The smart voice algorithm operates in local offline mode. After subscribing to audio data, it sends the data to the BPU for processing and then publishes messages including wake-up word detection, command word recognition, Direction of Arrival (DOA) angle information, and Automatic Speech Recognition (ASR) results. This functionality is implemented in the hobot_audio package of TogetheROS.Bot and supports both circular and linear 4-microphone arrays provided with RDK.
Code repository: (https://github.com/D-Robotics/hobot_audio.git)
Application scenarios: The smart voice algorithm can detect wake-up words and user-defined command words from audio input, interpret spoken content as corresponding commands, or convert speech into text. It enables functionalities such as voice control and speech-to-text translation, primarily applied in smart homes, intelligent vehicle cockpits, wearable devices, and similar domains.
Example: Voice-controlled robot car movement — 5.4.6 Voice-Controlled Robot Car Movement
Supported Platforms
| Platform | OS Environment | Example Functionality |
|---|---|---|
| RDK X3 | Ubuntu 20.04 (Foxy), Ubuntu 22.04 (Humble) | Launch audio module algorithms and display results in terminal |
| RDK X5, RDK X5 Module | Ubuntu 22.04 (Humble) | Launch audio module algorithms and display results in terminal |
Prerequisites
-
RDK has been flashed with Ubuntu 20.04 or Ubuntu 22.04 system image.
-
TogetheROS.Bot has been successfully installed on RDK.
-
The smart voice algorithm package has been successfully installed on RDK. Installation commands:
- Foxy
- Humble
sudo apt update
sudo apt install tros-hobot-audio
sudo apt update
sudo apt install tros-humble-hobot-audio
If the sudo apt update command fails or returns an error, refer to the FAQ section Common Issues, specifically Q10: How to resolve issues when apt update fails or reports errors?
- Connect either the circular or linear 4-microphone audio board to RDK following the instructions below.
Connecting the Audio Board
Interface Connection
Circular Microphone Array
The circular microphone board features an integrated design, as shown in the image below:
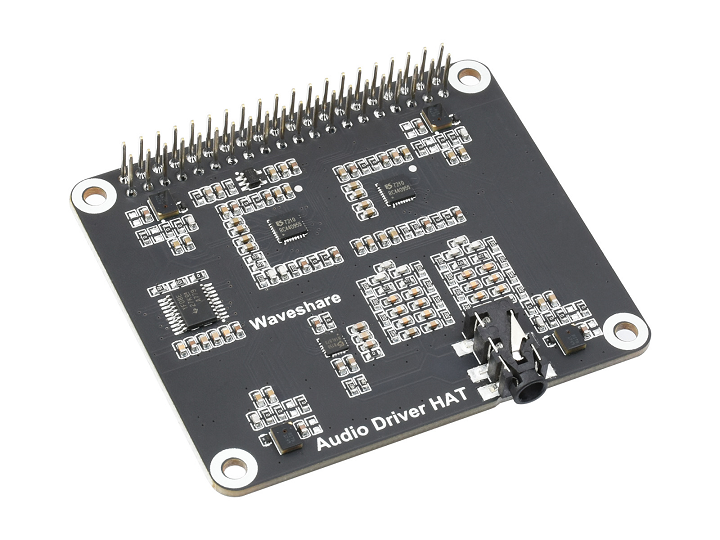
Purchase link:
(https://www.waveshare.net/shop/Audio-Driver-HAT.htm)
Connection steps:
-
Connect the microphone board to the RDK X3's 40-pin GPIO interface. The assembled setup is shown below:
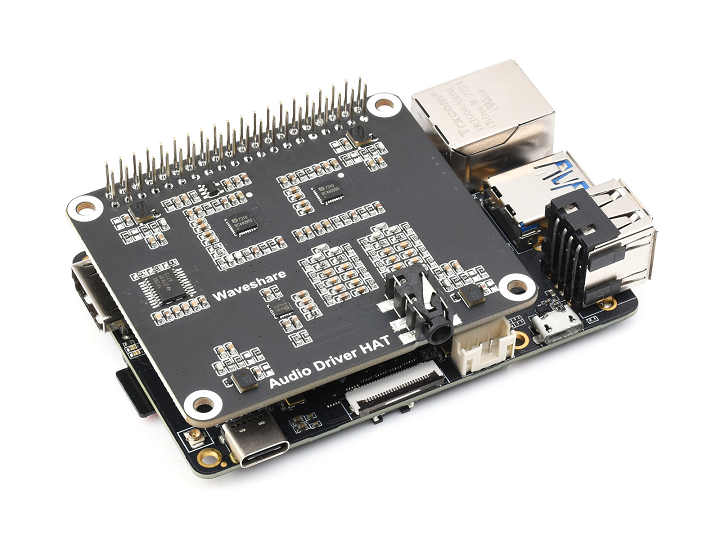
-
Connect power, Ethernet cable, etc.
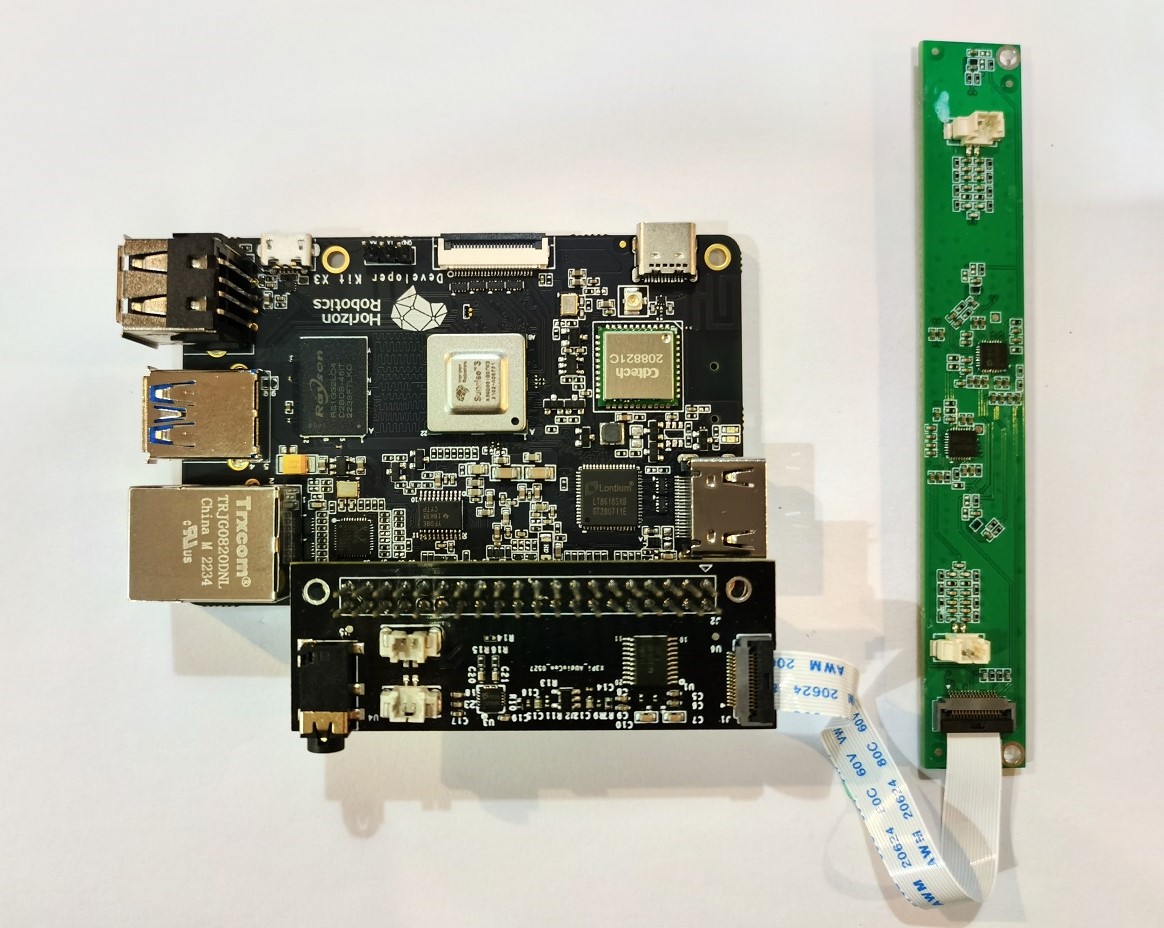
Linear Microphone Array
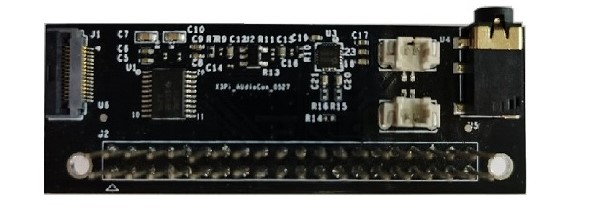
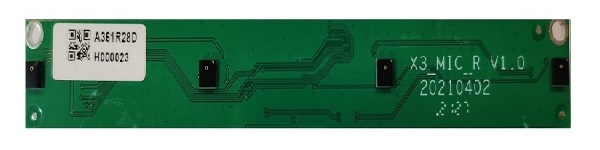
The linear microphone array consists of two parts: an audio adapter board and a linear microphone board. Their physical appearance and connection instructions are shown below:
Audio adapter board:
Linear microphone board:
-
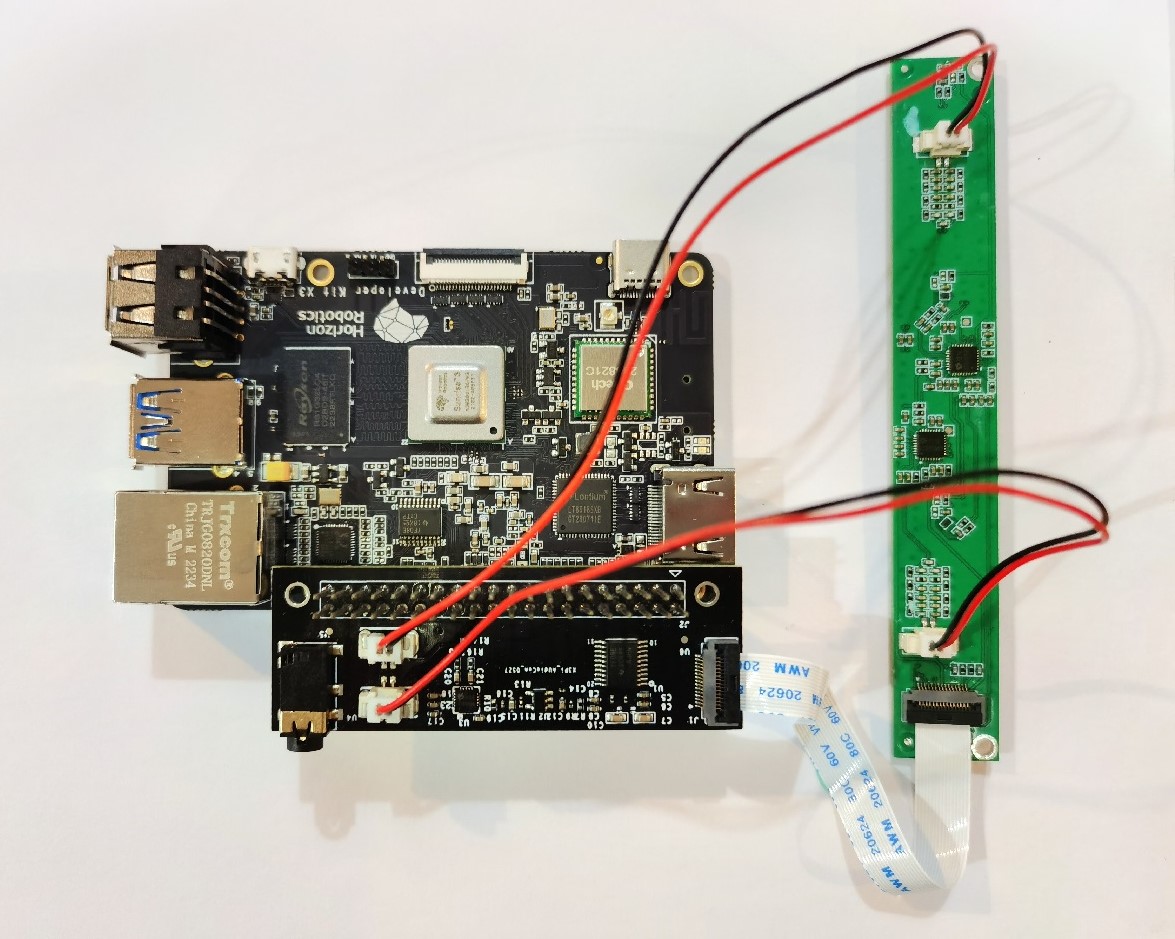
First, connect the RDK X3 to the audio adapter board, ensuring all pins are properly aligned. The connected setup is shown below:

-
Next, connect the RDK X3 to the linear microphone array board. Connect the FPC interface on the adapter board to the microphone array board using a 15-pin reverse-side FFC cable, with the gold fingers facing downward. The connected setup is shown below:
-
Connect the AEC cable.
-
Connect power, Ethernet cable, etc.
Power-On Verification
After connecting the RDK and microphone array, power on the system. Use the command i2cdetect -r -y 0 via serial terminal to verify device connectivity. If connected correctly, three I²C addresses should be detected by default, as shown below:
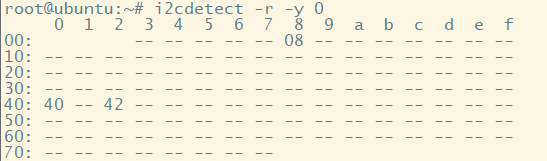
If no devices are detected, recheck all connections.
Audio Board Configuration
- RDK_X3
- RDK_X5
The first-time use of the audio board requires configuration via srpi-config. For detailed instructions, refer to the RDK User Manual section: RDK X3 Waveshare Audio Driver.
The first-time use of the audio board requires configuration via srpi-config. For detailed instructions, refer to the RDK User Manual section: RDK X5 Waveshare Audio Driver.
Usage Instructions
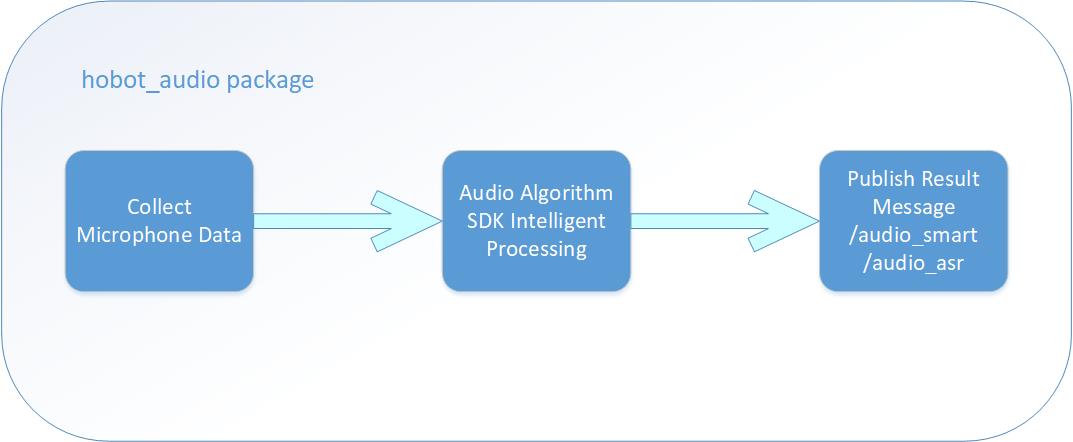
After launching the smart voice hobot_audio package, audio is captured from the microphone array and fed into the smart voice algorithm SDK module for intelligent processing. The module outputs wake-up events, command words, ASR results, and other smart information. Specifically:
- Wake-up events and command words are published as messages of type
audio_msg::msg::SmartAudioData. - ASR results are published as messages of type
std_msgs::msg::String.
The overall workflow is illustrated below:
By default, the smart voice feature performs noise reduction on raw audio before conducting ASR. The default wake-up word and command words are defined in the file config/hrsc/cmd_word.json located in the root directory of the smart voice module:
{
    "cmd_word": [
        "Hello Digua",
        "Move forward",
        "Move backward",
        "Turn left",
        "Turn right",
        "Stop moving"
    ]
}
Users may customize wake-up and command words as needed. Note that changing the wake-up word may result in performance differences compared to the default configuration. It is recommended to use Chinese phrases that are easy to pronounce, ideally consisting of 3–5 characters.
Additionally, the smart voice feature supports outputting DOA (Direction of Arrival) angle information, measured in degrees:
- Circular microphone array: 0° to 360°
- Linear microphone array: 0° to 180°
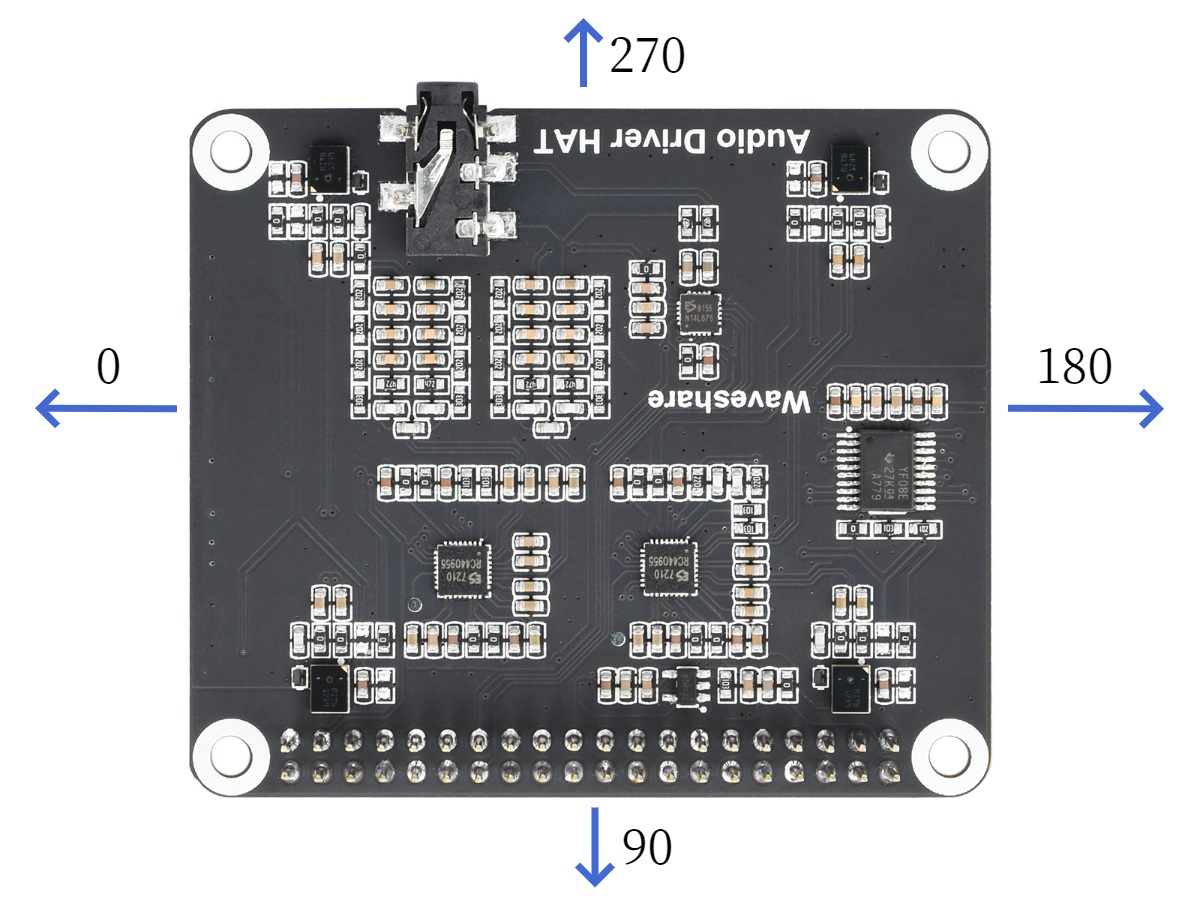
The angular reference frame is strongly dependent on the physical installation orientation of the microphone array. The DOA angle diagram for the circular microphone array is shown below:
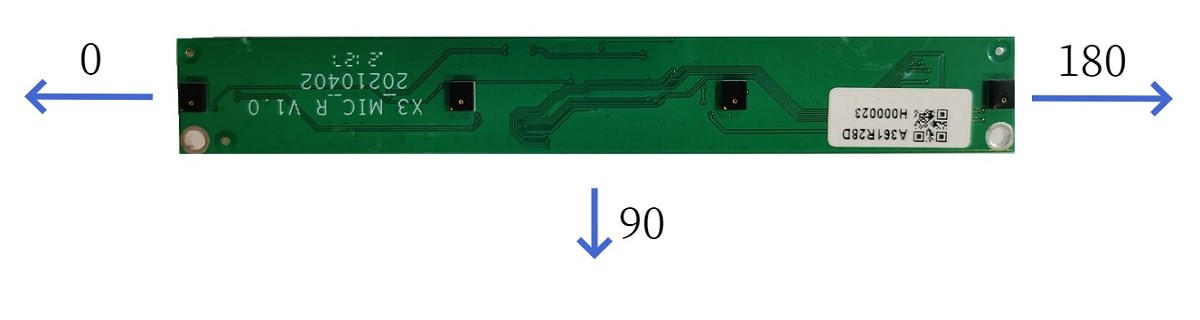
The DOA angle diagram for the linear microphone array is shown below:
To run the hobot_audio package on the RDK:
- Copy configuration files
- Foxy
- Humble
# Set up the tros.b environment
source /opt/tros/setup.bash
# Set up the tros.b environment
source /opt/tros/humble/setup.bash
# Copy required configuration files from the tros.b installation path (skip if already copied)
cp -r /opt/tros/${TROS_DISTRO}/lib/hobot_audio/config/ .
-
Verify configuration files
The default content of the configuration file config/audio_config.json is as follows:
{
   "micphone_enable": 1,
   "micphone_name": "hw:0,0",
   "micphone_rate": 16000,
   "micphone_chn": 8,
   "micphone_buffer_time": 0,
   "micphone_nperiods": 4,
   "micphone_period_size": 512,
   "voip_mode": 0,
   "mic_type": 0,
   "asr_mode": 0,
   "asr_channel": 3,
   "save_audio": 0
}
The following configurations need to be confirmed: microphone device ID, microphone array type, and whether ASR results should be published.
- Microphone device ID is set via the
micphone_namefield. The default value is"hw:0,0", which refers to audio device Card 0 Device 0. You can check available device IDs using the commandls /dev/snd, e.g.,"pcmC0D1c"; the trailing lettercindicates a capture device,C0stands for Card 0, andD1stands for Device 1. To use this device, modify the parameter to"hw:0,1". - Microphone array type is configured via the
mic_typefield. The default value is0, indicating a circular microphone array. If you are using a linear microphone array, change this field to1. - ASR output is controlled by the
asr_modefield. The default value is0, meaning ASR results are not published. To enable ASR result publishing, set this field to either1or2:1means performing one-time ASR recognition after wake-up and publishing the result.2means continuously performing ASR recognition and publishing results.
- Microphone device ID is set via the
-
Configure the tros.b environment and launch the application
- Foxy
- Humble
# Configure the tros.b environment
source /opt/tros/setup.bash

# Suppress debug log messages
export GLOG_minloglevel=3

# Launch the launch file
ros2 launch hobot_audio hobot_audio.launch.py
# Configure the tros.b environment
source /opt/tros/humble/setup.bash

# Suppress debug log messages
export GLOG_minloglevel=3

# Launch the launch file
ros2 launch hobot_audio hobot_audio.launch.py
Result Analysis
When running on the Sunrise X3 board, the terminal outputs the following logs:
alsa_device_init, snd_pcm_open. handle((nil)), name(hw:0,0), direct(1), mode(0)
snd_pcm_open succeed. name(hw:0,0), handle(0x557d6e4d00)
Rate set to 16000Hz (requested 16000Hz)
Buffer size range from 16 to 20480
Period size range from 16 to 10240
Requested period size 512 frames
Periods = 4
was set period_size = 512
was set buffer_size = 2048
alsa_device_init. hwparams(0x557d6e4fa0), swparams(0x557d6e5210)
The above log shows that the audio device has been successfully initialized and opened, and audio capture is working properly.
When a user speaks the command words “Digua hello”, “Move forward”, “Turn left”, “Turn right”, and “Move backward” near the microphone in sequence, the voice algorithm SDK processes the audio intelligently and outputs recognition results as shown in the following log:
recv hrsc sdk event wakeup success, wkp count is 1
[WARN] [1657869437.600230208] [hobot_audio]: recv event:0
recv hrsc sdk doa data: 100
recv hrsc sdk command data: Move forward
[WARN] [1657869443.870029101] [hobot_audio]: recv cmd word:Move forward
recv hrsc sdk doa data: 110
recv hrsc sdk command data: Turn left
[WARN] [1657869447.623147766] [hobot_audio]: recv cmd word:Turn left
recv hrsc sdk doa data: 100
recv hrsc sdk command data: Turn right
[WARN] [1657869449.865822772] [hobot_audio]: recv cmd word:Turn right
recv hrsc sdk doa data: 110
recv hrsc sdk command data: Move backward
[WARN] [1657869452.313969277] [hobot_audio]: recv cmd word:Move backward
The log shows successful recognition of the voice commands “Move forward”, “Turn left”, “Turn right”, and “Move backward”, along with DOA (Direction of Arrival) angle information. For example, the entry recv hrsc sdk doa data: 110 indicates a DOA angle of 110 degrees.
By default, hobot_audio publishes intelligent voice messages to the topic /audio_smart. You can verify this topic by running the command ros2 topic list in another terminal:
$ ros2 topic list
/audio_smart
If ASR output is enabled, an additional topic /audio_asr will be published. The output of ros2 topic list will then be:
$ ros2 topic list
/audio_smart
/audio_asr