Waveshare Audio Driver HAT REV2
Product Overview
The Audio Driver HAT REV2, produced by Waveshare Electronics, is an audio expansion board featuring the ES7210+ES8156 dual Codec solution. It supports 4-channel circular microphone recording, dual-channel audio playback, audio loopback, and more. The board is shown below:
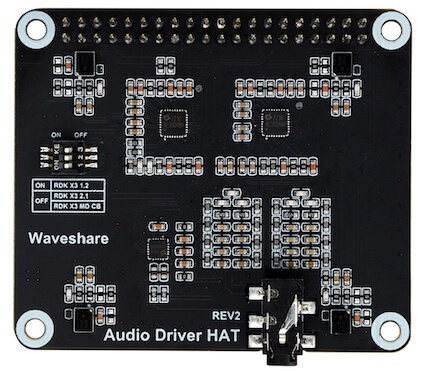
For detailed information about the audio sub-board, please refer to the Audio Driver HAT.
Installation
-
Hardware Setup
-
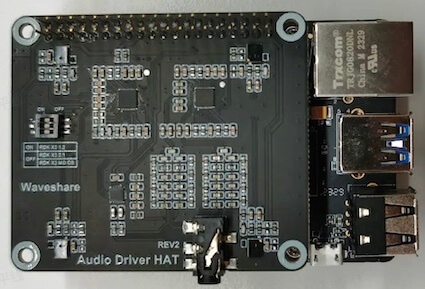
Connect the expansion board to the 40-pin header of the RDK X3 as shown below.
-
Set all 3 DIP switches to the
OFFposition.
-
Software Configuration
-
Use
srpi-configto configure the audio board.
Go to3 Interface Options->I5 Audio
SelectAudio Driver HAT V2: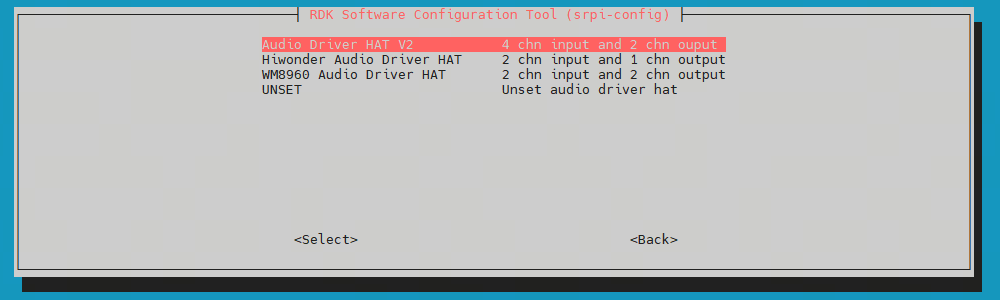
-
Follow the prompts to execute the
rebootcommand, or runsync && rebootto restart the board. Ifcat /proc/asound/cardsshows a sound card other thanduplexaudio, the expansion board is installed successfully.
root@ubuntu:~# cat /proc/asound/cards
 0 [duplexaudioi2s1]: simple-card - duplex-audio-i2s1
                      duplex-audio-i2s1
 1 [duplexaudio    ]: simple-card - duplex-audio
                      duplex-audio
-
Uninstallation
-
Use
srpi-configto configure the audio board.
Go to3 Interface Options->I5 Audio
SelectUNSETto uninstall the audio driver and related configurations. -
Remove the expansion board.
Usage
Check if the sound card exists and verify the device number.
To confirm the sound card is registered (as mentioned above):
root@ubuntu:~# cat /proc/asound/cards
 0 [duplexaudioi2s1]: simple-card - duplex-audio-i2s1
                      duplex-audio-i2s1
 1 [duplexaudio    ]: simple-card - duplex-audio
                      duplex-audio
Confirm the logical device by using the command cat /proc/asound/devices:
root@ubuntu:~# cat /proc/asound/devices
  2: [ 0- 0]: digital audio playback
  3: [ 0- 1]: digital audio capture
  4: [ 0]   : control
  5: [ 1- 0]: digital audio playback
  6: [ 1- 0]: digital audio capture
  7: [ 1]   : control
 33:        : timer
Check the actual device files in user space through the ls /dev/snd/ command:
root@ubuntu:~# ls /dev/snd/
by-path  controlC0  controlC1  pcmC0D0p  pcmC0D1c  pcmC1D0c  pcmC1D0p  timer
From the above, and with reference to the Onboard Earphone Audio Port, you can confirm that sound card 0 corresponds to the Audio Driver HAT REV2 node; the devices exist, and the device numbers are 0-0 and 0-1. The actual devices to operate are pcmC0D0p and pcmC0D1c.
The onboard sound card corresponds to 1, with device number 1-0, which is not used here.
-
Recording
-
2-channel microphone recording:
tinycap ./2chn_test.wav -D 0 -d 1 -c 2 -b 16 -r 48000 -p 512 -n 4 -t 5
- 4-channel microphone recording:
tinycap ./4chn_test.wav -D 0 -d 1 -c 4 -b 16 -r 48000 -p 512 -n 4 -t 5
-
Playback
-
Dual-channel audio playback (4-channel playback is not supported):
tinyplay ./2chn_test.wav -D 0 -d 0
Audio Loopback Test
The audio loopback function can be used to capture signals from the playback channel for subsequent analysis.
-
8-Channel Microphone Recording (Including Loopback)
The loopback signal on this audio board is mapped to recording channels 7 and 8. Use the 8-channel recording command:tinycap ./8chn_test.wav -D 0 -d 1 -c 8 -b 16 -r 48000 -p 512 -n 4 -t 5 -
Simultaneously Start Dual-Channel Audio Playback
tinyplay ./2chn_test.wav -D 0 -d 0 -
Analyze the Loopback Signal
After recording, use audio analysis software such as Audacity to open8chn_test.wavand examine the waveform or spectrum of channels 7 and 8 to verify whether the loopback function is working correctly.
FAQ
-
If no sound card is detected, check whether the hardware connections and DIP switch settings are correct.
-
If there is no sound during recording or playback, confirm that the audio file format and channel count match the command parameters.
-
If there is no signal in the loopback channel, ensure that the 8-channel recording command has been used correctly. For more questions, see this link