Waveshare WM8960 Audio HAT
Product Overview
The WM8960 Audio HAT is an audio adapter board produced by Waveshare Electronics, featuring the WM8960 Codec. It supports dual-channel microphone recording and audio playback. The board is shown below:
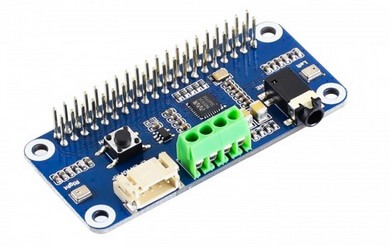
For more details, refer to the WM8960 Audio HAT Wiki.
Installation
-
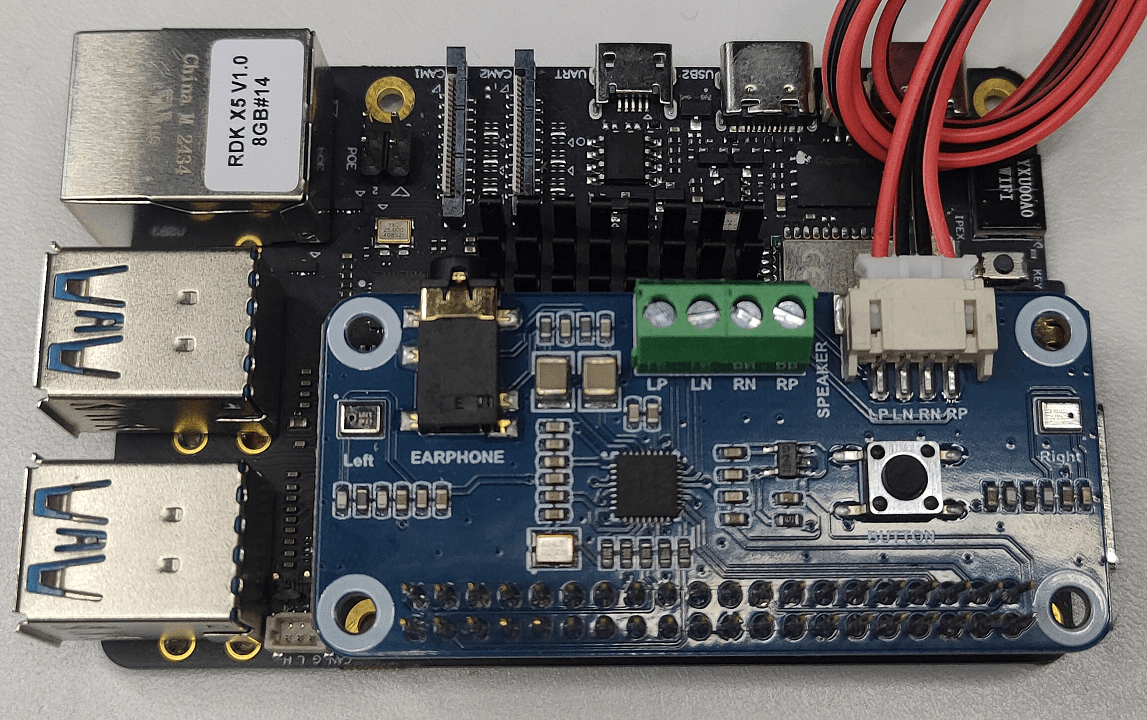
Hardware Setup
Connect the audio HAT to the 40-pin header of the RDK X5 as shown below:
-
Software Configuration
-
Use
srpi-configto configure the audio board.
Go to3 Interface Options->I5 Audio
SelectWM8960 Audio Driver HAT: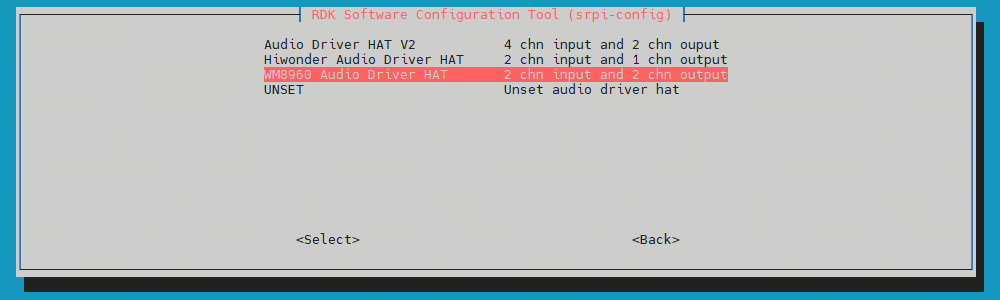
-
Follow the prompt to reboot, or run
sync && rebootto restart the board. Ifcat /proc/asound/cardsshows aduplexaudioi2s1sound card, the installation was successful.
root@ubuntu:~# cat /proc/asound/cards
 0 [duplexaudioi2s1]: simple-card - duplex-audio-i2s1
            duplex-audio-i2s1
 1 [duplexaudio    ]: simple-card - duplex-audio
            duplex-audio
-
Uninstallation
-
Use
srpi-configto configure the audio board.
Go to3 Interface Options->I5 Audio
SelectUNSETto uninstall the audio driver and related configurations. -
Remove the HAT from the board.
Usage
Check if the sound card exists and verify the device number.
Confirm whether the sound card is registered via the cat /proc/asound/cards command (mentioned above):
root@ubuntu:~# cat /proc/asound/cards
 0 [duplexaudioi2s1]: simple-card - duplex-audio-i2s1
            duplex-audio-i2s1
 1 [duplexaudio    ]: simple-card - duplex-audio
            duplex-audio
Confirm logical devices via the cat /proc/asound/devices command:
root@ubuntu:~# cat /proc/asound/devices
  2: [ 0- 0]: digital audio playback
  3: [ 0- 1]: digital audio capture
  4: [ 0]   : control
  5: [ 1- 0]: digital audio playback
  6: [ 1- 0]: digital audio capture
  7: [ 1]   : control
 33:        : timer
Check the actual device files in user space using the ls /dev/snd/ command:
root@ubuntu:~# ls /dev/snd/
by-path  controlC0  controlC1  pcmC0D0p  pcmC0D1c  pcmC1D0c  pcmC1D0p  timer
From the above, and with reference to the Onboard Earphone Audio Port, you can confirm that sound card 0 corresponds to the WM8960 Audio Driver HAT node. The devices exist, with device numbers 0-0 and 0-1. The actual devices to operate are pcmC0D0p and pcmC0D1c.
The onboard sound card is card 1, device number 1-0, which is not used here.
This audio HAT requires audio routing configuration before each function. The following commands must be run before each scenario.
Recording Operations
Audio Routing and Gain Configuration Before Recording
Before recording, it is necessary to correctly configure the audio input path and gain to ensure recording quality. The following commands sequentially set the input gain for left/right channels, recording volume, input path switches, etc.
# Set left/right channel input gain
tinymix -D 0 set 'Left Input Boost Mixer LINPUT1 Volume' 3
tinymix -D 0 set 'Right Input Boost Mixer RINPUT1 Volume' 3

# Adjust gain according to actual conditions (reduce appropriately if feedback occurs)
tinymix -D 0 set 'Left Input Boost Mixer LINPUT1 Volume' 1
tinymix -D 0 set 'Right Input Boost Mixer RINPUT1 Volume' 1

# Set recording volume
tinymix -D 0 set 'Capture Volume' 40,40
tinymix -D 0 set 'ADC PCM Capture Volume' 200,200

# Turn on input path switches
tinymix -D 0 set 'Left Boost Mixer LINPUT1 Switch' 1
tinymix -D 0 set 'Right Boost Mixer RINPUT1 Switch' 1
tinymix -D 0 set 'Left Input Mixer Boost Switch' 1
tinymix -D 0 set 'Right Input Mixer Boost Switch' 1

# Turn on recording switch
tinymix -D 0 set 'Capture Switch' 1,1
Start Recording
Use the tinycap command for recording:
tinycap ./2chn_test.wav -D 0 -d 0 -c 2 -b 16 -r 48000 -p 512 -n 4 -t 5
After recording completes, the 2chn_test.wav file will be generated.
Playback Operation
Speaker Playback (Dual Channel)
- Audio output path and volume need to be configured before playback:
# Enable left and right channel PCM playback switches
tinymix -D 0 set 'Left Output Mixer PCM Playback Switch' 1
tinymix -D 0 set 'Right Output Mixer PCM Playback Switch' 1

# Set speaker volume
tinymix -D 0 set 'Speaker DC Volume' 3
tinymix -D 0 set 'Speaker AC Volume' 3
tinymix -D 0 set 'Speaker Playback Volume' 127, 127
tinymix -D 0 set 'Playback Volume' 255, 255

# Ensure output switches are enabled again
tinymix -D 0 set 'Left Output Mixer PCM Playback Switch' 1
tinymix -D 0 set 'Right Output Mixer PCM Playback Switch' 1

# Play the recording file
tinyplay ./2chn_test.wav -D 0 -d 0
- Simultaneous headphone and speaker playback
tinymix -D  0 set 'Headphone Playback Volume' 80,80
tinymix -D  0 set 'Playback Volume' 220,220
tinymix -D  0 set 'Speaker DC Volume' 4
tinymix -D  0 set 'Left Output Mixer PCM Playback Switch' 1
tinymix -D  0 set 'Right Output Mixer PCM Playback Switch' 1
tinyplay ./2chn_test.wav -D 0 -d 0
- Headphone playback only (speaker muted)
tinymix -D  0 set 'Headphone Playback Volume' 115,115
tinymix -D  0 set 'Speaker Playback Volume' 0,0
tinymix -D  0 set 'Playback Volume' 244,244
tinymix -D  0 set 'Speaker DC Volume' 4
tinymix -D  0 set 'Left Output Mixer PCM Playback Switch' 1
tinymix -D  0 set 'Right Output Mixer PCM Playback Switch' 1
tinyplay ./2chn_test.wav -D 0 -d 0
FAQ
Q1: Hardware and software are working, audio path is normal, speakers have sound, but headphones are silent.
A1: The headphone volume may be too low. Increase the headphone volume, for example:
tinymix -D 0 set 'Headphone Playback Volume' 115,115