8.1 Hardware, System, and Environment Configuration
Many issues can be resolved through system updates. For related download resources, please refer to: Download Resources Summary
For certified accessories and purchase links, please refer to the Certified Accessories List.
Q1: What is the D-Robotics RDK Kit?
A: D-Robotics Developer Kits, abbreviated as D-Robotics RDK Kits, are robot developer kits based on D-Robotics intelligent chips. The main series currently include RDK X3 (Sunrise X3 Pi), RDK X3 Module, RDK X5, RDK X5 Module, RDK Ultra and RDK S100.
Q2: How to check the system version of an RDK board?
A: After logging into the RDK board, you can use the following commands:
-
Check the main system version:
cat /etc/versionFor example, the output might be
2.0.0orx3_ubuntu_v1.1.6. -
Check installed core D-Robotics packages:
apt list --installed | grep hobotOr use the
rdkos_infocommand (available on newer systems, e.g., 2.1.0 and above):rdkos_infoSample output (RDK OS 2.x, e.g., 2.0.0):
root@ubuntu:~# apt list --installed | grep hobot
hobot-boot/unknown,now 2.0.0-20230530181103 arm64 [installed]
hobot-bpu-drivers/unknown,now 2.0.0-20230530181103 arm64 [installed]
# ... other hobot-* packages
root@ubuntu:~# cat /etc/version
2.0.0
Sample output (RDK OS 1.x, e.g., 1.1.6):
root@ubuntu:~# apt list --installed | grep hobot
hobot-arm64-boot/unknown,now 1.1.6 arm64 [installed]
# ... other hobot-arm64-* packages
root@ubuntu:~# cat /etc/version
x3_ubuntu_v1.1.6
Q3: What is the relationship between different RDK OS versions and hardware platforms?
A:
- RDK OS 2.x and newer (e.g., 2.0.0, 2.1.0, 3.0.x):
- Based on D-Robotics open-source Linux packages.
- Typically supports the corresponding RDK hardware series, e.g., RDK X3 2.x/3.x supports RDK X3 and RDK X3 Module.
- RDK OS 1.x:
- Based on a closed-source Linux system (legacy version).
- Mainly supports early RDK X3 hardware.
Important Notes:
- Version upgrade: 1.x systems cannot be upgraded to 2.x or newer via
apt. To upgrade, you must re-flash the new system image (installation guide). - TROS compatibility: Different major TROS versions (e.g., Foxy-based TROS vs. Humble-based TROS) are usually tied to specific RDK OS versions. For example, RDK OS 2.x typically comes with ROS2 Foxy-based TROS, while RDK OS 3.x comes with ROS2 Humble-based TROS.
Q4: What should I pay attention to when plugging or unplugging the camera?
A: Never plug or unplug the camera while the board is powered on. Doing so can easily damage the camera module or the mainboard connector. Always disconnect all power before connecting or removing the camera.
Q5: How to correctly connect the RDK X3 debug serial cable?
A: One end of the RDK X3 debug serial cable (usually a white XH connector or corresponding pin header) connects to the DEBUG serial port on the RDK X3 board. The connector usually has a foolproof design (such as a notch or specific pin order), making it hard to connect incorrectly. The other end connects to a USB-to-serial module (e.g., CH340, CP210x), which then connects to your PC via USB.
Connection diagram:
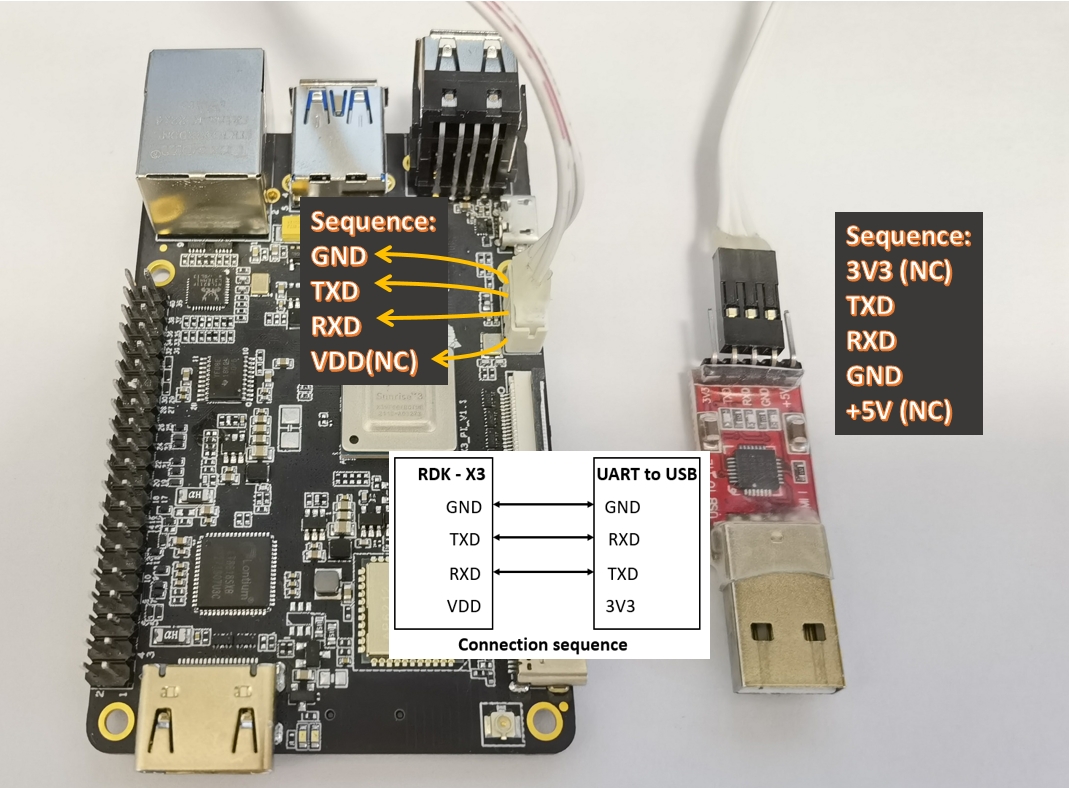 Key point: Ensure the serial module's TX connects to RDK's RX, RX to RDK's TX, and GND to GND.
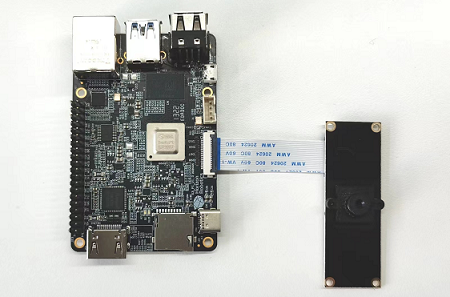
Q6: How to connect F37 and GC4663 MIPI cameras to RDK X3? How to verify the connection?
A: F37 and GC4663 MIPI camera modules usually connect via a 24-pin FPC (flexible flat cable).
Connection note: The FPC cable usually has a blue stiffener on both ends. Make sure the blue side faces up (or towards the connector latch, depending on the connector type) when inserting into the board and camera module, and lock the latch.
F37 camera connection diagram:
After connecting:
-
Ensure the camera is properly connected and the board is powered on.
-
Run the MIPI camera sample (for RDK X3):
cd /app/ai_inference/03_mipi_camera_sample # Path may vary by system version
sudo python3 mipi_camera.py
If successful, you should see the camera feed and possible AI results via HDMI or other output. Example HDMI output (detecting
teddy bear,cup, andvase):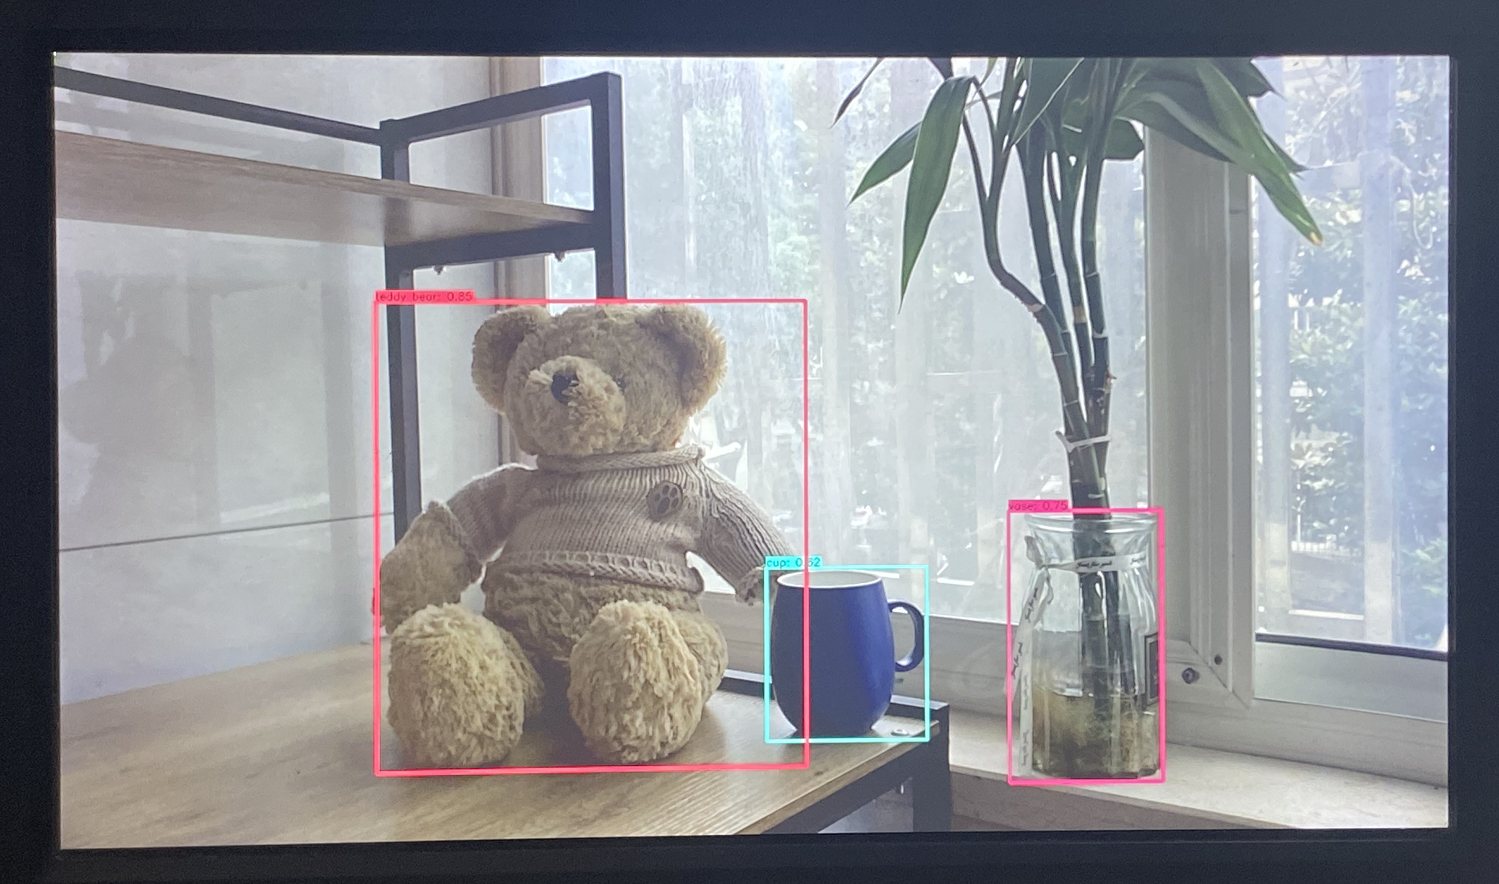
-
Check I2C communication with
i2cdetect: MIPI cameras use I2C for configuration. Usei2cdetectto scan devices on the relevant I2C bus (ofteni2c-1ori2c-2on RDK X3; check hardware manual or device tree).sudo i2cdetect -y -r 1 # Scan i2c-1
# or sudo i2cdetect -y -r 2 # Scan i2c-2Expected output:
- F37 (usually at 0x40):
      0  1  2  3  4  5  6  7  8  9  a  b  c  d  e  f
00:
...
30: -- -- -- -- -- -- -- -- -- -- -- UU -- -- -- --  (UU means kernel driver has claimed it)
40: 40 -- -- -- -- -- -- -- -- -- -- -- -- -- -- --  (0x40 is F37 address)
... - GC4663 (usually at 0x29):
      0  1  2  3  4  5  6  7  8  9  a  b  c  d  e  f
00:
...
20: -- -- -- -- -- -- -- -- -- 29 -- -- -- -- -- --  (0x29 is GC4663 address)
30: -- -- -- -- -- -- -- -- -- -- -- UU -- -- -- --
...
If
i2cdetectfinds the camera's I2C address, it means the camera is recognized at the I2C level. - F37 (usually at 0x40):
Q7: What could cause the board to fail to boot, show nothing on power-up, or keep rebooting? How to troubleshoot?
A: These issues are usually related to power supply, boot media (SD card/eMMC), or hardware connections.
-
Insufficient or unstable power:
- Symptoms: System reboots during U-Boot or early kernel boot without clear error logs; green LED abnormal (e.g., not blinking or always on); HDMI black screen.
- Troubleshooting:
- Use a power adapter that meets board requirements (RDK X3: at least 5V/2A, recommended 5V/3A or higher with QC/PD support).
- Do not power the board from a PC USB port.
- Use a reliable USB Type-C cable.
- Refer to the official accessory list for recommended adapters.
- Symptoms: System reboots during U-Boot or early kernel boot without clear error logs; green LED abnormal (e.g., not blinking or always on); HDMI black screen.
-
Boot media issues (Micro SD/eMMC):
- Symptoms: Serial log shows filesystem mount failure, missing partitions, MMC/SD init errors or timeouts.

- Troubleshooting:
- Ensure the SD card image is correctly and fully flashed.
- Try reflashing the system image.
- Replace with a new, high-quality Micro SD card.
- Clean the SD card slot and contacts.
- Symptoms: Serial log shows filesystem mount failure, missing partitions, MMC/SD init errors or timeouts.
-
Accidentally entering U-Boot via serial:
- Symptoms: System stops at U-Boot prompt (e.g.,
hobot>). - Troubleshooting: May be caused by unexpected serial input during power-up. Try unplugging the serial cable and rebooting. If at U-Boot prompt, try typing
bootand pressing Enter.
- Symptoms: System stops at U-Boot prompt (e.g.,
-
Other hardware or peripheral conflicts:
- If above steps fail, remove all unnecessary peripherals (USB devices, expansion boards) and try again.
- In rare cases, the board itself may be faulty.
-
Detailed troubleshooting: See the official forum guide. Connecting a debug serial cable and capturing the full boot log is crucial for diagnosis.
Q8: What are the power supply requirements for RDK X3?
A: RDK X3 is powered via USB Type-C and supports QC (Quick Charge) and PD (Power Delivery) protocols.
- Recommended: Use a QC or PD-compatible power adapter.
- Minimum: At least 5V DC 2A. For stable operation, especially with peripherals or high load, use 5V/3A or higher.
- Warning: Strongly discouraged to use a PC USB port for power, as it often cannot supply enough current, leading to boot failures, HDMI issues, abnormal LEDs, or reboots.
Q9: Are there recommended SD card brands or specs for RDK X3?
A:
- Specs: Use high-speed C10 (Class 10) or higher (e.g., UHS Speed Class 1 (U1), U3, Application Performance Class A1/A2) Micro SD cards. Capacity: 16GB or above.
- Compatibility: Old, unbranded, or low-speed SD cards may cause boot failures, slow operation, or unstable data access.
- Recommended brands (for reference, test and check latest official advice): Kingston, SanDisk, Samsung, etc.
- Kingston example:
https://item.jd.com/25263496192.html - SanDisk example:
https://item.jd.com/1875992.html#crumb-wrap(Links are from original docs; verify product and channel before purchase.)
- Kingston example:
Q10: What to do if apt update fails (e.g., key error, update failure, lock file in use)?
A:
(1) Source domain or GPG key issues
- Cause: The official apt source domain or GPG key may have changed.
- Error examples:
Clearsigned file isn't valid, got 'NOSPLIT'The repository '...' is no longer signed.Could not resolve 'archive.sunrisepi.tech'(or other old domains)The following signatures couldn't be verified because the public key is not available: NO_PUBKEY ...
- Solution:
- Update domain: Edit
/etc/apt/sources.list.d/sunrise.list(or other source files), replace old domains (e.g.,archive.sunrisepi.tech,sunrise.horizon.cc) with the latest (archive.d-robotics.cc).# Replace "old_domain" with the actual old domain in your file
sudo sed -i 's/old_domain/archive.d-robotics.cc/g' /etc/apt/sources.list.d/sunrise.list - Update GPG key: Download and install the latest GPG key.
sudo wget -O /usr/share/keyrings/sunrise.gpg http://archive.d-robotics.cc/keys/sunrise.gpg - Try
sudo apt updateagain.
- Update domain: Edit
(2) apt lock file in use
- Error example:
E: Could not get lock /var/lib/apt/lists/lock. It is held by process XXXX (apt-get)
N: Be aware that removing the lock file is not a solution and may break your system.
E: Unable to lock directory /var/lib/apt/lists/ - Cause: The system may be running background updates, or a previous apt operation didn't finish.
- Solution:
- Wait: Sometimes the background process will finish soon.
- Kill the process: If locked for a long time, kill the process holding the lock (the error message shows the PID, e.g.,
XXXX):sudo kill XXXX - Remove lock files (with caution): After confirming no apt/dpkg processes are running, you can remove lock files. This is risky and may break your package manager; proceed with caution.
sudo rm /var/lib/apt/lists/lock
sudo rm /var/cache/apt/archives/lock
sudo rm /var/lib/dpkg/lock
sudo rm /var/lib/dpkg/lock-frontend
sudo dpkg --configure -a # Attempt to fix unfinished package configs - Try
sudo apt updateagain.
Q11: How to check the status of CPU, BPU, and other hardware units on RDK X3?
A: Use the hrut_somstatus tool provided by D-Robotics to view real-time system status, including CPU core usage, BPU (AI unit) usage, memory, and chip temperature.
On the board terminal, run:
sudo hrut_somstatus
This command refreshes status at intervals. Press Ctrl+C to exit.
Q12: How to set up auto-start for RDK applications?
A: Two main methods:
-
Via
/etc/rc.local(traditional): Edit this file (create if missing, or enablerc-local.service), add your command beforeexit 0, and ensure the script is executable.#!/bin/bash -e
# rc.local
# Example: Start your application in the background
# /usr/bin/python3 /home/sunrise/my_app.py &
exit 0Reference: RDK Docs - rc.local Autostart
-
Via
systemdservice (modern, recommended): Create a.servicefile (e.g.,/etc/systemd/system/myapp.service), define the start command, dependencies, user, restart policy, etc. Examplemyapp.service:[Unit]
Description=My Application Service
After=network.target multi-user.target
[Service]
User=sunrise
ExecStart=/usr/bin/python3 /home/sunrise/my_app.py
Restart=on-failure
# StandardOutput=append:/var/log/myapp_stdout.log
# StandardError=append:/var/log/myapp_stderr.log
[Install]
WantedBy=multi-user.targetThen enable and start the service:
sudo systemctl daemon-reload
sudo systemctl enable myapp.service
sudo systemctl start myapp.service
# Check status: sudo systemctl status myapp.service
# View logs (if configured): journalctl -u myapp.service
Reference: RDK Community - systemd Autostart
Autostart notes:
- Ensure script/program paths are correct and executable.
- Handle dependencies (e.g., network, hardware init) and environment variables.
- If a GUI is needed, ensure
DISPLAYis set and X Server is running. - Redirect output to log files for troubleshooting.
Q13: What are the default login accounts and passwords for the board?
A: Usually, the following accounts are available:
- Normal user: Username
sunrise, passwordsunrise - Superuser (root): Username
root, passwordroot(Note: Actual defaults may vary by image version; check the release notes.)
Q14: How to mount an NTFS USB drive or HDD on RDK and enable read/write?
A: Ubuntu's default NTFS support may be read-only. For full read/write, install ntfs-3g:
- Install
ntfs-3g:sudo apt update
sudo apt -y install ntfs-3g - Mount the NTFS partition:
After installation, use
mount(the system will usentfs-3gautomatically).- Create a mount point:
sudo mkdir /mnt/my_ntfs_disk - Mount the device (replace
/dev/sda1as needed):sudo mount /dev/sda1 /mnt/my_ntfs_disk
# Or explicitly specify type (usually not needed)
# sudo mount -t ntfs-3g /dev/sda1 /mnt/my_ntfs_disk
/mnt/my_ntfs_disk. - Create a mount point:
Q15: Can RDK boards run VS Code locally? How to use VS Code on PC to connect remotely?
A:
- Local VS Code: RDK boards (ARM embedded devices) do not support running the full VS Code desktop app locally. Official VS Code is mainly for x86_64.
- Remote development (recommended):
Install VS Code on your PC (Windows, macOS, or Linux) and use the Remote - SSH extension to connect to the RDK board. This lets you use full VS Code features on your PC, while code runs/compiles on the board.
Steps:
- Install "Remote - SSH" in VS Code on your PC.
- Ensure your PC and RDK board are on the same LAN, and SSH is enabled on the board.
- Configure SSH in VS Code (e.g.,
ssh username@board_ip). - Once connected, you can open folders on the RDK board directly in VS Code.
Q16: How to enable and use ADB (Android Debug Bridge) on RDK?
A: RDK Ubuntu usually has adbd (ADB daemon) built in, but USB mode may need adjustment.
- Check
adbdservice: Ensure it's running or has a startup script. - USB mode: The board's USB Type-C or Micro USB (marked OTG/Device) may need to be set to Device mode (not Host) for ADB. This can sometimes be set via
srpi-configor by editing device tree/kernel params. - PC setup: Install ADB tools (part of Android SDK Platform Tools).
- Connect: Use a USB cable to connect PC and the board's Device-mode USB port.
- Verify: On PC, run
adb devices. If configured correctly, the RDK device should appear. - Usage: Once connected, use
adb shellfor terminal,adb push <local> <remote>to upload,adb pull <remote> <local>to download.
Note: Steps may vary by RDK model and system version. Check official docs for details. Sometimes, bootloader update guides may also cover ADB setup. Reference: bootloader image update (may be bootloader-focused; look for ADB-specific docs/posts).
Q17: What are common ways to transfer files between the board and a PC?
A: Several options:
-
SCP (Secure Copy, via SSH):
- PC to board:
scp /path/to/local_file sunrise@<board_ip>:/path/on/rdk/
# For folders:
scp -r /path/to/local_folder sunrise@<board_ip>:/path/on/rdk/ - Board to PC:
scp sunrise@<board_ip>:/path/on/rdk/remote_file /path/to/local/
scp -r sunrise@<board_ip>:/path/on/rdk/remote_folder /path/to/local/
SCP is built-in on Linux/macOS; on Windows, use WinSCP, MobaXterm, or Git Bash.
- PC to board:
-
SFTP (SSH File Transfer): Many FTP clients (FileZilla, WinSCP) support SFTP for GUI file transfer. Use SSH credentials.
-
USB storage (U disk/HDD):
- Format USB drive to a supported filesystem (FAT32, exFAT, or NTFS with
ntfs-3g). - Copy files on PC, insert into board's USB Host port.
- On the board, mount the drive (
sudo mount /dev/sda1 /mnt/usb_disk), then access files.
- Format USB drive to a supported filesystem (FAT32, exFAT, or NTFS with
-
ADB (if configured):
- PC to board:
adb push C:\local\path\file.txt /remote/path/on/rdk/ - Board to PC:
adb pull /remote/path/on/rdk/file.txt C:\local\path\
- PC to board:
-
Network sharing (Samba, NFS): Set up Samba or NFS on the board to share directories over LAN. More complex to configure.
-
Python HTTP server (for quick sharing): In the desired directory on the board:
cd /path/to/share
python3 -m http.server 8000
Then access
http://<board_ip>:8000in your PC browser to download files.
Choose based on file size, frequency, network, and preference. For code/config sync, SCP/SFTP or VS Code Remote-SSH is usually most convenient.
Q18: What is the default wired IP for RDK X3 in different system versions?
A:
- For RDK X3 RDK OS 2.0.0 and below: default wired IP is
192.168.1.10/24 - For RDK X3 RDK OS 2.1.0 and above: default wired IP is
192.168.127.10/24
Q19: What is the default network IP for RDK X5 in different system versions?
A: (Example: RDK OS 3.0.0)
- RDK X5 3.0.0 wired IP:
192.168.127.10/24 - RDK X5 3.0.0 USB Device port (virtual USB NIC):
192.168.128.10/24
Q20: What if the desktop goes black during apt upgrade?
A: It is recommended to perform system updates (sudo apt update && sudo apt upgrade) via serial terminal or SSH, not in a graphical terminal. Upgrading desktop-related packages in a GUI terminal may cause display interruption or X Server restart, resulting in a black screen.
Q21: Why doesn't my PC display anything when connecting RDK X3's HDMI output to the PC's HDMI input/output?
A: The RDK X3 HDMI port is output only, for sending video to a display (monitor/TV). PC HDMI ports are usually output only as well (for external monitors), unless your PC has a capture card or HDMI input.
- Connecting two outputs (RDK X3 and PC HDMI out) will not work.
- If your PC has HDMI input (e.g., via capture card), ensure it's set to the correct input source and supports the RDK X3's output resolution/format. For viewing RDK X3 output on a PC, recommended methods:
- VNC remote desktop: If using the Desktop version and VNC is enabled, use a VNC client on your PC.
- Video streaming: Stream camera or AI results from RDK X3 over the network (RTSP, WebRTC), then view on PC.
Q22: Why does the board boot with the SD card inserted, but fails to boot after removing it?
A: Depends on your RDK model and boot mode:
- For RDK X3 (standard, SD boot) and X3 Module set to SD boot: The Micro SD card is the only storage for OS and data. The SD card must remain inserted for normal operation. Removing it means the system can't find the OS and won't boot.
- For X3 Module set to eMMC boot: The board has onboard eMMC storage, and the OS can be flashed to eMMC. In this mode, the SD card is not required for boot (unless you want to boot from SD temporarily). If you remove an SD card used as external storage, it won't affect eMMC boot.
Check your board model and current boot media settings.
Q23: Can the RDK OS Server edition be directly upgraded to the Desktop edition?
A: The Server and Desktop editions of RDK OS differ significantly in their pre-installed software packages. Most notably, the Desktop edition includes a graphical user interface (such as the XFCE desktop environment) and related components, while the Server edition omits these to save resources.
- In theory: You can manually install all the necessary Desktop packages (such as
xserver-xorg,xfce4,lightdm, and their dependencies) on a Server system to "upgrade" it to a graphical environment. - Official support and stability: This manual upgrade path is not officially provided or recommended, and systems built this way are not guaranteed or tested for stability and completeness. The manual installation process is complex and prone to missing dependencies or configuration conflicts.
- Recommended approach: If you need the full functionality and best experience of the Desktop edition, it is strongly recommended to directly download and flash the official Desktop system image. This is the best way to ensure system stability and feature completeness.
Q24: Why is there no display or abnormal output after connecting an HDMI monitor?
A: HDMI display issues can be caused by several factors:
- Monitor compatibility:
- Some monitors may not be fully compatible with the specific resolutions or refresh rates output by the RDK board.
- RDK OS 2.1.0 and above introduced more HDMI resolution options, which may also cause compatibility issues with certain older monitors.
- Generally, standard 1080p (1920x1080) monitors connected at boot are most likely to work.
- Cable issues: Ensure the HDMI cable is of good quality and firmly connected. Try replacing the cable.
- RDK system configuration:
- For Desktop systems, ensure the graphical interface service (such as LightDM) is running.
- For Server systems, HDMI may only output the boot logo or console by default, not a graphical desktop.
- On RDK OS 2.1.0 and above, if you encounter display incompatibility, try connecting via VNC (if enabled) and adjust the HDMI output resolution in the system. See: HDMI display issues and resolution adjustment
- Power supply issues: Severe power instability may prevent the display subsystem from initializing properly.
- Hardware issues: Rarely, the HDMI port on the board or the monitor itself may be faulty.
Q25: How to capture EDID information for an unsupported HDMI monitor for technical support?
A: If your HDMI monitor does not display correctly, technical support may ask for the monitor's EDID (Extended Display Identification Data) to help diagnose or add compatibility. EDID contains information about the monitor's capabilities, supported resolutions, and timings. Common ways to obtain EDID:
- Via Linux command-line tools (if the board can boot or be accessed otherwise):
- Use tools like
get-edidandparse-edidfrom theread-edidpackage. Install withsudo apt install read-edid. - Then try to read the EDID from the connected monitor.
- Use tools like
- Using dedicated EDID hardware/software: Some monitor testing tools or EDID programmers can read and save EDID directly.
- Reading on a PC: If the monitor works on a Linux or Windows PC, you can try reading its EDID there.
- On Linux, use
xrandr --propsorget-edid | parse-edid. - On Windows, use tools like MonitorInfoView (NirSoft) or Phoenix EDID Designer.
- On Linux, use
Once you have the EDID data (usually a binary file or hex text), provide it to technical support. For detailed steps on RDK platforms, refer to the official forum guide: How to provide EDID info for unsupported monitors
Q26: What should I do if the SD card is not recognized or is unstable?
A: If the SD card is not recognized or is unstable, check the following:
- SD card quality:
- Using low-quality, aging, or damaged SD cards is a common cause. Try a new, reliable, high-speed Micro SD card (Class 10, U1/U3).
- SD card slot contact:
- Ensure the SD card is fully inserted and making good contact. Remove and clean the contacts with an eraser, and check for debris in the slot.
- SD card compatibility:
- While RDK X3 has improved SD card compatibility in newer systems, a few cards may still have issues.
- For Sunrise X3 Pi, if you encounter compatibility issues, try manually flashing the latest miniboot image. This also applies to RDK X3. See: SD card compatibility and miniboot update
- System image or flashing issues:
- Ensure the image file is not corrupted and the flashing process is correct. Try re-downloading and using recommended tools (balenaEtcher, Rufus).
- Power supply issues:
- Unstable power can indirectly affect SD card recognition and stability.
- Board hardware issues:
- Rarely, the SD card controller or slot may be faulty.
If you see logs like "mmc0: error -110 whilst initialising SD card" or "Card did not respond to voltage select", it usually indicates SD card recognition or initialization failure.
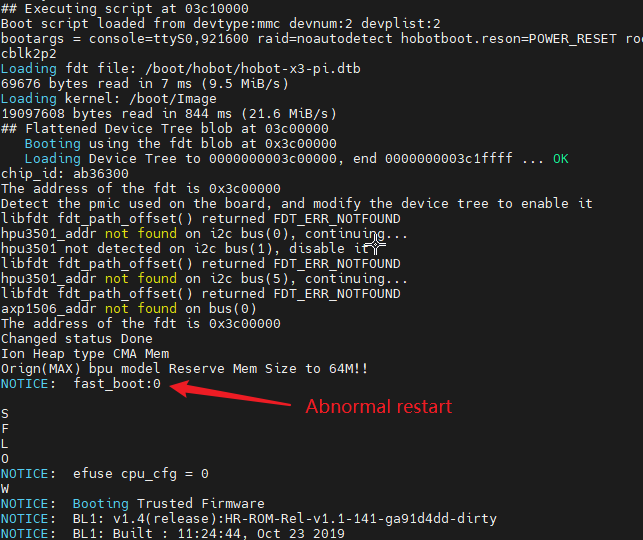
Q27: What should I do if the system stops at the hobot> U-Boot command line during boot?
A: If the system stops at the hobot> prompt, it means the board has entered U-Boot (Universal Boot Loader) command mode instead of booting Linux. Possible causes:
- Serial interference: If the debug serial port receives unexpected characters or signals (e.g., accidental keypress, terminal software sending control characters) during the first few seconds of boot, it may interrupt U-Boot's auto-boot and drop to the command line.
- Boot order configuration: U-Boot may be configured to try certain boot media first. If the configuration is changed or the preferred media is missing, it may stop at the command line.
- Boot script issues: Errors or interruptions in the U-Boot boot script.
- Key press interruption: Some boards enter U-Boot command mode if a specific key is pressed at boot.
Solutions:
- Simple attempt: At the
hobot>prompt, typebootand press Enter to try booting Linux. - Check serial connection: Ensure the debug serial connection is stable and free from interference. Try disconnecting the serial cable and rebooting.
- Check boot media: Ensure the SD card or eMMC image is intact and bootable.
- Reset U-Boot environment variables (with caution): If you suspect environment variables are corrupted, you can try restoring defaults (e.g.,
env default -a; saveenv; reset). This will erase all custom variables—proceed with caution.
Q28: Can Sunrise X3 Pi or RDK X3 be powered via the 40-pin GPIO?
A:
- Sunrise X3 Pi: According to official documentation, Sunrise X3 Pi cannot be powered via the 40-pin GPIO. Its power design may not support this path or protection.
- RDK X3 (standard/core board): Some versions of RDK X3 (not Sunrise X3 Pi) can be powered via the 5V pin on the 40-pin GPIO. However, this is generally not recommended as the main power method due to possible stability and current limitations compared to the dedicated Type-C port.
General strong recommendation: Always use a compliant power adapter via the board's Type-C (or dedicated power) port. Powering via non-recommended methods (such as GPIO pins or unsuitable modules) risks insufficient current, unstable voltage, and lack of protection, which may damage hardware or cause instability. Such risks are the user's responsibility.
See related FAQ entries for distinguishing RDK X3 and Sunrise X3 Pi.
Q29: What are common causes of image flashing failures?
A: When flashing a system image to an SD card (using balenaEtcher, Rufus, etc.), failures may be due to:
- Image file issues:
- Not fully extracted: Ensure you are flashing the raw
.imgfile, not a compressed archive. - Incomplete or corrupted download: Re-download and verify the image's MD5/SHA256 checksum if available.
- Not fully extracted: Ensure you are flashing the raw
- SD card issues:
- Damaged or poor-quality card: Try a new, reliable SD card.
- Write protection: Ensure the SD card's physical write-protect switch is off.
- Insufficient capacity: Ensure the SD card is larger than the extracted image.
- Card reader issues:
- Faulty or incompatible reader. Try another reader.
- Some high-speed SD cards may have issues with old or poor-quality readers.
- Flashing tool or PC environment issues:
- Software version: Try updating or switching flashing tools.
- USB port or drivers: Try a different USB port; ensure drivers are OK.
- OS permissions: On Windows, run the tool as administrator.
- Antivirus/firewall interference: Temporarily disable security software that may block disk writes.
- Windows format prompt: If Windows prompts to format the SD card during flashing, always choose "No" or close the dialog. Formatting will interrupt flashing.
- Cross-verification: If possible, try flashing on another PC or with different SD card/reader combinations to isolate the issue.
Q30: What should I do if I cannot connect to RDK X3's VNC remote desktop?
A: If you cannot connect via VNC, check the following:
- System version and VNC service status:
- Desktop image: Ensure you have flashed the Desktop system image. The Server version does not include a GUI or VNC by default.
- VNC service enabled:
- On RDK OS 2.1.0 and above (or upgraded from 2.0.0), VNC must be enabled manually in
srpi-config. SSH into the board, runsudo srpi-config, and enable VNC. - On earlier versions, VNC may be enabled by default.
- On RDK OS 2.1.0 and above (or upgraded from 2.0.0), VNC must be enabled manually in
- VNC service running: Check for VNC server processes (e.g.,
tightvncserver,x11vnc).
- Network connection:
- Ensure your PC and RDK X3 are on the same LAN.
- Ensure you can
pingthe RDK X3's IP from your PC. - Check firewalls to ensure VNC ports (default 5900 + display number, e.g., 5901 for :1) are not blocked.
- VNC client configuration:
- IP and port: Enter the correct IP and port in your VNC client. Port is usually
5900 + N(N = display number, usually 1, so 5901). Some clients use192.168.1.10:1. - Password: The default VNC password is usually
sunriseor what you set insrpi-config.
- IP and port: Enter the correct IP and port in your VNC client. Port is usually
- SSH connection check: Before troubleshooting VNC, ensure you can SSH into RDK X3. If SSH fails, resolve network or SSH issues first.
- Resource usage: RDK X3 (especially models without a dedicated GPU) may have high CPU/memory usage running a GUI and VNC. If overloaded, VNC may be slow or fail to connect.
Q31: Why is there only a black window (no image) when running /app/pydev_demo/02_camera_hdmi_output or 03_yolov5_camera_hdmi_output on RDK X5?
A:
- Update packages: Ensure all
hobot*packages are up to date. With the correct APT source, run:Then reboot the board.sudo apt update && sudo apt upgrade - Purpose of the demo: These demos (especially
02_camera_hdmi_output) are designed to output NV12 camera images directly to HDMI via hardware BT1120, not to display images in a window usingcv2.imshow(). The black/gray window you see may just be a placeholder; the actual image is output directly to the HDMI display. - Disable desktop environment (for HDMI hardware output): If running the Desktop version and you want HDMI hardware preview, you must stop the XFCE desktop environment:
After stopping the desktop, use SSH or serial to run the demos.
sudo systemctl stop lightdm - Sensor resolution selection: Some demo versions prompt you to select sensor resolution (e.g., enter a number 0-4). Follow the on-screen instructions.
Q32: Why is the HDMI output image upside down or missing YOLOv5 detection boxes when running these demos on RDK X5?
A:
- Upside-down image/no detection boxes (when running under XFCE): If you run these Python demos in the XFCE desktop and see a window via
cv2.imshow(), the image may be upside down (depending on OpenCV and sensor orientation), and YOLOv5 detection boxes may not appear. This is becausecv2.imshow()renders on the CPU, while detection boxes may be overlaid via hardware OSD (Overlay Screen Display) directly on the HDMI output. - Correct HDMI hardware preview:
- As in Q31, run
sudo systemctl stop lightdmto stop the desktop. - SSH or serial into RDK X5.
- Run the demo. The camera image and hardware OSD overlays (for
03_yolov5_camera_hdmi_output) will be output directly to the HDMI display.
- As in Q31, run
In short, the expected effect (correct orientation and hardware OSD) requires stopping the desktop and observing via HDMI.
Q33: What typical kernel log errors indicate SD card contact issues or damage?
A: If the Micro SD card has contact issues, is damaged, or incompatible, you may see errors like the following in the serial or dmesg logs:
mmc0: card never left busy state
mmc0: error -110 whilst initialising SD card
mmc_rescan_try_freq: send_status error -110
Card did not respond to voltage select! : -110
mmc0: unrecognised CSD structure version x
mmc0: error -22 whilst initialising SD card
eMMC or SD Card not detected on mmchost 0
MMC Device X not found
no mmc device at slot X
Such logs usually mean you should check the SD card, replace it, or check the slot.
Q34: Does RDK X5 support real-time Linux kernel (RT-Linux)? How to obtain and use it?
A: Yes, RDK X5 supports the Preempt-RT kernel, which is important for low-latency, deterministic robotics applications.
- How to obtain:
- System image: Your RDK X5 system version must support it (e.g., RDK OS 3.0.1 or newer).
Official images:
https://archive.d-robotics.cc/downloads/os_images/rdk_x5/(look for Preempt-RT resources under the relevant version). - Debian packages: Precompiled RT kernel
.debpackages are usually provided. - Kernel source: D-Robotics also provides Preempt-RT kernel source on GitHub. See: D-Robotics x5-kernel-rt on GitHub
- System image: Your RDK X5 system version must support it (e.g., RDK OS 3.0.1 or newer).
Official images:
- How to use:
- Ensure your base RDK X5 system is installed and running.
- Download the RT kernel
.debpackages (image and headers). - Transfer them to the board.
- Install with
sudo dpkg -i <kernel_image.deb> <kernel_headers.deb>. - Update the bootloader (U-Boot) config as per official docs.
- Reboot.
- Verify with
uname -a(should show-rtin the version).
Q35: VNC remote desktop on RDK X5 is laggy—how to optimize?
A: VNC performance depends on many factors, especially on embedded devices without a dedicated GPU. Try the following:
- Connect an HDMI monitor or dummy plug:
- Some systems limit graphics performance if no monitor is detected. Connecting a real HDMI monitor or dummy plug may improve VNC performance.
- Use virtual display software:
- Configure a virtual display (e.g.,
Xvfbor withx11vnc) so VNC grabs from a virtual screen. - See community guides, e.g.: RDK X5 virtual display configuration (CSDN)
- Configure a virtual display (e.g.,
- Optimize VNC settings:
- Lower color depth, compression quality, and disable visual effects to reduce data transfer and rendering load.
- Ensure a stable, high-bandwidth network (wired is better).
- Lower desktop resolution: Reducing screen resolution reduces data to transfer and render.
- Close unnecessary graphical apps: Free up resources for VNC.
- Check system load: Use
toporhtopto check CPU/memory usage. High load will affect VNC performance.
Q36: What should I do if the board gets too hot under heavy load?
A: Overheating can affect stability or damage hardware. Solutions:
- Improve cooling:
- Passive vs. active: For sustained high load, passive heatsinks may not be enough. Use active cooling (heatsink with fan) or install in a well-ventilated case.
- Heatsink installation: Ensure good contact with the chip, and use thermal paste or pads.
- Ensure airflow: Avoid placing the board in enclosed or poorly ventilated spaces.
- Monitor temperature:
- Use commands like
cpu_status_monitoror read/sys/class/thermal/thermal_zoneX/temp. - Know the safe operating temperature range for your board.
- Use commands like
- Optimize application load:
- Reduce unnecessary computation, optimize algorithms, or use lighter models to lower power and heat.
- Check power supply: Unstable power can cause abnormal operation and indirectly affect temperature.
Note: "Low power" does not mean "low temperature"—good cooling is essential for stable operation.
Q37: How to use D-Robotics RDK-specific Python packages (e.g., hobot.GPIO, hobot_dnn) in a Conda virtual environment?
A: Official hobot.GPIO, hobot_dnn, etc., are usually precompiled and optimized for the system Python on RDK, and may depend on system libraries and drivers. Using them in Conda or other virtual environments can be challenging due to isolation.
Possible approaches and notes:
- Check for official Conda support or
.whlfiles:- Check the latest official docs, community, or GitHub for Conda support or
.whlfiles that can be installed viapipin Conda. This is ideal.
- Check the latest official docs, community, or GitHub for Conda support or
- Try installing system packages in Conda via
pip(if no.whl):- If the packages are installed in the system Python (e.g.,
/usr/lib/python3/dist-packages/), and your Conda Python version matches, sometimes you can try installing viapippointing to the package path, but this is not recommended and rarely works reliably.
- If the packages are installed in the system Python (e.g.,
- Modify
PYTHONPATHorsys.path(not recommended):- You can add the system package path to
PYTHONPATHorsys.pathafter activating Conda, but this breaks isolation and can cause conflicts or runtime errors. Not recommended for production.
- You can add the system package path to
- Use the system Python environment:
- If your project does not require strict isolation, or mainly uses RDK-specific packages, the simplest way is to use the system Python.
- Containerization (Docker):
- If an official Docker image with these packages is available, use it for reliable isolation and deployment.
- Build from source (if available and permitted):
- If source code is available and you have build instructions, you can try building in your Conda environment, but this requires advanced skills.
Summary: Prefer official Conda support. If not available, use the system Python. Avoid mixing environments unless you fully understand the risks.
Q38: What should I do if I get "driver signature error" or "Required key not available" when loading a self-compiled Linux kernel module (.ko)?
A: Newer Linux kernels, especially with Secure Boot enabled, require kernel modules (.ko files) to be signed. If you compile a module without signing, you may see such errors when loading with insmod or modprobe.
Typical solution:
-
Generate a signing key pair: Use
opensslto generate a private and public key:openssl req -new -x509 -newkey rsa:2048 -keyout MOK.priv -outform DER -out MOK.der -nodes -days 36500 -subj "/CN=My Module Signing Key/"This creates
MOK.priv(private) andMOK.der(public). -
Sign the kernel module: Use the kernel's
scripts/sign-filescript with your keys:sudo /usr/src/linux-headers-$(uname -r)/scripts/sign-file sha256 ./MOK.priv ./MOK.der /path/to/your/module.koAdjust paths as needed.
-
Register the public key with the system's MOK (Machine Owner Key) list: Use
mokutil:sudo mokutil --import MOK.derSet a temporary password when prompted.
-
Reboot and enroll the key in MOK Manager: On reboot, enter the blue MOK Manager screen, select "Enroll MOK", and enter the password.
-
Load the signed module: After these steps, your module should load without signature errors.
Important:
- The above is a general process; details may vary by distro, kernel, and Secure Boot config.
- Always refer to your distro's and kernel's official documentation on "Kernel Module Signing".
- D-Robotics RDK docs may also have platform-specific guidance: RDK Docs - Linux Development - Kernel Headers & Module Compilation (see the relevant section on module signing).
Q39: How to upgrade MiniBoot on RDK X5?
A: On RDK X5, you can conveniently upgrade MiniBoot (the early-stage bootloader responsible for low-level hardware initialization and booting) using the srpi-config tool.
Steps:
- Log in to the RDK X5 system terminal via SSH or serial.
- Run the
srpi-configtool:sudo srpi-config - Navigate to the MiniBoot update option:
In the
srpi-configmenu, the typical path is:- Select
1 System Options(or similar system options) - Then select
S7 Update MiniBoot(or similar MiniBoot update option; the exact number and name may vary bysrpi-configversion)
- Select
- Follow the prompts: The tool will guide you through the upgrade process. This usually requires RDK X5 to be connected to the Internet to download the latest MiniBoot firmware package.
- Complete and reboot:
After the upgrade, exit
srpi-configas prompted and reboot RDK X5 to activate the new MiniBoot.
Verify the upgrade:
After rebooting RDK X5, you can check the U-Boot version information in the serial boot log. The updated MiniBoot will typically show a newer build date and version number.
For example, the updated version info may look like (date and version will vary):
U-Boot 2022.10+ (Dec 26 2024 - 16:58:41 +0800)
Note: Upgrading MiniBoot is a low-level firmware operation. Make sure to perform it under stable power and network conditions, and carefully read the prompts from the srpi-config tool.
Q40: What should I do if I encounter out-of-memory errors when compiling large projects (e.g., using gcc/make/cmake/colcon to build a ROS2 workspace) or running memory-intensive tools (such as hb_mapper model conversion)?
A: Out of Memory (OOM) is common when compiling large projects or running memory-intensive applications on embedded devices or resource-constrained development machines. Here are some solutions:
-
Increase swap space: When physical memory (RAM) is insufficient, the system can use part of the disk as virtual memory (swap). This can alleviate OOM issues, but performance will be much slower than physical memory.
- Create and enable a swap file (example: create 4GB swap, adjust size as needed):
# 1. Create an empty file of the specified size
sudo fallocate -l 4G /swapfile
# 2. Set file permissions
sudo chmod 600 /swapfile
# 3. Set the file as swap area
sudo mkswap /swapfile
# 4. Enable the swap file
sudo swapon /swapfile
# 5. (Optional) Verify swap is active
swapon --show
free -h - Make it mount automatically at boot: Edit
/etc/fstaband add at the end:/swapfile none swap sw 0 0 - Disable swap (if needed):
sudo swapoff /swapfile
sudo rm /swapfile # Remove file if not needed
# Also remove the corresponding line from /etc/fstab
- Create and enable a swap file (example: create 4GB swap, adjust size as needed):
-
Reduce build parallelism/number of threads: The build process (especially for C++ projects) often launches multiple parallel tasks to speed up, but this also consumes a lot of memory.
makecommand: Use the-jparameter to specify the number of parallel jobs. For example, single-threaded build:You can trymake -j1-j2,-jN(N is half the number of CPU cores or less).colcon build(ROS2):- Limit the number of parallel package builds:
colcon build --parallel-workers 1 - Disable parallel package build, use sequential build (slower but lower memory usage):
colcon build --executor sequential - Combine:
colcon build --executor sequential --parallel-workers 1
- Limit the number of parallel package builds:
cmake: CMake itself does not directly control make parallelism, but ultimately uses make. Pass the-jparameter when calling make.- Set the
MAKEFLAGSenvironment variable (temporary):export MAKEFLAGS="-j1"
# Then run colcon build or other build commands
-
For
hb_mapper(Horizon model conversion tool):- In the model conversion
yamlconfig file, look for options likecompiler_parameters->jobs: 1to limit the number of parallel processes during model compilation (e.g., ONNX to BIN model). Check the latest algorithm toolchain docs for specific parameter names.
- In the model conversion
-
Close unnecessary background services and applications: Before compiling or running memory-intensive tasks, close other memory-consuming programs (such as GUI, browsers, other services) to free up more physical memory.
-
Use a higher-spec development machine/server for compilation: If cross-compiling for RDK on an x86 development machine with limited memory, consider using a machine with more memory. For on-board compilation, if resources are insufficient, cross-compilation is a better choice.
-
Step-by-step/module-based compilation: For very large projects, if the build system supports it, try compiling only part of the project or breaking it into smaller modules for independent compilation.
Which method(s) to use depends on the specific error, available resources, and build time requirements. Increasing swap is a common mitigation.
Q41: What are the general recommendations for pre-checking RDK-related issues?
A: Before seeking help with RDK-related issues, it is recommended to perform the following pre-checks:
- Consult the latest official manuals: Make sure you are referring to the latest version of the official user manual, development documentation, and release notes. Official docs usually contain the latest information and solutions to known issues. You can get the latest docs from the D-Robotics developer community: https://developer.d-robotics.cc/information
- Update the system and related packages: Many issues may be fixed in newer software versions. Make sure your RDK board's OS and all key packages (
hobot-*,tros-*, etc.) are updated to the latest stable version. Usually, you can update with:When asking for help, also provide your current system and package versions viasudo apt update && sudo apt upgraderdkos_info,apt list --installed | grep hobot, etc. - Carefully check hardware connections: Ensure all hardware connections are secure and reliable, including power cables, SD cards, debug serial cables, camera cables, network cables, and other peripherals. Poor contact is the root cause of many issues.
- Provide complete problem reproduction information: When asking the community or technical support, provide as much of the following as possible:
- Clear problem description: What is the issue? What is the expected result? What is the actual observed behavior?
- RDK hardware model and system version: e.g., RDK X5, RDK OS 3.0.1.
- Relevant package versions.
- Detailed reproduction steps: Step-by-step instructions to trigger the issue.
- Complete error logs or screenshots: Including serial output, dmesg info, application error output, etc.
- Solutions you have tried and their results. Providing sufficient information helps others understand and locate your issue faster.
Q42: What should I do if Docker images, OE packages, or embedded development sample packages fail to download or are slow?
A:
- Docker images (e.g., for algorithm toolchains, cross-compilation environments):
- Official sources: Docker images are usually released on Docker Hub. D-Robotics may also provide some key images on their own servers or in specific developer community resource posts.
- Network issues: If pulling from Docker Hub is slow or fails, it may be due to network restrictions or international bandwidth. Try configuring Docker to use a domestic mirror accelerator service (e.g., Alibaba Cloud, DaoCloud, NetEase, etc. provide such services).
- Community resources: Check the D-Robotics developer community announcements or resource download area, which may provide image acquisition solutions for domestic users. For example, this post once provided related resources: D-Robotics Developer Community Forum Post (check the latest validity).
- OE (OpenEmbedded) packages / BSP (Board Support Package):
- OE build environment packages or full BSPs (including kernel source, drivers, filesystem build scripts, etc.) are usually large. If provided directly by the official site, ensure your network is stable and has enough bandwidth.
- These resources are generally available in the "Resource Center" section of the developer community or on the product documentation page for your RDK model.
- Embedded development sample packages (sample code):
- Sample code packages may be provided as part of the BSP (e.g., in
bsp/samples/after extracting the BSP). - They may also be provided as standalone SDKs, code repositories (such as on the D-Robotics GitHub organization), or compressed packages.
- Check the official documentation or quick start guide for your RDK model and version to find the correct way to obtain official sample code.
- Sample code packages may be provided as part of the BSP (e.g., in
- General download advice:
- Use download tools: For large files, use tools that support resuming interrupted downloads.
- Check network environment: If you are on a company or institutional network, check for firewalls, proxies, or policies that may restrict large downloads or access to certain domains.
- Download during off-peak hours: Try downloading when network load is lower.
- Official channels first: Always prefer to get development resources from official D-Robotics developer community, official documentation links, or official GitHub repositories to ensure file correctness, completeness, and security.
Q43: How should I set up the cross-compilation environment for RDK?
A: To cross-compile applications for RDK boards (usually ARM architecture), you generally need to set up a cross-compilation toolchain and the corresponding target system SDK (sysroot) on an x86 Linux development host (Ubuntu LTS versions like 20.04 or 22.04 are recommended). The specific steps depend on the type of program you want to compile (e.g., regular Linux C/C++ programs, ROS/TROS packages) and the target RDK model and system version.
-
Compiling regular Linux C/C++ applications:
- Obtain the cross-compilation toolchain: D-Robotics provides a toolchain for each RDK series (e.g., X3, X5, Ultra), usually as part of the SDK or as a separate download. The toolchain includes
aarch64-linux-gnu-gcc,aarch64-linux-gnu-g++, etc. - Install and configure the toolchain: Follow the official docs to extract the toolchain to a suitable path (e.g.,
/opt/toolchains/). Add the toolchain'sbindirectory to your host'sPATHso the system can find the cross-compilation commands. - Prepare the sysroot: Cross-compilation requires not only the compiler but also the target board's libraries (glibc, libstdc++, and other dependencies) and headers. This collection is called the sysroot. You can extract it from the official RDK SDK or copy it from a flashed RDK board's root filesystem. Specify the sysroot path with the compiler's
--sysroot=<path_to_sysroot>parameter. - Using CMake for cross-compilation: If your project uses CMake, create a toolchain file (e.g.,
aarch64-rdk.cmake) specifying:- Target system name (
CMAKE_SYSTEM_NAME, usuallyLinux). - Target processor architecture (
CMAKE_SYSTEM_PROCESSOR, usuallyaarch64). - C and C++ cross-compilers (
CMAKE_C_COMPILER,CMAKE_CXX_COMPILER). - Sysroot path (
CMAKE_SYSROOT). - Library and header search paths (
CMAKE_FIND_ROOT_PATH). Then run CMake with-DCMAKE_TOOLCHAIN_FILE=/path/to/your/aarch64-rdk.cmake.
- Target system name (
- Refer to official manuals: For detailed steps, toolchain file examples, and build parameters, refer to the official User Manual or SDK Development Guide for your RDK model and version, especially the sections on "Linux Application Development" or "Cross-Compilation Environment Setup".
- Obtain the cross-compilation toolchain: D-Robotics provides a toolchain for each RDK series (e.g., X3, X5, Ultra), usually as part of the SDK or as a separate download. The toolchain includes
-
Compiling ROS/TROS packages:
- Use the official Docker cross-compilation environment (strongly recommended): This is the easiest and most reliable way to cross-compile TROS packages. D-Robotics usually provides pre-configured Docker images with:
- The required TROS version (e.g., Foxy, Humble) toolchain.
- Ament/Colcon build tools.
- All base ROS libraries and dependencies for the target board.
- Workflow:
- Pull the appropriate TROS cross-compilation Docker image from the official source (Docker Hub or D-Robotics server).
- Start the Docker container as per the docs, mounting your ROS workspace source directory.
- Inside the container, use
colcon buildwith the appropriate cross-compilation parameters (usually pre-set in Docker).
- Refer to official manuals: The TROS User Manual's sections on "Source Installation", "Developer Guide", or "Cross-Compilation" usually have detailed Docker usage and command examples. For example: TROS Manual - Cross-Compilation Docker Reference (check link validity).
- Manual ROS/TROS cross-compilation setup (not recommended, very complex): If not using the official Docker environment, setting up a full ROS/TROS cross-compilation environment from scratch is very complex and error-prone. You must cross-compile all core ROS components, message types, dependencies, and configure many build parameters and environment variables. This is only for advanced users.
- Use the official Docker cross-compilation environment (strongly recommended): This is the easiest and most reliable way to cross-compile TROS packages. D-Robotics usually provides pre-configured Docker images with:
General cross-compilation advice:
- Read official docs carefully: Always follow the latest official development docs, SDK instructions, and porting guides for your RDK model and system version.
- Keep environment consistent: The libraries used in your cross-compilation environment (especially system and core dependencies) should match or be compatible with those on the target RDK board to avoid runtime errors or inconsistencies.
- Correct sysroot configuration is critical: Whether compiling regular Linux programs or ROS packages, correct sysroot setup is key to successful cross-compilation.