5.2.4 图像处理加速
高斯滤波
功能介绍
实现高斯滤波功能,加速类型分为 BPU 加速和 NEON 加速,BPU 加速暂时只支持 int16 格式,NEON 加速暂时只支持 int16 和 uint16 格式。
代码仓库:https://github.com/D-Robotics/hobot_cv
支持平台
| 平台 | 运行方式 | 示例功能 |
|---|---|---|
| RDK X3, RDK X3 Module | Ubuntu 20.04 (Foxy), Ubuntu 22.04 (Humble) | 读取 ToF 图片,进行高斯滤波 |
准备工作
RDK 平台
-
RDK 已烧录好 Ubuntu 系统镜像。
-
RDK 已成功安装 TogetheROS.Bot。
使用介绍
BPU 加速
当前版本支持的参数范围如下:
-
滤波类型:高斯滤波
-
支持的数据类型:int16
-
支持的分辨率:320x240。
-
滤波核:高斯 3x3
-
sigmax: 0
-
sigmay: 0
NEON 加速
当前版本支持的参数范围如下:
-
滤波类型:高斯滤波
-
支持的数据类型:int16、uint16
-
滤波核:高斯 3x3,5x5
-
sigmax: 0
-
sigmay: 0
package 中提供了简单测试程序,输入为本地的 ToF 图片,调用 hobot_cv 中接口实现高斯滤波功能。具体接口说明可参考 hobot_cv pakcage 中的 README.md 进一步了解。
RDK 平台
- Foxy
- Humble
# 配置tros.b环境
source /opt/tros/setup.bash
# 配置tros.b环境
source /opt/tros/humble/setup.bash
# 从tros.b的安装路径中拷贝出运行示例需要的模型和配置文件。
cp -r /opt/tros/${TROS_DISTRO}/lib/hobot_cv/config/ .

# 启动BPU加速测试程序pkg
ros2 launch hobot_cv hobot_cv_gaussian_blur.launch.py

# 启动NEON加速测试程序pkg
ros2 launch hobot_cv hobot_cv_neon_blur.launch.py
结果分析
BPU 加速
输出结果:

===================
image name :images/frame1_4.png
infe cost time:1314
guss_time cost time:2685
hobotcv save rate:0.510615

analyse_result start
---------GaussianBlur
out_filter type:2,cols:320,rows:240,channel:1
cls_filter type:2,cols:320,rows:240,channel:1
out_filter minvalue:96,max:2363
out_filter min,x:319,y:115
out_filter max,x:147,y:239
cls_filter minvalue:96,max:2364
cls_filter min,x:319,y:115
cls_filter max,x:147,y:239

diff diff diff
mat_diff minvalue:0,max:2
mat_diff min,x:2,y:0
mat_diff max,x:110,y:14

error sum:8.46524e+06,max:2,mean_error:0.439232
analyse_result,time_used_ms_end:2
analyse_result end

-------------------------
其中:
infe cost time:1314 //表示 hobotcv 加速的高斯滤波耗时 1314 微秒。
guss_time cost time:2685 //表示 opencv 的高斯滤波耗时 2685 微秒。
hobotcv save rate = (guss_time cost time - infe cost time)/ guss_time cost time = 0.510615
从以上比较结果,经过 hobot_cv 加速后性能提升 50%。
error sum:8.46524e+06,max:2,mean_error:0.439232 //单张图片总误差是:8.46524e+06,单个像素最大误差是:2,平均误差:0.439232
平均误差 = sum / (width height) = 8.46524e+06 / (320 240)
hobot_cv 高斯滤波 BPU 加速与 opencv 高斯滤波性能对比结果如下:
| 接口类型 | 滤波核大小 | 耗时(ms) | 单核 CPU 占比(%) |
|---|---|---|---|
| Hobotcv gaussian | Size(3,3) | 1.10435 | 15.9 |
| Opencv gaussian | Size(3,3) | 2.41861 | 49.7 |
NEON 加速
输出结果:
[neon_example-1] ===================
[neon_example-1] image name :config/tof_images/frame1_4.png
[neon_example-1] hobotcv mean cost time:674
[neon_example-1] opencv mean cost time:1025
[neon_example-1] hobotcv mean save rate:0.342439
[neon_example-1]
[neon_example-1] analyse_result start
[neon_example-1] ---------Mean_Blur
[neon_example-1] error sum:8.43744e+06,max:1,mean_error:0.430833
[neon_example-1]
[neon_example-1] hobotcv gaussian cost time:603
[neon_example-1] opencv gaussian cost time:2545
[neon_example-1] hobotcv gaussian save rate:0.763065
[neon_example-1]
[neon_example-1] analyse_result start
[neon_example-1] ---------Gaussian_Blur
[neon_example-1] error sum:9.13206e+06,max:1,mean_error:0.466302
[neon_example-1]
[neon_example-1] -------------------------
hobotcv gaussian cost time:603 //hobotcv 高斯滤波 neon 加速接口耗时 603 微秒。 opencv gaussian cost time:2545 //表示 opencv 的高斯滤波耗时 2545 微秒。 hobotcv gaussian save rate = (opencv cost time - hobotcv cost time)/ opencv cost time = 0.763065 从以上比较结果,经过 hobotcv 加速后高斯滤波性能提升 76%。
hobot_cv 高斯滤波 NEON 加速与 opencv 高斯滤波性能对比结果如下:
| 接口类型 | 滤波核大小 | 耗时(ms) | 单核 CPU 占比(%) |
|---|---|---|---|
| Hobotcv gaussian | Size(3,3) | 0.430284 | 27.1 |
| Opencv gaussian | Size(3,3) | 2.42225 | 47 |
| Hobotcv gaussian | Size(5,5) | 0.854871 | 39.1 |
| Opencv gaussian | Size(5,5) | 3.15647 | 99.8 |
均值滤波
功能介绍
实现均值滤波功能,加速方式为 NEON 加速,暂时只支持 int16,uint16 格式。
代码仓库:https://github.com/D-Robotics/hobot_cv
支持平台
| 平台 | 运行方式 | 示例功能 |
|---|---|---|
| RDK X3, RDK X3 Module | Ubuntu 20.04 (Foxy), Ubuntu 22.04 (Humble) | 读取 ToF 图片,进行均值滤波 |
准备工作
RDK 平台
-
RDK 已烧录好 Ubuntu 系统镜像。
-
RDK 已成功安装 TogetheROS.Bot。
使用介绍
当前版本支持的参数范围如下:
-
滤波类型:均值滤波
-
支持的数据类型:int16,uint16
-
滤波核:3x3,5x5
package 中提供了简单测试程序,输入为本地的 ToF 图片,调用 hobot_cv 中接口实现均值滤波功能。具体接口说明可参考 hobot_cv pakcage 中的 README.md 进一步了解。
RDK 平台
- Foxy
- Humble
# 配置tros.b环境
source /opt/tros/setup.bash
# 配置tros.b环境
source /opt/tros/humble/setup.bash
# 从TogetheROS的安装路径中拷贝出运行示例需要的配置文件。
cp -r /opt/tros/${TROS_DISTRO}/lib/hobot_cv/config/ .

# 启动测试程序pkg
ros2 launch hobot_cv hobot_cv_neon_blur.launch.py
结果分析
输出结果:
[neon_example-1] ===================
[neon_example-1] image name :config/tof_images/frame1_4.png
[neon_example-1] hobotcv mean cost time:674
[neon_example-1] opencv mean cost time:1025
[neon_example-1] hobotcv mean save rate:0.342439
[neon_example-1]
[neon_example-1] analyse_result start
[neon_example-1] ---------Mean_Blur
[neon_example-1] error sum:8.43744e+06,max:1,mean_error:0.430833
[neon_example-1]
[neon_example-1] -------------------------
其中:
hobotcv mean cost time:674 //hobot_cv 均值滤波 neon 加速接口耗时 674 微秒。 opencv mean cost time:1025 //表示 opencv 的均值滤波耗时 1025 微秒。 hobotcv mean save rate = (opencv cost time - hobotcv cost time)/ opencv cost time = 0.342439 从以上比较结果,经过 hobotcv 加速后均值滤波性能提升 34%
error sum:8.43744e+06,max:1,mean_error:0.430833 //均值滤波单张图片总误差是:8.43744e+06,单个像素最大误差是:1,平均误差:0.430833 均值滤波平均误差 = sum / (width x height) = 8.43744e+06 / (320 x 240)
hobot_cv 与 opencv 处理性能对比
| 接口类型 | 滤波核大小 | 耗时(ms) | 单核 CPU 占比(%) |
|---|---|---|---|
| Hobotcv mean | Size(3,3) | 0.466397 | 31.8 |
| Opencv mean | Size(3,3) | 0.676677 | 40.2 |
| Hobotcv mean | Size(5,5) | 0.737171 | 47.7 |
| Opencv mean | Size(5,5) | 0.798177 | 52.9 |
crop
功能介绍
实现图像裁剪功能,暂时只支持 NV12 格式。
代码仓库:https://github.com/D-Robotics/hobot_cv
支持平台
| 平台 | 运行方式 | 示例功能 |
|---|---|---|
| RDK X3, RDK X3 Module | Ubuntu 20.04 (Foxy), Ubuntu 22.04 (Humble) | 读取图片,进行抠图 |
| RDK X5, RDK X5 Module | Ubuntu 22.04 (Humble) | 读取图片,进行抠图 |
准备工作
RDK 平台
-
RDK 已烧录好 Ubuntu 系统镜像。
-
RDK 已成功安装 TogetheROS.Bot。
使用介绍
RDK 平台
- Foxy
- Humble
# 配置tros.b环境
source /opt/tros/setup.bash
# 配置tros.b环境
source /opt/tros/humble/setup.bash
# 从tros.b的安装路径中拷贝出运行示例需要的模型和配置文件。
cp -r /opt/tros/${TROS_DISTRO}/lib/hobot_cv/config/ .

# 启动launch文件
ros2 launch hobot_cv hobot_cv_crop.launch.py
结果分析
[INFO] [launch]: Default logging verbosity is set to INFO
[INFO] [crop_example-1]: process started with pid [3064]
[crop_example-1] [INFO] [1655951627.255477663] [example]: crop image to 960x540 pixels, time cost: 1 ms
[crop_example-1] [INFO] [1655951627.336889080] [example]: crop image to 960x540 pixels, time cost: 1 ms
[INFO] [crop_example-1]: process has finished cleanly [pid 3064]
根据 log 显示,测试程序完成了对本地 1920x1080 分辨率图片 crop 的处理,耗时如下:
| 图片处理 | 运行耗时 |
|---|---|
| 1920x1080 crop 出 960x540 | 1ms |
本地原图 1920x1080、crop 左上角 960x540 区域,效果图片展示如下:
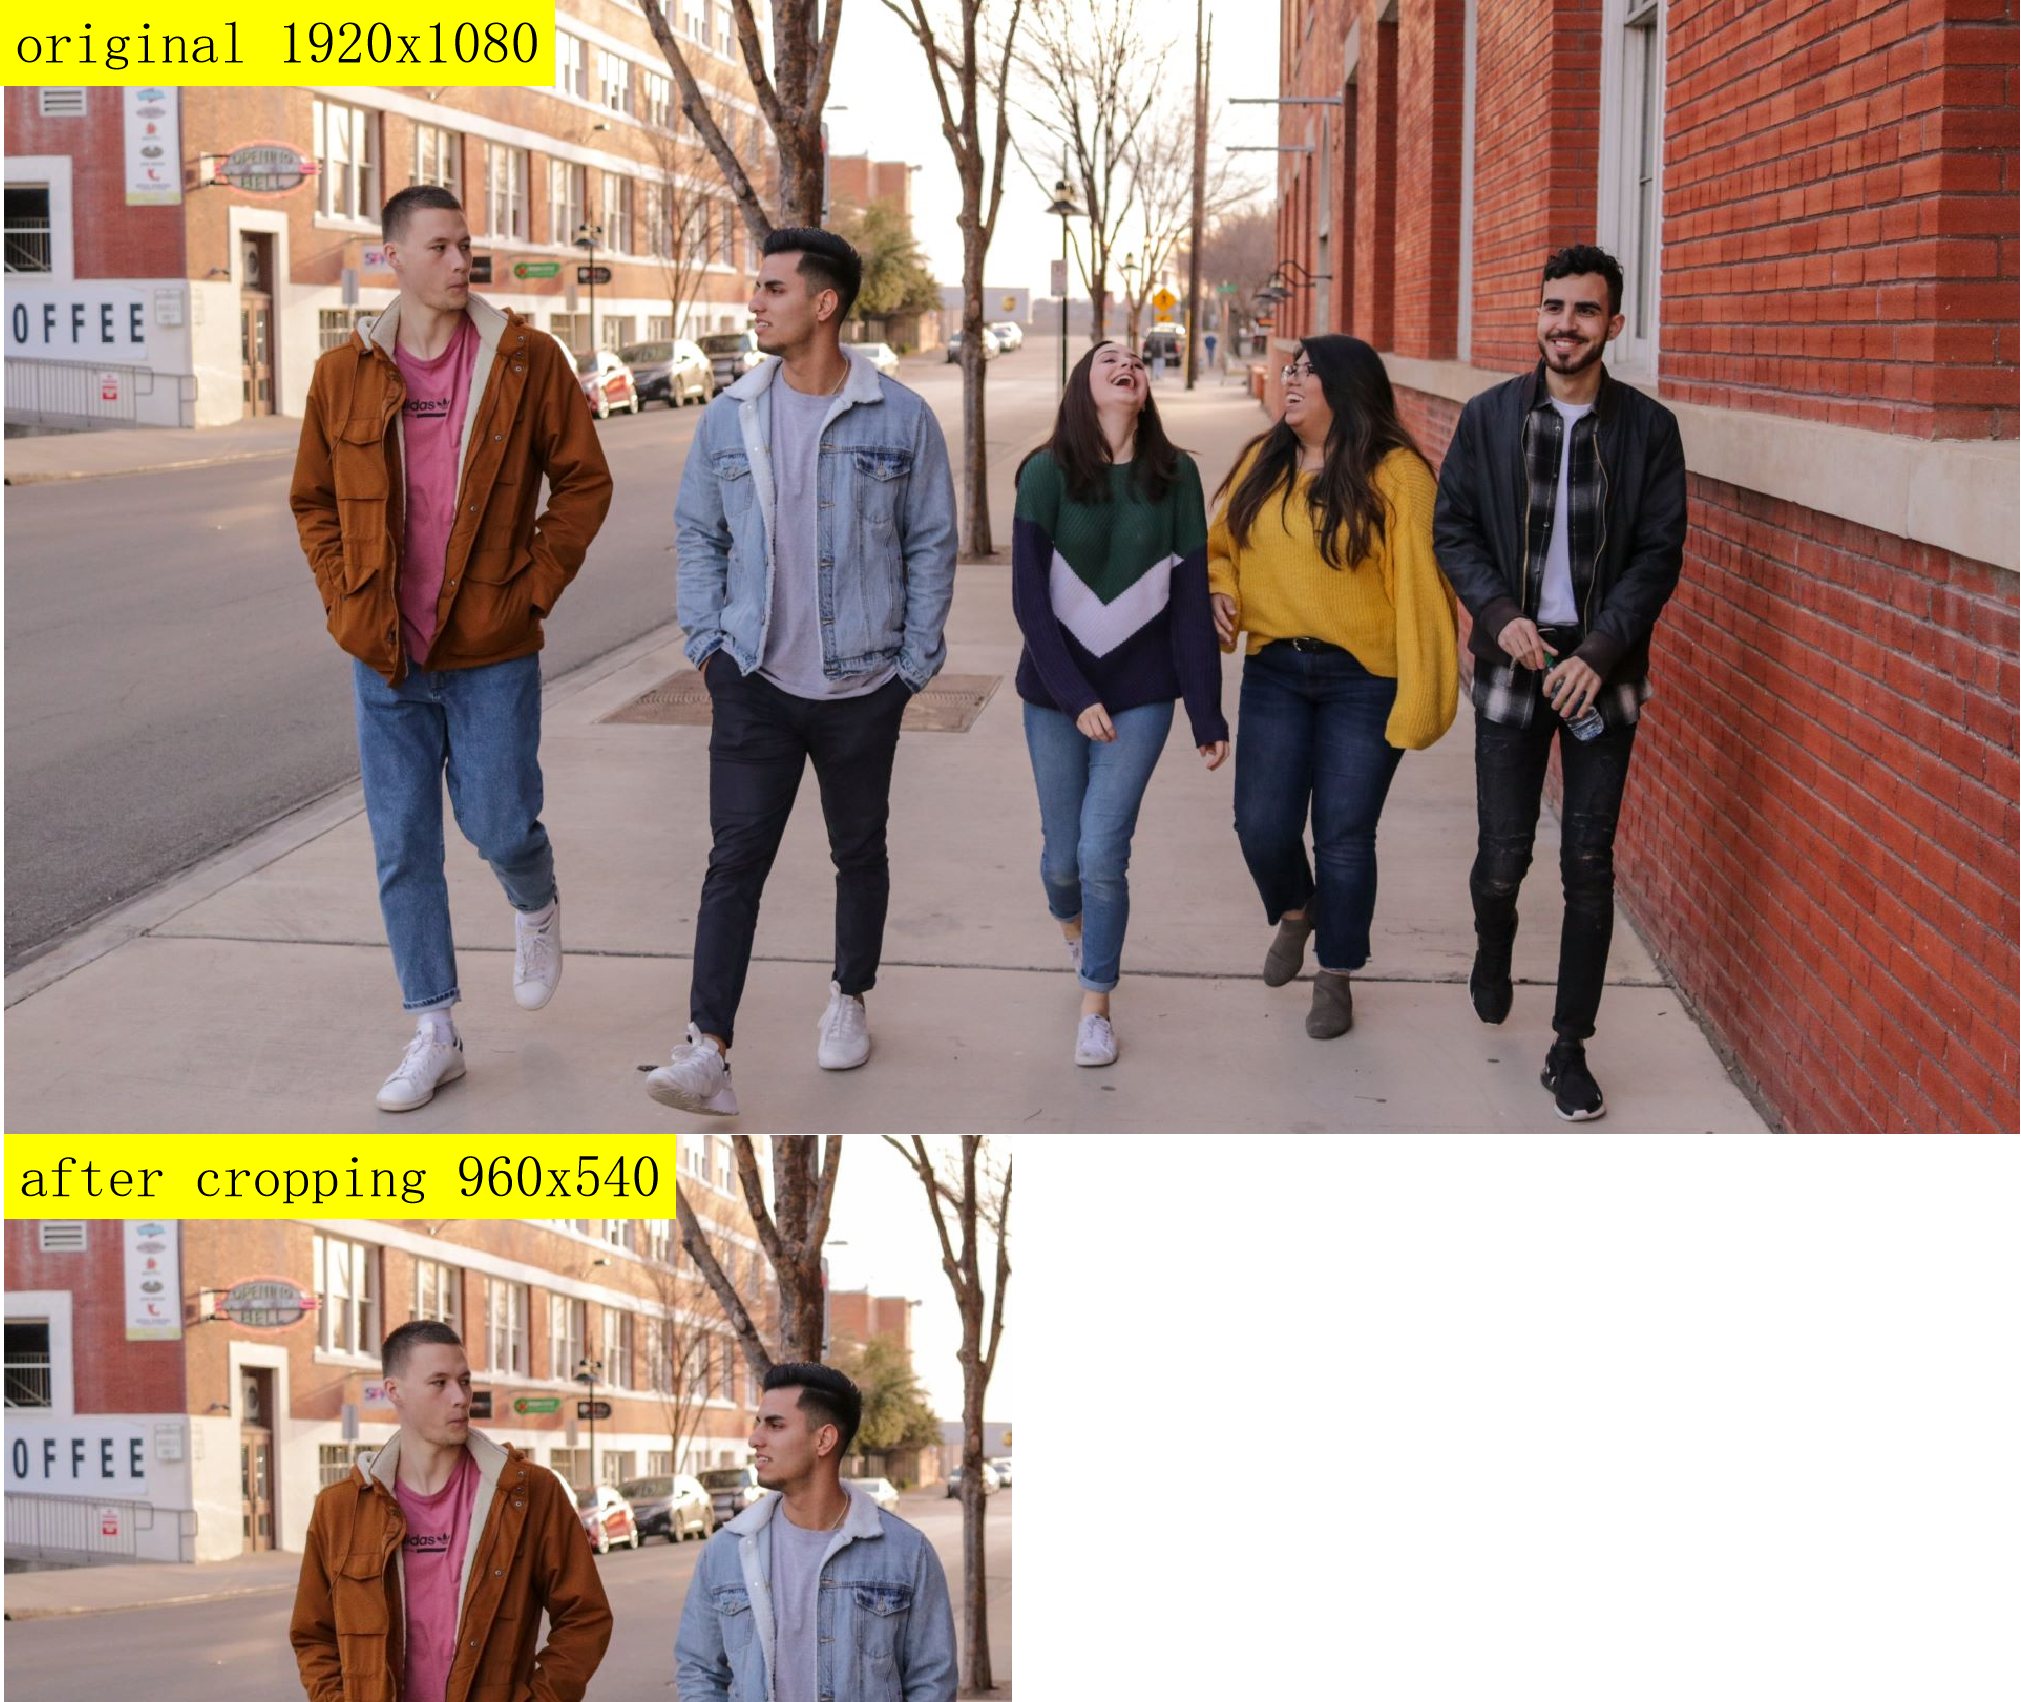
resize
功能介绍
实现图像缩放功能,暂时只支持 NV12 格式。
代码仓库:https://github.com/D-Robotics/hobot_cv
支持平台
| 平台 | 运行方式 |
|---|---|
| RDK X3, RDK X3 Module | Ubuntu 20.04 (Foxy), Ubuntu 22.04 (Humble) |
| RDK X5, RDK X5 Module | Ubuntu 22.04 (Humble) |
| RDK S100 | Ubuntu 22.04 (Humble) |
| RDK S600 | Ubuntu 24.04 (Jazzy) |
准备工作
RDK 平台
-
RDK 已烧录好 Ubuntu 系统镜像。
-
RDK 已成功安装 TogetheROS.Bot。
使用介绍
RDK
- Foxy
- Humble
- Jazzy
# 配置tros.b环境
source /opt/tros/setup.bash
# 配置tros.b环境
source /opt/tros/humble/setup.bash
# 配置tros.b环境
source /opt/tros/jazzy/setup.bash
- Humble
# 配置tros.b环境
source /opt/tros/humble/setup.bash
- Jazzy
# 配置tros.b环境
source /opt/tros/jazzy/setup.bash
# 从TogetheROS的安装路径中拷贝出运行示例需要的模型和配置文件。
cp -r /opt/tros/${TROS_DISTRO}/lib/hobot_cv/config/ .

# 启动launch文件
ros2 launch hobot_cv hobot_cv_resize.launch.py
结果分析
RDK X3 平台 resize
[INFO] [launch]: Default logging verbosity is set to INFO
[INFO] [resize_example-1]: process started with pid [3083]
[resize_example-1] [INFO] [1655951649.930987924] [example]:
[resize_example-1] source image config/test.jpg is 1920x1080 pixels
[resize_example-1] [INFO] [1655951649.931155799] [example]: resize image to 960x540 pixels, time cost: 297 ms
[resize_example-1] [INFO] [1655951650.039223757] [example]: resize image to 960x540 pixels, time cost: 15 ms
[INFO] [resize_example-1]: process has finished cleanly [pid 3083]
根据 log 显示,测试程序完成了对本地 1920x1080 分辨率图片 resize 的处理。接口调用两次,两次耗时分别如下。
| 图片处理 | 第一次运行耗时 | 第二次运行耗时 |
|---|---|---|
| 1920x1080 resize 到 960x540 | 297ms | 15ms |
因为第一次运行,需要对 vps 硬件进行配置所以耗时较多,如果不再更改硬件配置属性,硬件直接进行处理,耗时就会显著降低。
本地原图 1920x1080、resize 后 960x540 图片如下:
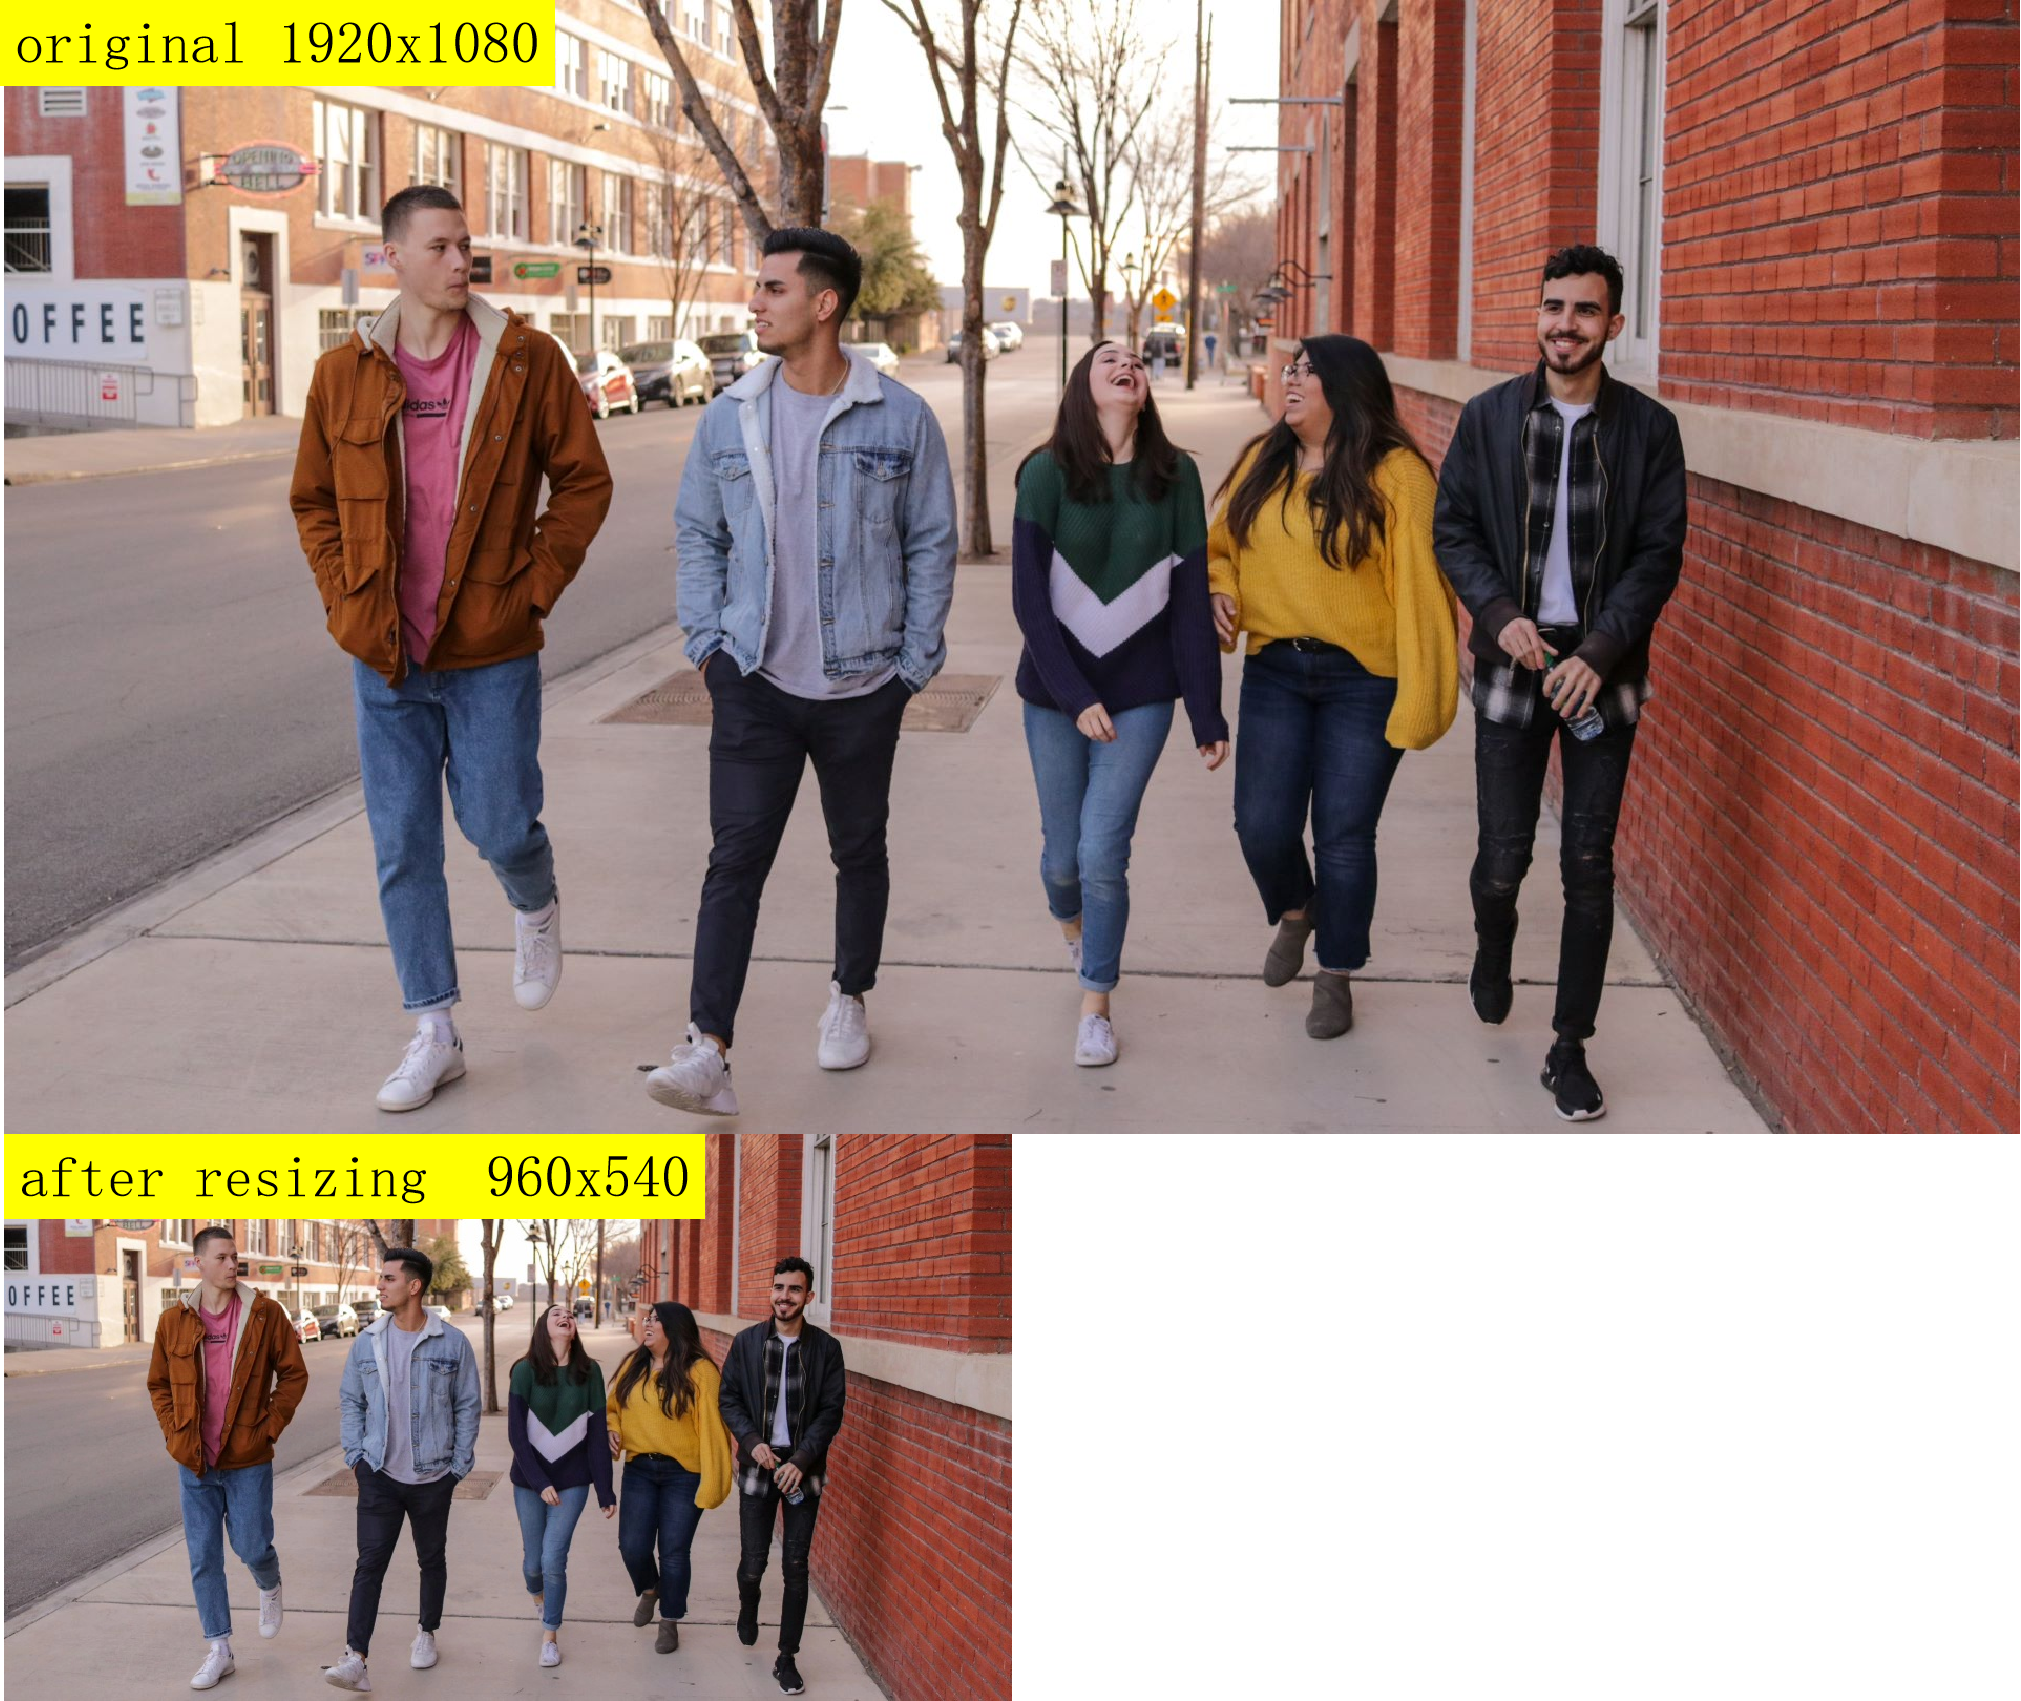
RDK X3 平台性能对比
使用 top 命令查看 cpu 占用,cpu 占用为测试进程 cpu 占比。 耗时统计单位为 ms,循环处理 1000 次取平均值。 测试时锁定 cpu 频率:
sudo bash -c 'echo performance > /sys/devices/system/cpu/cpufreq/policy0/scaling_governor'
| src wxh | dst wxh | vps 耗时 | vps 接口 cpu 占用 | bpu 耗时 | bpu 接口 cpu 占用 | opencv 耗时 | opencv 处理 cpu 占用 |
|---|---|---|---|---|---|---|---|
| 512x512 | 128x128 | 1.53789 | 25.9 | 1.11054 | 89 | 1.71119 | 100.3 |
| 640x640 | 320x320 | 2.48536 | 28.5 | 1.82232 | 88 | 1.82384 | 338.9 |
| 896x896 | 384x384 | 4.54422 | 24.6 | 2.81954 | 79.7 | 7.84396 | 273.1 |
| 1024x1024 | 512x512 | 6.01103 | 25.2 | 3.89325 | 81.7 | 2.55761 | 381.7 |
| 1920x1088 | 512x512 | 11.0406 | 20.6 | 5.8513 | 71.1 | 8.19324 | 380.1 |
| 1920x1080 | 960x544 | 11.1562 | 22.3 | 7.09085 | 77.7 | 15.2978 | 382.4 |
rotate
功能介绍
rotate 实现图像旋转功能,暂时只支持 NV12 格式的图片,支持的旋转角度为 90、180、270。
代码仓库:https://github.com/D-Robotics/hobot_cv
支持平台
| 平台 | 运行方式 | 示例功能 |
|---|---|---|
| RDK X3, RDK X3 Module | Ubuntu 20.04 (Foxy), Ubuntu 22.04 (Humble) | 读取图片,进行旋转 |
准备工作
RDK 平台
-
RDK 已烧录好 Ubuntu 系统镜像。
-
RDK 已成功安装 TogetheROS.Bot。
使用介绍
RDK 平台
- Foxy
- Humble
# 配置tros.b环境
source /opt/tros/setup.bash
# 配置tros.b环境
source /opt/tros/humble/setup.bash
# 从tros.b的安装路径中拷贝出运行示例需要的模型和配置文件。
cp -r /opt/tros/${TROS_DISTRO}/lib/hobot_cv/config/ .

# 启动launch文件
ros2 launch hobot_cv hobot_cv_rotate.launch.py
结果分析
[INFO] [launch]: Default logging verbosity is set to INFO
[INFO] [rotate_example-1]: process started with pid [3096]
[rotate_example-1] [INFO] [1655951661.173422471] [example]: rotate image 180 , time cost: 415 ms
[rotate_example-1]
[rotate_example-1] [INFO] [1655951661.416188013] [example]: second rotate image 180 , time cost: 40 ms
[rotate_example-1]
[INFO] [rotate_example-1]: process has finished cleanly [pid 3096]
根据 log 显示,测试程序完成了对本地 1920x1080 分辨率图片 rotate 的处理。接口调用两次,两次耗时分别如下。
| 图片处理 | 第一次运行耗时 | 第二次运行耗时 |
|---|---|---|
| 1920x1080 旋转 180 度 | 415ms | 40ms |
因为第一次运行,需要对 vps 硬件进行配置所以耗时较多,如果不再更改硬件配置属性,硬件直接进行处理,耗时就会显著降低。
本地原图 1920x1080、rotate 后 1920x1080 图片如下:

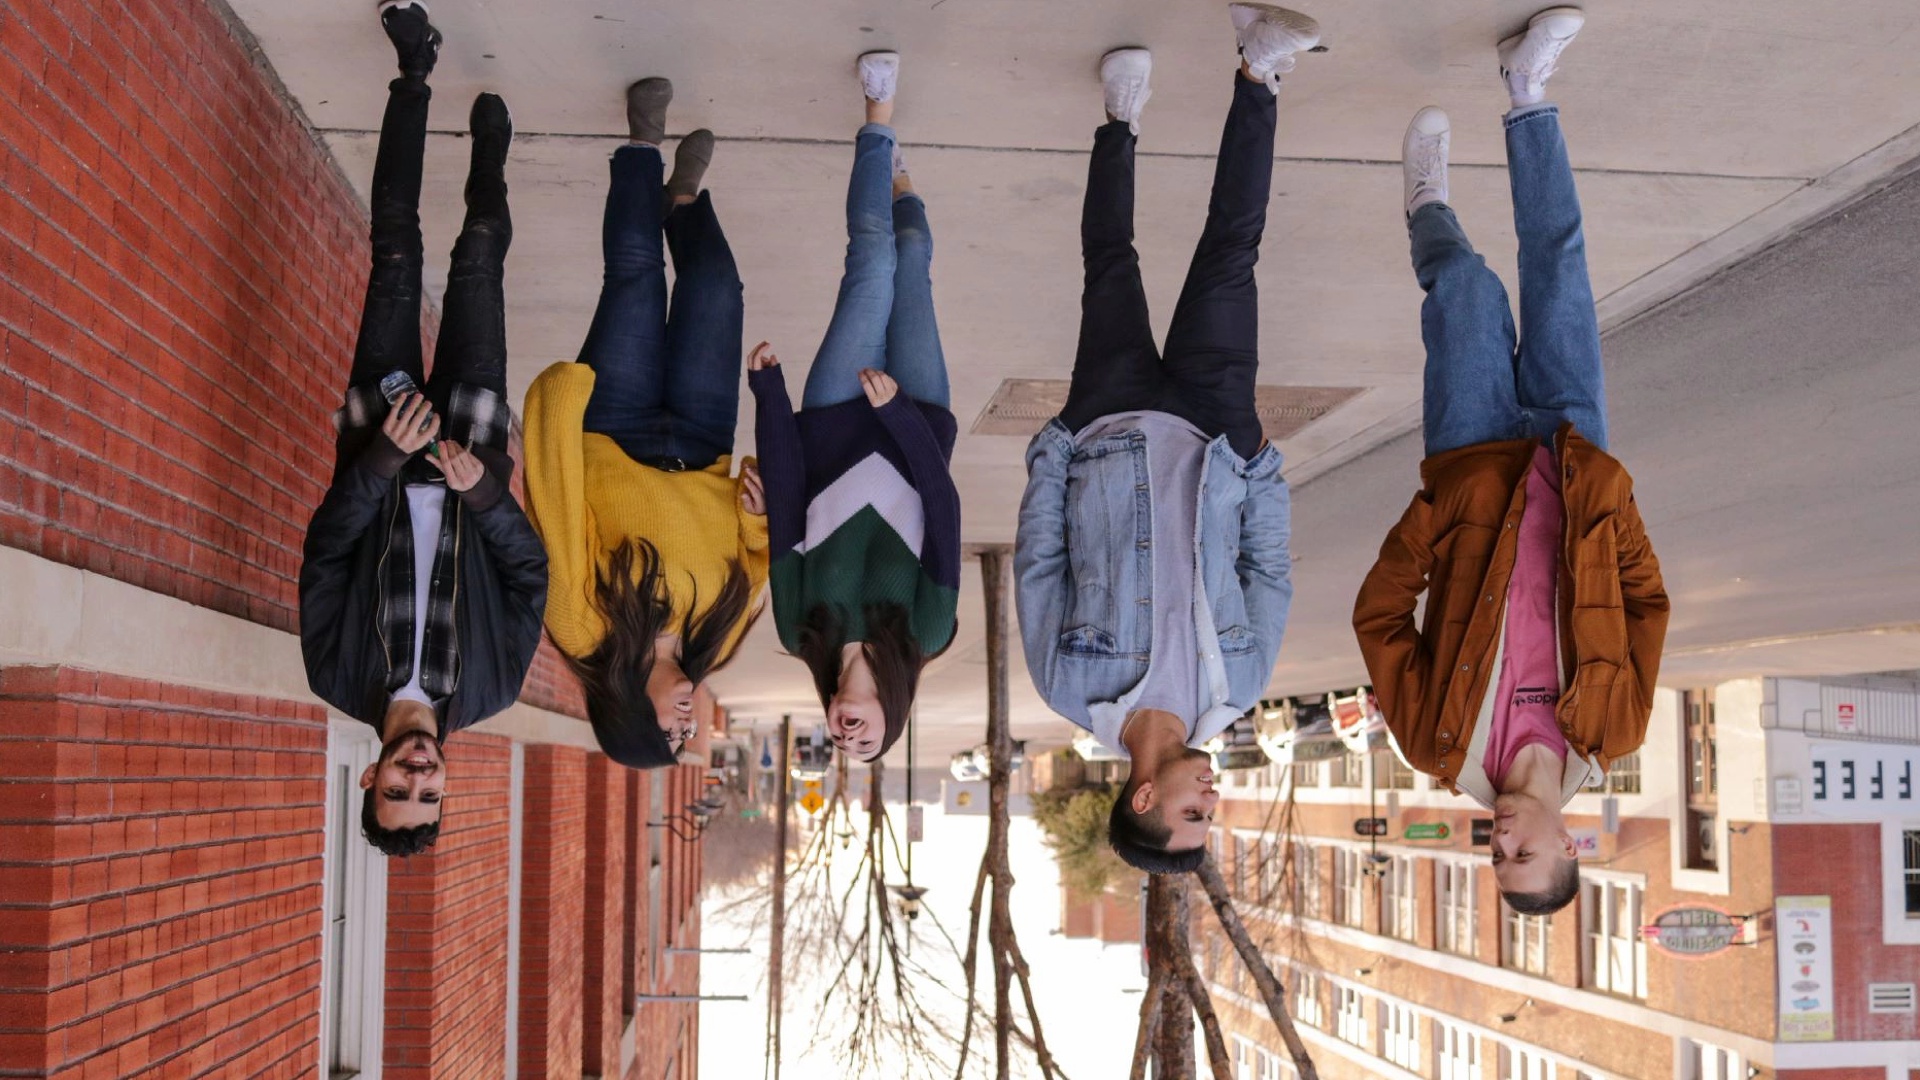
hobot_cv 与 opencv 处理性能对比
使用 top 命令查看 cpu 占用,cpu 占用为测试进程 cpu 占比。 耗时统计单位为 ms,循环处理 1000 次取平均值。 测试时锁定 cpu 频率:
sudo bash -c 'echo performance > /sys/devices/system/cpu/cpufreq/policy0/scaling_governor'
| src wxh | 旋转角度 | hobotcv 耗时 | hobotcv 接口 cpu 占用 | opencv 耗时 | opencv 处理 cpu 占用 |
|---|---|---|---|---|---|
| 1920x1080 | 90 | 37.6568 | 61.6 | 55.8886 | 100.0 |
| 640x640 | 180 | 7.3133 | 66.8 | 5.1806 | 100.0 |
| 896x896 | 270 | 14.7723 | 62.5 | 13.6497 | 100.0 |
pyramid
功能介绍
实现图像金字塔缩放功能,暂时只支持 NV12 格式。
代码仓库:https://github.com/D-Robotics/hobot_cv
支持平台
| 平台 | 运行方式 | 示例功能 |
|---|---|---|
| RDK X3, RDK X3 Module | Ubuntu 20.04 (Foxy), Ubuntu 22.04 (Humble) | 读取图片,进行金字塔缩放 |
准备工作
RDK 平台
-
RDK 已烧录好 Ubuntu 系统镜像。
-
RDK 已成功安装 TogetheROS.Bot。
使用介绍
RDK 平台
- Foxy
- Humble
# 配置tros.b环境
source /opt/tros/setup.bash
# 配置tros.b环境
source /opt/tros/humble/setup.bash
# 从tros.b的安装路径中拷贝出运行示例需要的模型和配置文件。
cp -r /opt/tros/${TROS_DISTRO}/lib/hobot_cv/config/ .

# 启动launch文件
ros2 launch hobot_cv hobot_cv_pyramid.launch.py
结果分析
[INFO] [launch]: Default logging verbosity is set to INFO
[INFO] [pyramid_example-1]: process started with pid [3071]
[pyramid_example-1] [INFO] [1655951639.110992960] [example]: pyramid image , time cost: 299 ms
[pyramid_example-1]
[pyramid_example-1] [INFO] [1655951639.432398919] [example]: pyramid image , time cost: 19 ms
[pyramid_example-1]
[INFO] [pyramid_example-1]: process has finished cleanly [pid 3071]
根据 log 显示,测试程序完成了对本地 1920x1080 分辨率图片金字塔缩小的处理。接口调用两次,两次耗时分别如下。
| 图片处理 | 第一次运行耗时 | 第二次运行耗时 |
|---|---|---|
| 1920x1080 金字塔六层基础层输出 | 299ms | 19ms |
因为第一次运行,需要对 vps 硬件进行配置所以耗时较多,如果不再更改硬件配置属性,硬件直接进行处理,耗时就会显著降低。
本地原图 1920x1080、pyramid 缩放后图片如下:
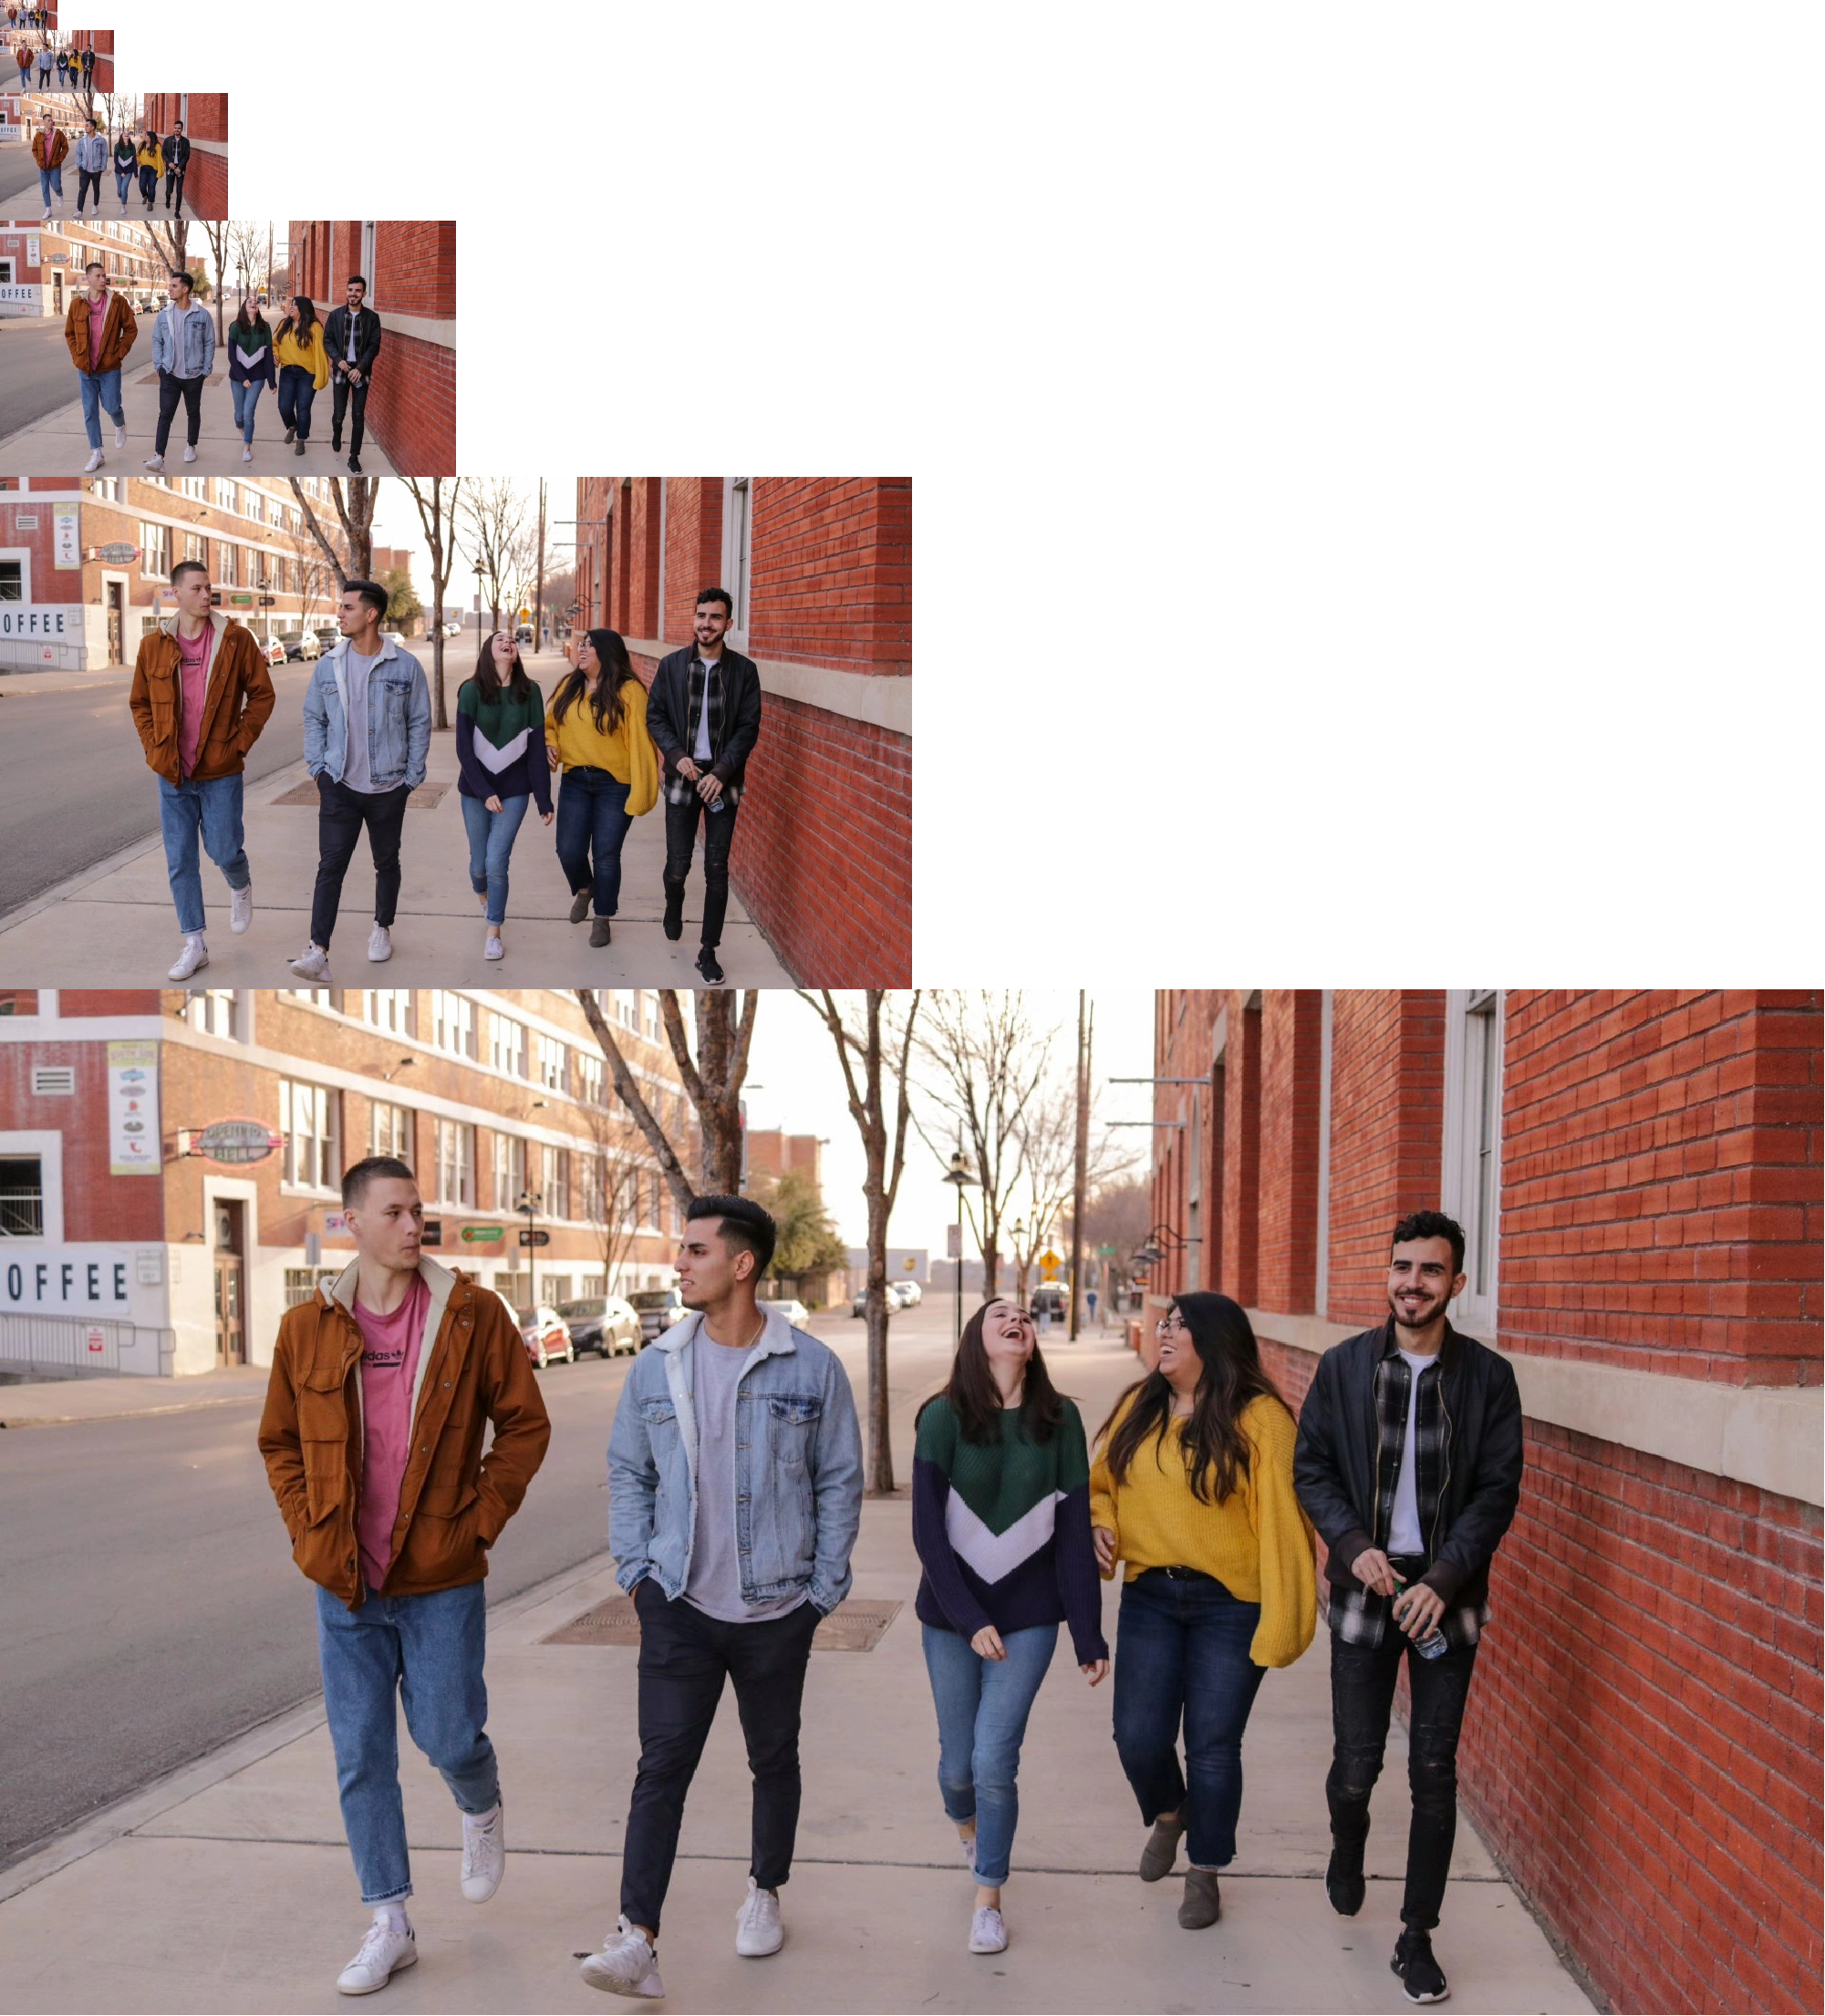
输出基础层六层,每一层 size 是上一层的 1/2
性能对比
输入图片 1920x1080,向上获取 5 层输出获取到 960x540、480x270、240x134、120x66、60x32 分辨率的图片。分别对比 opencv 和 hobotcv 效率,结果如下:
cpu 占用为单核百分比,耗时统计单位为 ms
| VPS 接口耗时 | vps 接口 cpu 占比 | opencv 耗时 | opencv 接口 cpu 占比 |
|---|---|---|---|
| 19ms | 42.5 | 56 | 100 |
color
功能介绍
实现图像的 nv12,bgr24 之间的转换。
代码仓库:https://github.com/D-Robotics/hobot_cv
支持平台
| 平台 | 运行方式 | 示例功能 |
|---|---|---|
| RDK X5, RDK X5 Module, RDK S100 | Ubuntu 22.04 (Humble) | nv12,bgr24 之间的转换 |
| RDK S600 | Ubuntu 24.04 (Jazzy) | nv12,bgr24 之间的转换 |
准备工作
RDK 平台
-
RDK 已烧录好 Ubuntu 系统镜像。
-
RDK 已成功安装 TogetheROS.Bot。
使用介绍
RDK 平台
- Humble
- Jazzy
# 配置tros.b环境
source /opt/tros/humble/setup.bash
# 配置tros.b环境
source /opt/tros/jazzy/setup.bash
- Humble
# 配置tros.b环境
source /opt/tros/humble/setup.bash
- Jazzy
# 配置tros.b环境
source /opt/tros/jazzy/setup.bash
# 从tros.b的安装路径中拷贝出运行示例需要的模型和配置文件。
cp -r /opt/tros/${TROS_DISTRO}/lib/hobot_cv/config/ .

# 启动launch文件
ros2 launch hobot_cv hobot_cv_conversion.launch.py
结果分析
[INFO] [launch]: All log files can be found below /root/.ros/log/2025-03-25-14-50-55-535138-ubuntu-4139
[INFO] [launch]: Default logging verbosity is set to INFO
[INFO] [test_conersion-1]: process started with pid [4140]
[test_conersion-1] [INFO] [1742885455.683144151] [hobot_cv]: bgr24_to_nv12 opencv time cost: 4 ms
[test_conersion-1] [INFO] [1742885455.685469463] [hobot_cv]: nv12_to_bgr24 neon 1 time cost: 2 ms
[test_conersion-1] [INFO] [1742885455.836798125] [hobot_cv]: nv12_to_bgr24 neon 2 time cost: 2 ms
[test_conersion-1] [INFO] [1742885455.992973665] [hobot_cv]: bgr24_to_nv12 neon 1 time cost: 1 ms
[test_conersion-1] [INFO] [1742885455.997803043] [hobot_cv]: nv12_to_bgr24 opencv time cost: 4 ms
[test_conersion-1] [INFO] [1742885456.156813423] [hobot_cv]: bgr24_to_nv12 neon 2 time cost: 1 ms
[test_conersion-1] [INFO] [1742885456.161413872] [hobot_cv]: nv12_to_bgr24 opencv time cost: 4 ms
[INFO] [test_conersion-1]: process has finished cleanly [pid 4140]