decode2display Sample Introduction
Sample Overview
decode2display is a C language interface development code example located in the /app/cdev_demo directory, demonstrating how to use C language for decoding and displaying to the screen. By referring to this example, users can understand and develop related applications.
Effect Demonstration
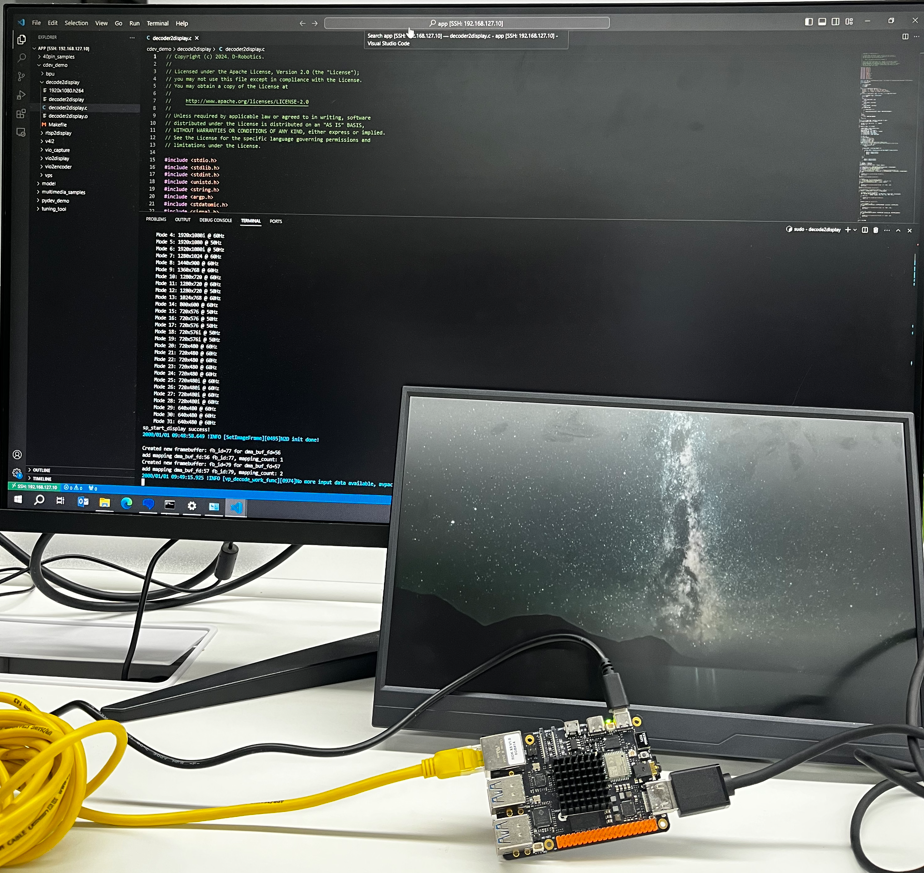
The following image shows the phenomenon of the RDK connected to an HDMI screen during program execution and the network terminal output through SSH connection to the RDK.
The HDMI screen will loop playback the decoded file, while the VScode remote RDK network terminal continuously prints the program's execution status.
Hardware Preparation
Prepare an RDK development board and log in to the desktop via HDMI.
Hardware Connection
This example does not require a mouse and keyboard, so only an HDMI display, Ethernet port, and power cable are connected here.

Quick Start
Code and Board Location
Navigate to the /app/cdev_demo/decode2display location, where you can see the decode2display example contains 2 files:
root@ubuntu:/app/cdev_demo/decode2display# tree
.
├── decoder2display.c
└── Makefile
Compilation and Execution
We can directly use the make command in this directory to compile the decoder2display executable file.
root@ubuntu:/app/cdev_demo/decode2display# tree
.
├── decoder2display
├── decoder2display.c
├── decoder2display.o
└── Makefile
Execution Effect
- First, we need to prepare the input data. Here we can copy existing board data, such as the 1920x1080.h264 file from the
/opt/tros/humble/lib/hobot_codec/config/1920x1080.h264directory to the current directory for separate operation without affecting the original data. - Second, we use
systemctl stop lightdmto stop the display service. - Finally, we use the
./decoder2displaycommand. The default execution result is to decode the 1920x1080.h264 file and display it on the monitor.
root@ubuntu:/app/cdev_demo/decode2display# sudo ./decoder2display -w 1920 -h 1080 -i 1920x1080.h264
Opened DRM device: /dev/dri/card0
1920x1080
1280x800
1280x720
720x576
720x480
640x480
disp_w=1920, disp_h=1080
sp_start_decode success!
Opened DRM device: /dev/dri/card0
DRM is available, using libdrm for rendering.
------------------------------------------------------
Plane 0:
  Plane ID: 41
  Src W: 1920
  Src H: 1080
  CRTC X: 0
  CRTC Y: 0
  CRTC W: 1920
  CRTC H: 1080
  Format: NV12
  Z Pos: 0
  Alpha: 65535
  Pixel Blend Mode: 1
  Rotation: -1
  Color Encoding: -1
  Color Range: -1
------------------------------------------------------
Setting DRM client capabilities...
Setting up KMS...
CRTC ID: 31
CRTC ID: 63
Number of connectors: 1
Connector ID: 74
    Type: 11
    Type Name: HDMI-A
    Connection: Connected
    Modes: 30
    Subpixel: 1
    Mode 0: 1280x800 @ 59Hz
    Mode 1: 1920x1080 @ 60Hz
    Mode 2: 1920x1080 @ 60Hz
    Mode 3: 1920x1080 @ 60Hz
    Mode 4: 1920x1080i @ 60Hz
    Mode 5: 1920x1080i @ 60Hz
    Mode 6: 1920x1080i @ 60Hz
    Mode 7: 1920x1080 @ 50Hz
    Mode 8: 1920x1080i @ 50Hz
    Mode 9: 1920x1080 @ 24Hz
    Mode 10: 1920x1080 @ 24Hz
    Mode 11: 1280x720 @ 60Hz
    Mode 12: 1280x720 @ 60Hz
    Mode 13: 1280x720 @ 60Hz
    Mode 14: 1280x720 @ 50Hz
    Mode 15: 720x576 @ 50Hz
    Mode 16: 720x576 @ 50Hz
    Mode 17: 720x576i @ 50Hz
    Mode 18: 720x576i @ 50Hz
    Mode 19: 720x480 @ 60Hz
    Mode 20: 720x480 @ 60Hz
    Mode 21: 720x480 @ 60Hz
    Mode 22: 720x480 @ 60Hz
    Mode 23: 720x480 @ 60Hz
    Mode 24: 720x480i @ 60Hz
    Mode 25: 720x480i @ 60Hz
    Mode 26: 720x480i @ 60Hz
    Mode 27: 720x480i @ 60Hz
    Mode 28: 640x480 @ 60Hz
    Mode 29: 640x480 @ 60Hz
sp_start_display success!
2000/01/01 09:44:29.126 !INFO [SetImageFrame][0495]N2D init done!

Created new framebuffer: fb_id=77 for dma_buf_fd=56
add mapping dma_buf_fd:56 fb_id:77, mapping_count: 1
Created new framebuffer: fb_id=79 for dma_buf_fd=57
add mapping dma_buf_fd:57 fb_id:79, mapping_count: 2
2000/01/01 09:44:46.374 !INFO [vp_decode_work_func][0974]No more input data available, avpacket.size: 0. Re-cycling to send again.
2000/01/01 09:45:03.869 !INFO [vp_decode_work_func][0974]No more input data available, avpacket.size: 0. Re-cycling to send again.
2000/01/01 09:45:21.331 !INFO [vp_decode_work_func][0974]No more input data available, avpacket.size: 0. Re-cycling to send again.
2000/01/01 09:45:38.826 !INFO [vp_decode_work_func][0974]No more input data available, avpacket.size: 0. Re-cycling to send again.
2000/01/01 09:45:56.299 !INFO [vp_decode_work_func][0974]No more input data available, avpacket.size: 0. Re-cycling to send again.
2000/01/01 09:46:13.737 !INFO [vp_decode_work_func][0974]No more input data available, avpacket.size: 0. Re-cycling to send again.
2000/01/01 09:46:31.219 !INFO [vp_decode_work_func][0974]No more input data available, avpacket.size: 0. Re-cycling to send again.
2000/01/01 09:46:48.713 !INFO [vp_decode_work_func][0974]No more input data available, avpacket.size: 0. Re-cycling to send again.
2000/01/01 09:47:06.197 !INFO [vp_decode_work_func][0974]No more input data available, avpacket.size: 0. Re-cycling to send again.
2000/01/01 09:47:23.669 !INFO [vp_decode_work_func][0974]No more input data available, avpacket.size: 0. Re-cycling to send again.
2000/01/01 09:47:41.161 !INFO [vp_decode_work_func][0974]No more input data available, avpacket.size: 0. Re-cycling to send again.
2000/01/01 09:47:58.649 !INFO [vp_decode_work_func][0974]No more input data available, avpacket.size: 0. Re-cycling to send again.
2000/01/01 09:48:16.111 !INFO [vp_decode_work_func][0974]No more input data available, avpacket.size: 0. Re-cycling to send again.
2000/01/01 09:48:33.572 !INFO [vp_decode_work_func][0974]No more input data available, avpacket.size: 0. Re-cycling to send again.
The content displayed on the HDMI screen is as follows:

Detailed Introduction
Sample Program Parameter Options Description
We can directly execute the target file to confirm the parameter options description:
root@ubuntu:/app/cdev_demo/decode2display# sudo ./decoder2display
Usage: decoder2display [OPTION...]
decode2display sample -- An example of streaming video decoding to the display

  -h, --height=height        height of input video
  -i, --input=path           input video path
  -w, --width=width          width of input video
  -?, --help                 Give this help list
      --usage                Give a short usage message
Where:
-h is a required option, representing the pixel height of the input video
-w is a required option, representing the pixel width of the input video
-i is a required option, representing the file path of the input video
Software Architecture Description
This Sample is implemented based on the spcdev interface. It parses the parameters passed to main, obtains the display resolution through libspcdev.so API, initializes the decoder and display modules, and determines whether VPS is needed based on the adapted resolution and display resolution.
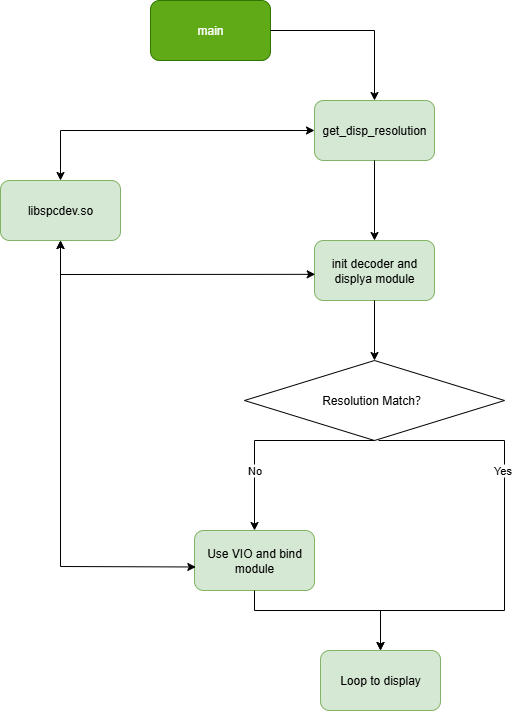
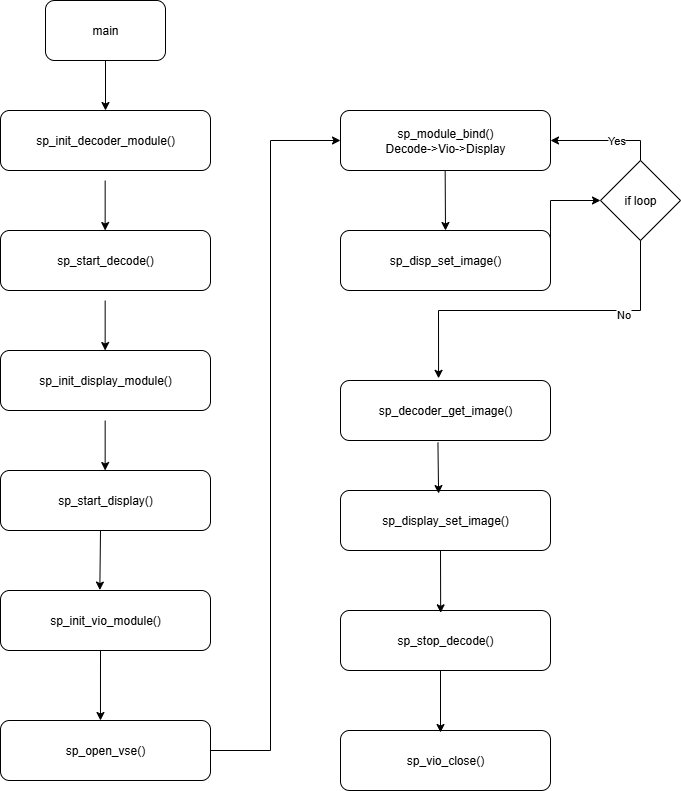
API Flow Description
FAQ
Q: Is there more detailed documentation for the API?
A: You can check at the Decoding Module API location.
Q: Why use systemctl stop lightdm?
A: We can also use windows for display, but it consumes too many resources, which may cause lag or stuttering. Displaying directly to the monitor provides a more intuitive effect.