BPU Sample Introduction
Sample Overview
BPU is a C language interface development code example located in the /app/cdev_demo directory, demonstrating how to call models already supported by BPU using C language. By referencing this example, users can understand and develop related applications.
Effect Demonstration
The BPU sample supports two scenarios: one with a camera, which fixedly uses the YOLO model, and one without a camera, which performs inference on backfilled data.
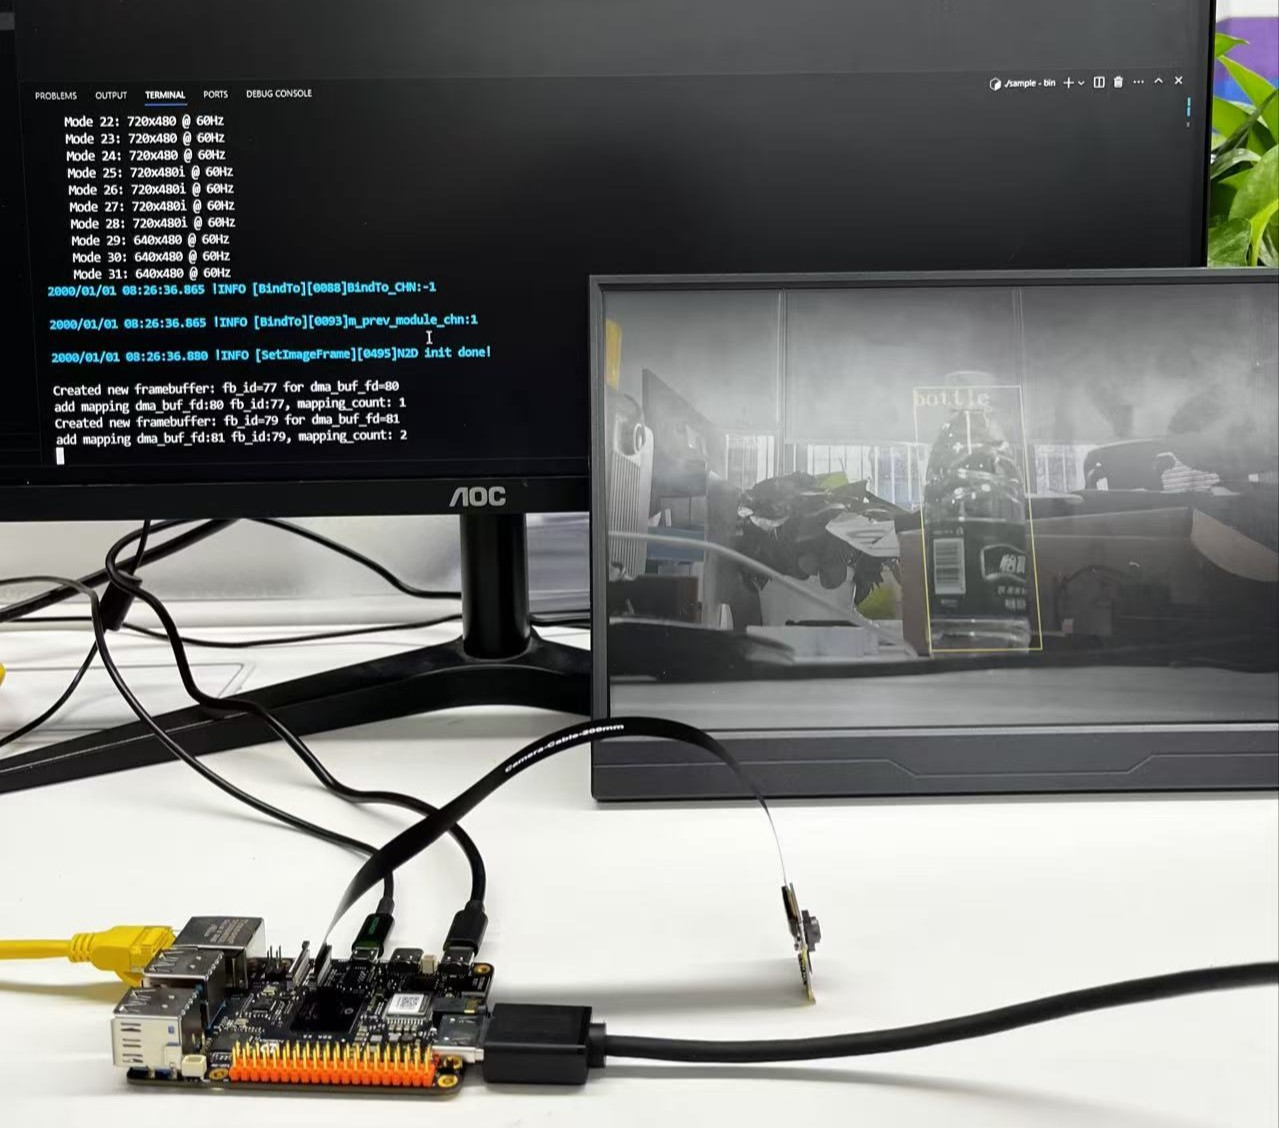
The following shows the effect of using a camera with YOLOv5 for inference. The monitor displays that a water bottle has been detected:
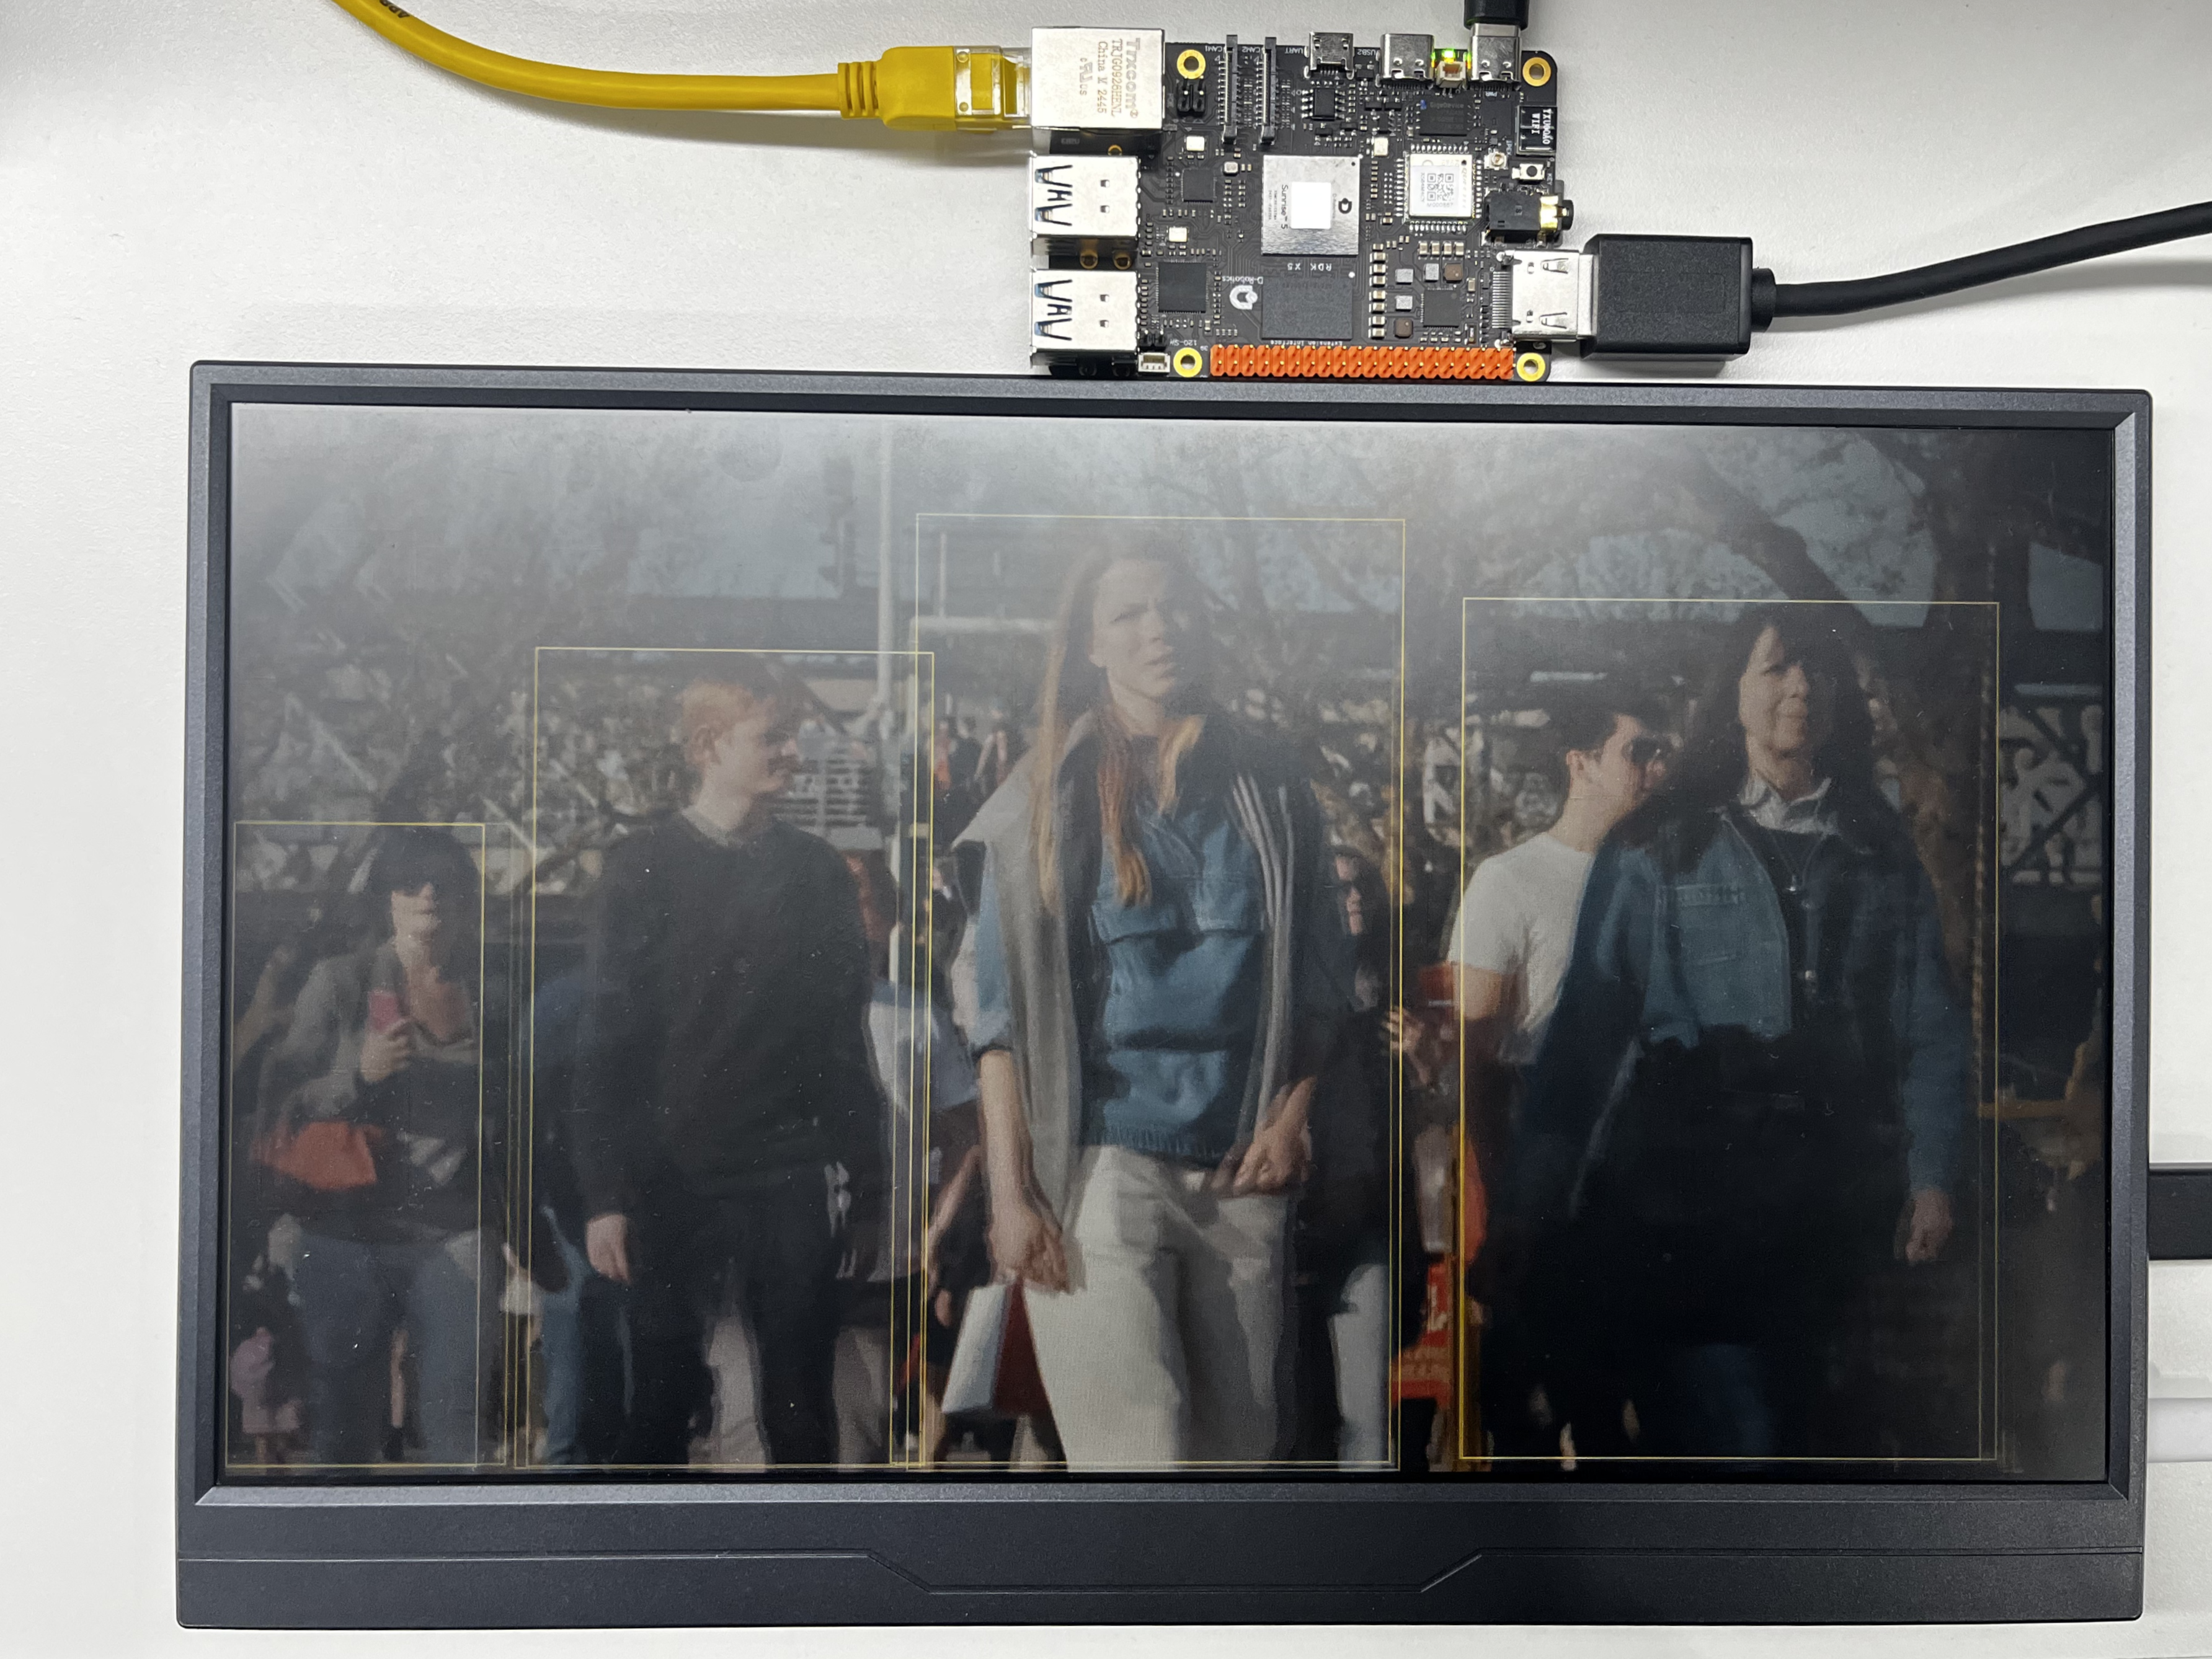
The following shows the effect of using FCOS for inference. The monitor displays the inference results using an H264 file as input data:
Hardware Preparation
Hardware Connection
(1) YOLOv5 inference with camera
This example does not require a mouse or keyboard, so only a camera, HDMI display, Ethernet port, and power cable are connected here:
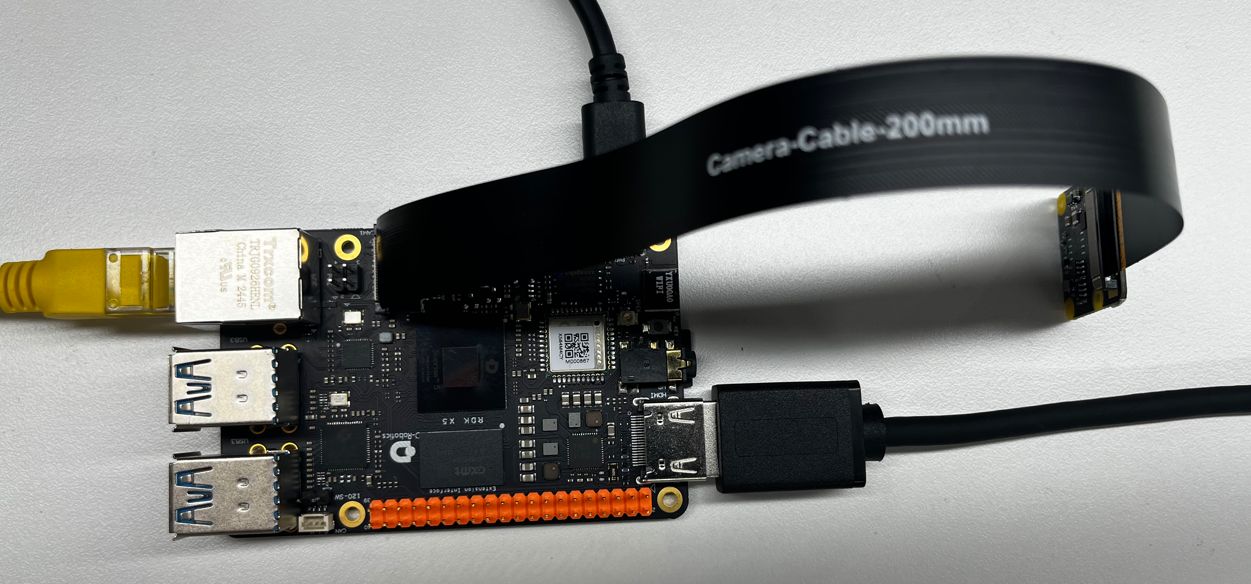
(2) Inference without camera using H264 stream, with results displayed on monitor
This example does not require a mouse or keyboard, so only an HDMI display, Ethernet port, and power cable are connected here:

Quick Start
Code and Board Location
Navigate to the /app/cdev_demo/bpu location, where you can see two directories and a README.md file. The include directory contains the header files required for the sample models, while the src directory contains the program entry point and implementations of pre-processing, inference, post-processing, etc., for various models.
root@ubuntu:/app/cdev_demo/bpu# tree -L 1
.
├── include
├── README.md
└── src
Compilation and Execution
We need to enter the src directory and execute make. The output will appear in the src/bin directory.
root@ubuntu:/app/cdev_demo/bpu/src/bin# tree
.
├── 1080p_.h264
└── sample
We need to execute in the /app/cdev_demo/bpu/src/bin directory. Here, we use the YOLOv5 inference with camera as the execution example.
Execution Effect
(1) Use the systemctl stop lightdm command to close the graphical interface service.
(2) YOLOv5 inference with camera
In the directory root@ubuntu:/app/cdev_demo/bpu/src/bin#, run the command ./sample -f /app/model/basic/yolov5s_672x672_nv12.bin -m 0.
root@ubuntu:/app/cdev_demo/bpu/src/bin# ./sample -f /app/model/basic/yolov5s_672x672_nv12.bin -m 0
Opened DRM device: /dev/dri/card0
[BPU_PLAT]BPU Platform Version(1.3.6)!
[HBRT] set log level as 0. version = 3.15.55.0
[DNN] Runtime version = 1.24.5_(3.15.55 HBRT)
[A][DNN][packed_model.cpp:247][Model](2025-10-25,23:45:13.56.570) [HorizonRT] The model builder version = 1.23.5
[W][DNN]bpu_model_info.cpp:491][Version](2025-10-25,23:45:13.222.713) Model: yolov5s_v2_672x672_bayese_nv12. Inconsistency between the hbrt library version 3.15.55.0 and the model build version 3.15.47.0 detected, in order to ensure correct model results, it is recommended to use compilation tools and the BPU SDK from the same OpenExplorer package.
Model info:
model_name: yolov5s_v2_672x672_bayese_nv12Input count: 1input[0]: tensorLayout: 2 tensorType: 1 validShape:(1, 3, 672, 672, ), alignedShape:(1, 3, 672, 672, )
Output count: 3Output[0]: tensorLayout: 0 tensorType: 13 validShape:(1, 84, 84, 255, ), alignedShape:(1, 84, 84, 255, )
Output[1]: tensorLayout: 0 tensorType: 13 validShape:(1, 42, 42, 255, ), alignedShape:(1, 42, 42, 255, )
Output[2]: tensorLayout: 0 tensorType: 13 validShape:(1, 21, 21, 255, ), alignedShape:(1, 21, 21, 255, )
2025/10/25 23:45:13.229 !INFO [OpenCamera][0447]hbn module
set camera fps: -1,width: 1920,height: 1080
Camera 0:
        mipi_host: 0
......
......
......
You will see the same effect as shown in the image at the beginning of the document:
(3) Inference using FCOS model after decoding H264
In the root@ubuntu:/app/cdev_demo/bpu/src/bin# directory, use the ./sample -f /app/model/basic/fcos_512x512_nv12.bin -m 1 -i 1080p_.h264 -w 1920 -h 1080 command.
root@ubuntu:/app/cdev_demo/bpu/src/bin# ./sample -f /app/model/basic/fcos_512x512_nv12.bin -m 1 -i 1080p_.h264 -w 1920 -h 1080
Opened DRM device: /dev/dri/card0
[BPU_PLAT]BPU Platform Version(1.3.6)!
[HBRT] set log level as 0. version = 3.15.55.0
[DNN] Runtime version = 1.24.5_(3.15.55 HBRT)
[A][DNN][packed_model.cpp:247][Model](2025-10-25,23:46:08.985.465) [HorizonRT] The model builder version = 1.23.5
[W][DNN]bpu_model_info.cpp:491][Version](2025-10-25,23:46:09.127.913) Model: fcos_efficientnetb0_512x512_nv12. Inconsistency between the hbrt library version 3.15.55.0 and the model build version 3.15.47.0 detected, in order to ensure correct model results, it is recommended to use compilation tools and the BPU SDK from the same OpenExplorer package.
Model info:
model_name: fcos_efficientnetb0_512x512_nv12Input count: 1input[0]: tensorLayout: 2 tensorType: 1 validShape:(1, 3, 512, 512, ), alignedShape:(1, 3, 512, 512, )
Output count: 15Output[0]: tensorLayout: 0 tensorType: 14 validShape:(1, 64, 64, 80, ), alignedShape:(1, 64, 64, 80, )
......
......
......
You will see the same effect as shown in the image at the beginning of the document:
Detailed Introduction
This sample code is relatively extensive, but there are fixed correspondences during execution. Our YOLOv5 is paired with a camera.
Sample Program Parameter Options Description
root@ubuntu:/app/cdev_demo/bpu/src/bin# ./sample
Usage: sample [OPTION...]
bpu sample -- An C++ example of using bpu

  -d, --debug                Print lots of debugging information.
  -f, --file=modle_file      path of model file
  -h, --video_height=height  height of video
  -i, --input_video=video path   path of video
  -m, --mode=type            0:yolov5;1:fcos
  -w, --video_width=width    width of video
  -?, --help                 Give this help list
      --usage                Give a short usage message

Mandatory or optional arguments to long options are also mandatory or optional
for any corresponding short options.
root@ubuntu:/app/cdev_demo/bpu/src/bin#
Where:
-d represents printing debug information.
-f represents the location of the model.
-i represents the path to the video file input to the program. Note that this is only input when not using a camera; it is not needed when running the example with a camera.
-m represents the selected model.
-w represents the width of the output video.
-h represents the height of the output video.
-? represents printing help information.
Software Architecture Description
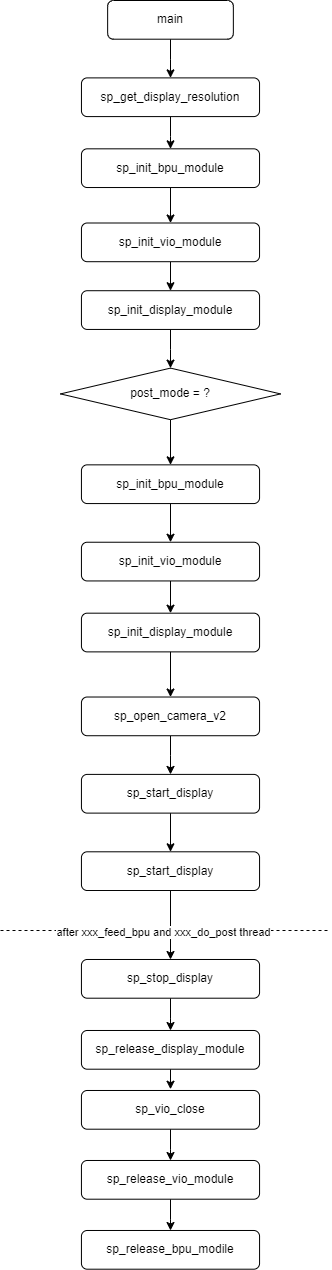
This Sample is implemented based on the spcdev interface. It parses the parameters passed to main, uses the libspcdev.so API to obtain the display resolution, then initializes the model module, display module, and video input module. Based on the adapted resolution and the display resolution, it determines whether to use VPS for scaling. Through appropriate pre-processing and post-processing threads, the inference results are converted into coordinates and presented on the display. Since this sample code includes inference examples for multiple models, we have extracted the main core logic for display in the software architecture diagram.

API Flow Description
FAQ
Q: Is the pre-processing different for different models?
A: It depends on the characteristics of the model; generally, different models require different pre-processing.