On-board Model Application Development Guide
Model Inference DNN API Usage Example
Overview
This section introduces the specific usage of the horizon_runtime_sample package for on-board model application development. Developers can experience and develop applications based on these examples to lower the development threshold.
The sample package provides three types of examples:
- Model inference DNN API usage examples
- Special features examples such as custom operators (custom OP)
- Miscellaneous examples for non-NV12 input models
Please read on for more details.
To obtain the horizon_runtime_sample package, please refer to the Deliverables Instructions.
Sample Code Package Structure Introduction
  +---horizon_runtime_sample
  |── README.md
  ├── code                                      # Sample source code
  │   ├── 00_quick_start                        # Quick start example: Using mobilenetv1 for single image inference and result parsing with the DNN API.
  │   │   ├── CMakeLists.txt
  │   │   ├── CMakeLists_x86.txt
  │   │   └── src
  │   ├── 01_api_tutorial                       # DNN SDK API usage tutorial
  │   │   ├── CMakeLists.txt
  │   │   ├── mem
  │   │   ├── model
  │   │   ├── resize
  │   │   ├── roi_infer
  │   │   └── tensor
  │   ├── 02_advanced_samples                   # Special feature examples
  │   │   ├── CMakeLists.txt
  │   │   ├── custom_identity
  │   │   ├── multi_input
  │   │   ├── multi_model_batch
  │   │   └── nv12_batch
  │   ├── 03_misc                               # Miscellaneous examples for non-NV12 input models.
  │   │   ├── CMakeLists.txt
  │   │   ├── lenet_gray
  │   │   └── resnet_feature
  │   ├── CMakeLists.txt
  │   ├── build_ultra.sh                        # Script for aarch64 compilation on RDK Ultra
  │   ├── build_xj3.sh                          # Script for aarch64 compilation on RDK X3
  │   └── deps_gcc9.3                           # Third-party dependencies required for the sample code. Users should replace or trim as needed for their own projects.
  ├── ultra
  │   ├── data                                  # Preloaded data files
  │   │   ├── cls_images
  │   │   ├── custom_identity_data
  │   │   ├── det_images
  │   │   └── misc_data
  │   ├── model
  │   │   ├── README.md
  │   │   └── runtime -> ../../../model_zoo/runtime/horizon_runtime_sample   # Soft link pointing to the model in the OE package. Board-side runtime environment requires users to specify the model path manually.
  │   ├── script                                # aarch64 sample execution scripts
  │   │   ├── 00_quick_start
  │   │   ├── 01_api_tutorial
  │   │   ├── 02_advanced_samples
  │   │   ├── 03_misc
  │   │   └── README.md
  │   └── script_x86                            # x86 sample execution scripts
  │       ├── 00_quick_start
  │       └── README.md
  ├── xj3
  │   ├── data                                  # Preloaded data files
  │   │   ├── cls_images
  │   │   ├── custom_identity_data
  │   │   ├── det_images
  │   │   └── misc_data
  │   ├── model
  │   │   ├── README.md
  │   │   └── runtime -> ../../../model_zoo/runtime/horizon_runtime_sample   # Soft link pointing to the model in the OE package. Board-side runtime environment requires users to specify the model path manually.
  │   ├── script                                # aarch64 sample execution scripts
  │   │   ├── 00_quick_start
  │   │   ├── 01_api_tutorial
  │   │   ├── 02_advanced_samples
  │   │   ├── 03_misc
  │   │   └── README.md
  │   └── script_x86                            # x86 sample execution scripts
  │       ├── 00_quick_start
  │       └── README.md
- 00_quick_start: Quick start using the
dnnAPI, demonstrating single-image inference with MobileNetV1 and result parsing. - 01_api_tutorial: DNN SDK API usage tutorial, including mem, model, resize, roi_infer, and tensor components.
- 02_advanced_samples: Special feature examples, such as custom_identity, multi_input, multi_model_batch, and nv12_batch functionality.
- 03_misc: Miscellaneous examples for non-NV12 input models.
- xj3: RDK X3 development board sample execution scripts, preloaded with data and related models.
- ultra: RDK Ultra development board sample execution scripts, preloaded with data and related models.
- build_xj3.sh: One-click compilation script for RDK X3.
- build_ultra.sh: One-click compilation script for RDK Ultra.
- deps/deps_gcc9.3: Third-party dependencies required for the sample code. Users should replace or trim as needed for their own projects.
For running on a private model, please refer to the sample code flow of 00_quick_start/src/run_mobileNetV1_224x224.cc for code rewriting. After successful compilation, you can test and verify on the development board!
Environment Building
Development Board Preparation
-
After receiving the development board, please update the development board image to the latest version. For the upgrade method, please refer to the System Update chapter.
-
Ensure that the local development machine and the development board can be connected remotely.
Compilation
Compilation requires the installation of cross-compilation tools: aarch64-linux-gnu-g++, aarch64-linux-gnu-gcc. Please use the D-Robotics provided development machine Docker image for compilation directly. Please read the Environment Installation chapter for obtaining and using the development machine Docker environment;
According to the situation of the development board used, please use the build_xj3.sh or build_ultra.sh script under the horizon_runtime_sample/code directory to compile the executable program in the development board environment with one click. The executable program and corresponding dependencies will be automatically copied to the xj3/script directory under the aarch64 directory or the ultra/script directory under the aarch64 directory.
The project specifies the path of the cross-compilation tool by obtaining the environment variable LINARO_GCC_ROOT, users can check whether the local environment variable is the target cross-compilation tool before use.
If you need to specify the path of the cross-compilation tool, you can set the environment variable LINARO_GCC_ROOT, or directly modify the script build_xj3.sh or build_ultra.sh, specify the variables CC and CXX.
  export CC=${GCC_ROOT}/bin/aarch64-linux-gnu-gcc
  export CXX=${GCC_ROOT}/bin/aarch64-linux-gnu-g++
Example Usage
basic_samples Example
The model inference example script is mainly in the xj3/script and xj3/script_x86 directories. After compiling the program, the directory structure is as follows:
  # RDK X3 usage script information
    ├─script
      ├── 00_quick_start
      │   ├── README.md
      │   └── run_mobilenetV1.sh
      ├── 01_api_tutorial
      │   ├── model.sh
      │   ├── README.md
      │   ├── resize_bgr.sh
      │   ├── resize_y.sh
      │   ├── roi_infer.sh
      │   ├── sys_mem.sh
      │   └── tensor.sh
      ├── 02_advanced_samples
      │   ├── custom_arm_op_custom_identity.sh
      │   ├── README.md
      │   └── run_multi_model_batch.sh
      ├── 03_misc
      │   ├── README.md
      │   ├── run_lenet.sh
      │   └── run_resnet50_feature.sh
      ├── aarch64
      │   ├── bin
      │   │   ├── model_example
      │   │   ├── resize_bgr_example
      │   │   ├── resize_y_example
      │   │   ├── roi_infer
      │   │   ├── run_custom_op
      │   │   ├── run_lenet_gray
      │   │   ├── run_mobileNetV1_224x224
      │   │   ├── run_multi_model_batch
      │   │   ├── run_resnet_feature
      │   │   ├── sys_mem_example
      │   │   └── tensor_example
      │   └── lib
      │       ├── libdnn.so
      │       ├── libhbrt_bernoulli_aarch64.so
      │       └── libopencv_world.so.3.4
      └── README.md

    # RDK Ultra Script Information
    ├─script
      ├── 00_quick_start
      │   ├── README.md
      │   └── run_mobilenetV1.sh
      ├── 01_api_tutorial
      │   ├── model.sh
      │   ├── README.md
      │   ├── roi_infer.sh
      │   ├── sys_mem.sh
      │   └── tensor.sh
      ├── 02_advanced_samples
      │   ├── plugin
      │   │   └── custom_arm_op_custom_identity.sh
      │   ├── README.md
      │   ├── run_multi_input.sh
      │   ├── run_multi_model_batch.sh
      │   └── run_nv12_batch.sh├── 03_misc
      │   ├── README.md
      │   ├── run_lenet.sh
      │   └── run_resnet50_feature.sh
      ├── aarch64                        # Compilation generates executable programs and dependency libraries
      │   ├── bin
      │   │   ├── model_example
      │   │   ├── roi_infer
      │   │   ├── run_custom_op
      │   │   ├── run_lenet_gray
      │   │   ├── run_mobileNetV1_224x224
      │   │   ├── run_multi_input
      │   │   ├── run_multi_model_batch
      │   │   ├── run_nv12_batch
      │   │   ├── run_resnet_feature
      │   │   ├── sys_mem_example
      │   │   └── tensor_example
      │   └── lib
      │       ├── libdnn.so
      │       ├── libhbrt_bayes_aarch64.so
      │       └── libopencv_world.so.3.4
      └── README.md
- The
modelfolder contains the path to the model, where theruntimefolder is a symbolic link, and the link path is../../../model_zoo/runtime/horizon_runtime_sample, which can directly find the model path in the delivery package. - The board-side running environment needs to place the model in the
modelfolder.
quick_start
The quick_start directory under 00_quick_start is an example of quick starting the model inference:
  00_quick_start/
  ├── README.md
  └── run_mobilenetV1.sh
run_mobilenetV1.sh: This script implements the example function of reading a single image using the MobilenetV1 model for inference.
api_tutorial
The api_tutorial directory contains examples demonstrating how to use embedded APIs. Its subscripts are as follows:
|-- model.sh
|-- resize_bgr.sh
|-- resize_y.sh
|-- roi_infer.sh
|-- sys_mem.sh
|-- tensor.sh
model.sh: This script primarily handles reading model information. To use it, navigate to the01_api_tutorialdirectory and executesh model.sh, like this:
The following example logs are based on actual testing on the RDK X3 development board. Results may differ when using the RDK Ultra board; please refer to your specific test results.
#!/bin/sh
/usr/local/ruxin.song/xj3/script/01_api_tutorial# sh model.sh
../aarch64/bin/model_example --model_file_list=../../model/runtime/mobilenetv1/mobilenetv1_nv12_hybrid_horizonrt.bin
I0000 00:00:00.000000 24638 vlog_is_on.cc:197] RAW: Set VLOG level for "*" to 3
[HBRT] set log level as 0. version = 3.12.1
[BPU_PLAT]BPU Platform Version(1.2.2)!
[HorizonRT] The model builder version = 1.3.3
I0108 04:19:27.245879 24638 model_example.cc:104] model count:1, model[0]: mobilenetv1_nv12
I0108 04:19:27.246064 24638 model_example.cc:112] hbDNNGetModelHandle [mobilenetv1_nv12] success!
I0108 04:19:27.246139 24638 model_example.cc:189] [mobilenetv1_nv12] Model Info:  input num: 1, input[0] validShape: ( 1, 3, 224, 224 ), alignedShape: ( 1, 4, 224, 224 ), tensorLayout: 2, tensorType: 1, output num: 1, output[0] validShape: ( 1, 1000, 1, 1 ), alignedShape: ( 1, 1000, 1, 1 ), tensorLayout: 2, tensorType: 13
resize_bgr.sh: This script demonstrates how to use thehbDNNResizeAPI. The example code in the script resizes a 1352x900 image, crops a portion with coordinates [5, 19, 340, 343], and saves the resized image (402x416) asresize_bgr.jpg. Run it by executingsh resize_bgr.sh:
The following example logs are based on the RDK X3 development board. Results may vary for the RDK Ultra board; please refer to your actual test results.
#!/bin/sh

/usr/local/ruxin.song/xj3/script/01_api_tutorial# sh resize_bgr.sh
../aarch64/bin/resize_bgr_example --image_file=../../data/det_images/kite.jpg --resize_height=416 --resize_width=402 --resized_image=./resize_bgr.jpg --crop_x1=5 --crop_x2=340 --crop_y1=19 --crop_y2=343
I0000 00:00:00.000000 24975 vlog_is_on.cc:197] RAW: Set VLOG level for "*" to 3
I0108 06:58:03.327212 24975 resize_bgr_example.cc:116] Original shape: 1352x900 ,dest shape:402x416 ,aligned shape:402x416
[HBRT] set log level as 0. version = 3.12.1
[BPU_PLAT]BPU Platform Version(1.2.2)!
I0108 06:58:03.328739 24975 resize_bgr_example.cc:139] resize success!
I0108 06:58:03.335835 24975 resize_bgr_example.cc:143] wait task done finished!
After execution, the resize_bgr.jpg image will be successfully saved in the current directory.
resize_y.sh: This script guides the usage of thehbDNNResizeAPI. It resizes an image to a size of 416x402. Run it by executingsh resize_y.sh:
Logs are from the RDK X3 development board. Results may vary for the RDK Ultra board; please refer to your actual test results.
#!/bin/sh

/usr/local/ruxin.song/xj3/script/01_api_tutorial# sh resize_y.sh
../aarch64/bin/resize_y_example --image_file=../../data/det_images/kite.jpg --resize_height=416 --resize_width=402 --resized_image=./resize_y.jpg
I0000 00:00:00.000000 24992 vlog_is_on.cc:197] RAW: Set VLOG level for "*" to 3
I0108 06:59:36.887241 24992 resize_y_example.cc:101] Original shape: 1352x900 ,dest shape:402x416 ,aligned shape:402x416
[HBRT] set log level as 0. version = 3.12.1
[BPU_PLAT]BPU Platform Version(1.2.2)!
I0108 06:59:36.888770 24992 resize_y_example.cc:119] resize success
I0108 06:59:36.891711 24992 resize_y_example.cc:123] wait resize success
I0108 06:59:36.891798 24992 resize_y_example.cc:129] spent time: 0.003463
After execution, the resize_y.jpg image will be successfully saved in the current directory.
-
roi_infer.sh: This script demonstrates how to use thehbDNNRoiInferAPI. It resizes an image to the model input size, converts it to NV12 format, and performs inference (inferencing) with a given ROI (Region of Interest). -
sys_mem.sh: This script guides the usage of thehbSysAllocMem,hbSysFlushMem, andhbSysFreeMemAPIs. Execute it directly within the01_api_tutorialdirectory by runningsh sys_mem.sh. -
tensor.sh: This script demonstrates how to prepare model inputs and outputs. Execute it in the01_api_tutorialdirectory by runningsh tensor.sh, as shown below:
Logs are from the RDK X3 development board. Results may vary for the RDK Ultra board; please refer to your actual test results.
/usr/local/ruxin.song/xj3/script/01_api_tutorial# sh tensor.sh
Tensor data type:0, Tensor layout: 2, shape:1x1x721x1836, aligned shape:1x1x721x1840
Tensor data type:1, Tensor layout: 2, shape:1x3x773x329, aligned shape:1x3x773x336
Tensor data type:2, Tensor layout: 2, shape:1x3x108x1297, aligned shape:1x3x108x1312
Tensor data type:5, Tensor layout: 2, shape:1x3x858x477, aligned shape:1x3x858x477
Tensor data type:5, Tensor layout: 0, shape:1x920x102x3, aligned shape:1x920x102x3
Tensor
advanced_samples
The examples under the 02_advanced_samples directory are used to demonstrate the use of special features in custom operators. The directory includes the following scripts:
  ├── custom_arm_op_custom_identity.sh
  └── run_multi_model_batch.sh
custom_arm_op_custom_identity.sh: This script is mainly used for custom operator model inference. To use it, enter the02_advanced_samplesdirectory and executesh custom_arm_op_custom_identity.shdirectly as shown below:
The following example logs are the results of actual tests using RDK X3 development board. The log information may vary if using the RDK Ultra development board. Please refer to specific tests for accuracy!
/userdata/ruxin.song/xj3/script/02_advanced_samples# sh custom_arm_op_custom_identity.sh
../aarch64/bin/run_custom_op --model_file=../../model/runtime/custom_op/custom_op_featuremap.bin --input_file=../../data/custom_identity_data/input0.bin,../../data/custom_identity_data/input1.bin
I0000 00:00:00.000000 30421 vlog_is_on.cc:197] RAW: Set VLOG level for "*" to 3
I0723 15:06:12.172068 30421 main.cpp:212] hbDNNRegisterLayerCreator success
I0723 15:06:12.172335 30421 main.cpp:217] hbDNNRegisterLayerCreator success
[BPU_PLAT]BPU Platform Version(1.3.1)!
[HBRT] set log level as 0. version = 3.15.3.0
[DNN] Runtime version = 1.15.2_(3.15.3 HBRT)
[A][DNN][packed_model.cpp:217](1563865572232) [HorizonRT] The model builder version = 1.13.5
I0723 15:06:12.240696 30421 main.cpp:232] hbDNNGetModelNameList success
I0723 15:06:12.240784 30421 main.cpp:239] hbDNNGetModelHandle success
I0723 15:06:12.240819 30421 main.cpp:245] hbDNNGetInputCount success
file length: 602112
file length: 602112
I0723 15:06:12.243616 30421 main.cpp:268] hbDNNGetOutputCount success
I0723 15:06:12.244102 30421 main.cpp:297] hbDNNInfer success
I0723 15:06:12.257903 30421 main.cpp:302] task done
I0723 15:06:14.277941 30421 main.cpp:306] write output tensor

The output data of the first model is saved in the `output0.txt` file.
run_multi_model_batch.sh: This script is mainly used for batch inference of multiple small models. To use it, enter the02_advanced_samplesdirectory and executesh run_multi_model_batch.shdirectly as shown below:
The following example logs are the results of actual tests using RDK X3 development board. The log information may vary if using the RDK Ultra development board. Please refer to specific tests for accuracy!
root@x3sdbx3-hynix2G-3200:/userdata/chaoliang/xj3/script/02_advanced_samples# sh run_multi_model_batch.sh
../aarch64/bin/run_multi_model_batch --model_file=../../model/runtime/googlenet/googlenet_224x224_nv12.bin,../../model/runtime/mobilenetv2/mobilenetv2_224x224_nv12.bin --input_file=../../data/cls_images/zebra_cls.jpg,../../data/cls_images/zebra_cls.jpg
I0000 00:00:00.000000 17060 vlog_is_on.cc:197] RAW: Set VLOG level for "*" to 3
[HBRT] set log level as 0. version = 3.13.4
```[BPU_PLAT]BPU Platform Version(1.1.1)!
    [HorizonRT] The model builder version = 1.3.18
    [HorizonRT] The model builder version = 1.3.18
    I0317 12:37:18.249785 17060 main.cpp:119] hbDNNInitializeFromFiles success
    I0317 12:37:18.250029 17060 main.cpp:127] hbDNNGetModelNameList success
    I0317 12:37:18.250071 17060 main.cpp:141] hbDNNGetModelHandle success
    I0317 12:37:18.283633 17060 main.cpp:155] read image to nv12 success
    I0317 12:37:18.284270 17060 main.cpp:172] prepare input tensor success
    I0317 12:37:18.284456 17060 main.cpp:184] prepare output tensor success
    I0317 12:37:18.285344 17060 main.cpp:218] infer success
    I0317 12:37:18.296559 17060 main.cpp:223] task done
    I0317 12:37:18.296701 17060 main.cpp:228] googlenet class result id: 340
    I0317 12:37:18.296805 17060 main.cpp:232] mobilenetv2 class result id: 340
    I0317 12:37:18.296887 17060 main.cpp:236] release task successI0108 07:23:35.510927 25139 run_lenet_gray.cc:217] TOP 4 result id: 2
misc
The 03_misc directory contains examples for using models with non-nv12 inputs. It consists of the following scripts:
  ├── run_lenet.sh
  └── run_resnet50_feature.sh
run_lenet.sh: This script primarily implements the inference functionality of a LeNet model with Y data input. To use it, navigate to the03_miscdirectory and executesh run_lenet.sh, as shown below:
The following example logs are from actual tests on an RDK X3 development board. Logs may differ for an RDK Ultra board; refer to your specific test results!
    /userdata/ruxin.song/xj3/script/03_misc# sh run_lenet.sh
    ../aarch64/bin/run_lenet_gray --model_file=../../model/runtime/lenet_gray/lenet_gray_hybrid_horizonrt.bin --data_file=../../data/misc_data/7.bin --image_height=28 --image_width=28 --top_k=5
    I0000 00:00:00.000000 25139 vlog_is_on.cc:197] RAW: Set VLOG level for "*" to 3
    [HBRT] set log level as 0. version = 3.12.1
    [BPU_PLAT]BPU Platform Version(1.2.2)!
    [HorizonRT] The model builder version = 1.3.3
    I0108 07:23:35.507514 25139 run_lenet_gray.cc:145] hbDNNInitializeFromFiles success
    I0108 07:23:35.507737 25139 run_lenet_gray.cc:153] hbDNNGetModelNameList success
    I0108 07:23:35.507771 25139 run_lenet_gray.cc:160] hbDNNGetModelHandle success
    I0108 07:23:35.508070 25139 run_lenet_gray.cc:176] prepare y tensor success
    I0108 07:23:35.508178 25139 run_lenet_gray.cc:189] prepare tensor success
    I0108 07:23:35.509909 25139 run_lenet_gray.cc:200] infer success
    I0108 07:23:35.510721 25139 run_lenet_gray.cc:205] task done
    I0108 07:23:35.510790 25139 run_lenet_gray.cc:210] task post process finished
    I0108 07:23:35.510832 25139 run_lenet_gray.cc:217] TOP 0 result id: 7
    I0108 07:23:35.510857 25139 run_lenet_gray.cc:217] TOP 1 result id: 9
    I0108 07:23:35.510879 25139 run_lenet_gray.cc:217] TOP 2 result id: 3
    I0108 07:23:35.510903 25139 run_lenet_gray.cc:217] TOP 3 result id: 4
    I0108 07:23:35.510927 25139 run_lenet_gray.cc:217] TOP 4 result id: 2
run_resnet50_feature.sh: This script mainly demonstrates the inference functionality of a ResNet50 model with feature data input. The example code preprocesses the feature data by quantizing and padding it to meet the model's requirements before feeding it into the model. To use it, navigate to the03_miscdirectory and runsh run_resnet50_feature.sh, as follows:
See above note for logs.
    /userdata/ruxin.song/xj3/script/03_misc# sh run_resnet50_feature.sh
    ../aarch64/bin/run_resnet_feature --model_file=../../model/runtime/resnet50_feature/resnet50_feature_hybrid_horizonrt.bin --data_file=../../data/misc_data/np_0 --top_k=5
    I0000 00:00:00.000000 25155 vlog_is_on.cc:197] RAW: Set VLOG level for "*" to 3
    [HBRT] set log level as 0. version = 3.12.1
    [BPU_PLAT]BPU Platform Version(1.2.2)!
    [HorizonRT] The model builder version = 1.3.3
    I0108 07:25:41.300466 25155 run_resnet_feature.cc:136] hbDNNInitializeFromFiles success
    I0108 07:25:41.300708 25155 run_resnet_feature.cc:144] hbDNNGetModelNameList success
    I0108 07:25:41.300741 25155 run_resnet_feature.cc:151] hbDNNGetModelHandle success
    I0108 07:25:41.302760 25155 run_resnet_feature.cc:166] prepare feature tensor success
    I0108 07:25:41.302919 25155 run_resnet_feature.cc:176] prepare tensor success
    I0108 07:25:41.304678 25155 run_resnet_feature.cc:187] infer success
    I0108 07:25:41.373052 25155 run_resnet_feature.cc:192] task done
    I0108 07:25:41.373328 25155 run_resnet_feature.cc:197] task post process finished
    I0108 07:25:41.373374 25155 run_resnet_feature.cc:204] TOP 0 result id: 74
    I0108 07:25:41.373399 25155 run_resnet_feature.cc:204] TOP 1 result id: 815
    I0108 07:25:41.373422 25155 run_resnet_feature.cc:204] TOP 2 result id: 73
    I0108 07:25:41.373445 25155 run_resnet_feature.cc:204] TOP 3 result id: 78
    I0108 07:25:41.373468 25155 run_resnet_feature.cc:204] TOP 4 result id: 72
Auxiliary tools and common operations
Logs
This section mainly includes "Example Logs" and "Model Inference DNN API Logs". The example logs refer to the application logs in the delivery package example code, and all log content will be output.
Example Logs
The example logs mainly use vlog in glog. In the basic_samples of the example code, all log content will be output.
Model Inference DNN API Logs
For the configuration of model inference DNN API logs, please refer to the "Configuration Information" section in the "Algorithm Toolchain Manual" document.
Public model performance accuracy evaluation instructions
Public model performance accuracy indicatorsThe table below provides performance and accuracy indicators of typical deep neural network models on the X3 processor.
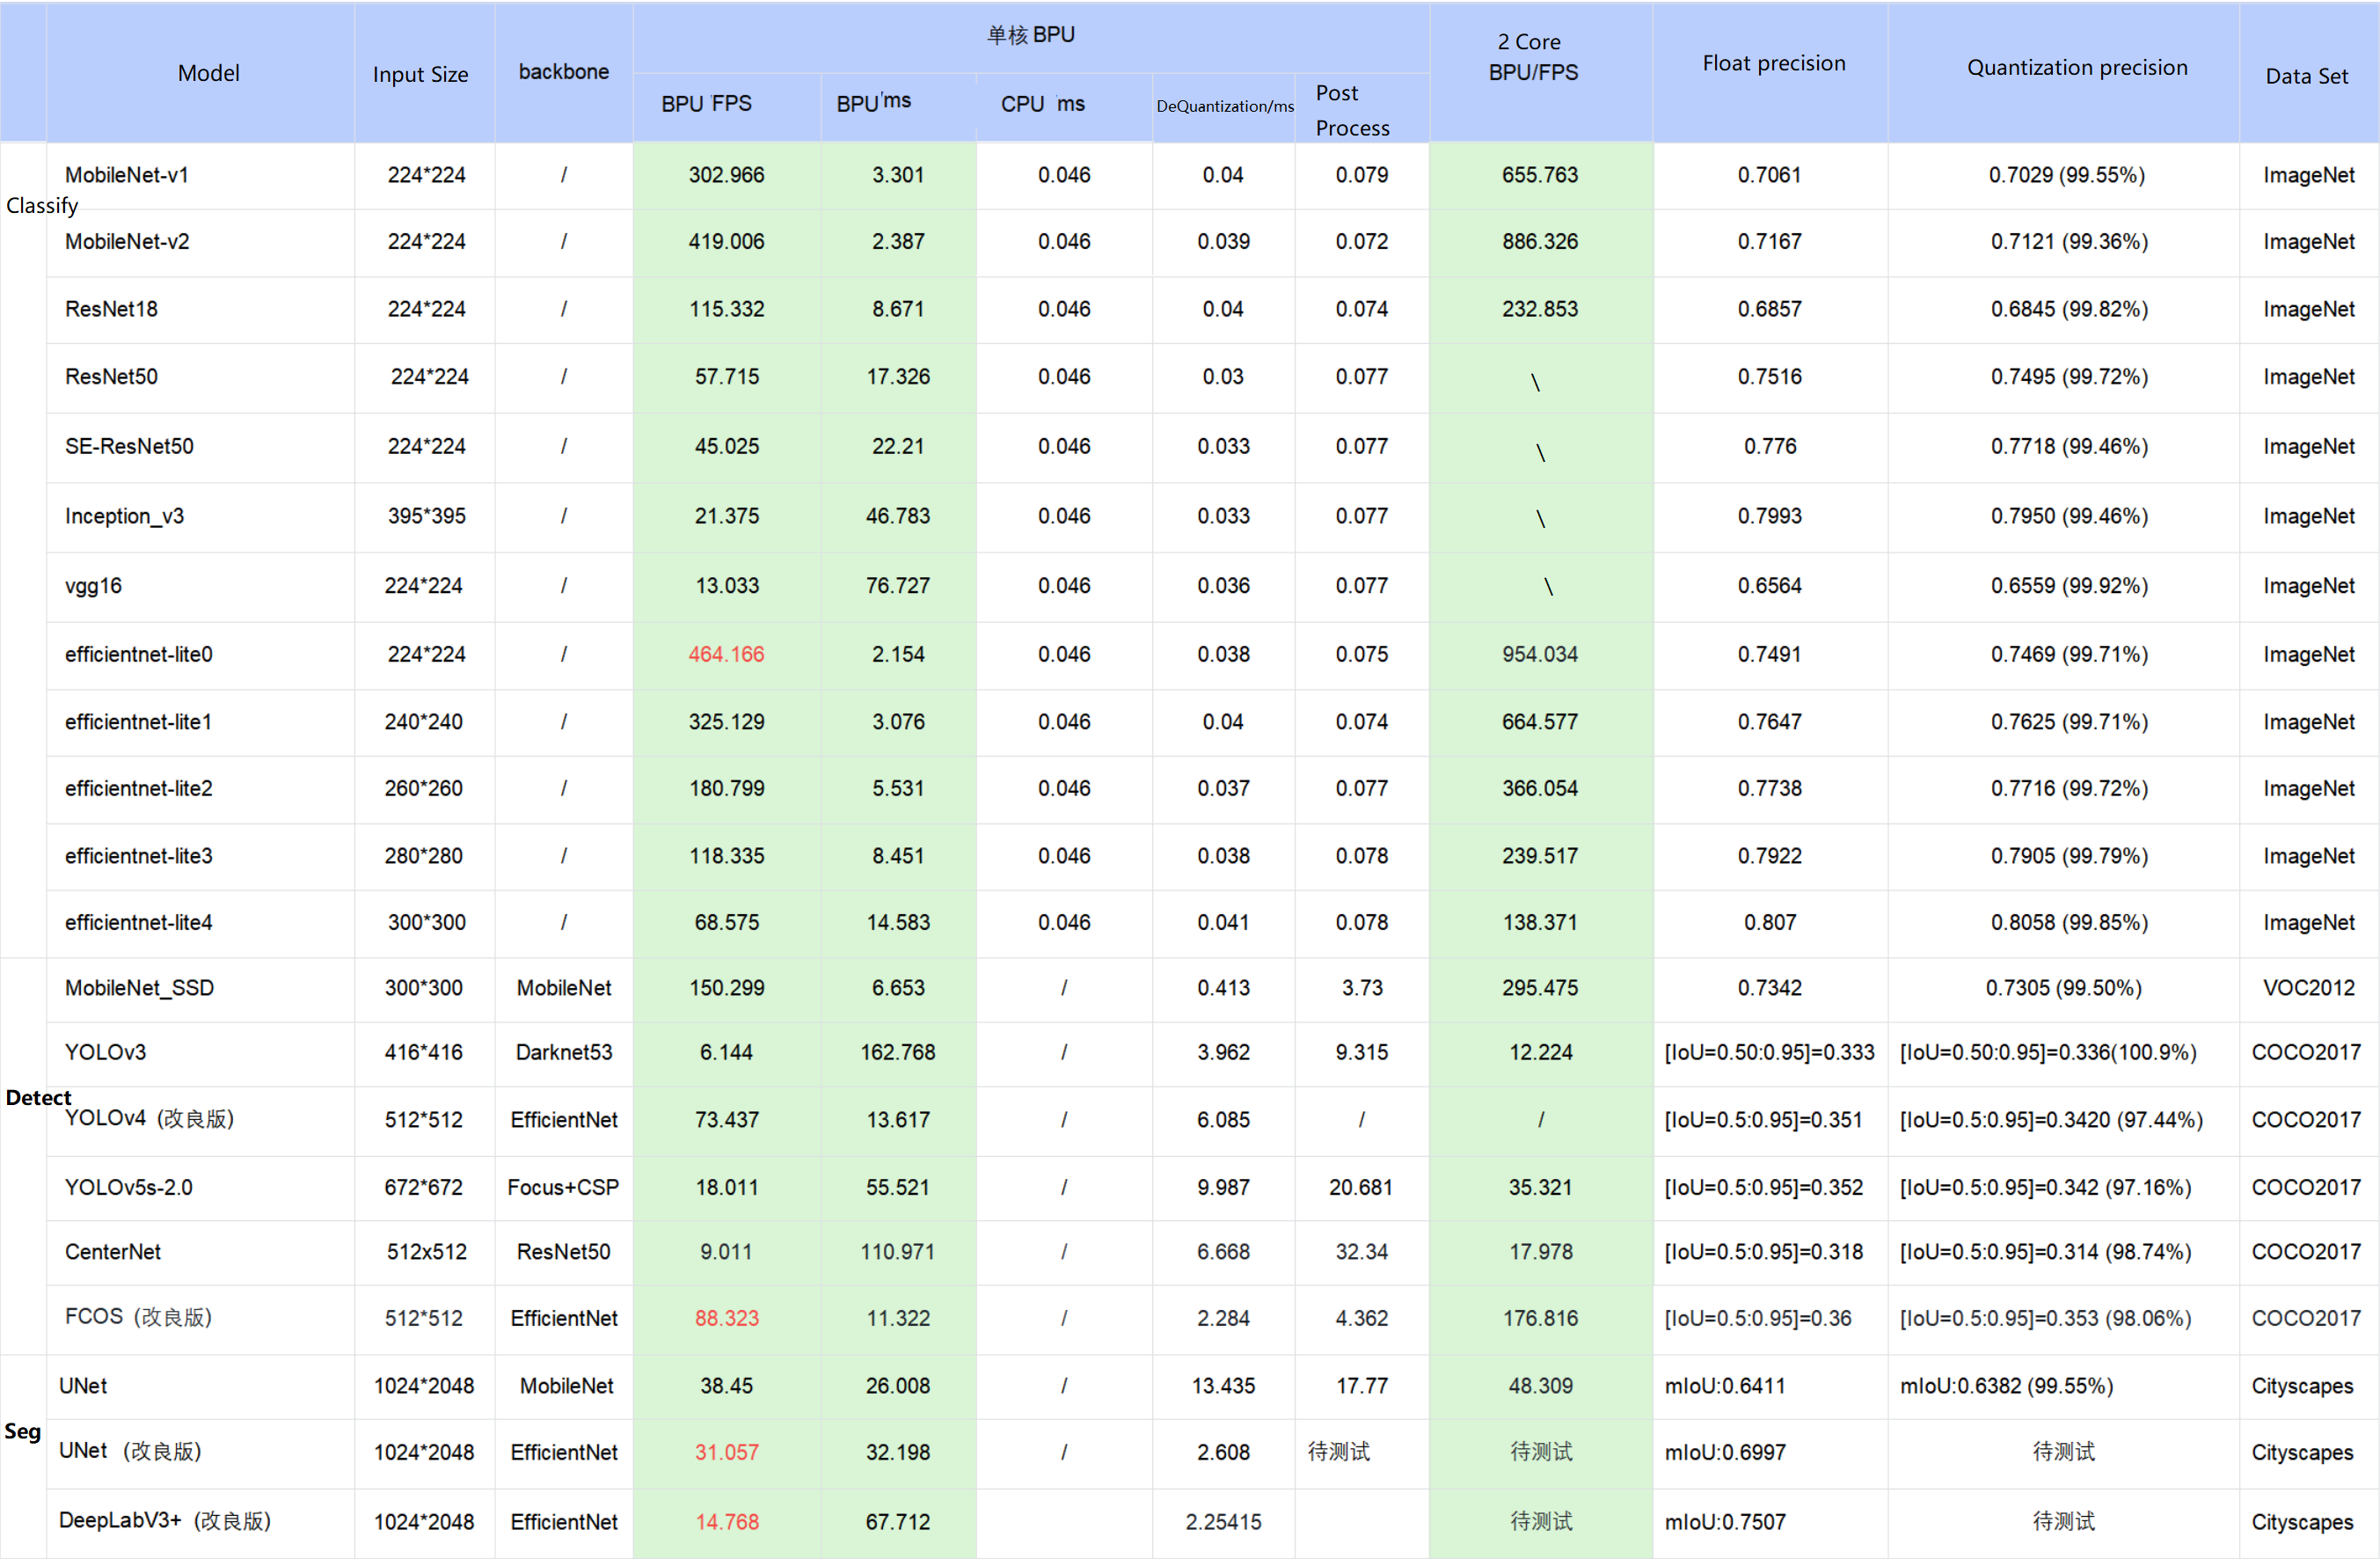
-
The data in the table are measured results on the D-Robotics RDK X3 development board, and the test models are from the horizon_model_convert_sample model example package.
-
For the BPU/CPU hybrid heterogeneous models in the model example package, the frame consumption time is mainly composed of the input quantization CPU node, model BPU operators, model CPU operators, output dequantization CPU node, CPU post-processing, etc. The specific explanation is as follows:
a. Input quantization CPU node: completes the float32 to int8 input quantization operation, which is only included in models that use featuremap input. The quantization time is proportional to the input shape size.
b. Model CPU operators:
i. Any CPU operators not included in the detection model.
ii. The Softmax and Reshape at the tail of the classification model are CPU operators.
iii. The Argmax at the tail of the segmentation model DeepLabV3+ is a CPU operator.
c. Output dequantization CPU node: completes the int8 to float32 output dequantization operation. The quantization time is proportional to the output shape size.
d. D-Robotics currently supports manually removing the quantization/dequantization nodes of a model and integrating them into pre- and post-processing code by users to reduce the overhead of duplicate data traversal. Taking the EfficientDet model as an example, after removing the dequantization node and incorporating it into the post-processing, the inference performance is improved from 66 FPS to 100 FPS.
e. Currently, the post-processing of the D-Robotics sample models has not been specifically optimized for performance. You can use optimization methods such as approximate and efficient implementation according to your actual needs to accelerate the code at the code level.
-
In practical applications, the BPU and CPU can run concurrently to improve the overall inference speed.
-
If the measured performance is inconsistent with the test results in the table above, several factors may cause this situation:
a. The impact of DDR bandwidth, the development board can only run the ai_benchmark program.
b. The algorithm toolchain version does not exactly match the system image version. The ideal scenario is to use the algorithm toolchain and system image released together.
c. The impact of CPU frequency reduction, currently the development board enables automatic frequency reduction by default after reboot. To achieve the best performance, you need to execute the command to disable frequency reduction on the development board:
echo performance > /sys/devices/system/cpu/cpufreq/policy0/scaling_governor.
Evaluation Method Description
Introduction
This section describes the specific usage of the ai_benchmark example package for public model accuracy and performance evaluation. The example package provides source code, executable programs, and evaluation scripts. Developers can directly experience and develop embedded applications based on these examples on the D-Robotics development board, reducing the development threshold.
The example package provides performance and accuracy evaluation examples for common classification, detection, and segmentation models. Please refer to the following content for details.
To obtain the ai_benchmark example package for public model accuracy and performance evaluation, please refer to the Deliverables Instructions.
Example Code Package Structure
ai_benchmark/code # Example source code folder
├── build_ptq_xj3.sh # for RDK X3
├─�─ build_ptq_ultra.sh # for RDK Ultra
├── CMakeLists.txt
├── deps/deps_gcc9.3 # Third-party dependency library, gcc9.3 is deps_gcc9.3
│ ├── aarch64
│ └── vdsp
├── include # Source header files
│ ├── base
│ ├── input
│ ├── method
│ ├── output
│ ├── plugin
│ └── utils
├── README.md
└── src # Example source code
├── input
├── method
�├── output
├── plugin
├── simple_example.cc # Example main program
└── utils
ai_benchmark/xj3 # Example package runtime environment
└── ptq # PTQ solution model example
├── data # Model accuracy evaluation dataset
├── mini_data # Model performance evaluation dataset
│ ├── cifar10
│ ├── cityscapes
│ ├── coco
│ ├── culane
│ ├── flyingchairs
│ ├── imagenet
│ ├── kitti3d
│ ├── mot17
│ ├── nuscenes
│ ├── nuscenes_lidar
│ └── voc
├── model # PTQ solution nv12 model
│ ├── README.md
│ └── runtime -> ../../../../model_zoo/runtime/ai_benchmark/ptq # Symbolic link to the model in the OE package, the board-side runtime environment needs to specify the model path on its own
├── README.md
├── script # Execution script
│ ├── aarch64 # Compile executable files and dependent libraries
│ ├── classification # Classification model example
│ │ ├── efficientnet_lite0
│ │ ├── efficientnet_lite1
│ │ ├── efficientnet_lite2
│ │ ├── efficientnet_lite3
│ │ ├── efficientnet_lite4
│ │ ├── googlenet
│ │ ├── mobilenetv1
│ │ ├── mobilenetv2
│ │ └── resnet18
│ ├── config # Model inference configuration files
│ │ └── data_name_list
│ ├── detection # Detection model examples
│ │ ├── centernet_resnet50
│ │ ├── efficientdetd0
│ │ ├── fcos_efficientnetb0
│ │ ├── preq_qat_fcos_efficientnetb0
│ │ ├── preq_qat_fcos_efficientnetb1
│ │ ├── preq_qat_fcos_efficientnetb2
│ │ ├── ssd_mobilenetv1
│ │ ├── yolov2_darknet19
│ │ ├── yolov3_darknet53
│ │ └── yolov5s
│ ├── segmentation # Segmentation model examples
│ │ ├── deeplabv3plus_efficientnetb0
│ │ ├── fastscnn_efficientnetb0
│ │ └── unet_mobilenet
│ ├── base_config.sh # Base configuration
│ └── README.md
└── tools # Accuracy evaluation tools
├── python_tools
└── README.md
ai_benchmark/ultra # Example package runtime environment
└── ptq # PTQ solution model examples
├── data # Model accuracy evaluation datasets
├── mini_data # Model performance evaluation datasets
│ ├── cifar10
│ ├── cityscapes
│ ├── coco
│ ├── culane
│ ├── flyingchairs
│ ├── imagenet
│ ├── kitti3d
│ ├── mot17
│ ├── nuscenes
│ ├── nuscenes_lidar
│ └── voc
├── model # PTQ solution nv12 model
│ │ ├── README.md
│ │ └── runtime -> ../../../../model_zoo/runtime/ai_benchmark/ptq # Symbolic link to the model in the OE package, the model path needs to be specified separately in the board-side runtime environment
├── README.md
├── script # Execution scripts│ ├── aarch64 # Compiled executable files and dependency libraries
│ ├── classification # Classification model examples
│ │ ├── efficientnasnet_m
│ │ ├── efficientnasnet_s
│ │ ├── efficientnet_lite0
│ │ ├── efficientnet_lite1
│ │ ├── efficientnet_lite2
│ │ ├── efficientnet_lite3
│ │ ├── efficientnet_lite4
│ │ ├── googlenet
│ │ ├── mobilenetv1
│ │ ├── mobilenetv2
│ │ ├── resnet18
│ │ └── vargconvnet
│ ├── config # Model inference configuration files
│ │ └── model
│ ├── detection # Detection model examples
│ │ ├── centernet_resnet101
│ │ ├── preq_qat_fcos_efficientnetb0
│ │ ├── preq_qat_fcos_efficientnetb2
│ │ ├── preq_qat_fcos_efficientnetb3
│ │ ├── ssd_mobilenetv1
│ │ ├── yolov2_darknet19
│ │ ├── yolov3_darknet53
│ │ ├── yolov3_vargdarknet
│ │ └── yolov5x
│ ├── segmentation # Segmentation model examples
│ │ ├── deeplabv3plus_efficientnetb0
│ │ ├── deeplabv3plus_efficientnetm1
│ │ ├── deeplabv3plus_efficientnetm2
│ │ └── fastscnn_efficientnetb0
│ ├── env.sh # Environment script
│ └── README.md
└── tools # Accuracy assessment tools
├── python_tools
└── README.md
- code: This directory contains the source code for the model evaluation program, used to assess model performance and accuracy.
- xj3: Provides pre-compiled applications and various benchmark scripts to test the performance and accuracy of multiple models on the D-Robotics BPU, specifically for RDK X3.
- ultra: Offers pre-compiled applications and benchmark scripts to evaluate the performance and accuracy of various models on the D-Robotics BPU, designed for RDK Ultra.
- build_ptq_xj3.sh: One-click build script for the development board program (for RDK X3).
- build_ptq_ultra.sh: One-click build script for the development board program (for RDK Ultra).
- deps/deps_gcc9.3: Dependencies required for the example code, primarily including:
gflags glog hobotlog nlohmann opencv rapidjson
Sample Models
We provide an open-source model library containing commonly used classification, detection, and segmentation models. The naming convention for these models is: {model_name}_{backbone}_{input_size}_{input_type}, which developers can directly utilize.
The bin models in the table below are all compiled and converted using the horizon_model_convert_sample model conversion example package. Please refer to the horizon_model_convert_sample chapter for instructions on how to obtain them.
| MODEL | MODEL NAME |
|---|---|
| centernet_resnet101 | centernet_resnet101_512x512_nv12.bin |
| deeplabv3plus_efficientnetb0 | deeplabv3plus_efficientnetb0_1024x2048_nv12.bin |
| deeplabv3plus_efficientnetm1 | deeplabv3plus_efficientnetm1_1024x2048_nv12.bin |
| efficientnasnet_m | efficientnasnet_m_300x300_nv12.bin |
| efficientnet_lite4 | efficientnet_lite4_300x300_nv12.bin |
| fastscnn_efficientnetb0 | fastscnn_efficientnetb0_1024x2048_nv12.bin |
| googlenet | googlenet_224x224_nv12.bin |
| mobilenetv1 | mobilenetv1_224x224_nv12.bin |
| mobilenetv2 | mobilenetv2_224x224_nv12.bin |
| preq_qat_fcos_efficientnetb0 | fcos_efficientnetb0_512x512_nv12.bin |
| preq_qat_fcos_efficientnetb2 | fcos_efficientnetb2_768x768_nv12.bin |
| resnet18 | resnet18_224x224_nv12.bin |
| ssd_mobilenetv1 | ssd_mobilenetv1_300x300_nv12.bin |
| vargconvnet | vargconvnet_224x224_nv12.bin |
| yolov3_darknet53 | yolov3_darknet53_416x416_nv12.bin |
| yolov5s | yolov5s_672x672_nv12.bin |
| yolov5x | yolov5x_672x672_nv12.bin |
Public Datasets
The evaluation examples mainly use datasets such as VOC, COCO, ImageNet, Cityscapes, FlyingChairs, KITTI, Culane, Nuscenes, and Mot17.
Please download them in a Linux environment using the following links:
  VOC: http://host.robots.ox.ac.uk/pascal/VOC/ (using the VOC2012 version)

  COCO: https://cocodataset.org/#download

  ImageNet: https://www.image-net.org/download.php

  Cityscapes: https://github.com/mcordts/cityscapesScripts

  FlyingChairs: https://lmb.informatik.uni-freiburg.de/resources/datasets/FlyingChairs.en.html

  KITTI3D: https://www.cvlibs.net/datasets/kitti/eval_object.php?obj_benchmark=3d

  CULane: https://xingangpan.github.io/projects/CULane.htmlnuScenes: https://www.nuscenes.org/nuscenes#download

  mot17: https://opendatalab.com/MOT17
Environment Setup
Development Board Preparation
-
After receiving the development board, please update the board image to the latest version. Refer to the chapter Installation for the upgrade method.
-
Make sure that the local development machine and the development board can be connected remotely.
Compiler Environment Preparation
The compilation requires the installation of the cross-compilation tool gcc-ubuntu-9.3.0-2020.03-x86_64-aarch64-linux-gnu in the current environment. Please use the Docker image provided by D-Robotics for development machine, and directly compile and use it. Read the chapter Environment Installation for obtaining and using the development machine Docker environment;
Please use the script build_ptq_xj3.sh or build_ptq_ultra.sh under the code directory to compile the executable program in the development board environment. The executable program and its corresponding dependencies will be automatically copied to the directory xj3/ptq/script under the aarch64 directory or the directory ultra/ptq/script under the aarch64 directory.
Please note that the position of the cross-compilation toolchain specified in the script build_ptq_xj3.sh and build_ptq_ultra.sh is in the directory /opt. If the user installs it in another location, the script can be manually modified.
  export CC=/opt/gcc-ubuntu-9.3.0-2020.03-x86_64-aarch64-linux-gnu/bin/aarch64-linux-gnu-gcc
  export CXX=/opt/gcc-ubuntu-9.3.0-2020.03-x86_64-aarch64-linux-gnu/bin/aarch64-linux-gnu-g++
Evaluation Example Usage Instructions
The evaluation example scripts are mainly located in the script and tools directories. The script directory contains evaluation scripts that run on the development board, including common classification, detection, and segmentation models. Each model has three scripts, which represent:
- fps.sh: Uses multi-threading scheduling to calculate frames per second (FPS). Users can freely set the number of threads according to their requirements.
- latency.sh: Calculates the latency of a single frame (one thread, one frame).
- accuracy.sh: Used for accuracy evaluation.
The following examples are based on the testing results of the RDK X3 development board. If using the RDK Ultra development board, there may be differences in information. Please refer to the specific testing results.
  script:

  ├── aarch64             # Compiled executable files and dependent libraries
  │   ├── bin
  │   └── lib
  ├── base_config.sh      # Basic configuration
  ├── config              # image_name configuration files
  │   ├── data_name_list
  |   |   ├── coco_detlist.list
  │   |   ├── imagenet.list
  │   |   └── voc_detlist.list
  ├── classification      # Classification model evaluation
  │   ├── efficientnet_lite0
  │   │   ├── accuracy.sh
  │   │   ├── fps.sh
  │   │   ├── latency.sh
  │   │   ├── workflow_accuracy.json
  │   │   ├── workflow_fps.json
  │   │   └── workflow_latency.json
  │   ├── mobilenetv1
  │   ├── .....
  │   └── resnet18
  ├── detection           # Detection model
  |   ├── centernet_resnet50
  │   │   ├── accuracy.sh
  │   │   ├── fps.sh
  │   │   ├── latency.sh
  │   │   ├── workflow_accuracy.json
  │   │   ├── workflow_fps.json
  │   │   └── workflow_latency.json
  │   ├── yolov2_darknet19
  │   ├── yolov3_darknet53
  │   ├── ...
  │   └── efficientdetd0
  └── segmentation       # Segmentation model
      ├── deeplabv3plus_efficientnetb0
      │   ├── accuracy.sh
      │   ├── fps.sh
      │   ├── latency.sh
      │   ├── workflow_accuracy.json
      │   ├── workflow_fps.json
      │   └── workflow_latency.json
      ├── fastscnn_efficientnetb0
      └── unet_mobilenet
The scripts required for accuracy evaluation are in the tools directory. It mainly includes the accuracy calculation scripts under python_tools.
  tools:

  python_tools
    └── accuracy_tools
        ├── cityscapes_metric.py
        ├── cls_eval.py
        ├── coco_metric.py
        ├── coco_det_eval.py
        ├── config.py
        ├── parsing_eval.py
        ├── voc_det_eval.py### voc_metric.py
Before evaluation, execute the following commands to copy the ptq directory to the development board, and then copy the model_zoo/runtime to the ptq/model directory.
The following examples are the test results using the RDK X3 development board. If the RDK Ultra development board is used, the information may vary. Please refer to the specific test results!
  scp -r ai_toolchain_package/Ai_Toolchain_Package-release-vX.X.X-OE-vX.X.X/ai_benchmark/xj3/ptq root@192.168.1.10:/userdata/ptq/

  scp -r model_zoo/runtime root@192.168.1.10:/userdata/ptq/model/
Performance Evaluation
Performance evaluation includes latency and fps.
- Usage of the evaluation script
Enter the directory of the model to be evaluated and execute sh latency.sh to test the latency of a single frame. As shown in the following figure:
The following examples are the test results using the RDK X3 development board. If the RDK Ultra development board is used, the information may vary. Please refer to the specific test results!
I0419 02:35:07.041095 39124 output_plugin.cc:80] Infer latency: [avg: 13.124ms, max: 13.946ms, min: 13.048ms], Post process latency: [avg: 3.584ms, max: 3.650ms, min: 3.498ms].
inferrepresents the inference time of the model.Post processrepresents the post-processing time.
Enter the directory of the model to be evaluated and execute sh fps.sh to test the frame rate. As shown in the following figure:
The following examples are the test results using the RDK X3 development board. If the RDK Ultra development board is used, the information may vary. Please refer to the specific test results!
I0419 02:35:00.044417 39094 output_plugin.cc:109] Throughput: 176.39fps # Model frame rate
This function uses multi-threading and concurrency to achieve optimal performance on BPU. Due to the nature of multi-threading and data sampling, the frame rate value may be lower during the startup phase, and will gradually increase and stabilize over time. The fluctuation range of frame rate is controlled within 0.5%.
- Command line arguments
The following example is based on the test results using RDK X3 development board. If using RDK Ultra development board, the information may vary. Please refer to specific test results for accuracy.
Content of fps.sh script:
  #!/bin/sh

  source ../../base_config.sh
  export SHOW_FPS_LOG=1
  export STAT_CYCLE=10                             # Set environment variable, FPS statistics cycle

  ${app} \
    --config_file=workflow_fps.json \
    --log_level=1
Content of latency.sh script:
  #!/bin/sh

  source ../../base_config.sh
  export SHOW_LATENCY_LOG=1                            # Set environment variable, print LATENCY level log
  export STAT_CYCLE=5                                  # Set environment variable, LATENCY statistics cycle

  ${app} \
    --config_file=workflow_latency.json \
    --log_level=1
- Configuration file explanation
Note: When the max_cache parameter is in effect, the images will be preprocessed and read into memory. To ensure the stable operation of your program, please do not set a value that is too large. We recommend setting the value to no more than 30. :::Taking the fcos_efficientnetb0 model as an example, the contents of the workflow_fps.json configuration file are as follows:
 {
    "input_config": {
      "input_type": "image",                                    # Input data format, supports image or bin file
      "height": 512,                                            # Input data height
      "width": 512,                                             # Input data width
      "data_type": 1,                                           # Input data type: HB_DNN_IMG_TYPE_NV12
      "image_list_file": "../../../mini_data/coco/coco.lst",    # Path to the preprocessed dataset lst file
      "need_pre_load": true,                                    # Whether to use preloading to read the dataset
      "limit": 10,
      "need_loop": true,                                        # Whether to read the data for evaluation in a loop
      "max_cache": 10
    },
    "output_config": {
      "output_type": "image",                                   # Visualized output data type
      "image_list_enable": true,
      "in_order": false                                         # Whether to output in order
    },
    "workflow": [
      {
        "method_type": "InferMethod",                           # Infer inference mode
        "unique_name": "InferMethod",
        "method_config": {
          "core": 0,                                            # Inference core id
          "model_file": "../../../model/runtime/fcos_efficientnetb0/fcos_efficientnetb0_512x512_nv12.bin" # Model file
        }
      },
      {
        "thread_count": 4,                                      # Post-processing thread count
        "method_type": "PTQFcosPostProcessMethod",              # Post-processing method
        "unique_name": "PTQFcosPostProcessMethod",
        "method_config": {                                      # Post-processing parameters
          "strides": [
            8,
            16,
            32,
            64,
            128
          ],
          "class_num": 80,
          "score_threshold": 0.5,
          "topk": 1000,
          "det_name_list": "../../config/data_name_list/coco_detlist.list"
        }
      }
    ]
  }
workflow_latency.json as follows:
{
   "input_config":{
      "input_type":"image",
      "height":512,
      "width":512,
      "data_type":1,
      "image_list_file":"../../../mini_data/coco/coco.lst",
      "need_pre_load":true,
      "limit":1,
      "need_loop":true,
      "max_cache":10
   },
   "output_config":{
      "output_type":"image",
      "image_list_enable":true
   },
   "workflow":[
      {
         "method_type":"InferMethod",
         "unique_name":"InferMethod",
         "method_config":{
            "core":0,
            "model_file":"../../../model/runtime/fcos_efficientnetb0/fcos_efficientnetb0_512x512_nv12.bin"
         }
      },
      {
         "thread_count":1,
         "method_type":"PTQFcosPostProcessMethod",
         "unique_name":"PTQFcosPostProcessMethod",
         "method_config":{
            "strides":[
               8,
               16,
               32,
               64,
               128
            ],
            "class_num":80,
            "score_threshold":0.5,
            "topk":1000,
            "det_name_list":"../../config/data_name_list/coco_detlist.list"
         }
      }
   ]
}
Accuracy Evaluation
The accuracy evaluation of the model consists of four steps:
- Data preprocessing.
- Data loading.
- Model inference.
- Accuracy calculation.
-
Data Preprocessing
For PTQ models: Data preprocessing needs to be performed on an x86 development machine using the "hb_eval_preprocess" tool to preprocess the dataset. Data preprocessing refers to specific operations performed on image data before feeding it into the model, such as image resizing, cropping, and padding. This tool is integrated into the environment of the model conversion and compilation on the development machine. After the original dataset is preprocessed using this tool, it will generate a corresponding preprocessing binary file (.bin file) for the model. Running "hb_eval_preprocess --help" directly will display the usage rules of this tool.
- To learn about the command-line parameters of the "hb_eval_preprocess" tool, you can enter "hb_eval_preprocess -h" or refer to the section hb_eval_preprocess Tool for an explanation of PTQ quantization principles and steps.
Next, we will provide a detailed introduction to the dataset corresponding to each model in the example package and the preprocessing operations for the corresponding dataset:
- "VOC dataset": This dataset is mainly used for evaluating the ssd_mobilenetv1 model. Its directory structure is as follows, and the example mainly uses the val.txt file under "Main", source images under "JPEGImages", and annotation data under "Annotations":
  .
  └── VOCdevkit                  # Root directory
      └── VOC2012                # Datasets of different years, only 2012 is downloaded here, there are other years like 2007 as well
          ├── Annotations        # Stores XML files, each corresponding to a image in JPEGImages, explains the content of the image, etc.
          ├── ImageSets          # This directory stores text files, and each line in the text file contains the name of an image, followed by ±1 indicating positive or negative samples
          │   ├── Action
          │   ├── Layout
          │   ├── Main
          │   └── Segmentation
          ├── JPEGImages         # Stores source images
          ├── SegmentationClass  # Stores images related to semantic segmentation
          └── SegmentationObject # Stores images related to instance segmentation
Perform data preprocessing on the dataset:
hb_eval_preprocess -m ssd_mobilenetv1 -i VOCdevkit/VOC2012/JPEGImages -v VOCdevkit/VOC2012/ImageSets/Main/val.txt -o ./pre_ssd_mobilenetv1
- "COCO dataset": This dataset is mainly used for evaluating detection models such as yolov2_darknet19, yolov3_darknet53, yolov5s, efficientdetd0, fcos_efficientnetb0, and centernet_resnet50, etc.The directory structure is as follows, and the example mainly uses the "instances_val2017.json" annotation file in the "annotations" folder and the images in the "images" folder:
  .
  ├── annotations    # stores annotation data
  └── images         # stores source images
Preprocess the dataset:
hb_eval_preprocess -m model_name -i coco/coco_val2017/images -o ./pre_model_name
- "ImageNet dataset": This dataset is mainly used for the evaluation of classification models such as EfficientNet_lite0, EfficientNet_Lite1, EfficientNet_Lite2, EfficientNet_Lite3, EfficientNet_Lite4, MobileNet, GoogleNet, ResNet, etc. In the example, the "val.txt" annotation file and the source images in the "val" directory are mainly used.
  .
  ├── val.txt
  └── val
Preprocess the dataset:
hb_eval_preprocess -m model_name -i imagenet/val -o ./pre_model_name
- "Cityscapes dataset": This dataset is used for the evaluation of segmentation models such as deeplabv3plus_efficientnetb0, deeplabv3plus_efficientnetm1, deeplabv3plus_efficientnetm2, fastscnn_efficientnetb0, etc. In the example, the annotation files in "./gtFine/val" and the source images in "./leftImg8bit/val" are mainly used.
  .
  ├── gtFine
  │   └── val
  │       ├── frankfurt
  │       ├── lindau
  │       └── munster
  └── leftImg8bit
      └── val
          ├── frankfurt
          ├── lindau
          └── munster
Preprocess the dataset:
hb_eval_preprocess -m unet_mobilenet -i cityscapes/leftImg8bit/val -o ./pre_unet_mobilenet
The workflow for running the accuracy calculation script in the example is:1. According to the value of the "image_list_file" parameter in "workflow_accurary.json", search for the corresponding "lst" file of the dataset.
- Load each pre-processing file according to the preprocessing file path information stored in the "lst" file, and then perform inference.
Therefore, after generating the pre-processing file, it is necessary to generate the corresponding lst file and write the path of each pre-processing file into the lst file, which is related to the storage location of the dataset on the development board. Here we recommend placing it in the same directory as the "script" folder, as follows:
  # For RDK X3, use the following format:
  |-- ptq
  |   |-- data
  |   |   |-- cityscapes
  |   |   |   -- xxxx.bin             # Pre-processed binary file
  |   |   |   -- ....
  |   |   |   -- cityscapes.lst       # lst file: record the path of each pre-processing file
  |   |   |-- coco
  |   |   |   -- xxxx.bin
  |   |   |   -- ....
  |   |   |   -- coco.lst
  |   |   |-- imagenet
  |   |   |   -- xxxx.bin
  |   |   |   -- ....
  |   |   |   -- imagenet.lst
  |   |   `-- voc
  |   |   |   -- xxxx.bin
  |   |   |   -- ....
  |   |       `-- voc.lst
  |   |-- model
  |   |   |-- ...
  |   |-- script
  |   |   |-- ...

  # For RDK Ultra, use the following format:
  |-- ptq
  |   |-- data
  |   |   |-- cityscapes
  |   |   |   |-- pre_deeplabv3plus_efficientnetb0
  |   |   |   |   |-- xxxx.bin                            # Pre-processed binary file
  |   |   |   |   |-- ....
  |   |   |   |-- pre_deeplabv3plus_efficientnetb0.lst    # lst file: record the path of each pre-processing file
  |   |   |   |-- pre_deeplabv3plus_efficientnetm1
  |   |   |   |-- pre_deeplabv3plus_efficientnetm1.lst
  |   |   |   |-- pre_deeplabv3plus_efficientnetm2
  |   |   |   |-- pre_deeplabv3plus_efficientnetm2.lst
  |   |   |   |-- pre_fastscnn_efficientnetb0
  |   |   |   |-- pre_fastscnn_efficientnetb0.lst
  |   |   |-- coco
  |   |   |   |-- pre_centernet_resnet101
  |   |   |   |   |-- xxxx.bin|   |   |   |   |-- ....
  |   |   |   |-- pre_centernet_resnet101.lst
  |   |   |   |-- pre_yolov3_darknet53
  |   |   |   |-- pre_yolov3_darknet53.lst
  |   |   |   |-- pre_yolov3_vargdarknet
  |   |   |   |-- pre_yolov3_vargdarknet.lst
  |   |   |   |-- pre_yolov5x
  |   |   |   |-- pre_yolov5x.lst
  |   |   |   |-- pre_preq_qat_fcos_efficientnetb0
  |   |   |   |-- pre_preq_qat_fcos_efficientnetb0.lst
  |   |   |   |-- pre_preq_qat_fcos_efficientnetb2
  |   |   |   |-- pre_preq_qat_fcos_efficientnetb2.lst
  |   |   |   |-- pre_preq_qat_fcos_efficientnetb3
  |   |   |   |-- pre_preq_qat_fcos_efficientnetb3.lst
  |   |   |-- imagenet
  |   |   |   |-- pre_efficientnasnet_m
  |   |   |   |   |-- xxxx.bin
  |   |   |   |   |-- ....
  |   |   |   |-- pre_efficientnasnet_m.lst
  |   |   |   |-- pre_efficientnasnet_s
  |   |   |   |-- pre_efficientnasnet_s.lst
  |   |   |   |-- pre_efficientnet_lite4
  |   |   |   |-- pre_efficientnet_lite4.lst
  |   |   |   |-- pre_googlenet
  |   |   |   |-- pre_googlenet.lst
  |   |   |   |-- pre_mobilenetv1
  |   |   |   |-- pre_mobilenetv1.lst
  |   |   |   |-- pre_mobilenetv2
  |   |   |   |-- pre_mobilenetv2.lst
  |   |   |   |-- pre_resnet18
  |   |   |   |-- pre_resnet18.lst
  |   |   |   |-- pre_vargconvnet
  |   |   |   |-- pre_vargconvnet.lst
  |   |   |-- voc
  |   |   |   |-- pre_ssd_mobilenetv1
  |   |   |   |   |-- xxxx.bin
  |   |   |   |   |-- ....
  |   |   |   |-- pre_ssd_mobilenetv1.lst
  |-- model
  |   |-- ...
  |-- script
  |   |-- ...
To generate the corresponding lst files, refer to the following method:
  # For RDK X3, please use the following command:
  find ../../../data/coco/fcos -name "*bin*" > ../../../data/coco/coco.lst# RDK Ultra Please use the following command:
  find ../../../data/coco/pre_centernet_resnet101 -name "*bin*" > ../../../data/coco/pre_centernet_resnet101.lst
The generated lst file stores a relative path: ../../../data/ or ../../../data/coco/pre_centernet_resnet101/, which can match the default configuration path of workflow_accuracy.json.
If you need to change the storage location of the pre-processing dataset, make sure that the corresponding lst file can be read by workflow_accuracy.json. Secondly, ensure that the program can read the corresponding pre-processing file based on the path information in lst.
-
Data Mounting
Since the dataset is relatively large and not suitable to be placed directly on the development board, it can be mounted via nfs for the board to read.
Host PC (requires root permission):
- Edit /etc/exports and add a line:
/nfs *(insecure,rw,sync,all_squash,anonuid=1000,anongid=1000,no_subtree_check)./nfsrepresents the mount path on the local machine, which can be replaced with a user-specified directory. - Execute the command
exportfs -a -rto make /etc/exports take effect.
Board Side:
- Create the directory to be mounted:
mkdir -p /mnt. mount -t nfs {PC IP}:/nfs /mnt -o nolock.
The /nfs folder on the PC side is mounted to the /mnt folder on the board side. In this way, mount the folder containing the pre-processing data to the board side, and create a soft link from the /data directory to the /ptq directory on the board side, which is at the same level as the /script directory.
-
Model Inference
The following example is the actual test result using RDK X3 development board. If using RDK Ultra development board, there may be differences in the information. Please refer to the specific test for accuracy!
After mounting the data, please log in to the development board. For the login method, please read the development board login section. After successful login, execute the accuracy.sh script in the fcos_efficientnetb0/ directory as shown below:
  /userdata/ptq/script/detection/fcos# sh accuracy.sh
  ../../aarch64/bin/example --config_file=workflow_accuracy.json --log_level=2
  ...
  I0419 03:14:51.158655 39555 infer_method.cc:107] Predict DoProcess finished.
  I0419 03:14:51.187361 39556 ptq_fcos_post_process_method.cc:123] PTQFcosPostProcessMethod DoProcess finished, predict result: [{"bbox":[-1.518860,71.691170,574.934631,638.294922],"prob":0.750647,"label":21,"class_name":"
  I0118 14:02:43.636204 24782 ptq_fcos_post_process_method.cc:123] PTQFcosPostProcessMethod DoProcess finished, predict result: [{"bbox":[3.432283,164.936249,157.480042,264.276825],"prob":0.544454,"label":62,"class_name":"
  ...
The program on the board side will generate an eval.log file in the current directory, which is the result file of the prediction.
-
Accuracy Calculation
Please perform the accuracy calculation in the environment of the "development machine" model conversion.
The script for accuracy calculation is located in the "python_tools" directory. Among them, in "accuracy_tools": cls_eval.py is used to calculate the accuracy of classification models; coco_det_eval.py is used to calculate the accuracy of detection models evaluated using the COCO dataset; parsing_eval.py is used to calculate the accuracy of segmentation models evaluated using the Cityscapes dataset; voc_det_eval.py is used to calculate the accuracy of detection models evaluated using the VOC dataset.
- Classification Model
The calculation method for classification models using the CIFAR-10 dataset and the ImageNet dataset is as follows:
  #!/bin/sh

  python3 cls_eval.py --log_file=eval.log --gt_file=val.txt
- "log_file": The prediction result file of the classification model.
- "gt_file": The annotation file of the CIFAR-10 and ImageNet datasets.
- Detection Model
The calculation method for detection models using the COCO dataset is as follows:
  #!/bin/sh

  python3 coco_det_eval.py --eval_result_path=eval.log --annotation_path=instances_val2017.json
- "eval_result_path": The prediction result file of the detection model.
- "annotation_path": The annotation file of the COCO dataset.
The calculation method for detection models using the VOC dataset is as follows:
  #!/bin/sh

  python3 voc_det_eval.py --eval_result_path=eval.log --annotation_path=../Annotations --val_txt_path=../val.txt
- "eval_result_path": The prediction result file of the detection model.-
annotation_path: The annotation file of the VOC dataset. val_txt_path: The val.txt file in the ImageSets/Main folder of the VOC dataset.
- Segmentation Model
The accuracy calculation method for the segmentation model using the Cityscapes dataset is as follows:
  #!/bin/sh

  python3 parsing_eval.py --width=output_width --height=output_height --log_file=eval.log --gt_path=cityscapes/gtFine/val
width: The output width of the segmentation model.height: The output height of the segmentation model.log_file: The prediction result file of the segmentation model.gt_path: The annotation file of the Cityscapes dataset.
Model Integration
Model post-processing integration mainly consists of 2 steps, taking centernet_resnet50 model integration as an example:
- Add the post-processing file
ptq_centernet_post_process_method.ccand the header fileptq_centernet_post_process_method.h. - Add the model execution script and configuration file.
Adding Post-processing Files
The following example is based on the RDK X3 development board. If you are using the RDK Ultra development board, the information may vary. Please refer to the specific instructions.
The post-processing code file can be directly reused from any post-processing file in the src/method directory. The main modifications are the InitFromJsonString function and the PostProcess function.
The InitFromJsonString function is mainly used to read the post-processing related parameter configurations from the workflow.json file. Users can customize the input parameters accordingly.
The PostProcess function completes the logic of post-processing.
The .cc file should be placed in the ai_benchmark/code/src/method/ path,
The .h header file should be placed in the ai_benchmark/code/include/method/ path:
  |--ai_benchmark
  |  |--code                                                 # Example source code
  |  |  |--include
  |  |  |  |--method                                         # Add header files in this folder
  |  |  |  |  |--ptq_centernet_post_process_method.h
  |  |  |  |  |--......
|--ptq_yolo5_post_process_method.h
  |--src
  |  |--method                                         # Add post-processing .cc files in this folder
  |  |  |--ptq_centernet_post_process_method.cc
  |  |  |  |--......
  |  |  |  |--ptq_yolo5_post_process_method.cc
Add model running scripts and configuration files
The directory structure of the scripts is as follows:
|--ai_benchmark
  |--xj3/ptq/script                                      # Example script folder
  |  |--detection
  |  |  |--centernet_resnet50
  |  |  |  |--accuracy.sh                                # Accuracy testing script
  |  |  |  |--fps.sh                                     # Performance testing script
  |  |  |  |--latency.sh                                 # Single frame latency example script
  |  |  |  |--workflow_accuracy.json                     # Accuracy configuration file
  |  |  |  |--workflow_fps.json                          # Performance configuration file
  |  |  |  |--workflow_latency.json                      # Single frame latency configuration file
Auxiliary tools and common operations
Instructions for using the logging system
The logging system mainly includes "sample logs" and "model inference API DNN logs". The sample logs refer to the application logs in the delivery package. Users can obtain different logs based on their needs.
- Sample logs
- Log levels. Sample logs mainly use vlog from glog, and there are four custom levels:
- "0" (SYSTEM), which is mainly used to output error messages;
- "1" (REPORT), which is mainly used in the sample code to output performance data;
- "2" (DETAIL), which is mainly used in the sample code to output system status information;
- "3" (DEBUG), which is mainly used in the sample code to output debug information. Logging level setting rules: Suppose the level is set to "P", if there is a level "Q" lower than "P", it can be enabled, or else it will be suppressed; DEBUG>DETAIL>REPORT>SYSTEM by default.
- Log level setting. Set the log level through the "log_level" parameter. When running the sample, specify the "log_level" parameter to set the level. For example, specifying "log_level=0" outputs SYSTEM logs; if specifying "log_level=3", it outputs DEBUG, DETAIL, REPORT, and SYSTEM logs.
- Model inference API DNN logs
For the configuration of model inference DNN API logs, please refer to the "Configuration Information" section in the Model Inference DNN API Usage Guide.#### Operator Time Explanation
The statistics on the performance of the model operators (OP) are achieved by setting the environment variable HB_DNN_PROFILER_LOG_PATH. This section introduces the performance analysis of the model's inference, which helps developers to understand the real inference performance of the model.
The type and value of this variable are described as follows:
export HB_DNN_PROFILER_LOG_PATH=${path}: represents the output path where the dumped OP nodes are located. After the program runs normally and exits, a profiler.log file will be generated.
- Example Explanation
The following example uses RDK X3 development board as an example. If using RDK Ultra development board, there may be differences in the information. Please refer to the specific board used!
The following code block takes the mobilenetv1 model as an example, starts running the model with a single thread, and sets export HB_DNN_PROFILER_LOG_PATH=./. The statistical output information is as follows:
  {
    "perf_result": {
      "FPS": 677.6192525182025,
      "average_latency": 11.506142616271973
    },
    "running_condition": {
      "core_id": 0,
      "frame_count": 200,
      "model_name": "mobilenetv1_224x224_nv12",
      "run_time": 295.151,
      "thread_num": 1
    }
  }
  ***
  {
    "chip_latency": {
      "BPU_inference_time_cost": {
        "avg_time": 11.09122,
        "max_time": 11.54,
        "min_time": 3.439
      },
      "CPU_inference_time_cost": {
        "avg_time": 0.18836999999999998,
        "max_time": 0.4630000000000001,
        "min_time": 0.127
      }
    },
    "model_latency": {
    "BPU_MOBILENET_subgraph_0": {
    "avg_time": 11.09122,
    "max_time": 11.54,
    "min_time": 3.439
  },
  "Dequantize_fc7_1_HzDequantize": {
    "avg_time": 0.07884999999999999,
    "max_time": 0.158,
    "min_time": 0.068
  },
  "MOBILENET_subgraph_0_output_layout_convert": {
    "avg_time": 0.018765,
    "max_time": 0.08,
    "min_time": 0.01
  },
  "Preprocess": {
    "avg_time": 0.0065,
    "max_time": 0.058,
    "min_time": 0.003
  },
  "Softmax_prob": {
    "avg_time": 0.084255,
    "max_time": 0.167,
    "min_time": 0.046
  }
},
"task_latency": {
  "TaskPendingTime": {
    "avg_time": 0.029375,
    "max_time": 0.059,
    "min_time": 0.009
  },
  "TaskRunningTime": {
    "avg_time": 11.40324,
    "max_time": 11.801,
    "min_time": 4.008
  }
}
The above output shows the "model_latency" and "task_latency". The "model_latency" outputs the time consumption for each OP in the model, while the "task_latency" outputs the time consumption for each task module in the model.
- The profiler.log file will only be generated if the program exits normally.
Dump Tool
This section mainly introduces the method of enabling the dump tool. Generally, it is not necessary to pay attention to it. The dump tool is only used when the model accuracy is abnormal.
By setting the environment variable export HB_DNN_DUMP_PATH=${path}, the input and output of each node in the model inference process can be dumped. Based on the dumped output, it is possible to check whether there are consistency issues between the model inference on the development machine simulator and the development board: that is, whether the outputs of the same model and the same input on the development machine simulator and the development board are exactly the same.
Instructions for Model-on-Board Analysis Tool
Overview
This section introduces a fast verification tool for model inference on D-Robotics Algorithm Toolchain. This tool allows developers to quickly obtain information about the "xxx.bin" model, model inference performance, and model debugging.
Instructions for hrt_model_exec Tool
The "hrt_model_exec" tool allows for quickly evaluating model inference performance and obtaining model information on the development board.
Currently, the tool provides three types of functions, as shown in the table below:
| Number | Subcommand | Description |
|---|---|---|
| 1 | "model_info" | Get model information, such as input-output information of the model. |
| 2 | "infer" | Perform model inference and obtain the inference results. |
| 3 | "perf" | Perform model performance analysis and obtain the performance analysis results. |
The tool can also check the version of the "dnn" prediction library using the "-v" or "--version" command.
For example: hrt_model_exec -v or hrt_model_exec --version
Input Parameter Description
Run "hrt_model_exec" , "hrt_model_exec -h" or "hrt_model_exec --help" on the development board to get the tool's usage parameter details. As shown in the figure below:
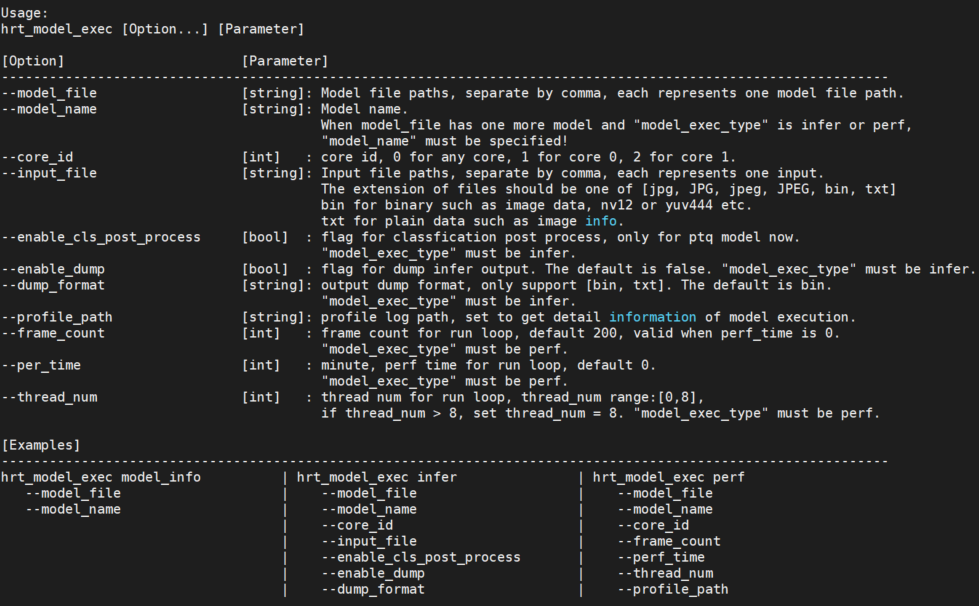
| Number | Parameter | Type | Description |
|---|---|---|---|
| 1 | "model_file" | string | Model file path, multiple paths can be separated by commas. |
| 2 | "model_name" | string | Specify the name of a model in the model. |
| 3 | "core_id" | int | Specify the running core. |
| 4 | "input_file" | string | Model input information, multiple can be separated by commas. |
| 5 | "roi_infer" | bool | Enable resizer model inference. |
| 6 | "roi" | string | Specify the ROI area required for inference of the resizer model. |
| 7 | "frame_count" | int | Execute the number of frames for the model run. |
| 8 | "dump_intermediate" | string | Dump the inputs and outputs of each layer of the model. |
| 9 | "enable_dump" | bool | Enable dumping of model inputs and outputs. |
| 10 | "dump_precision" | int | Control the number of decimal places for outputting float data in txt format. |
| 11 | "hybrid_dequantize_process" | bool | Control the output of float data in txt format. |
| 12 | "dump_format" | string | Format for dumping model inputs and outputs. |
| 13 | "dump_txt_axis" | int | Control the line break rules for input and output in txt format. |
| 14 | "enable_cls_post_process" | bool | Enable classification post-processing. |
| 16 | thread_num | int | Specify the number of threads to run the program. |
| 17 | profile_path | string | Save path for model performance/scheduling performance statistics. |
Instructions
This section describes the specific usage of the three subfunctions of the hrt_model_exec tool.
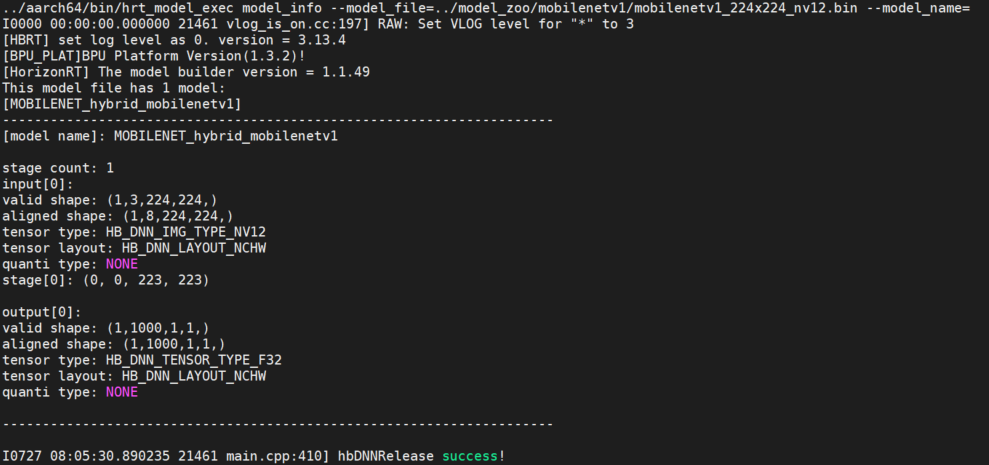
model_info
- Overview
This parameter is used to obtain model information. The supported models are QAT models and PTQ models.
This parameter is used together with model_file to obtain detailed information about the model;
The model information includes the model's input and output information hbDNNTensorProperties and the model's segment information stage; The model's segment information is: a picture can be inferred in multiple stages. The stage information is [x1, y1, x2, y2], which are the coordinates of the top left and bottom right corners of the picture inference. Currently, D-Robotics RDK Ultra's Bayes architecture supports inference of such segmented models, and the models on RDK X3 are all 1-stage models.
If model_name is not specified, all model information in the model will be output. If model_name is specified, only the information of the corresponding model will be output.
- Example
- Single model
hrt_model_exec model_info --model_file=xxx.bin
- Multiple models (output all model information)
hrt_model_exec model_info --model_file=xxx.bin,xxx.bin
- Multiple models - pack model (output specific model information)
hrt_model_exec model_info --model_file=xxx.bin --model_name=xx
Supplementary Explanation of Input Parameters
- Repeat Input
If the same parameter input is specified repeatedly, the parameters will be overwritten. For example, when obtaining model information, if two model files are specified repeatedly, the later parameter input yyy.bin will be used:
hrt_model_exec model_info --model_file=xxx.bin --model_file=yyy.bin
If input is repeated without adding the command line parameter --model_file, the value after the command line parameter will be used, and parameters without arguments will not be recognized. For example, in the following example, yyy.bin will be ignored and the parameter value will be xxx.bin:
hrt_model_exec model_info --model_file=xxx.bin yyy.bin
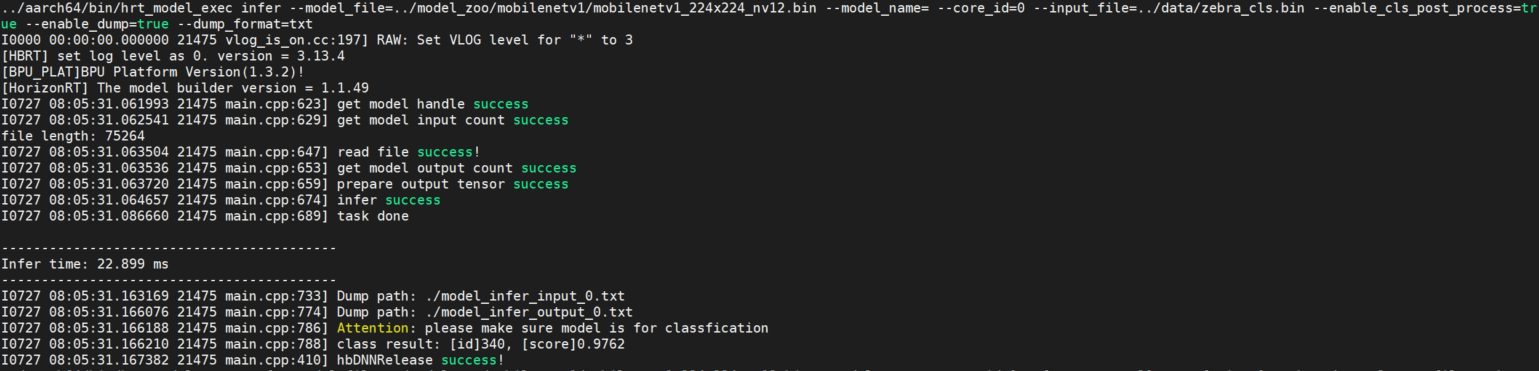
infer
- Overview
This parameter is used to input a custom image, and the model infers one frame and provides the inference result.
This parameter needs to be used together with input_file to specify the input image path. The tool resizes the image and organizes the model input information based on the model information.
The program runs single-threaded to process one frame of data and outputs the time it takes for the model to run.
- Example Explanation
- Single Model
hrt_model_exec infer --model_file=xxx.bin --input_file=xxx.jpg
- Multi Model
hrt_model_exec infer --model_file=xxx.bin,xxx.bin --model_name=xx --input_file=xxx.jpg

-
Optional Parameters
Parameters Description core_idSpecify the core id for model inference, 0: all cores, 1: core 0, 2: core 1; default is 0.roi_inferEnable resizer model inference; if the model input contains a resizer source, set to true, default isfalse.roiEffective when roi_inferistrue, set theroiarea required for inference of the resizer model, separated by semicolons.frame_countSet the number of frames the inferruns, repeat the inference for one frame, can be used withenable_dumpto check the consistency of the output, default is1.dump_intermediateDump input and output data for each layer of the model, default value is 0, do not dump data.1: output file type isbin;2: output type isbinandtxt, with BPU node output as aligned data;3: output type isbinandtxt, with BPU node output as valid data.enable_dumpDump model output data, default is false.dump_precisionControl the decimal places for outputting float type data in txt format, default is 9.hybrid_dequantize_processControl the float type data in txt format, if the output is fixed point data, perform reverse quantization processing, currently only supports four-dimensional models. dump_formatType of output file for dumping the model, optional parameters are binortxt, default isbin.dump_txt_axisLine break rules for dumping model txt format output; if the output dimension is n, the parameter range is [0, n], default is 4.enable_cls_post_processEnable classification post-processing, currently only supports ptq classification models, default is false.
Multi-input Model Explanation
The infer function of the tool supports the inference of multi-input models, supports image input, binary file input, and text file input, and the input data is separated by commas.
The input information of the model can be viewed through model_info.
hrt_model_exec infer --model_file=xxx.bin --input_file=xxx.jpg,input.txt
Supplementary Explanation of Input Parameters
input_file
For image type input, the file name extension must be one of the following: bin / JPG / JPEG / jpg / jpeg. For feature input, the file name extension must be one of the following: bin / txt. Each input file needs to be separated by a comma. For example: xxx.jpg,input.txt.
enable_cls_post_process
Enable classification post-processing. It is only supported in PTQ classification models. When the sub-command is infer, the variable should be set to true to print the classification results. Refer to the following figure:
roi_infer
If the model contains a resizer input source, both infer and perf functions need to set roi_infer to true, and configure the input_file and roi parameters corresponding to the input source. For example, if the model has three inputs with the input source order of [ddr, resizer, resizer], the command line for inferring two sets of input data is as follows:
  // infer
  hrt_model_exec infer --model_file=xxx.bin --input_file="xx0.bin,xx1.jpg,xx2.jpg,xx3.bin,xx4.jpg,xx5.jpg"  --roi="2,4,123,125;6,8,111,113;27,46,143,195;16,28,131,183"
  // perf
  hrt_model_exec perf --model_file=xxx.bin --input_file="xx0.bin,xx1.jpg,xx2.jpg,xx3.bin,xx4.jpg,xx5.jpg"   --roi="2,4,123,125;6,8,111,113;27,46,143,195;16,28,131,183"
Each roi input needs to be separated by a semicolon.
dump_intermediate
Dump the input data and output data of each layer node in the model. When dump_intermediate=0, the default dump function is turned off. When dump_intermediate=1, the input data and output data of each layer node in the model are saved in bin format, and the output of BPU node is saved as aligned data. When dump_intermediate=2, the input data and output data of each layer node in the model are saved in both bin and txt formats, and the output of BPU node is saved as aligned data. When dump_intermediate=3, the input data and output data of each layer node in the model are saved in both bin and txt formats, and the output of BPU node is saved as valid data. For example, if the model has two inputs with the input source order of [pyramid, ddr], and the input and output of each layer node in the model are saved as bin files, and the output of BPU node is saved as aligned type, the inference command line is as follows:
hrt_model_exec infer --model_file=xxx.bin --input_file="xx0.jpg,xx1.bin" --dump_intermediate=1
The dump_intermediate parameter supports both infer and perf modes.
hybrid_dequantize_process
Control the float type output data in txt format. The hybrid_dequantize_process parameter is effective when enable_dump=true. When enable_dump=true, if hybrid_dequantize_process=true is set, the integer output data is dequantized, and all outputs are saved as txt files in float format. The output of the model is valid data, and it supports configuring dump_txt_axis and dump_precision. If hybrid_dequantize_process=false is set, the aligned data of the model output is directly saved without any processing. For example, if the model has three outputs with the order of tensor data types as [float, int32, int16], and the valid data of float type in txt format is output, the inference command line is as follows:
hrt_model_exec infer --model_file=xxx.bin --input_file="xx0.jpg,xx1.bin" --dump_intermediate=1
The dump_intermediate parameter supports both infer and perf modes.// Output float type data
hrt_model_exec infer --model_file=xxx.bin --input_file="xx.bin" --enable_dump=true --hybrid_dequantize_process=true
hybrid_dequantize_process parameter currently only supports four-dimensional models.
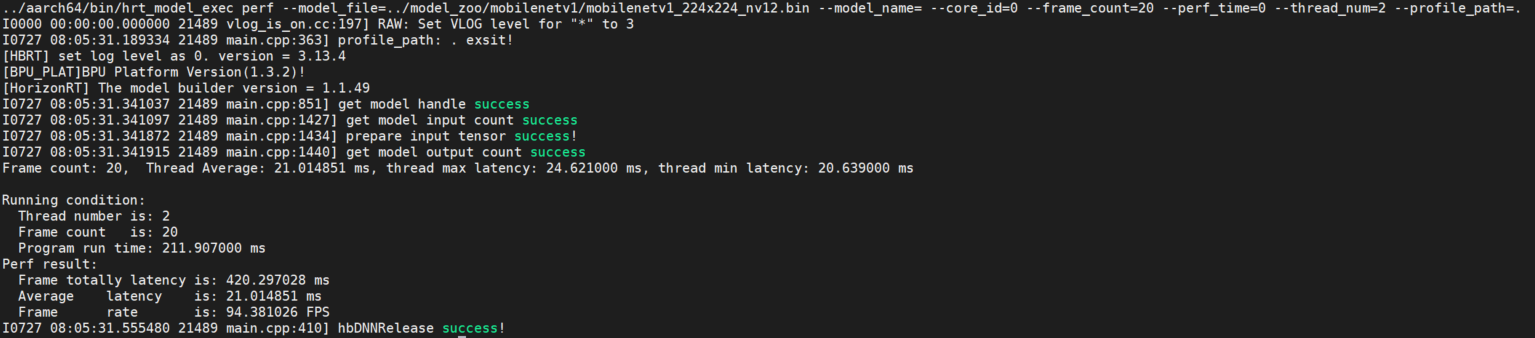
perf
- Overview
This parameter is used to test the inference performance of the model. With this command tool, users do not need to input data. The program will automatically construct the input tensor of the model based on the model information, and the tensor data will be random. The program runs with a default single thread and 200 frames of data. When the perf_time parameter is specified, the frame_count parameter is invalid, and the program will exit after executing for the specified time. After the program completes, it will output the number of program threads, frame count, total model inference time, average model inference latency, frame rate information, etc.
The program prints performance information every 200 frames: maximum, minimum, and average values of latency. When the number of frames is less than 200, the program prints once after the program finishes running.
- Example
- Single model
hrt_model_exec perf --model_file=xxx.bin
- Multiple models
hrt_model_exec perf --model_file=xxx.bin,xxx.bin --model_name=xx
-
Optional parameters
Parameter Description core_idSpecify the core id for model inference. 0: any core, 1: core0, 2: core1; default is 0.input_fileModel input information, multiple inputs can be separated by commas. roi_inferEnable resizer model inference; if the model input contains a resizer source, set to true, default isfalse.roiEffect when roi_inferis set totrue, set the requiredroiarea for inference of resizer model, separated by semicolons.frame_countSet the number of frames for perfto run, effective when perf_time is 0, default is200.dump_intermediateDump the input and output data of each layer of the model, default is 0, no dumping.1: output file type isbin;2: output type isbinandtxt, with BPU node output being aligned data;3: output type isbinandtxt, with BPU node output being valid data.perf_timeSet the running time of perf, unit: minutes, default is0.thread_numSet the number of threads for program execution, range: [1, 8], default is 1, set to 8 or greater to process with 8 threads.profile_pathProfiling tool log generation path, running generates profiler.log and profiler.csv, analyzing op time and scheduling time.
Multi-thread Latency Data Explanation
The purpose of multiple threads is to fully utilize BPU resources. Multiple threads process frame_count frames or execute for perf_time until data processing is completed/execution time ends and the program terminates.
In the multi-thread perf process, you can execute the following command to obtain the real-time occupancy of BPU resources.
hrut_somstatus -n 10000 -d 1
Output:
=====================1=====================
temperature-->
        CPU      : 37.5 (C)
cpu frequency-->
              min       cur     max
        cpu0: 240000    1200000 1200000
        cpu1: 240000    1200000 1200000
        cpu2: 240000    1200000 1200000
        cpu3: 240000    1200000 1200000
bpu status information---->
          min        cur             max             ratio
        bpu0: 400000000 1000000000      1000000000      0
        bpu1: 400000000 1000000000      1000000000      0
The above example shows the output log of the RDK X3 development board. If using the RDK Ultra development board, simply use the above command to obtain the output. In "perf" mode, the latency measurement of a single thread represents the actual on-board performance of the model, while the latency data of multiple threads represents the processing time of each thread per frame, which is longer than that of a single thread. However, the overall processing time of multiple threads is reduced, and the frame rate is improved.
Supplementary explanation of input parameters
profile_path
Directory where the profile log file is generated.
This parameter can be set by setting the environment variable export HB_DNN_PROFILER_LOG_PATH=${path} to view the OP and task scheduling time during model execution.
Generally, setting "--profile_path='.'" is sufficient, which means that the log file is generated in the current directory and the log file is named profiler.log.
thread_num
Number of threads (parallelism), indicating the maximum number of tasks processed in parallel. When testing latency, the value needs to be set to 1, so that there is no resource contention and the latency test is more accurate. When testing throughput, it is recommended to set it to a value greater than 2 (number of BPU cores), adjust the number of threads to maximize BPU utilization, and make the throughput test more accurate.
  // Dual-core FPS
  hrt_model_exec perf --model_file xxx.bin --thread_num 8 --core_id 0
  // Latency
  hrt_model_exec perf --model_file xxx.bin --thread_num 1 --core_id 1
Instructions for using the hrt_bin_dump tool"hrt_bin_dump" is a layer dump tool for the PTQ debug model, and the output file of the tool is a binary file.
Description of Input Parameters
| No. | Parameter | Type | Description | Explanation |
|---|---|---|---|---|
| 1 | model_file | string | Model file path. | It must be a debug model. The compilation parameter layer_out_dump of the model needs to be set to True, which specifies that the intermediate results of each layer should be output during the model conversion process. |
| 2 | input_file | string | Input file path. | The input file of the model supports all types of input of "hbDNNDataType"; The IMG type file must be a binary file (with a suffix of .bin), and the size of the binary file should match the input information of the model. For example, the size of the YUV444 file is :math:height * width * 3; The TENSOR type file must be a binary file or a text file (with a suffix of .bin/.txt), The size of the binary file should match the input information of the model, and the number of data read from the text file must be greater than or equal to the number of input data required by the model. The excess data will be discarded; Each input is separated by a comma. For example, if the model has two inputs, it should be: --input_file=kite.bin,input.txt. |
| 3 | conv_mapping_file | string | Model convolution layer configuration file. | The model layer configuration file specifies the information of each layer in the model and is generated during the model compilation process. The file name is generally: model_name_quantized_model_conv_output_map.json. |
| 4 | conv_dump_path | string | Tool output path. | The output path of the tool, which should be a valid path. |
Instructions
The tool provides the function of dumping the output of convolutional layers, and the output file is a binary file.
Run hrt_bin_dump directly to get the details of tool usage.
See the figure below:
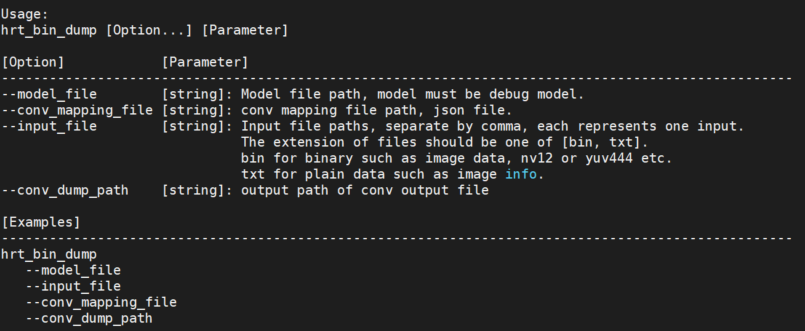
The tool can also view the version number of the "dnn" prediction library of the tool using the -v or --version command.
For example: hrt_bin_dump -v or hrt_bin_dump --version
Example
Taking the debug model of MobileNetV1 as an example, create the "outputs" folder and run the following command:
./hrt_bin_dump --model_file=./mobilenetv1_hybrid_horizonrt.bin --conv_mapping_file=./mobilenetv1_quantized_model_conv_output_map.json --conv_dump_path=./outputs --input_file=./zebra_cls.bin
The run log is as follows:

The output can be viewed in the "outputs/" folder as shown below:
