4.1.5 基于MIPI摄像头推理
目标检测算法—fcos
本示例主要实现以下功能:
- 加载
fcos图像目标检测算法模�型(基于COCO数据集训练的80个类别的目标检测) - 从MIPI摄像头读取视频图像,并进行推理
- 解析模型输出并将结果渲染到原始视频流
- 通过
HDMI接口输出渲染后的视频流。
运行方法
请查阅 MIPI摄像头AI推理 了解如何快速运行本示例。
示例代码解析
-
导入python模块 导入hobot_dnn、hobot_vio、numpy、opencv模块、colorsys等模块
import numpy as np
import cv2
import colorsys

from hobot_dnn import pyeasy_dnn as dnn
from hobot_vio import libsrcampy as srcampy -
加载模型文件
调用load方法加载模型文件,并返回一个
hobot_dnn.pyeasy_dnn.Model类的 list。models = dnn.load('../models/fcos_512x512_nv12.bin')fcos模型的输入是1x3x512x512数据,格式为NCHW。输出为15组数据,用来表示检测到的物体检测框。示例中定义了print_properties函数用来输出模型的输入、输出参数:# print properties of input tensor
print_properties(models[0].inputs[0].properties)
# print properties of output tensor
print(len(models[0].outputs))
for output in models[0].outputs:
print_properties(output.properties) -
数据预处理
调用
srcampy.Camera类get_cam接口,获取MIPI camera的实时图像,并把图像缩放到符合模型输入tensor的尺寸# create Camera object
cam = srcampy.Camera()
h, w = get_hw(models[0].inputs[0].properties)
# open MIPI Camera, set 30fps,solution 1920 x 1080, 512 x 512
cam.open_cam(0, 1, 30, [1920, w], [1080, h])# get the image, solution 512x512
img = cam.get_img(2, 512, 512)
# transform data to np format
img = np.frombuffer(img, dtype=np.uint8) -
数据流绑定
为减少图像数据的拷贝, 示例将图像数据的输入、输出模块进行了绑定, 可以在底层将
camera的图像数据直接送到display显示模块disp = srcampy.Display()
# For the meaning of parameters, please refer to the relevant documents of HDMI display
disp.display(0, 1920, 1080)
# bind camera directly to display
srcampy.bind(cam, disp)关于camera详细使用方法,可以查看Camera章节了解更多信息。
-
模型推理
调用 Model 类��的
forward接口进行推理,模型输出15组数据,用来表示检测到的物体检测框。outputs = models[0].forward(nv12_data) -
算法后处理
示例中的后处理函数
postprcess,会处理模型输出的物体类别、检测框、置信度等信息。# do postprocess
prediction_bbox = postprocess(outputs, input_shape, origin_img_shape=(1080,1920)) -
检测结果可视化
示例对算法结果和原始视频流进行了渲染,并通过
HDMI接口输出,用户��可在显示器上实时预览效果。显示部分用到了hobot_vio模块的Display功能,该模块详细信息请查看 Display章节。for index, bbox in enumerate(prediction_bbox):
...
if index == 0:
disp.set_graph_rect(coor[0], coor[1], coor[2], coor[3], 2, 1,
box_color_ARGB)
disp.set_graph_word(coor[0], coor[1] - 2, bbox_string, 2, 1,
box_color_ARGB)
else:
disp.set_graph_rect(coor[0], coor[1], coor[2], coor[3], 2, 0,
box_color_ARGB)
disp.set_graph_word(coor[0], coor[1] - 2, bbox_string, 2, 0,
box_color_ARGB)
目标检测算法 Web端可视化
本示例我们要实现:
- 加载
fcos图像目标检测算法模型(基于COCO数据集训练的80个类别的目标检测) - 从MIPI摄像头、读取视频图像,并进行推理
- 解析模型输出结果
- 推送算法结果、视频流到web端
本示例中数据预处理、模型推理以及后处理部分代码与上一章节一致,下面只解析差异部分。
代码解析
-
启动
web_service服务在使用web服务之前,请确保开发板与电脑处于同一网段,并可以相互ping通。然后执行如下命令启动web服务
cd /app/pydev_demo/05_web_display_camera_sample/
sudo sh ./start_nginx.sh
sudo python3 ./mipi_camera_web.py
注意,如果在运行
start_nginx.sh时报以下错误,说明设备上已经有运行httpd的服务,tcp的80端口已经被占用
此时需要找到并结束掉占用
80端口的进程,可以执行命令lsof -i:80,得到占用端口的进程PID,并用kill -9 PID结束掉进程即可。 -
protobuf序列化
web端接收的是使用protobuf序列化之后的数据,开发板作为服务端需要将模型输出按照一定的数据格式进行序列号,本示例中通过
serialize函数完成序列化操作def serialize(FrameMessage, prediction_bbox):
if (prediction_bbox.shape[0] > 0):
for i in range(prediction_bbox.shape[0]):
# get class name
Target = x3_pb2.Target()
id = int(prediction_bbox[i][5])
Target.type_ = classes[id]
Box = x3_pb2.Box()
Box.type_ = classes[id]
Box.score_ = prediction_bbox[i][4]
Box.top_left_.x_ = prediction_bbox[i][0]
Box.top_left_.y_ = prediction_bbox[i][1]
Box.bottom_right_.x_ = prediction_bbox[i][2]
Box.bottom_right_.y_ = prediction_bbox[i][3]
Target.boxes_.append(Box)
FrameMessage.smart_msg_.targets_.append(Target)
prot_buf = FrameMessage.SerializeToString()
return prot_buf -
protobuf数据包发送
开发板web服务端通过
websockets插件完成对数据的发送,需要获取本机IP地址:# call ifconfig cmd, to get device ip
ifconfig_cmd = subprocess.check_output("ifconfig | grep broadcast | awk '{print $2}'", shell=True)
board_ip = str(ifconfig_cmd, 'UTF-8')[:-1]然后启动
websockets,并通过数据发送函数web_service发送数据。start_server = websockets.serve(web_service, board_ip, 8080)async def web_service(websocket, path):
while True:
# create protobuf message object
FrameMessage = x3_pb2.FrameMessage()
# set frame solution and format
FrameMessage.img_.height_ = 1080
FrameMessage.img_.width_ = 1920
FrameMessage.img_.type_ = "JPEG"
# get camera image for inference
img = cam.get_img(2, 512, 512)
img = np.frombuffer(img, dtype=np.uint8)
outputs = models[0].forward(img)
# do postprocess
prediction_bbox = postprocess(outputs, input_shape, origin_img_shape=(1080, 1920))
print(prediction_bbox)
# get camera image for render
origin_image = cam.get_img(2, 1920, 1080)
# encode image to mjpeg
enc.encode_file(origin_image)
FrameMessage.img_.buf_ = enc.get_img()
FrameMessage.smart_msg_.timestamp_ = int(time.time())
# serialize data
prot_buf = serialize(FrameMessage, prediction_bbox)
# send data
await websocket.send(prot_buf)
cam.close_cam() -
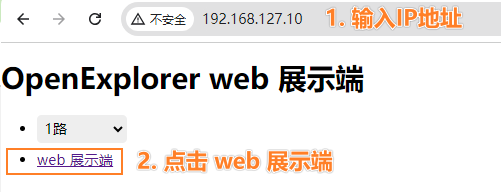
web端查看展示效果
在
chrome浏览器输入开发板IP地址,即可实时预览渲染后的视频画面