4.1.5 MIPI Camera-based Inference
Object Detection Algorithm - FCOS
This example mainly achieves the following functions:
- Load the
fcosimage object detection algorithm model (trained on the COCO dataset with 80 object detection categories). - Read video images from the MIPI camera and perform inference.
- Parse the model output and render the result to the original video stream.
- Output the rendered video stream through the
HDMIinterface.
Running Method
Please refer to MIPI Camera AI Inference for how to quickly run this example.
Example Code Analysis
-
Import Python modules Import modules such as hobot_dnn, hobot_vio, numpy, opencv, colorsys, etc.
import numpy as np
import cv2
import colorsys

from hobot_dnn import pyeasy_dnn as dnn
from hobot_vio import libsrcampy as srcampy -
Load the model file
Call the load method to load the model file and return a list of
hobot_dnn.pyeasy_dnn.Modelclass.models = dnn.load('../models/fcos_512x512_nv12.bin')The input of the
fcosmodel is1x3x512x512data with the format ofNCHW. The output is 15 sets of data used to represent the detected object bounding boxes. In the example, theprint_propertiesfunction is defined to output the input and output parameters of the model:# print properties of input tensor
print_properties(models[0].inputs[0].properties)
# print properties of output tensor
print(len(models[0].outputs))
for output in models[0].outputs:
print_properties(output.properties) -
Data Preprocessing
Call the
get_caminterface of thesrcampy.Cameraclass to obtain the real-time image from the MIPI camera and resize the image to fit the size of the model's input tensor.# create Camera object
cam = srcampy.Camera()
h, w = get_hw(models[0].inputs[0].properties)
# open MIPI Camera, set 30fps, solution 1920 x 1080, 512 x 512
cam.open_cam(0, 1, 30, [1920, w], [1080, h])# get the image, solution 512x512
img = cam.get_img(2, 512, 512)
# transform data to np format
img = np.frombuffer(img, dtype=np.uint8) -
Data Stream Binding
To reduce the data copying of the image data, the example binds the input and output modules of the image data, allowing the image data from
camerato be directly sent to thedisplaymodule at the lower level.disp = srcampy.Display()
# For the meaning of parameters, please refer to the relevant documents of HDMI display
disp.display(0, 1920, 1080)
# bind camera directly to display
srcampy.bind(cam, disp)For more information about the detailed usage of the camera, please refer to the Camera section.
-
Model Inference
Call the
forwardinterface of the Model class for inference. The model outputs 15 sets of data to represent the detected object detection boxes.outputs = models[0].forward(nv12_data) -
Algorithm Postprocessing
The postprocessing function
postprocessin the example will process the information of the object categories, detection boxes, and confidence from the model outputs.# do postprocess
prediction_bbox = postprocess(outputs, input_shape, origin_img_shape=(1080,1920)) -
Visualization of Detection Results
The example renders the algorithm results and the original video stream and outputs them through the HDMI interface. Users can preview the effects in real time on a display. The display part uses the Display function of the hobot_vio module, for more detailed information about this module, please refer to the Display section.
for index, bbox in enumerate(prediction_bbox):
...
    if index == 0:
        disp.set_graph_rect(coor[0], coor[1], coor[2], coor[3], 2, 1,
                            box_color_ARGB)
        disp.set_graph_word(coor[0], coor[1] - 2, bbox_string, 2, 1,
                            box_color_ARGB)
    else:
        disp.set_graph_rect(coor[0], coor[1], coor[2], coor[3], 2, 0,
                            box_color_ARGB)
        disp.set_graph_word(coor[0], coor[1] - 2, bbox_string, 2, 0,
                            box_color_ARGB)
Object Detection Algorithm Web Visualization
In this example, we want to achieve the following:
- Load the "fcos" image object detection algorithm model (trained on COCO dataset with 80 object categories)
- Read video images from a MIPI camera and perform inference
- Parse the model output results
- Push the algorithm results and video stream to the web-side
The data preprocessing, model inference, and post-processing code in this example are the same as in the previous sections. Only the differences will be explained below.
Code Analysis
-
Start
web_serviceBefore using the web service, please make sure that the development board and the computer are in the same network segment and can ping each other. Then execute the following command to start the web service:
cd /app/pydev_demo/05_web_display_camera_sample/
sudo sh ./start_nginx.sh
sudo python3 ./mipi_camera_web.py
Note that if you encounter the following error when running
start_nginx.sh, it means that there is already an httpd service running on the device and TCP port 80 is occupied:
In this case, you need to find and terminate the process that occupies port
80. You can execute the commandlsof -i:80to get the PID of the process occupying the port, and then usekill -9 PIDto terminate the process. -
Protobuf Serialization
The web client receives data that has been serialized using Protobuf. As the server, the development board needs to serialize the model's output according to a specific data format. In this example, the serialization operation is performed using the serialize function.
def serialize(FrameMessage, prediction_bbox):
    if (prediction_bbox.shape[0] > 0):
        for i in range(prediction_bbox.shape[0]):
            # get class name
            Target = x3_pb2.Target()
            id = int(prediction_bbox[i][5])
            Target.type_ = classes[id]
            Box = x3_pb2.Box()
            Box.type_ = classes[id]
            Box.score_ = prediction_bbox[i][4]

            Box.top_left_.x_ = prediction_bbox[i][0]
            Box.top_left_.y_ = prediction_bbox[i][1]
            Box.bottom_right_.x_ = prediction_bbox[i][2]
            Box.bottom_right_.y_ = prediction_bbox[i][3]

            Target.boxes_.append(Box)
            FrameMessage.smart_msg_.targets_.append(Target)
    prot_buf = FrameMessage.SerializeToString()
    return prot_buf
- Sending Protobuf Data
The web server on the development board sends the data using the websockets plugin, and it needs to obtain the IP address of the local device:
# call ifconfig cmd, to get device ip
ifconfig_cmd = subprocess.check_output("ifconfig | grep broadcast | awk '{print $2}'", shell=True)
board_ip = str(ifconfig_cmd, 'UTF-8')[:-1]
Then, start the websockets and send the data using the web_service function.
start_server = websockets.serve(web_service, board_ip, 8080)
async def web_service(websocket, path):
    while True:
        # create protobuf message object
        FrameMessage = x3_pb2.FrameMessage()
        # set frame solution and format
        FrameMessage.img_.height_ = 1080
        FrameMessage.img_.width_ = 1920
        FrameMessage.img_.type_ = "JPEG"

        # get camera image for inference
        img = cam.get_img(2, 512, 512)
        img = np.frombuffer(img, dtype=np.uint8)
        outputs = models[0].forward(img)
        # do postprocess
        prediction_bbox = postprocess(outputs, input_shape, origin_img_shape=(1080, 1920))
        print(prediction_bbox)

        # get camera image for render
        origin_image = cam.get_img(2, 1920, 1080)
        # encode image to mjpeg
        enc.encode_file(origin_image)
        FrameMessage.img_.buf_ = enc.get_img()
        FrameMessage.smart_msg_.timestamp_ = int(time.time())
        # serialize data
        prot_buf = serialize(FrameMessage, prediction_bbox)
        # send data
        await websocket.send(prot_buf)
    cam.close_cam()
-
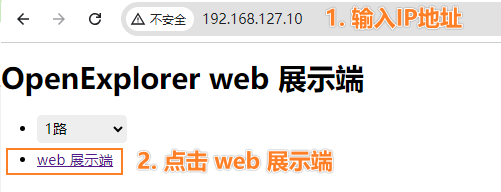
View the display effect on the web
Enter the IP address of the development board in the
chromebrowser to preview the video image rendered in real time