4.1.3 Static Image Inference
Image Classification Algorithm - Mobilenet v1
This example mainly implements the following functions:
- Load the
mobilenet v1image classification model - Read the static image
zebra_cls.jpgas the input of the model - Parse the model output to obtain the classification result of the image
Running Method
The complete code and test data of this example are installed in the /app/pydev_demo/01_basic_sample/ directory. Call the following command to run:
cd /app/pydev_demo/01_basic_sample/
sudo python3 ./test_mobilenetv1.py
After successfully running, the classification result of the image will be output as shown below:
========== Classification result ==========
cls id: 340 Confidence: 0.991851
Explanation of Example Code
-
Importing algorithm inference libraries hobot_dnn, numpy, and opencv modules
from hobot_dnn import pyeasy_dnn as dnn
import numpy as np
import cv2 -
Model loading Call the load interface to load the model file and return a list of
hobot_dnn.pyeasy_dnn.Modelclass.models = dnn.load('../models/mobilenetv1_224x224_nv12.bin')In this example, the input of the
mobilenetv1model is1x3x224x224data with the formatNCHW. The output is a list of 1000 data, representing the confidence of 1000 categories. The example defines theprint_propertiesfunction to output the input and output parameters of the model:# print properties of input tensor
print_properties(models[0].inputs[0].properties)
# print properties of output tensor
print_properties(models[0].outputs[0].properties) -
Data preprocessing
Example opens the image file
zebra_cls.jpgcontaining a zebra, and resizes the image to fit the input size of the model (244 x 224):# open image
img_file = cv2.imread('./zebra_cls.jpg')
# get the input tensor size
h, w = models[0].inputs[0].properties.shape[2], models[0].inputs[0].properties.shape[3]
print("input tensor size: %d x %d" % (h, w))
des_dim = (w, h)
# resize image to input size
resized_data = cv2.resize(img_file, des_dim, interpolation=cv2.INTER_AREA)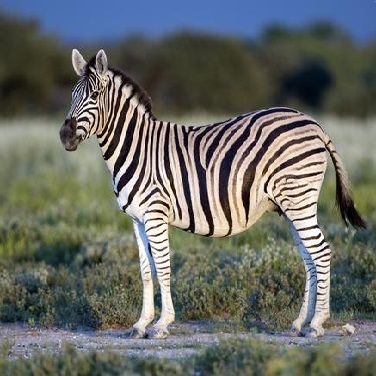
Then, convert the image from BGR format to NV12 format, which is compatible with the model input, using the
bgr2nv12_opencvfunction:nv12_data = bgr2nv12_opencv(resized_data) -
Model inference
Call the
forwardinterface of the Model class for algorithm inference, and then obtain a list of 1000 values representing the predicted probabilities for 1000 categories.outputs = models[0].forward(nv12_data) -
Algorithm post-processing
The output of the algorithm model needs to be post-processed to obtain the desired class, detection box, and other information. In this example, the model output corresponds to 1000 categories, so it needs to be filtered based on confidence to obtain the correct result.
print("=" * 10, "Classification result", "=" * 10)
np.argmax(outputs[0].buffer)
# output target id and confidence
print("cls id: %d Confidence: %f" % (np.argmax(outputs[0].buffer), outputs[0].buffer[0][np.argmax(outputs[0].buffer)]))
The correct result when running is:
========== Classification result ==========
cls id: 340 Confidence: 0.991851
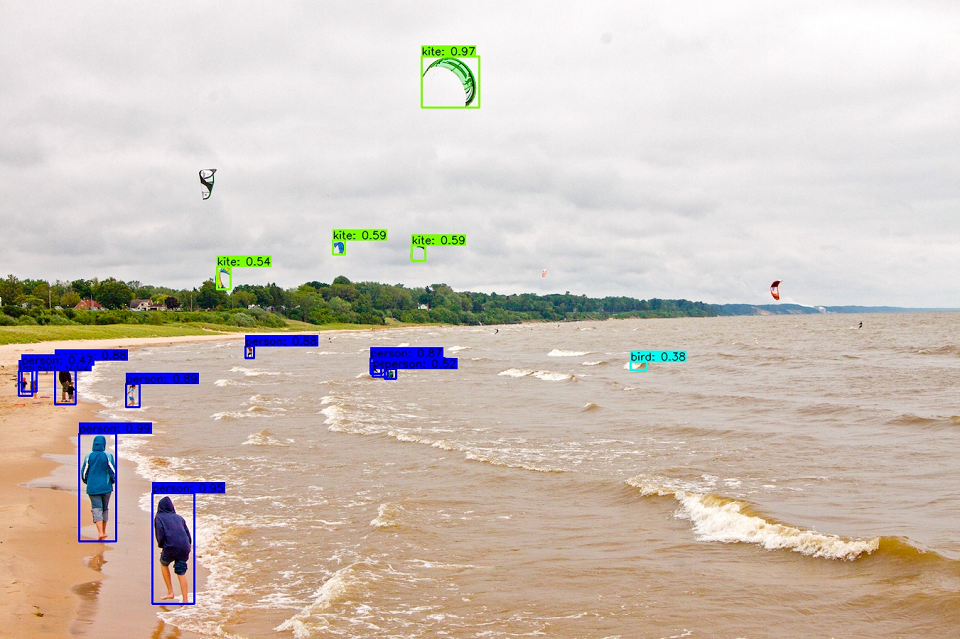
Object Detection Algorithm - YOLOv3
This example mainly implements the following functions:
- Load the
yolov3_416x416_nv12object detection model. - Read the static image
kite.jpgas the input of the model. - Analyze the algorithm result and render the detection results.
How to Run
The complete code and test data of this example are installed in the directory /app/pydev_demo/06_yolov3_sample/. Run the following command to execute:
cd /app/pydev_demo/06_yolov3_sample/
sudo python3 ./test_yolov3.py
After successful execution, it will output the object detection results and save the rendered results to the file result.jpg, as shown in the following figure:
Object Detection Algorithm - YOLOv5
This example mainly implements the following functions:
- Load the
yolov5s_672x672_nv12object detection model. - Read the static image
kite.jpgas the input of the model. - Analyze the algorithm result and render the detection results.
How to Run
The complete code and test data of this example are installed in the directory /app/pydev_demo/07_yolov5_sample/. Run the following command to execute:
cd /app/pydev_demo/07_yolov5_sample/
sudo python3 ./test_yolov5.py
After successful execution, it will output the object detection results and save the rendered results to the file result.jpg, as shown in the following figure:
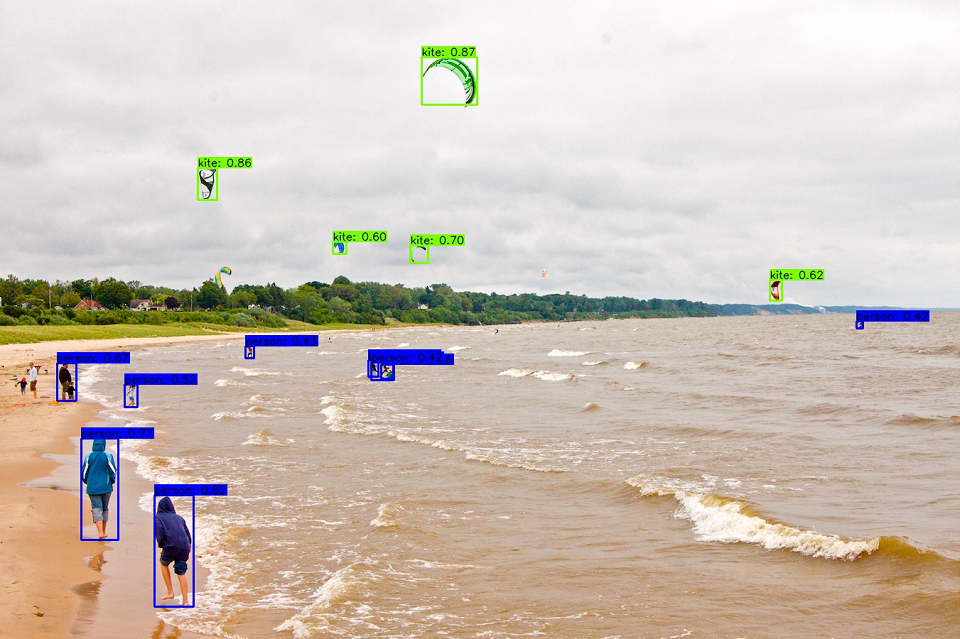
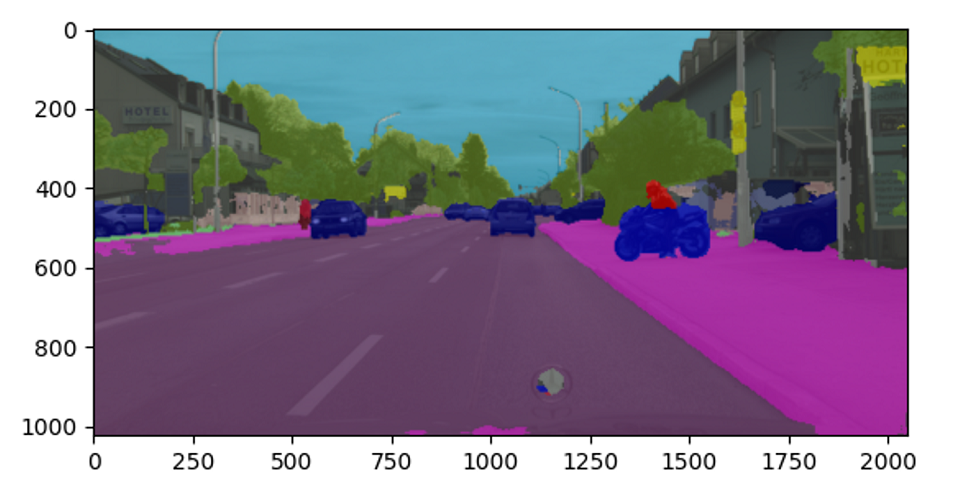
Image Segmentation Algorithm - UNet
This example mainly implements the following functions:
- Loading the
mobilenet_unet_1024x2048_nv12image segmentation model (pre-trained segmentation model for cityscapes). - Reading the
segmentation.pngstatic image as the input of the model. - Analyzing the algorithm results and rendering the segmentation results.
Running Method
The complete code and test data of this example are installed in the /app/pydev_demo/04_segment_sample/ directory. Use the following command to run:
cd /app/pydev_demo/04_segment_sample/
sudo python3 ./test_mobilenet_unet.py
After successful execution, the segmentation results of the image will be output, and the segmentation effect image will be output to the segment_result.png file, as shown in the following image: