IPC 模块介绍
IPC(Inter-Processor Communication)模块是用于多核之间的通信,支持同构核和异构核之间的通信,软件上基于 buffer-ring 进行共享内存的管理,硬件上基于 MailBox 实现核间中断。IPCF 具有多路通道,大数据传输,适用多种平台的特点。RPMSG 基于开源协议框架,支持 Acore 与 VDSP 的核间通信。
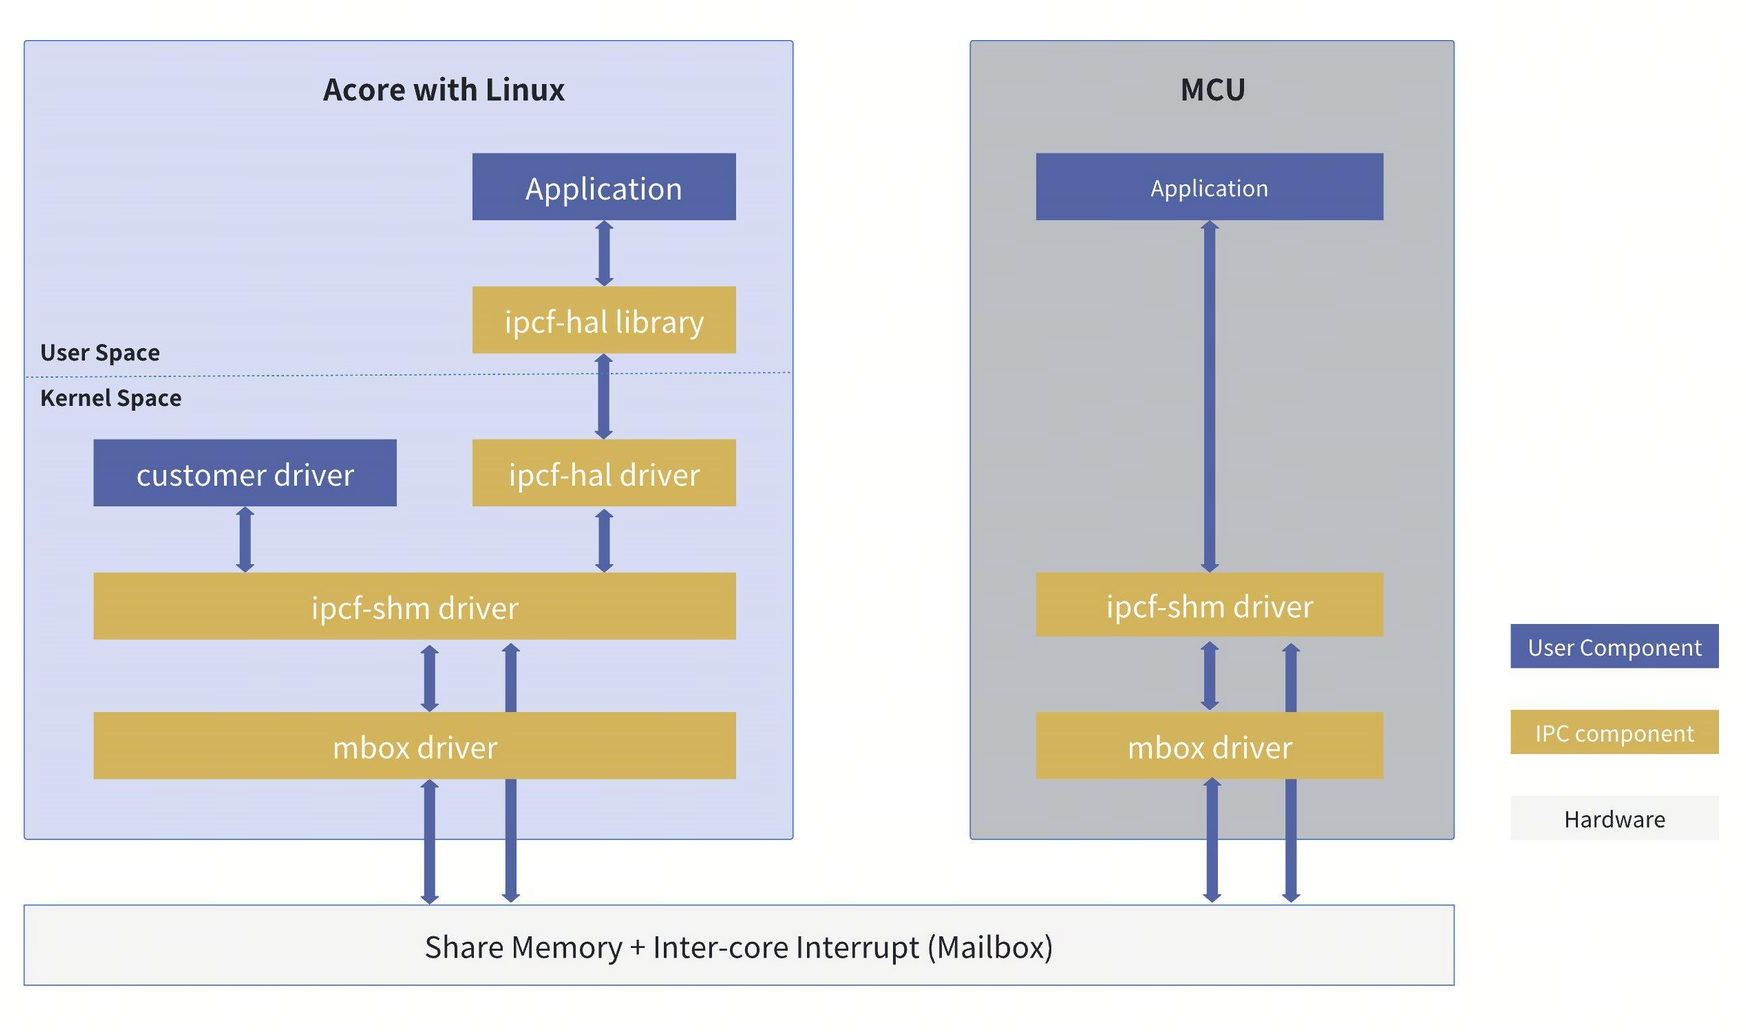
IPCF 软硬件组件框图
Acore 与 MCU 之间的核间通信,Acore 侧主要使用 IPCFHAL,MCU 侧使用 IPCF,其中 IPCFHAL 是基于 IPCF 封装了一层接口,用于用户态与内核态的数据传递。
IPC 典型使用场景
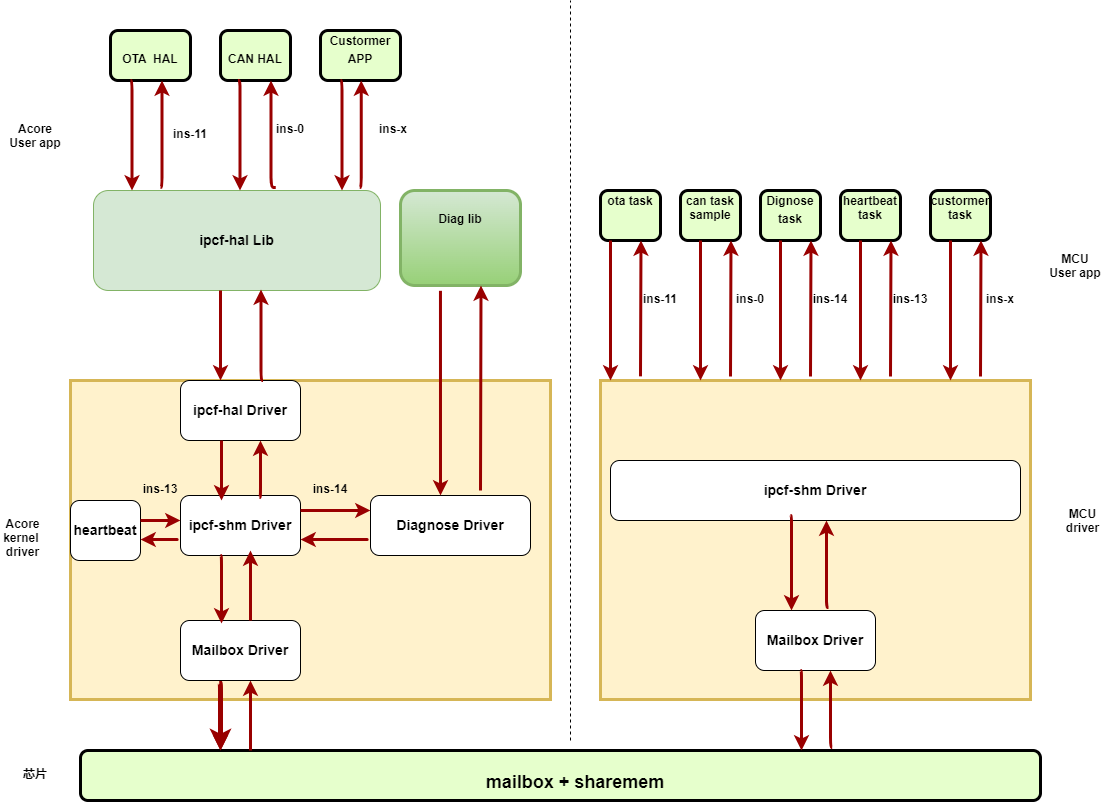
IPC 典型应用场景有 OTA 模块、规控、CANHAL 等。
IPC 实例分配方案
IPC Acore 侧实例编号范围为[0-34],分别用于 Acore 与 MCU 通信的实例[0-14]、Acore 与 VDSP 通信的实例[22-24]、Acore 与 BPU 通信的实例[32-34],其余实例做其它私有用途。Acore 与 MCU 通信可使用实例[0-8],实例[4-6]默认为客户预留,若用户不需要 CANHAL、规控等业务,可以自行修改配置文件。S100中 AOCRE 与 MCU 的 IPC 通信情况可以查阅 MCU IPC使用指南 中的 IPC 使用情况章节。
IPC Acore 侧实例编号范围为[0-63],分别用于 Acore 与 MCU 通信的实例[0-15]和[50-53]、Acore 与 VDSP 通信的实例[22-24]和[42-44]、Acore 与 BPU 通信的实例[32-39],其余实例做其它私有用途。客户 Acore 与 MCU 通信可使用实例[0-15],其余实例为内部使用。
IPC VDSP 侧实例编号范围为[0-6],分别用于 VDSP 与 Acore 通信的实例[0-2](VDSP0对应 Acore 实例[22-24],VDSP1对应 Acore 实例[42-44]),其余实例做私有用途。
Acore 侧配置实例方法
Acore 侧配置实例可通过设备树文件配置,配置路径为:
source/hobot-drivers/kernel-dts/drobot-s100-ipc.dtsi
source/hobot-drivers/kernel-dts/include/drobot_s100_ipc.h
设备树配置信息如下(仅供参考):
ipcfhal_cfg: ipcfhal_cfg {
    status = "okay"; #节点状态,不需要改动
    compatible = "hobot,hobot-ipcfhal";  #节点属性,不可改动

    /****************instance--num_chans--num_bufs--buf_size****************/
    ipc-ins = <&ipc_instance0	8	8	0x2000>, #(Acore&MCU)用于CANHAL
            <&ipc_instance1	8	8	0x1000>, #(Acore&MCU)空闲
            <&ipc_instance2	2	8	0x800>, #(Acore&MCU)空闲
            <&ipc_instance3	8	8	0x1000>, #(Acore&MCU)空闲
            <&ipc_instance4	8	8	0x1000>, #(Acore&MCU)用于CANHAL
            <&ipc_instance5	8	8	0x1000>, #(Acore&MCU)用于外置RTC
            <&ipc_instance6	8	8	0x1000>, #(Acore&MCU)空闲,用户可自行配置
            <&ipc_instance7	8	8	0x1000>, #(Acore&MCU)透传uart,spi,i2c等外设和运行mcu侧cmd应用
            <&ipc_instance8	8	8	0x1000>, #(Acore&MCU)部分空闲,用户可自行配置
            <&ipc_instance9	2	5	0x400>,  #(Acore&MCU)私有实例,内部预留
            <&ipc_instance10	1	5	0x200>, #(Acore&MCU)私有实例,内部预留
            <&ipc_instance22	8	8	0x1000>, #(Acore&VDSP)VDSP预留,暂未对客户开放
            <&ipc_instance23	8	8	0x1000>, #(Acore&VDSP)VDSP预留,暂未对客户开放
            <&ipc_instance24	8	8	0x1000>; #(Acore&VDSP)VDSP预留,暂未对客户开放
};
Acore 侧配置实例可通过设备树文件配置,配置路径为:
source/hobot-drivers/kernel-dts/drobot-s600-ipc.dtsi
source/hobot-drivers/kernel-dts/include/drobot_s600_ipc.h
设备树配置信息如下(仅供参考):
ipcfhal_cfg: ipcfhal_cfg {
    status = "okay"; #节点状态,不需要改动
    compatible = "hobot,hobot-ipcfhal";  #节点属性,不可改动

    /****************instance--num_chans--num_bufs--buf_size****************/
        ipc-ins = <&ipc_instance0         8       8       0x2000>, #Acore&MCU,canhal
                <&ipc_instance1         8       8       0x1000>, #Acore&MCU,用户可自行配置
                <&ipc_instance2         2       8       0x800>, #Acore&MCU,用户可自行配置
                <&ipc_instance3         8       8       0x1000>, #Acore&MCU,用户可自行配置
                <&ipc_instance4         8       8       0x1000>, #Acore&MCU,canhal
                <&ipc_instance5         8       8       0x1000>, #Acore&MCU,外置RTC
                <&ipc_instance6         8       8       0x1000>, #Acore&MCU,用户可自行配置
                <&ipc_instance7         8       8       0x1000>, #Acore&MCU,ipcbox
                <&ipc_instance8         8       8       0x1000>, #Acore&MCU,启动mcu1
                <&ipc_instance9         2       5       0x400>, #Acore&MCU,用户可自行配置
                <&ipc_instance10        1       5       0x200>, #Acore&MCU,timesync
                <&ipc_instance11        8       8       0x1000>, #Acore&MCU,用户可自行配置
                <&ipc_instance12        8       8       0x1000>, #Acore&MCU,用户可自行配置
                <&ipc_instance13        8       8       0x1000>, #Acore&MCU,用户可自行配置
                <&ipc_instance14        8       8       0x1000>, #Acore&MCU,用户可自行配置
                <&ipc_instance15        8       8       0x1000>, #Acore&MCU,用户可自行配置
                <&ipc_instance22        8       8       0x1000>, #Acore&VDSP0,暂未对客户开放
                <&ipc_instance23        8       8       0x1000>, #Acore&VDSP0,暂未对客户开放
                <&ipc_instance24        8       8       0x1000>, #Acore&VDSP0,暂未对客户开放
                <&ipc_instance42        8       8       0x1000>, #Acore&VDSP1,暂未对客户开放
                <&ipc_instance43        8       8       0x1000>, #Acore&VDSP1,暂未对客户开放
                <&ipc_instance44        8       8       0x1000>; #Acore&VDSP1,暂未对客户开放
};
设备树配置说明
设备树 ipcfhal_cfg 节点默认配置了一些实例的属性:
- 属性中第一列表示实例编号,必须唯一且在有效范围
- 属性的第二列表示该实例分配的通道数量,用户可以自行配置,最大值为32个
- 属性的第三列表示每个通道的缓冲 buf 的个数,用户可以自行配置,最大值为1024个,但受控制空间大小的限制。属性第四列表示缓冲 buf 的大小,单位是 Bytes,用户可以自行配置,通道个数*缓冲 buf 个数*buf 大小需要小于等于0.5MB(目前每个实例预分配了1MB 的数据空间,暂不扩增)。
单个实例的设备树节点如下:
#Not used, User can apply for it
ipc_instance3: ipc_instance3 {
        status = "okay"; #节点状态,不需要改动
        compatible = "hobot,hobot-ipc"; #节点属性,不可改动
        mbox-names = "mbox-chan"; #mailbox名字属性,不可改动
        mboxes = <&mailbox0 3 19 3>; #mailbox通信方向,实例5和实例6需要改动,其它实例不需要改动
        instance = <3>; #实例id,不需要改动
        data_local_addr = /bits/ 64 <IPC_INS3_DATA_LOCAL>; #Acore数据段,实例5和实例6需要改动,其它实例不需要改动
        data_remote_addr = /bits/ 64 <IPC_INS3_DATA_REMOTE>; #MCU数据段,实例5和实例6需要改动,其它实例不需要改动
        data_size = <IPC_SINGLE_DATA_SIZE>; #数据段大小,不可改动,单位Bytes
        ctrl_local_addr = /bits/ 64 <IPC_INS3_CTRL_LOCAL>; #Acore控制段,实例5和实例6需要改动,其它实例不需要改动
        ctrl_remote_addr = /bits/ 64 <IPC_INS3_CTRL_REMOTE>; #MCU控制段,实例5和实例6需要改动,其它实例不需要改动
        ctrl_size = <IPC_SINGLE_CTRL_SIZE>; #数据段大小,不可改动,单位Bytes
};
由于实例5和实例6内部用于测试,外部客户若需要使用,需要自行配置,配置信息如下,不需要改动。
ipc_instance5: ipc_instance5 {
        status = "okay";
        compatible = "hobot,hobot-ipc";
        mbox-names = "mbox-chan";
        mboxes = <&mailbox0 5 21 5>;
        instance = <5>;
        data_local_addr = /bits/ 64 <IPC_INS5_DATA_LOCAL>;
        data_remote_addr = /bits/ 64 <IPC_INS5_DATA_REMOTE>;
        data_size = <IPC_SINGLE_DATA_SIZE>;
        ctrl_local_addr = /bits/ 64 <IPC_INS5_CTRL_LOCAL>;
        ctrl_remote_addr = /bits/ 64 <IPC_INS5_CTRL_REMOTE>;
        ctrl_size = <IPC_SINGLE_CTRL_SIZE>;
};

ipc_instance6: ipc_instance6 {
        status = "okay";
        compatible = "hobot,hobot-ipc";
        mbox-names = "mbox-chan";
        mboxes = <&mailbox0 6 22 6>;
        instance = <6>;
        data_local_addr = /bits/ 64 <IPC_INS6_DATA_LOCAL>;
        data_remote_addr = /bits/ 64 <IPC_INS6_DATA_REMOTE>;
        data_size = <IPC_SINGLE_DATA_SIZE>;
        ctrl_local_addr = /bits/ 64 <IPC_INS6_CTRL_LOCAL>;
        ctrl_remote_addr = /bits/ 64 <IPC_INS6_CTRL_REMOTE>;
        ctrl_size = <IPC_SINGLE_CTRL_SIZE>;
};
设备树配置注意事项:
- 实例3~8数据段默认预分配了1MB 空间,Acore 侧使用0.5MB,MCU 侧使用0.5MB,所以通道个数*缓冲 buf 个数*buf 大小需要小于等于0.5MB。
- 实例3~8控制段默认预分配了5KB 空间,Acore 侧使用2.5KB,MCU 侧使用2.5KB,存放环形 buf 的控制信息和状态信息,所以(缓冲 buf 个数+2)*16*通道个数+8需要小于等于2.5KB。
- 实例5~6用于地瓜机器人内部测试,用户可按照上面配置,修改设备树节点即可。 // TODO:可以完全放开给到客户
- 每个实例的通道数量需要小于等于32,缓冲 buf 个数需要小于等于1024,同时需要满足前两点的不等式。
- 多个业务使用同一个实例的不同通道或者使用不同实例对传输影响不大,主要是参考 buf_size/buf_num 是否合适以及业务的开发和维护是否方便。
- 底层 Mailbox 中断分配不支持修改。
- Acore 与 MCU 的通道个数、缓冲 buf 个数和大小需要保持一致,数据段和控制段的 local 和 remote 需要相反。
- 实例的控制段首地址存储实例是否初始化的状态,可用于判断实例是否初始化,其中 Acore 默认启动 kernel 时完成初始化。
- 若用户需要自行分配数据段和地址段,则需要修改 Acore 设备树文件、Uboot 设备树文件以及 MCU 配置文件。
- 在同一个 channel 中,发送(push)和接收(pop)使用独立的 ring buffer 和中断机制,因此收发操作是相互独立、互不影响的。
设备树 ipcfhal_cfg 节点默认配置了一些实例的属性:
- 属性中第一列表示实例编号,必须唯一且在有效范围
- 属性的第二列表示该实例分配的通道数量,用户可以自行配置,最大值为32个
- 属性的第三列表示每个通道的缓冲 buf 的个数,用户可以自行配置,最大值为1024个,但受控制空间大小的限制。属性第四列表示缓冲 buf 的大小,单位是 Bytes,用户可以自行配置,通道个数*缓冲 buf 个数*buf 大小需要小于等于0.5MB(目前每个实例预分配了1MB 的数据空间,暂不扩增)。
单个实例的设备树节点如下:
#Not used, User can apply for it
ipc_instance3: ipc_instance3 {
        status = "okay"; #节点状态,不需要改动
        compatible = "hobot,hobot-ipc"; #节点属性,不可改动
        mbox-names = "mbox-chan"; #mailbox名字属性,不可改动
        mboxes = <&mailbox0 3 19 3>; #mailbox通信方向
        instance = <3>; #实例id,不需要改动
        data_local_addr = /bits/ 64 <IPC_INS3_DATA_LOCAL>; #Acore数据段
        data_remote_addr = /bits/ 64 <IPC_INS3_DATA_REMOTE>; #MCU数据段
        data_size = <IPC_SINGLE_DATA_SIZE>; #数据段大小,不可改动,单位Bytes
        ctrl_local_addr = /bits/ 64 <IPC_INS3_CTRL_LOCAL>; #Acore控制段
        ctrl_remote_addr = /bits/ 64 <IPC_INS3_CTRL_REMOTE>; #MCU控制段
        ctrl_size = <IPC_SINGLE_CTRL_SIZE>; #数据段大小,不可改动,单位Bytes
};
设备树配置注意事项:
- 实例0~15数据段默认预分配了1MB 空间,Acore 侧使用0.5MB,MCU 侧使用0.5MB,所以通道个数*缓冲 buf 个数*buf 大小需要小于等于0.5MB。
- 实例0~15控制段默认预分配了8KB 空间,Acore 侧使用4KB,MCU 侧使用4KB,存放环形 buf 的控制信息和状态信息,所以(缓冲 buf 个数+2)*16*通道个数+8需要小于等于4KB。
- 每个实例的通道数量需要小于等于32,缓冲 buf 个数需要小于等于1024,同时需要满足前两点的不等式。
- 多个业务使用同一个实例的不同通道或者使用不同实例对传输影响不大,主要是参考 buf_size/buf_num 是否合适以及业务的开发和维护是否方便。
- 底层 Mailbox 中断分配不支持修改。
- Acore 与 MCU 的通道个数、缓冲 buf 个数和大小需要保持一致,数据段和控制段的 local 和 remote 需要相反。
- 实例的控制段首地址存储实例是否初始化的状态,可用于判断实例是否初始化,其中 Acore 默认启动 kernel 时完成初始化。
- 若用户需要自行分配数据段和地址段,则需要修改 Acore 设备树文件、Uboot 设备树文件以及 MCU 配置文件。
用户态 IPC 应用和配置文件的使用方法
IPC Sample 实现 Acore 与 MCU 之间的 IPC 收发通信,展示 IPC 多实例多通道多线程的使用示例。
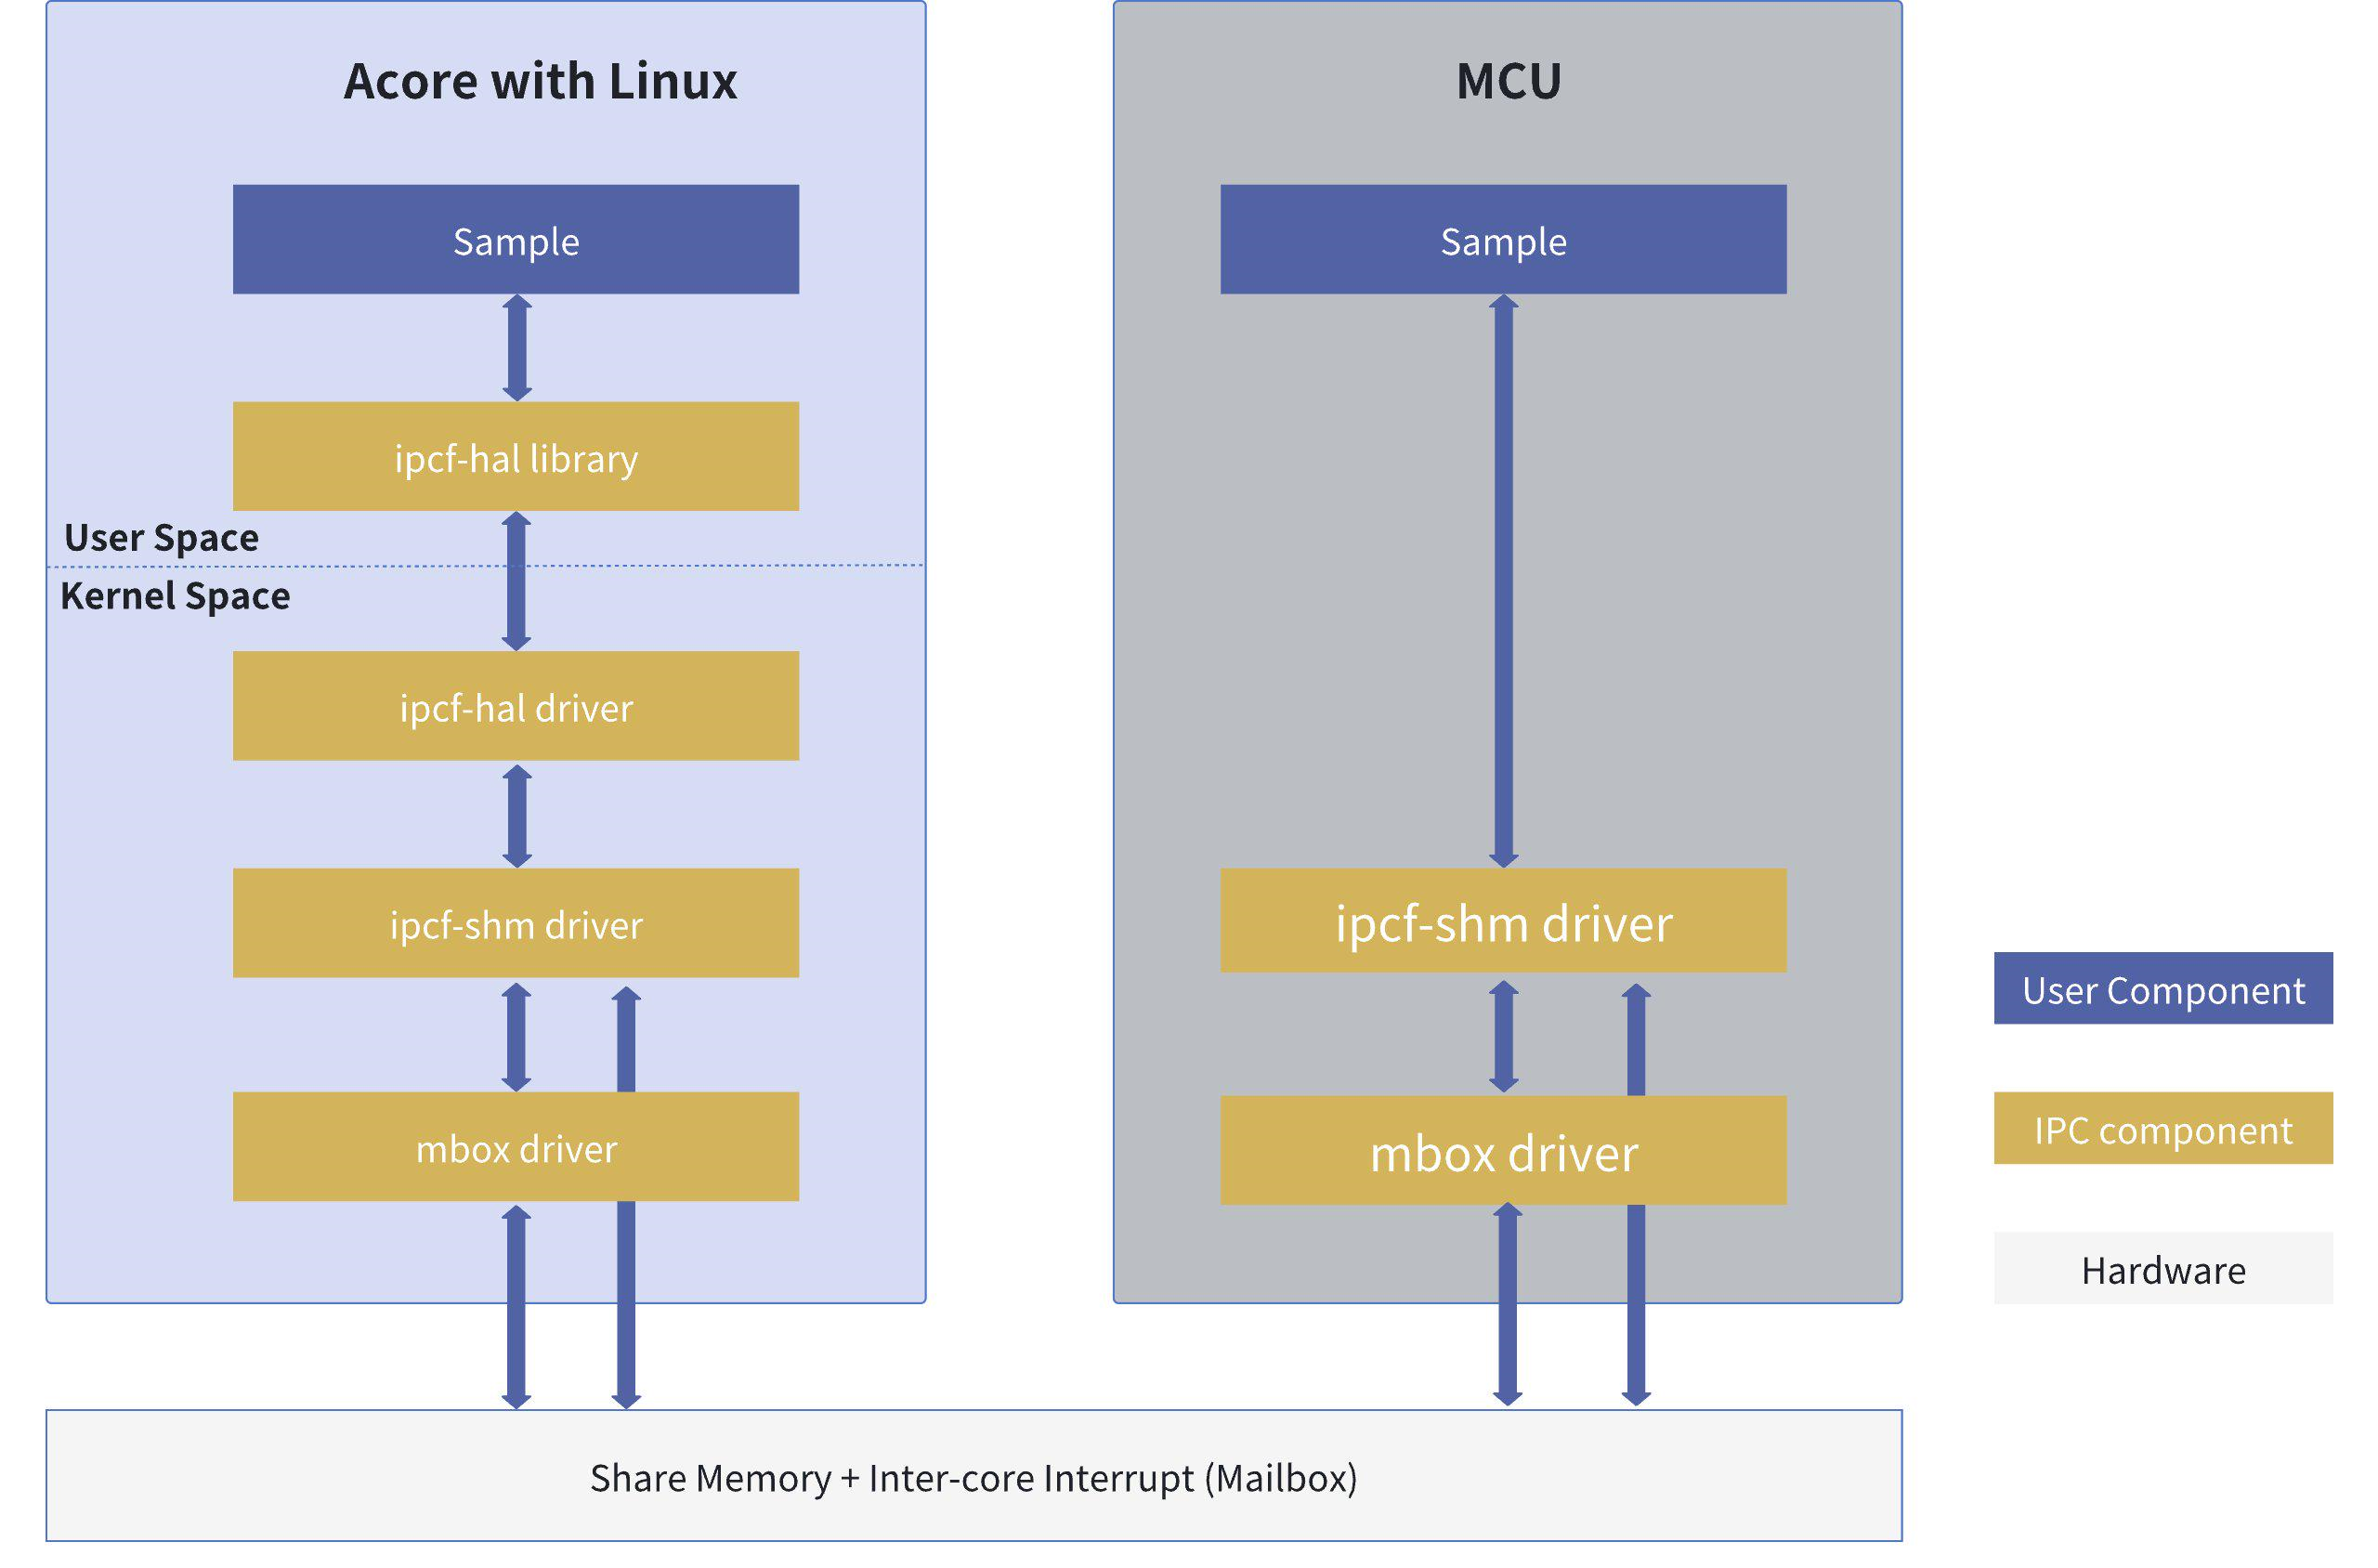
Sample 软件架构图中 Acore 使用 libipcfhal 的接口进行数据收发,底层基于 ipcf 的驱动,MCU 直接使用 ipcf 的接口进行收发。其中由于 Acore 侧有多套 IPC 接口,便于区分,分别描述为 IPCFHAL、RPMSG、IPCF,MCU 侧只有一套 IPC 接口,因此 IPCF 在 MCU 侧文档统一描述为 IPC。
硬件数据流说明
Sample 的共享内存数据流和中断信号流
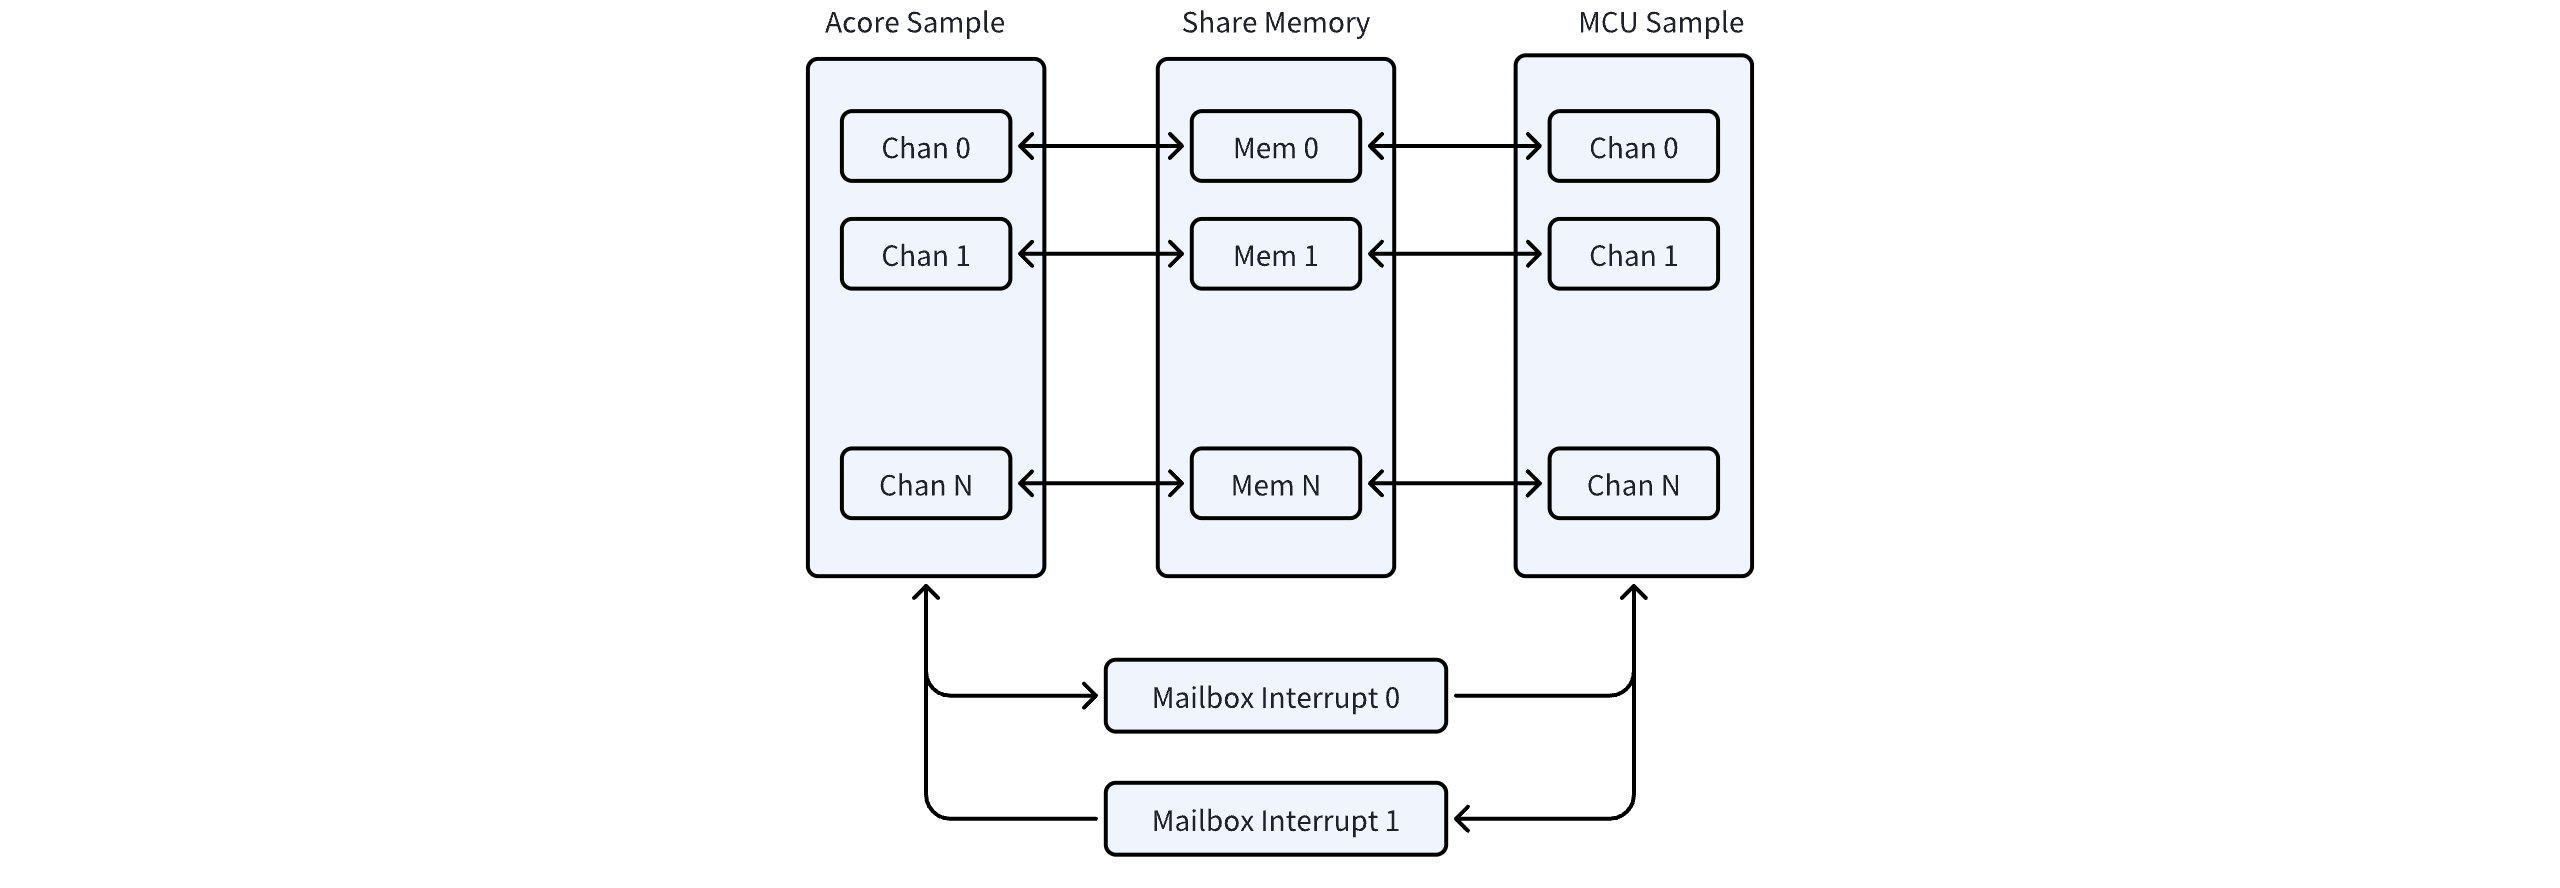
Sample 中 Acore 与 MCU 通过共享内存传输数据,通过 mailbox 中断通知双方。
Acore 侧 Sample 代码位置与目录结构
代码路径:
# Sample源码路径
${SDK}/source/hobot-io-samples/debian/app/ipcbox_sample  # ipc C++  Sample
${SDK}/source/hobot-io-samples/debian/app/pyhbipchal_sample # ipc python Sample
${SDK}/source/hobot-io/debian/app/pyhbipchal # ipc C++库为转换pyhton库源码


# 源码随固件一同打包,可在S100自行编译, 路径如下
${S100}/app/ipcbox_sample
${S100}/app/pyhbipchal_sample
目录结构:
root@ubuntu:/app/ipcbox_sample# tree .
.
├── ipcbox_runcmd # 运行mcu侧cmd命令Sample
│   ├── Makefile # Sample编译框架
│   ├── ipcbox_runcmd.cpp # Sample代码
│   └── ipcfhal_sample_config.json # Sample配置文件
└── ipcbox_uart # ipc透传uart Sample
    ├── Makefile # Sample编译框架
    ├── ipcbox_uart.cpp # Sample代码
    └── ipcfhal_sample_config.json # Sample配置文件
IPC 实时性能优化设置
如果特定场景下需要提高 IPC 通信的实时性能,可以按照如下几步进行设置,以 ipc_instance5为例进行说明。
- 首先查找 ipc_instance5对应的中断号和中断线程 pid
#中断号查找:
root@ubuntu:~# cat /proc/interrupts | grep "mailbox"
 14:          0          0          0          0          0          0     GICv3 293 Level     29f00000.mailbox0
 15:          0          0          0          0          0          0     GICv3 294 Level     29f00000.mailbox0
 16:          0          0          0          0          0          0     GICv3 295 Level     29f00000.mailbox0
 17:          0          0          0          0          0          0     GICv3 296 Level     29f00000.mailbox0
 18:          0          0          0          0          0          0     GICv3 297 Level     29f00000.mailbox0
 19:          0          0          0          0          0          0     GICv3 298 Level     29f00000.mailbox0
 20:          0          0          0          0          0          0     GICv3 299 Level     29f00000.mailbox0
 21:          0          0          0          0          0          0     GICv3 300 Level     29f00000.mailbox0
 22:          0          0          0          0          0          0     GICv3 301 Level     29f00000.mailbox0
 23:          0          0          0          0          0          0     GICv3 302 Level     29f00000.mailbox0
 24:          0          0          0          0          0          0     GICv3 303 Level     29f00000.mailbox0
 25:          1          0          1          0          1          1     GICv3 304 Level     29f00000.mailbox0
 26:          0          0          0          0          0          0     GICv3 305 Level     29f00000.mailbox0
 27:          0          0          0          0          0          0     GICv3 306 Level     29f00000.mailbox0
 28:          0          0          0          0          0          0     GICv3 307 Level     29f00000.mailbox0
 29:          0          0          0          0          0          0     GICv3 280 Level     29f01000.mailbox1
 30:          0          0          0          0          0          0     GICv3 281 Level     29f01000.mailbox1
 31:          0          0          0          0          0          0     GICv3 282 Level     29f01000.mailbox1
 32:          0          0          0          0          0          0     GICv3 283 Level     29f01000.mailbox1
 33:          0          0          0          0          0          0     GICv3 284 Level     29f01000.mailbox1
 34:          0          0          0          0          0          0     GICv3 285 Level     29f01000.mailbox1
 35:          0          0          0          0          0          0     GICv3 286 Level     29f01000.mailbox1
 36:          0          0          0          0          0          0     GICv3 287 Level     29f01000.mailbox1
 37:          0          0          0          0          0          0     GICv3 288 Level     29f01000.mailbox1
 38:          0          0          0          0          0          0     GICv3 289 Level     29f01000.mailbox1
 39:          0          0          0          0          0          0     GICv3 290 Level     29f01000.mailbox1
 40:          0          0          0          0          0          0     GICv3 291 Level     29f01000.mailbox1
 41:          0          0          0          0          0          0     GICv3 292 Level     29f01000.mailbox1
 42:          0          0          0          0          0          0     GICv3  50 Level     28109000.mailbox2
 43:          0          0          0          0          0          0     GICv3  52 Level     2810d000.mailbox3
 44:          0          0          0          0          0          0     GICv3  54 Level     28105000.mailbox4
#中断线程PID查找
root@ubuntu:~# ps aux | grep "mailbox"
root          70  0.0  0.0      0     0 ?        S    22:17   0:00 [irq/14-29f00000.mailbox0]
root          71  0.0  0.0      0     0 ?        S    22:17   0:00 [irq/15-29f00000.mailbox0]
root          72  0.0  0.0      0     0 ?        S    22:17   0:00 [irq/16-29f00000.mailbox0]
root          73  0.0  0.0      0     0 ?        S    22:17   0:00 [irq/17-29f00000.mailbox0]
root          74  0.0  0.0      0     0 ?        S    22:17   0:00 [irq/18-29f00000.mailbox0]
root          75  0.0  0.0      0     0 ?        S    22:17   0:00 [irq/19-29f00000.mailbox0]
root          76  0.0  0.0      0     0 ?        S    22:17   0:00 [irq/20-29f00000.mailbox0]
root          77  0.0  0.0      0     0 ?        S    22:17   0:00 [irq/21-29f00000.mailbox0]
root          78  0.0  0.0      0     0 ?        S    22:17   0:00 [irq/22-29f00000.mailbox0]
root          79  0.0  0.0      0     0 ?        S    22:17   0:00 [irq/23-29f00000.mailbox0]
root          80  0.0  0.0      0     0 ?        S    22:17   0:00 [irq/24-29f00000.mailbox0]
root          81  0.0  0.0      0     0 ?        S    22:17   0:00 [irq/25-29f00000.mailbox0]
root          82  0.0  0.0      0     0 ?        S    22:17   0:00 [irq/26-29f00000.mailbox0]
root          83  0.0  0.0      0     0 ?        S    22:17   0:00 [irq/27-29f00000.mailbox0]
root          84  0.0  0.0      0     0 ?        S    22:17   0:00 [irq/28-29f00000.mailbox0]
root          85  0.0  0.0      0     0 ?        S    22:17   0:00 [irq/29-29f01000.mailbox1]
root          86  0.0  0.0      0     0 ?        S    22:17   0:00 [irq/30-29f01000.mailbox1]
root          87  0.0  0.0      0     0 ?        S    22:17   0:00 [irq/31-29f01000.mailbox1]
root          88  0.0  0.0      0     0 ?        S    22:17   0:00 [irq/32-29f01000.mailbox1]
root          89  0.0  0.0      0     0 ?        S    22:17   0:00 [irq/33-29f01000.mailbox1]
root          90  0.0  0.0      0     0 ?        S    22:17   0:00 [irq/34-29f01000.mailbox1]
root          91  0.0  0.0      0     0 ?        S    22:17   0:00 [irq/35-29f01000.mailbox1]
root          92  0.0  0.0      0     0 ?        S    22:17   0:00 [irq/36-29f01000.mailbox1]
root          93  0.0  0.0      0     0 ?        S    22:17   0:00 [irq/37-29f01000.mailbox1]
root          94  0.0  0.0      0     0 ?        S    22:17   0:00 [irq/38-29f01000.mailbox1]
root          95  0.0  0.0      0     0 ?        S    22:17   0:00 [irq/39-29f01000.mailbox1]
root          96  0.0  0.0      0     0 ?        S    22:17   0:00 [irq/40-29f01000.mailbox1]
root          97  0.0  0.0      0     0 ?        S    22:17   0:00 [irq/41-29f01000.mailbox1]
root          98  0.0  0.0      0     0 ?        S    22:17   0:00 [irq/42-28109000.mailbox2]
root          99  0.0  0.0      0     0 ?        S    22:17   0:00 [irq/43-2810d000.mailbox3]
root         100  0.0  0.0      0     0 ?        S    22:17   0:00 [irq/44-28105000.mailbox4]
#依据设备树ipc_instance5对应的mailbox为 mboxes = <&mailbox0 5 21 5>;所以中断号为19,中断线程pid为75.
- 中断绑核,降低迁移带来的消耗
#将IRQ 19绑定到 CPU2:
root@ubuntu:/# echo 4 > /proc/irq/19/smp_affinity
- 中断线程绑核,降低迁移带来的消耗
#将PID 75绑定到 CPU2:
root@ubuntu:/# taskset -p 0x04 75
pid 75's current affinity mask: 3f
pid 75's new affinity mask: 4
- 设置中断线程优先级,防止被高优任务打断
#将PID 75的优先级提高到99
root@ubuntu:/# chrt -f -p 99 75
root@ubuntu:/# chrt -p 75
pid 75's current scheduling policy: SCHED_FIFO
pid 75's current scheduling priority: 99
- 中断 CPU 设置隔离,确保对应 CPU 专门用于实时任务
#将CPU2进行隔离,需要进入uboot模式下设置
Hobot$ printenv bootargs
bootargs=earlycon=uart8250,mmio32,0x394B0000 no_console_suspend root=/dev/ram0 rdinit=/init  rootwait net.ifnames=0
Hobot$ setenv bootargs "${bootargs} isolcpus=2 nohz_full=2 rcu_nocbs=2"
Hobot$ saveenv
Saving Environment to MMC... Writing to MMC(0)... OK
Hobot$ reset
#系统启动之后查看是否生效
root@ubuntu:/# cat /sys/devices/system/cpu/isolated
2
- 设置 RT 内核调度器状态,防止 RT 任务被强行 yield
root@ubuntu:/# echo -1 > /proc/sys/kernel/sched_rt_runtime_us
该设置会允许所有 RT 任务无限制地占用 CPU,从而提升系统的实时性能,但也可能导致普通任务无法获得调度机会而被饿死。因此,在使用 -1 时需谨慎。有关 RT 线程调度的调试,请参考内核官方文档
API 流程说明
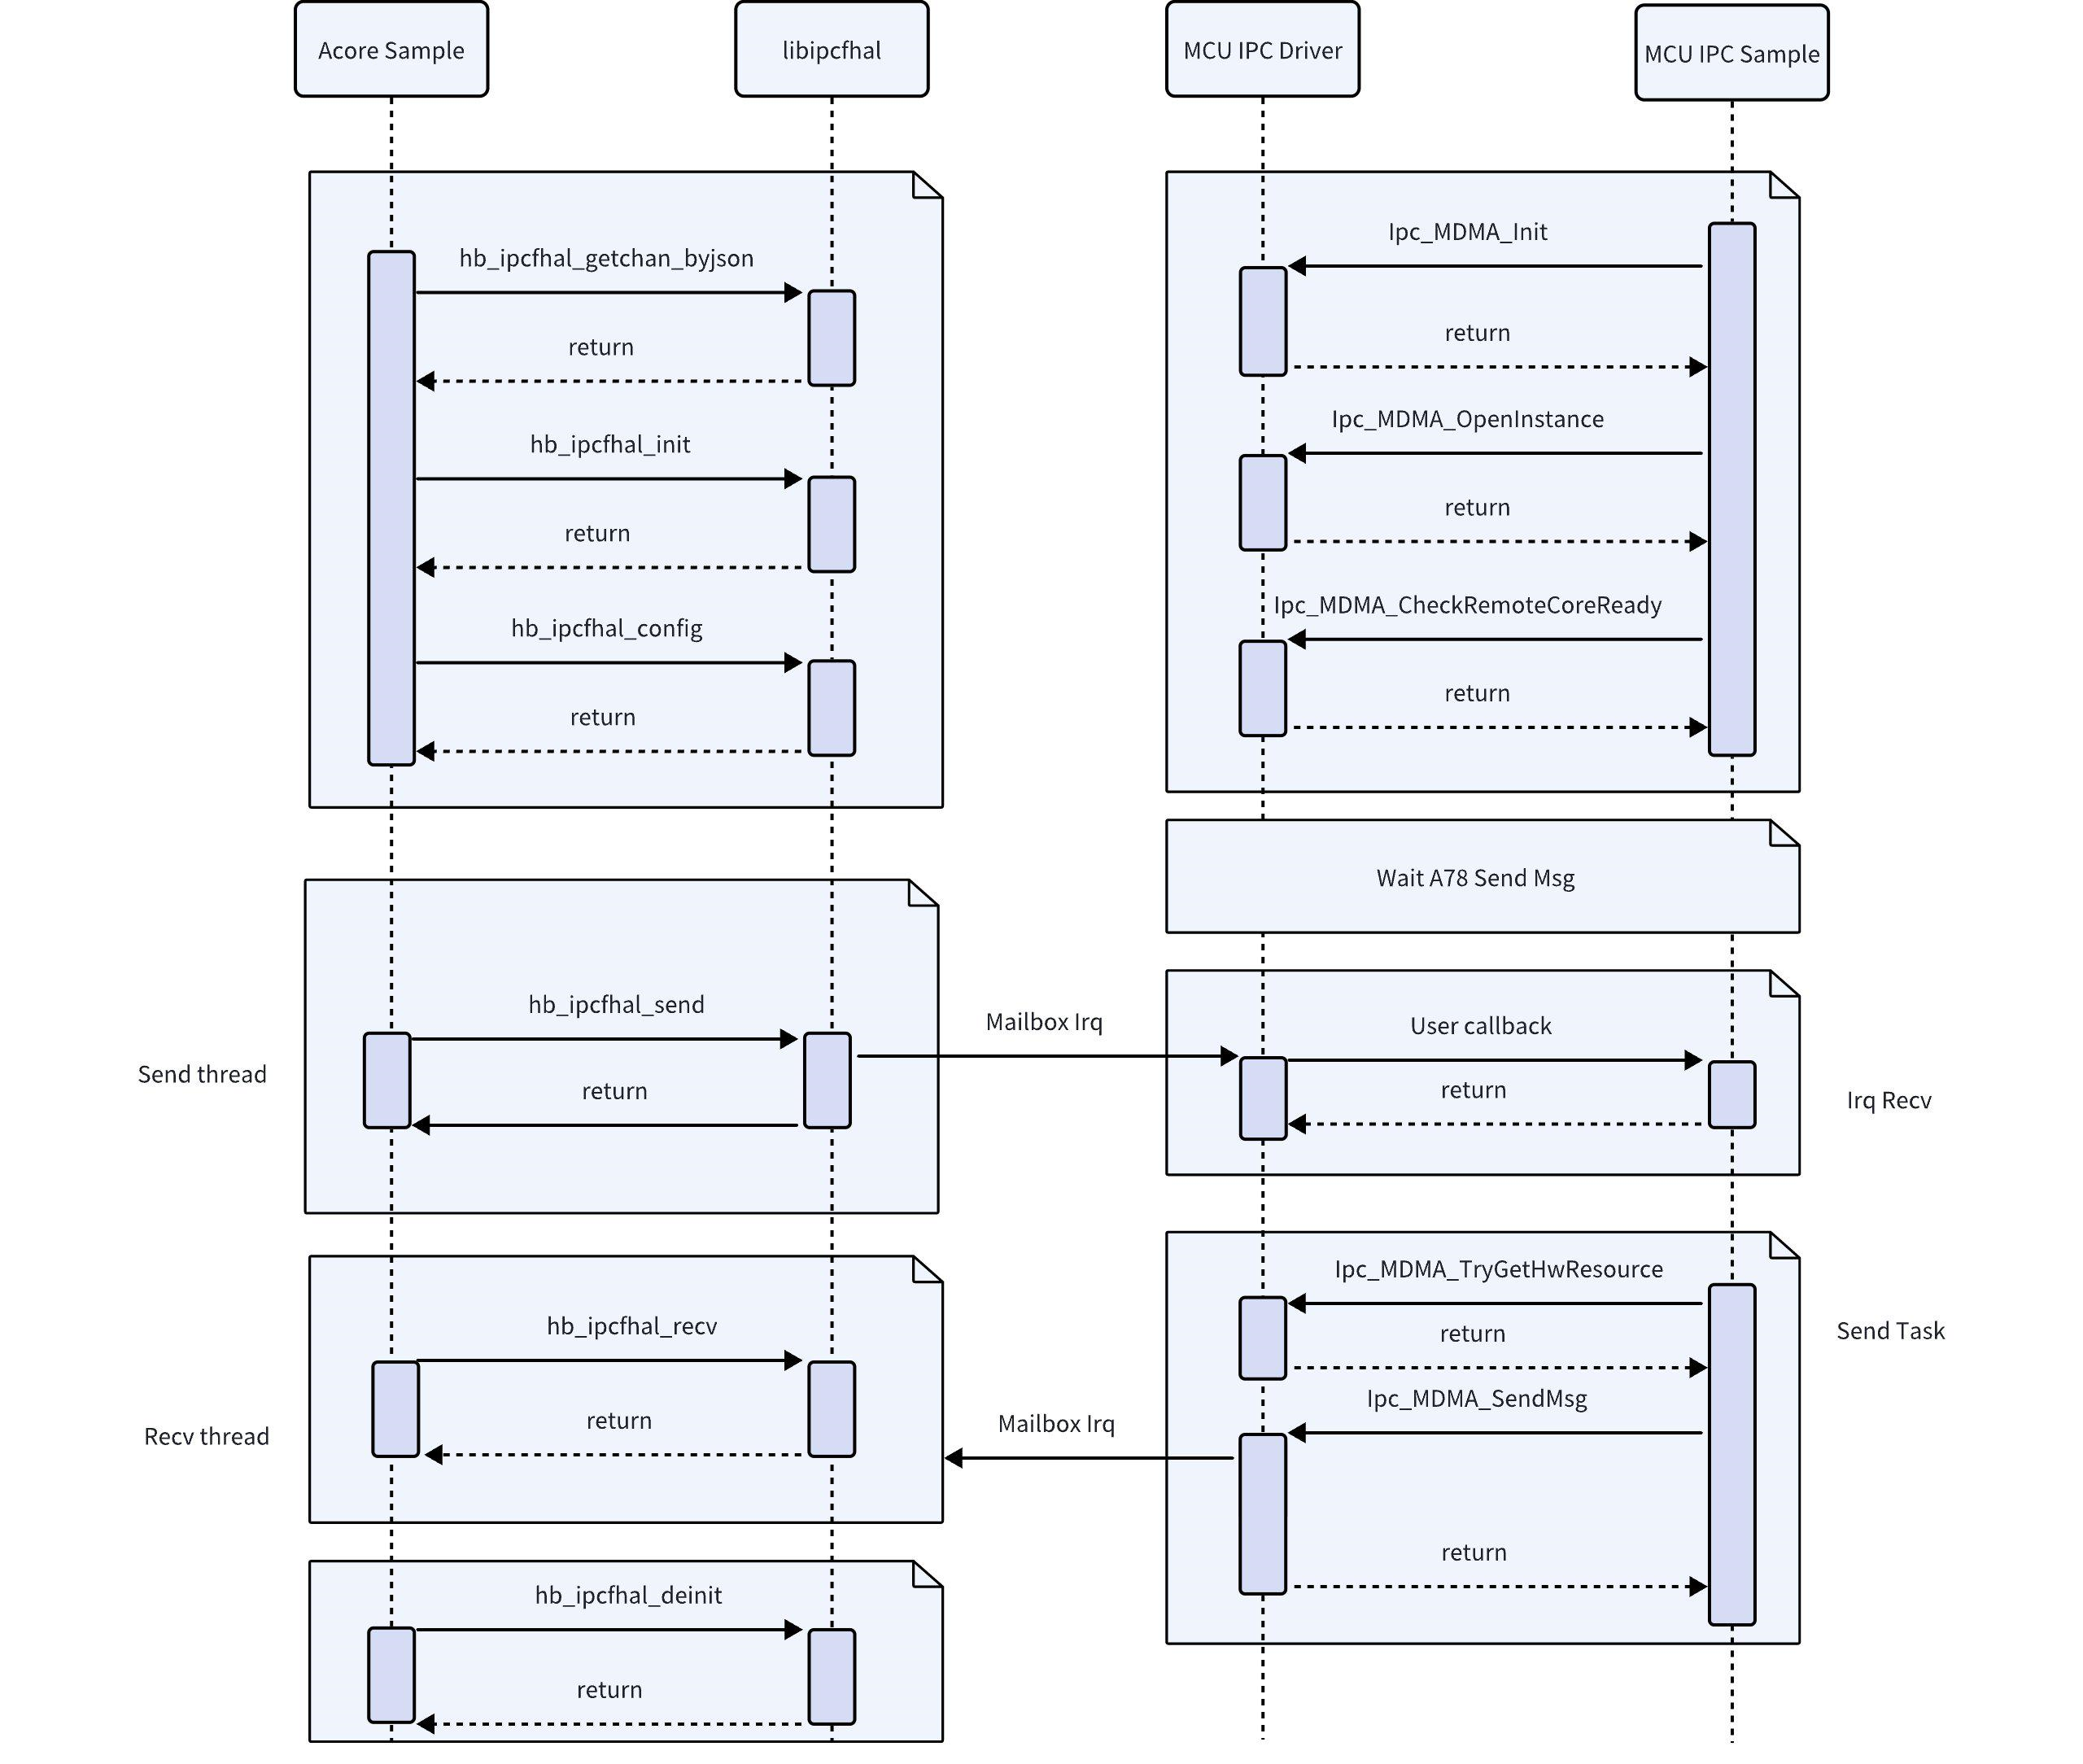
Acore 与 MCU(IRQ 方式)之间 API Sample 运行流程图
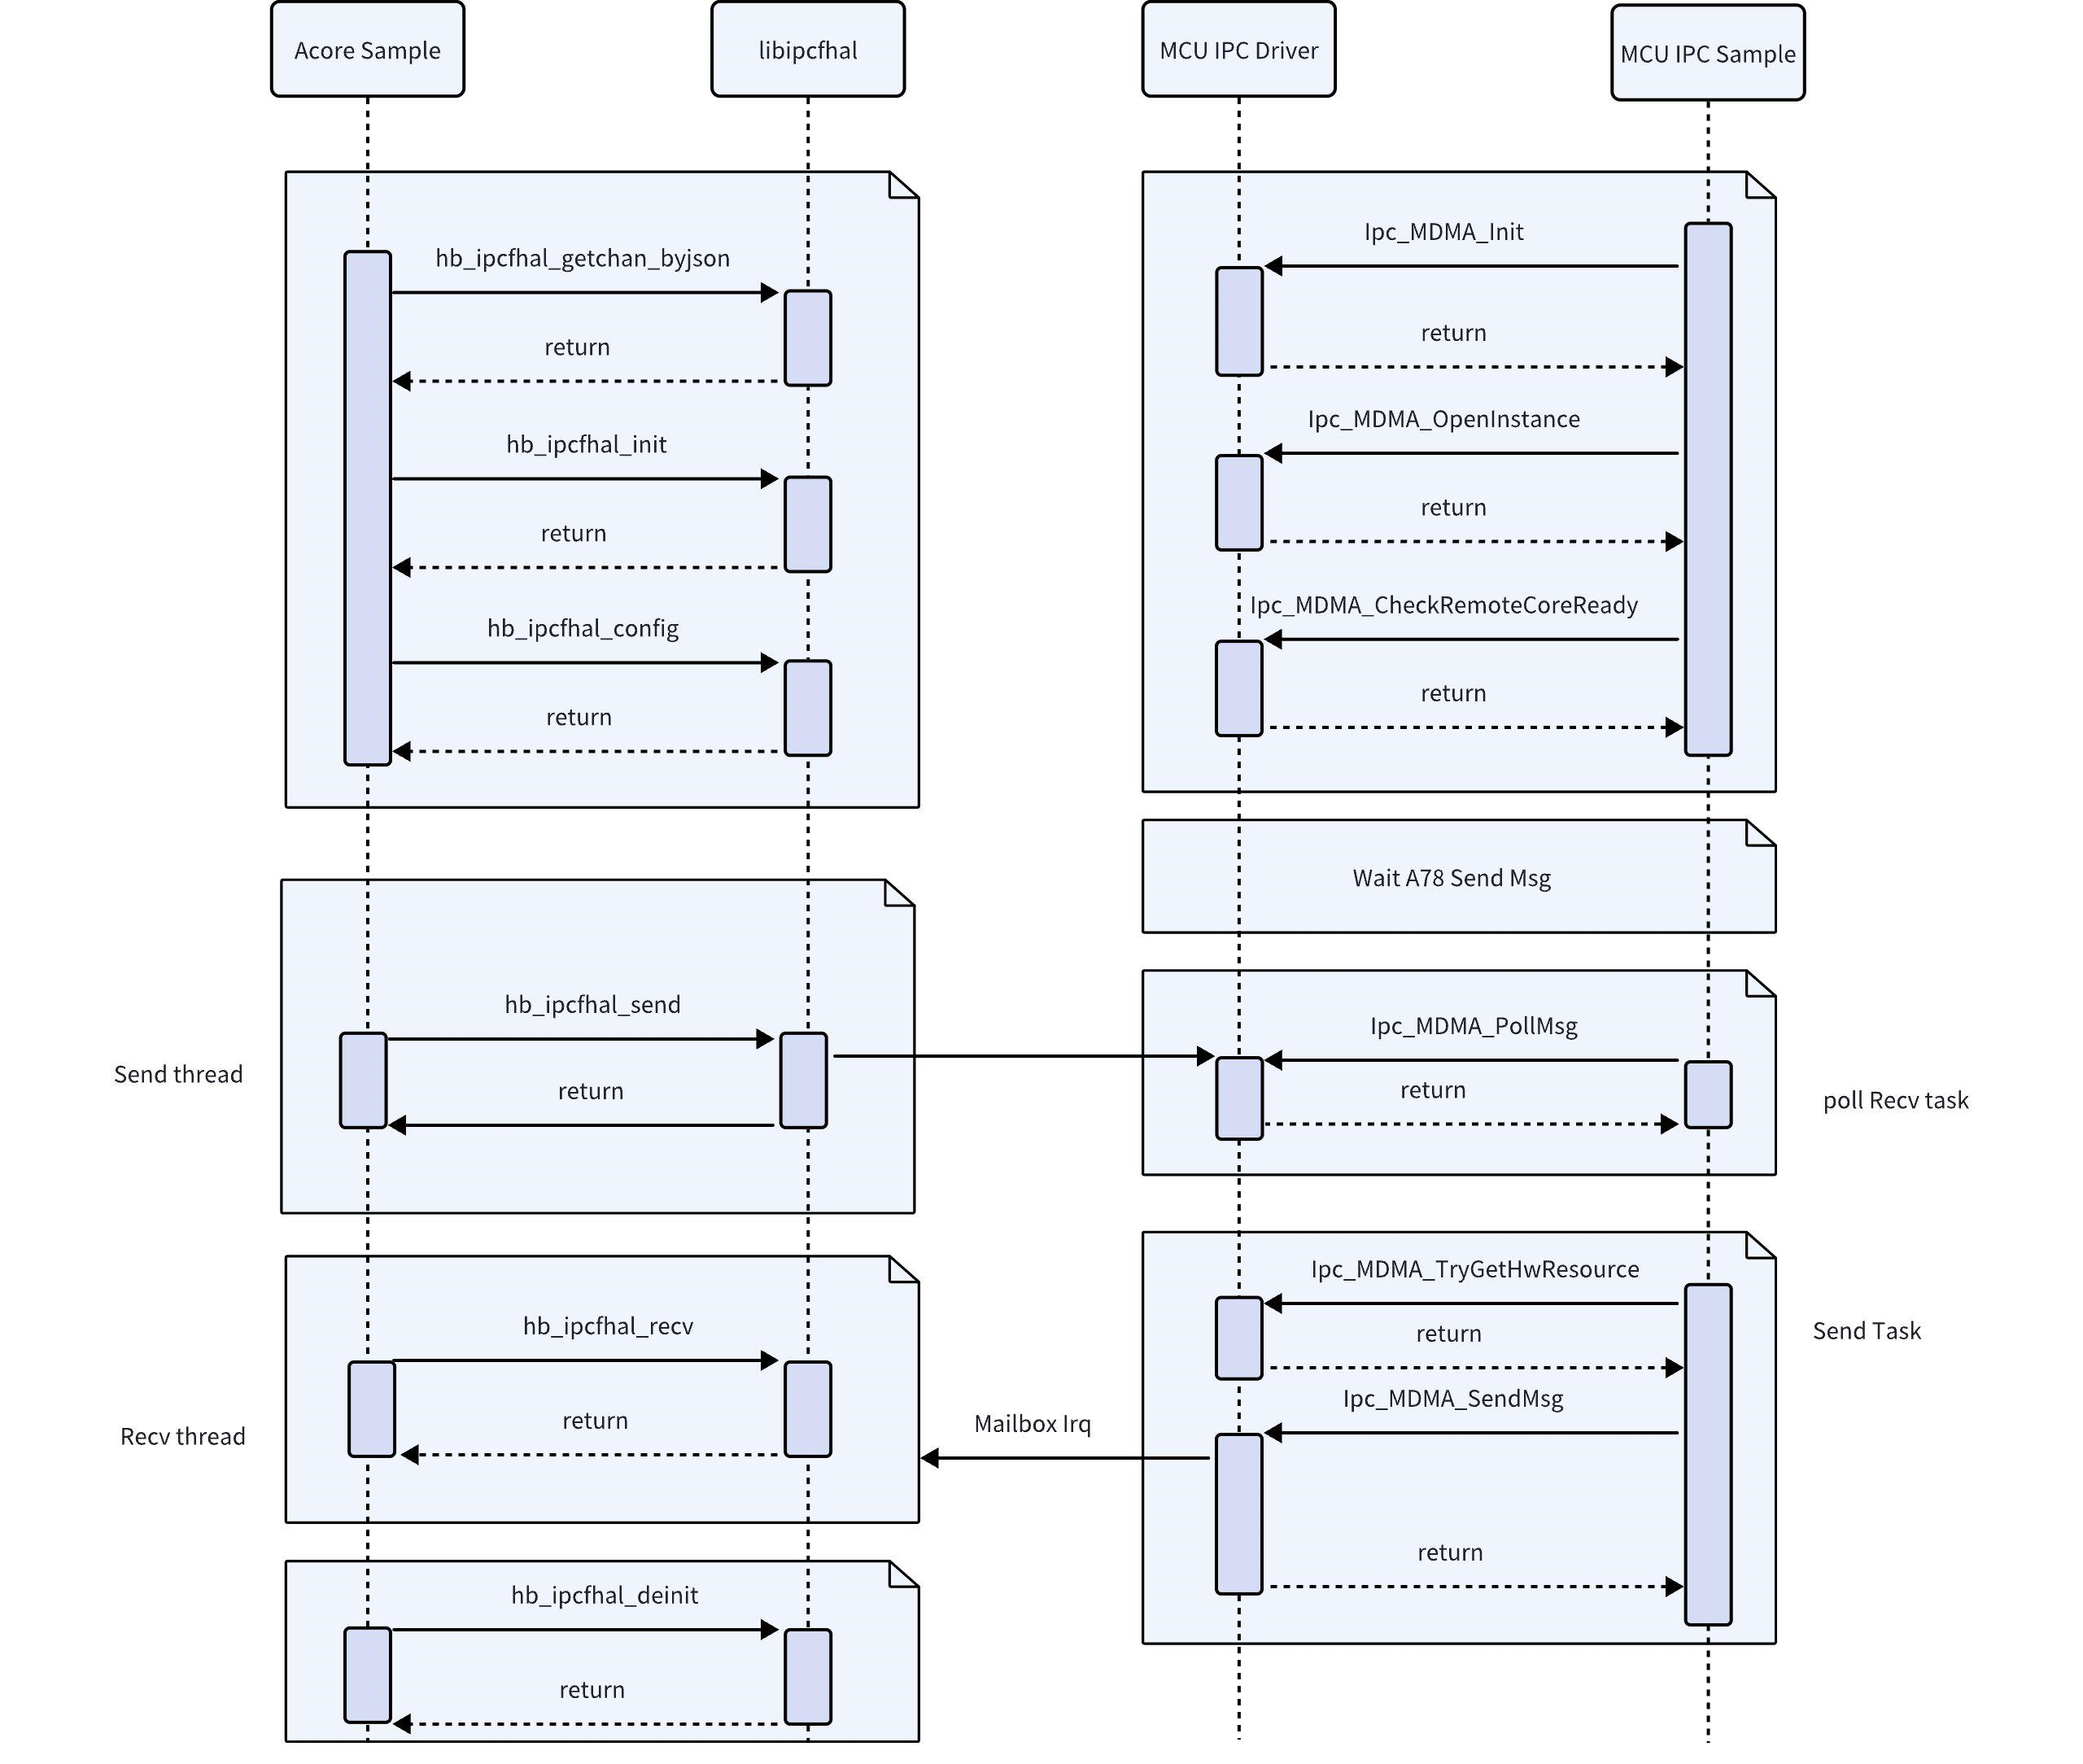
Acore 与 MCU(POLL 方式)之间 API Sample 运行流程图
通路配置
可以增加 Json 文件中的通道数量 config_num,并增加通道信息,本 Sample 未支持增加通道的功能,若需要增加通道,需要修改 Acore 和 MCU 两侧配置文件。
{
        "log_level": 0, # 日志等级,可省略
        "config_num": 4, # 配置通道数量
        "config_num_max":256, #配置通道数量最大值
        "config_0": { # 配置通道
                "name": "cpu2mcu_ins7ch0", # 通道名字
                "instance": 7, # 实例id
                "channel": 0, # 通道id
                "pkg_size_max": 4096, # 发送包最大字节,推荐小于等于4096Bytes
                "fifo_size": 64000, # 缓冲fifo的大小,取决于需要缓冲的个数
                "fifo_type": 0, # 缓冲fifo的类型,仅支持0
                "ipcf_dev_path":"/dev/ipcdrv", # 字符设备驱动,仅支持/dev/ipcdrv
                "ipcf_dev_name":"ipcdrv" # 字符设备驱动名字,仅支持ipcdrv
        },
        "config_1": {
                "name": "cpu2mcu_ins7ch1",
                "instance": 7,
                "channel": 1,
                "pkg_size_max": 4096,
                "fifo_size": 64000,
                "fifo_type": 0,
                "ipcf_dev_path":"/dev/ipcdrv",
                "ipcf_dev_name":"ipcdrv"
        },
        "config_2": {
                "name": "cpu2mcu_ins8ch0",
                "instance": 8,
                "channel": 0,
                "pkg_size_max": 4096,
                "fifo_size": 64000,
                "fifo_type": 0,
                "ipcf_dev_path":"/dev/ipcdrv",
                "ipcf_dev_name":"ipcdrv"
        },
        "config_3": {
                "name": "cpu2mcu_ins8ch1",
                "instance": 8,
                "channel": 1,
                "pkg_size_max": 4096,
                "fifo_size": 64000,
                "fifo_type": 0,
                "ipcf_dev_path":"/dev/ipcdrv",
                "ipcf_dev_name":"ipcdrv"
        }
}
实例说明
错误码定义
| 错误码宏定义 | 错误码值 | 中文说明 |
|---|---|---|
IPCF_HAL_E_OK | 0 | 操作成功 |
IPCF_HAL_E_NOK | 1 | 操作失败 |
IPCF_HAL_E_CONFIG_FAIL | 2 | 配置失败 |
IPCF_HAL_E_WRONG_CONFIGURATION | 3 | 配置错误 |
IPCF_HAL_E_NULL_POINTER | 4 | 传入了空指针参数 |
IPCF_HAL_E_PARAM_INVALID | 5 | 参数无效 |
IPCF_HAL_E_LENGTH_TOO_SMALL | 6 | 长度过小 |
IPCF_HAL_E_INIT_FAILED | 7 | 初始化失败 |
IPCF_HAL_E_UNINIT | 8 | 在未初始化前调用 |
IPCF_HAL_E_BUFFER_OVERFLOW | 9 | 源地址或目标地址缓冲区溢出 |
IPCF_HAL_E_ALLOC_FAIL | 10 | 资源分配失败 |
IPCF_HAL_E_TIMEOUT | 11 | 操作超时 |
IPCF_HAL_E_REINIT | 12 | 重复初始化 |
IPCF_HAL_E_BUSY | 13 | 系统繁忙 |
IPCF_HAL_E_CHANNEL_INVALID | 14 | 数据写入通道状态异常:内核态 RingBuffer 已达容量上限,导致数据写入操作失败,建议等待1~2ms 后重试操作; 数据读取通道状态异常:内核态 RingBuffer 已空,导致数据读取操作失败,建议等待1~2ms 后重试操作 |
C++ 应用
Acore 侧实现了多个应用,用于操作 MCU 端的外设,这些应用位于/app/ipcbox_sample目录下:
root@ubuntu:/app/ipcbox_sample# tree -L 1
.
├── common  # 公共文件,实现了对数据的封包和解包,数据校验等功能
├── ipcbox_i2c # 操作MCU侧I2C外设 Sample
├── ipcbox_runcmd # 运行mcu侧cmd命令 Sample
├── ipcbox_spi # 操作MCU侧SPI外设 Sample
└── ipcbox_uart # 操作MCU侧UART外设 Sample
- 应用实际操作的是 MCU 侧外设,在使用前要确认 MCU1是否启动,MCU1的启动可以参考MCU1 启动
- 操作这些外设时,需要确认 MCU 侧是否将这些外设配置用于透传,可以参考MCU侧IPCBOX配置
RunCmd 应用
此 sample 实现了对读取了 ADC chanel 的电压。
- 开机进入 S100后,打开应用目录
/app/ipcbox_sample/ipcbox_runcmd
- 开机进入 S600后,打开应用目录
/app/ipcbox_sample/ipcbox_runcmd
- 编译:
make - 运行:
./ipcbox_runcmd - 出现
Extracted adc data:{"adc_ch":1,"adc_result":628,"adc_mv":276}的打印则测试通过,其中表示 adc 对应 pin 口,adc_mv 表示读出来的电压值root@ubuntu:/app/ipcbox_sample/ipcbox_runcmd# ./ipcbox_runcmd
[INFO][hb_ipcf_hal.cpp:282] [channel] cpu2mcu_ins7ch0 [ins] 7 [id] 0 init success.
[INFO][hb_ipcf_hal.cpp:333] [channel] cpu2mcu_ins7ch0 [ins] 7 [id] 0 config success.
Extracted adc data:{"adc_ch":1,"adc_result":628,"adc_mv":276}
[INFO][hb_ipcf_hal.cpp:553] [channel] cpu2mcu_ins7ch0 [ins] 7 [id] 0 deinit success.
Uart 透传
测试前提
在测试前,需要将用到的Uart的 TX 和 RX 短接。其中 S100和 S600默认使用的 Uart 如下:
| 平台 | Uart id |
|---|---|
| S100 | Uart5 |
| S600 | Uart11 |
所使用的 Uart 可以对 mcu 侧的mcu/Config/McalCdd/gen_xxx/Uart/inc/Uart_Board.h文件进行修改,例如 S600,将UART_IPCBOX_HW_CHANNEL定义为对应的 Uart 硬件
#define UART_IPCBOX_HW_CHANNEL (UART11_HW_CHANNEL)
同时需要检查 MCU 侧mcu/Service/HouseKeeping/ipc_box/src/ipc_box.c中的IpcBox_InstanceMap配置,确保uart对应项使能。默认如下配置中uart为DISABLE,需要改为ENABLE:
{ IPCBOX_COM_ID_UART, "uart", IpcConf_IpcInstance_IpcInstance_7,
#if ((SOC_TYPE_S100 == SOC_TYPE) || (SOC_TYPE_S100P == SOC_TYPE))
  IpcConf_IpcInstance_7_IpcChannel_1, ENABLE, UART5_CHANNEL,
#else
  IpcConf_IpcInstance_7_IpcChannel_1, ENABLE, UART_IPCBOX_HW_CHANNEL,
#endif
  IpcBox_UartInit, IpcBox_UartDeinit },
测试 sample 实现了对Uart的透传,操作步骤如下:
- 开机进入 S100后,打开应用目录
cd /app/ipcbox_sample/ipcbox_uart
- 开机进入 S600后,打开应用目录
cd /app/ipcbox_sample/ipcbox_uart
- 编译:
make - 运行:
./ipcbox_uart - 出现
tx_data and rx_data are identical.的打印则测试通过, 参考 log 如下:root@ubuntu:/app/ipcbox_sample/ipcbox_uart# ./ipcbox_uart
[INFO][hb_ipcf_hal.cpp:282] [channel] cpu2mcu_ins7ch1 [ins] 7 [id] 1 init success.
[INFO][hb_ipcf_hal.cpp:333] [channel] cpu2mcu_ins7ch1 [ins] 7 [id] 1 config success.
tx_data(32)
31 32 33 34 35 36 37 38 39 61 62 63 64 65 66 67
68 69 6A 6B 00 00 00 00 00 00 00 00 00 00 00 00
rx_packet(32)
31 32 33 34 35 36 37 38 39 61 62 63 64 65 66 67
68 69 6A 6B 00 00 00 00 00 00 00 00 00 00 00 00
[SUCCESS]: tx_data and rx_packet are identical.
[INFO][hb_ipcf_hal.cpp:553] [channel] cpu2mcu_ins7ch1 [ins] 7 [id] 1 deinit success.
SPI 读写测试
测试前提
在测试前,需要将用到的SPI的 MOSI 和 MISO 短接。其中 S100和 S600默认使用的 SPI 如下:
| 平台 | SPI id |
|---|---|
| S100 | SPI3 |
| S600 | SPI6 |
所使用的 SPI 可以对 mcu 侧的mcu/Config/McalCdd/gen_xxxx/Spi/inc/Spi_Board.h文件进行修改,例如 S600,将SPI_IPCBOXUSEBUS定义为对应的 SPI 硬件
#define SPI_IPCBOXUSEBUS (SPI_BUS6)
同时需要检查 MCU 侧mcu/Service/HouseKeeping/ipc_box/src/ipc_box.c中的IpcBox_InstanceMap配置,确保spi对应项使能。默认如下配置中spi为DISABLE,需要改为ENABLE:
{ IPCBOX_COM_ID_SPI, "spi", IpcConf_IpcInstance_IpcInstance_7,
  IpcConf_IpcInstance_7_IpcChannel_2, ENABLE, IPCBOX_PERIID_INVALID,
  IpcBox_SpiInit, IpcBox_SpiDeinit },
测试 sample 实现了对 SPI 的回环测试,以 S100使用 SPI3为例,若使用 S600注意将./ipcbox_spi -b 3修改为./ipcbox_spi -b 6
- 开机进入 S100后,打开应用目录
cd /app/ipcbox_sample/ipcbox_spi
- 开机进入 S600后,打开应用目录
cd /app/ipcbox_sample/ipcbox_spi
- 编译:
make - 运行:
./ipcbox_spi - 出现
SPI write successful, 128 bytes的打印则测试通过, 参考 log 如下:root@ubuntu:/app/ipcbox_sample/ipcbox_spi# ./ipcbox_spi -b 3
[INFO][hb_ipcf_hal.cpp:282] [channel] cpu2mcu_ins7ch2 [ins] 7 [id] 2 init success.
[INFO][hb_ipcf_hal.cpp:333] [channel] cpu2mcu_ins7ch2 [ins] 7 [id] 2 config success.
SPI write successful, 128 bytes
tx_data(128)
00 01 02 03 04 05 06 07 08 09 0A 0B 0C 0D 0E 0F
10 11 12 13 14 15 16 17 18 19 1A 1B 1C 1D 1E 1F
20 21 22 23 24 25 26 27 28 29 2A 2B 2C 2D 2E 2F
30 31 32 33 34 35 36 37 38 39 3A 3B 3C 3D 3E 3F
40 41 42 43 44 45 46 47 48 49 4A 4B 4C 4D 4E 4F
50 51 52 53 54 55 56 57 58 59 5A 5B 5C 5D 5E 5F
60 61 62 63 64 65 66 67 68 69 6A 6B 6C 6D 6E 6F
70 71 72 73 74 75 76 77 78 79 7A 7B 7C 7D 7E 7F
rx_packet(128)
00 01 02 03 04 05 06 07 08 09 0A 0B 0C 0D 0E 0F
10 11 12 13 14 15 16 17 18 19 1A 1B 1C 1D 1E 1F
20 21 22 23 24 25 26 27 28 29 2A 2B 2C 2D 2E 2F
30 31 32 33 34 35 36 37 38 39 3A 3B 3C 3D 3E 3F
40 41 42 43 44 45 46 47 48 49 4A 4B 4C 4D 4E 4F
50 51 52 53 54 55 56 57 58 59 5A 5B 5C 5D 5E 5F
60 61 62 63 64 65 66 67 68 69 6A 6B 6C 6D 6E 6F
70 71 72 73 74 75 76 77 78 79 7A 7B 7C 7D 7E 7F
[INFO][hb_ipcf_hal.cpp:553] [channel] cpu2mcu_ins7ch2 [ins] 7 [id] 2 deinit success.
IpcBox 只实现了对 SPI Master 的操控,有以下限制
- 不支持 Slave 模式
- MCU 侧底层默认使用中断+异步方式,支持同步模式
- 不支持应用层控制帧长度
I2C 测试
测试 sample 实现了对 I2c 的 detect 测试,以 S100使用 I2c6为例,若使用 S600注意将./ipcbox_i2c detect 6修改为./ipcbox_i2c detect 13
同时需要检查 MCU 侧mcu/Service/HouseKeeping/ipc_box/src/ipc_box.c中的IpcBox_InstanceMap配置,确保i2c对应项使能。默认如下配置中i2c为DISABLE,需要改为ENABLE:
{ IPCBOX_COM_ID_I2C, "i2c", IpcConf_IpcInstance_IpcInstance_7,
  IpcConf_IpcInstance_7_IpcChannel_3, ENABLE, IPCBOX_PERIID_INVALID,
  IpcBox_I2cInit, IpcBox_I2cDeinit },
- 开机进入 S100后,打开应用目录
cd /app/ipcbox_sample/ipcbox_i2c
- 开机进入 S600后,打开应用目录
cd /app/ipcbox_sample/ipcbox_i2c
- 编译:
make - 运行:
./ipcbox_i2c出现如下参考命令root@ubuntu:/app/ipcbox_sample/ipcbox_i2c# ./ipcbox_i2c
Usage: ./ipcbox_i2c detect [i2c_channel]
./ipcbox_i2c get [i2c_channel] [slave_addr] [reg_addr]
./ipcbox_i2c set [i2c_channel] [slave_addr] [reg_addr] [val]
Examples:
./ipcbox_i2c detect 0
./ipcbox_i2c set 0 0x50 0x01 0xAA
./ipcbox_i2c get 0 0x50 0x01 - 输入
./ipcbox_i2c detect 6,探测I2c6的设备root@ubuntu:/app/ipcbox_sample/ipcbox_i2c# ./ipcbox_i2c detect 6
Parsed arguments: operation=detect, channel=6
[INFO][hb_ipcf_hal.cpp:282] [channel] cpu2mcu_ins7ch3 [ins] 7 [id] 3 init success.
[INFO][hb_ipcf_hal.cpp:333] [channel] cpu2mcu_ins7ch3 [ins] 7 [id] 3 config success.
0 1 2 3 4 5 6 7 8 9 a b c d e f
00: -- -- -- -- -- -- -- -- -- -- -- -- -- -- --
10: -- -- -- 13 -- -- -- -- -- -- -- -- -- -- -- --
20: -- -- -- -- -- -- -- -- -- -- -- -- -- -- -- --
30: -- -- 32 -- -- -- -- -- -- -- -- -- -- -- -- --
40: -- -- -- -- 44 45 -- 47 48 49 4a 4b 4c 4d 4e 4f
50: -- -- -- -- -- -- -- -- -- -- -- -- -- -- -- --
60: -- -- -- -- -- -- -- -- -- -- -- -- -- -- -- --
70: -- -- -- -- -- -- -- --
[INFO][hb_ipcf_hal.cpp:553] [channel] cpu2mcu_ins7ch3 [ins] 7 [id] 3 deinit success. - 读取
I2c6上,slave 地址为0x13,寄存器地址为0x2root@ubuntu:/app/ipcbox_sample/ipcbox_i2c# ./ipcbox_i2c get 6 0x13 0x2
Parsed arguments: operation=get, channel=6, slave_addr=0x13, reg_addr=0x2
[INFO][hb_ipcf_hal.cpp:282] [channel] cpu2mcu_ins7ch3 [ins] 7 [id] 3 init success.
[INFO][hb_ipcf_hal.cpp:333] [channel] cpu2mcu_ins7ch3 [ins] 7 [id] 3 config success.
Read data[0]: 0x3C
[INFO][hb_ipcf_hal.cpp:553] [channel] cpu2mcu_ins7ch3 [ins] 7 [id] 3 deinit success.
ipcbox 只实现了对 i2c Master 的简单传输,不支持 Slave
测试用例中的读写操作都是对8bit 地址的 slave 做测试,需要根据 slave 的实际情况更改 MCU 的 IpcBox_I2cGetValue/IpcBox_I2cSetValue,此函数位于 MCU 的 SDK 中的 Service/HouseKeeping/ipc_box/src/ipc_i2c.c
Python 应用
测试前提
由于 Python 应用调用了 IpcBox 中的 Uart,所以与 C++的用例类似,在测试前,需要将用到的Uart的 TX 和 RX 短接。其中 S100和 S600默认使用的 Uart 如下:
| 平台 | Uart id |
|---|---|
| S100 | Uart5 |
| S600 | Uart11 |
所使用的 Uart 可以对 mcu 侧的mcu/Config/McalCdd/gen_xxx/Uart/inc/Uart_Board.h文件进行修改,例如 S600,将UART_TEST_HW_CHANNEL定义为对应的 Uart 硬件
#define UART_IPCBOX_HW_CHANNEL (UART11_HW_CHANNEL)
- 应用实际操作的是 MCU 侧外设,在使用前要确认 MCU1是否启动,MCU1的启动可以参考MCU1 启动
- 操作这些外设时,需要确认 MCU 侧是否将这些外设配置用于透传,可以参考MCU侧IPCBOX配置
S100提供 Python 库文件使用 Ipc,其原理为通过 pybind11调用 C++接口,函数名与宏定义等两端保持一致。
S600提供 Python 库文件使用 Ipc,其原理为通过 pybind11调用 C++接口,函数名与宏定义等两端保持一致。
- 包的导入
import pyhbipchal as pyipc
import pyhbipchal_utils as ipc_utils
from ipcbox_packet import ipcbox_packet
from ipcbox_packet import ipcbox_packet
- 源码路径
├── ipcbox_packet.py // ipcbox_packet对象封装

├── ipcbox_packet.py // ipcbox_packet对象封装
├── ipcfhal_sample_config.json // 配置文件,用于初始化ipc
├── pyhbipchal_test.py // 使用pyhbipchal库编写基础python应用测试过用例
├── pyhbipchal_utils.py // pyhbipchal_utils对象源码,pyhbipchal进行二次封装,相较于pyhbipchal更符合pyhton的编程习惯
└── pyhbipchal_utils_test.py // pyhbipchal_utils测试用例
- 示例
测试 python 库的效果与 C++提供的接口是否一致
root@ubuntu:/app/pyhbipchal_sample# python pyhbipchal_test.py
Library version: 1.0.0
====================test error code==================

IPCF_HAL_E_OK (0): General OK

IPCF_HAL_E_NOK (-1): General Not OK

IPCF_HAL_E_CONFIG_FAIL (-2): Config fail

IPCF_HAL_E_WRONG_CONFIGURATION (-3): Wrong configuration

IPCF_HAL_E_NULL_POINTER (-4): A null pointer was passed as an argument

IPCF_HAL_E_PARAM_INVALID (-5): A parameter was invalid

IPCF_HAL_E_LENGTH_TOO_SMALL (-6): Length too small

IPCF_HAL_E_INIT_FAILED (-7): Initialization failed

IPCF_HAL_E_UNINIT (-8): Called before initialization

IPCF_HAL_E_BUFFER_OVERFLOW (-9): Source address or destination address Buffer overflow

IPCF_HAL_E_ALLOC_FAIL (-10): Source alloc fail

IPCF_HAL_E_TIMEOUT (-11): Expired the time out

IPCF_HAL_E_REINIT (-12): Re initilize

IPCF_HAL_E_BUSY (-13): Busy

IPCF_HAL_E_CHANNEL_INVALID (-14): Channel is invalid

=====================test OK=======================

[INFO][hb_ipcf_hal.cpp:282] [channel] cpu2mcu_ins7ch1 [ins] 7 [id] 1 init success.
[INFO][hb_ipcf_hal.cpp:333] [channel] cpu2mcu_ins7ch1 [ins] 7 [id] 1 config success.
=== Sending Packet ===
Original message: This is the PYIPC UART test
Original data length: 27 bytes
Fixed data length: 32 bytes
Fixed data content (hex):
54 68 69 73 20 69 73 20 74 68 65 20 50 59 49 50
43 20 55 41 52 54 20 74 65 73 74 00 00 00 00 00

IPCBox packet length: 160
Full packet content (hex):
44 49 50 43 01 00 00 00 97 0A 00 00 A0 00 00 00
[INFO][hb_ipcf_hal.cpp:282] [channel] cpu2mcu_ins7ch1 [ins] 7 [id] 1 init success.
[INFO][hb_ipcf_hal.cpp:333] [channel] cpu2mcu_ins7ch1 [ins] 7 [id] 1 config success.
=== Sending Packet ===
Original message: This is the PYIPC UART test
Original data length: 27 bytes
Fixed data length: 32 bytes
Fixed data content (hex):
54 68 69 73 20 69 73 20 74 68 65 20 50 59 49 50
43 20 55 41 52 54 20 74 65 73 74 00 00 00 00 00

IPCBox packet length: 160
Full packet content (hex):
44 49 50 43 01 00 00 00 97 0A 00 00 A0 00 00 00
00 00 00 00 00 00 00 00 00 00 00 00 00 00 00 00
00 00 00 00 00 00 00 00 00 00 00 00 00 00 00 00
00 00 00 00 00 00 00 00 00 00 00 00 00 00 00 00
00 00 00 00 00 00 00 00 00 00 00 00 00 00 00 00
00 00 00 00 00 00 00 00 00 00 00 00 00 00 00 00
00 00 00 00 00 00 00 00 00 00 00 00 00 00 00 00
00 00 00 00 00 00 00 00 00 00 00 00 00 00 00 00
54 68 69 73 20 69 73 20 74 68 65 20 50 59 49 50
43 20 55 41 52 54 20 74 65 73 74 00 00 00 00 00

=== Received Packet ===
Raw received data length: 160
Raw received data (hex):
44 49 50 43 01 00 00 00 97 0A 00 00 A0 00 00 00
00 00 00 00 00 00 00 00 00 00 00 00 00 00 00 00
00 00 00 00 00 00 00 00 00 00 00 00 00 00 00 00
00 00 00 00 00 00 00 00 00 00 00 00 00 00 00 00
00 00 00 00 00 00 00 00 00 00 00 00 00 00 00 00
00 00 00 00 00 00 00 00 00 00 00 00 00 00 00 00
54 68 69 73 20 69 73 20 74 68 65 20 50 59 49 50
43 20 55 41 52 54 20 74 65 73 74 00 00 00 00 00

=== Received Packet ===
Raw received data length: 160
Raw received data (hex):
44 49 50 43 01 00 00 00 97 0A 00 00 A0 00 00 00
00 00 00 00 00 00 00 00 00 00 00 00 00 00 00 00
00 00 00 00 00 00 00 00 00 00 00 00 00 00 00 00
00 00 00 00 00 00 00 00 00 00 00 00 00 00 00 00
00 00 00 00 00 00 00 00 00 00 00 00 00 00 00 00
00 00 00 00 00 00 00 00 00 00 00 00 00 00 00 00
00 00 00 00 00 00 00 00 00 00 00 00 00 00 00 00
00 00 00 00 00 00 00 00 00 00 00 00 00 00 00 00
54 68 69 73 20 69 73 20 74 68 65 20 50 59 49 50
43 20 55 41 52 54 20 74 65 73 74 00 00 00 00 00

tx_data(32)
54 68 69 73 20 69 73 20 74 68 65 20 50 59 49 50
43 20 55 41 52 54 20 74 65 73 74 00 00 00 00 00

rx_data(32)
54 68 69 73 20 69 73 20 74 68 65 20 50 59 49 50
43 20 55 41 52 54 20 74 65 73 74 00 00 00 00 00

[SUCCESS]: tx_data and rx_data are identical.
[INFO][hb_ipcf_hal.cpp:553] [channel] cpu2mcu_ins7ch1 [ins] 7 [id] 1 deinit success.
00 00 00 00 00 00 00 00 00 00 00 00 00 00 00 00
00 00 00 00 00 00 00 00 00 00 00 00 00 00 00 00
00 00 00 00 00 00 00 00 00 00 00 00 00 00 00 00
00 00 00 00 00 00 00 00 00 00 00 00 00 00 00 00
00 00 00 00 00 00 00 00 00 00 00 00 00 00 00 00
54 68 69 73 20 69 73 20 74 68 65 20 50 59 49 50
43 20 55 41 52 54 20 74 65 73 74 00 00 00 00 00

tx_data(32)
54 68 69 73 20 69 73 20 74 68 65 20 50 59 49 50
43 20 55 41 52 54 20 74 65 73 74 00 00 00 00 00

rx_data(32)
54 68 69 73 20 69 73 20 74 68 65 20 50 59 49 50
43 20 55 41 52 54 20 74 65 73 74 00 00 00 00 00

[SUCCESS]: tx_data and rx_data are identical.
[INFO][hb_ipcf_hal.cpp:553] [channel] cpu2mcu_ins7ch1 [ins] 7 [id] 1 deinit success.
测试 pyhbipchal_utils 包的 IPC 通信功能是否正常。
root@ubuntu:/app/pyhbipchal_sample# python pyhbipchal_utils_test.py
[INFO][hb_ipcf_hal.cpp:282] [channel] cpu2mcu_ins7ch1 [ins] 7 [id] 1 init success.
[INFO][hb_ipcf_hal.cpp:333] [channel] cpu2mcu_ins7ch1 [ins] 7 [id] 1 config success.
Sending IPCBox packet:
Original message: ipc_runcmd_send 7 0 123456789 10
Fixed data length: 32 bytes
IPCBox packet length: 160 bytes
IPCBox packet content (hex):
44 49 50 43 01 00 00 00 13 0B 00 00 A0 00 00 00
00 00 00 00 00 00 00 00 00 00 00 00 00 00 00 00
00 00 00 00 00 00 00 00 00 00 00 00 00 00 00 00
00 00 00 00 00 00 00 00 00 00 00 00 00 00 00 00
00 00 00 00 00 00 00 00 00 00 00 00 00 00 00 00
00 00 00 00 00 00 00 00 00 00 00 00 00 00 00 00
00 00 00 00 00 00 00 00 00 00 00 00 00 00 00 00
00 00 00 00 00 00 00 00 00 00 00 00 00 00 00 00
69 70 63 5F 72 75 6E 63 6D 64 5F 73 65 6E 64 20
37 20 30 20 31 32 33 34 35 36 37 38 39 20 31 30

Received data (hex):
44 49 50 43 01 00 00 00 13 0B 00 00 A0 00 00 00
00 00 00 00 00 00 00 00 00 00 00 00 00 00 00 00
00 00 00 00 00 00 00 00 00 00 00 00 00 00 00 00
00 00 00 00 00 00 00 00 00 00 00 00 00 00 00 00
00 00 00 00 00 00 00 00 00 00 00 00 00 00 00 00
00 00 00 00 00 00 00 00 00 00 00 00 00 00 00 00
00 00 00 00 00 00 00 00 00 00 00 00 00 00 00 00
00 00 00 00 00 00 00 00 00 00 00 00 00 00 00 00
69 70 63 5F 72 75 6E 63 6D 64 5F 73 65 6E 64 20
37 20 30 20 31 32 33 34 35 36 37 38 39 20 31 30

Extracted data length: 32 bytes
Extracted data content (hex):
69 70 63 5F 72 75 6E 63 6D 64 5F 73 65 6E 64 20
37 20 30 20 31 32 33 34 35 36 37 38 39 20 31 30
[INFO][hb_ipcf_hal.cpp:282] [channel] cpu2mcu_ins7ch1 [ins] 7 [id] 1 init success.
[INFO][hb_ipcf_hal.cpp:333] [channel] cpu2mcu_ins7ch1 [ins] 7 [id] 1 config success.
Sending IPCBox packet:
Original message: ipc_runcmd_send 7 0 123456789 10
Fixed data length: 32 bytes
IPCBox packet length: 160 bytes
IPCBox packet content (hex):
44 49 50 43 01 00 00 00 13 0B 00 00 A0 00 00 00
00 00 00 00 00 00 00 00 00 00 00 00 00 00 00 00
00 00 00 00 00 00 00 00 00 00 00 00 00 00 00 00
00 00 00 00 00 00 00 00 00 00 00 00 00 00 00 00
00 00 00 00 00 00 00 00 00 00 00 00 00 00 00 00
00 00 00 00 00 00 00 00 00 00 00 00 00 00 00 00
00 00 00 00 00 00 00 00 00 00 00 00 00 00 00 00
00 00 00 00 00 00 00 00 00 00 00 00 00 00 00 00
69 70 63 5F 72 75 6E 63 6D 64 5F 73 65 6E 64 20
37 20 30 20 31 32 33 34 35 36 37 38 39 20 31 30

Received data (hex):
44 49 50 43 01 00 00 00 13 0B 00 00 A0 00 00 00
00 00 00 00 00 00 00 00 00 00 00 00 00 00 00 00
00 00 00 00 00 00 00 00 00 00 00 00 00 00 00 00
00 00 00 00 00 00 00 00 00 00 00 00 00 00 00 00
00 00 00 00 00 00 00 00 00 00 00 00 00 00 00 00
00 00 00 00 00 00 00 00 00 00 00 00 00 00 00 00
00 00 00 00 00 00 00 00 00 00 00 00 00 00 00 00
00 00 00 00 00 00 00 00 00 00 00 00 00 00 00 00
69 70 63 5F 72 75 6E 63 6D 64 5F 73 65 6E 64 20
37 20 30 20 31 32 33 34 35 36 37 38 39 20 31 30

Extracted data length: 32 bytes
Extracted data content (hex):
69 70 63 5F 72 75 6E 63 6D 64 5F 73 65 6E 64 20
37 20 30 20 31 32 33 34 35 36 37 38 39 20 31 30
Acore 与 MCU 的传输流程
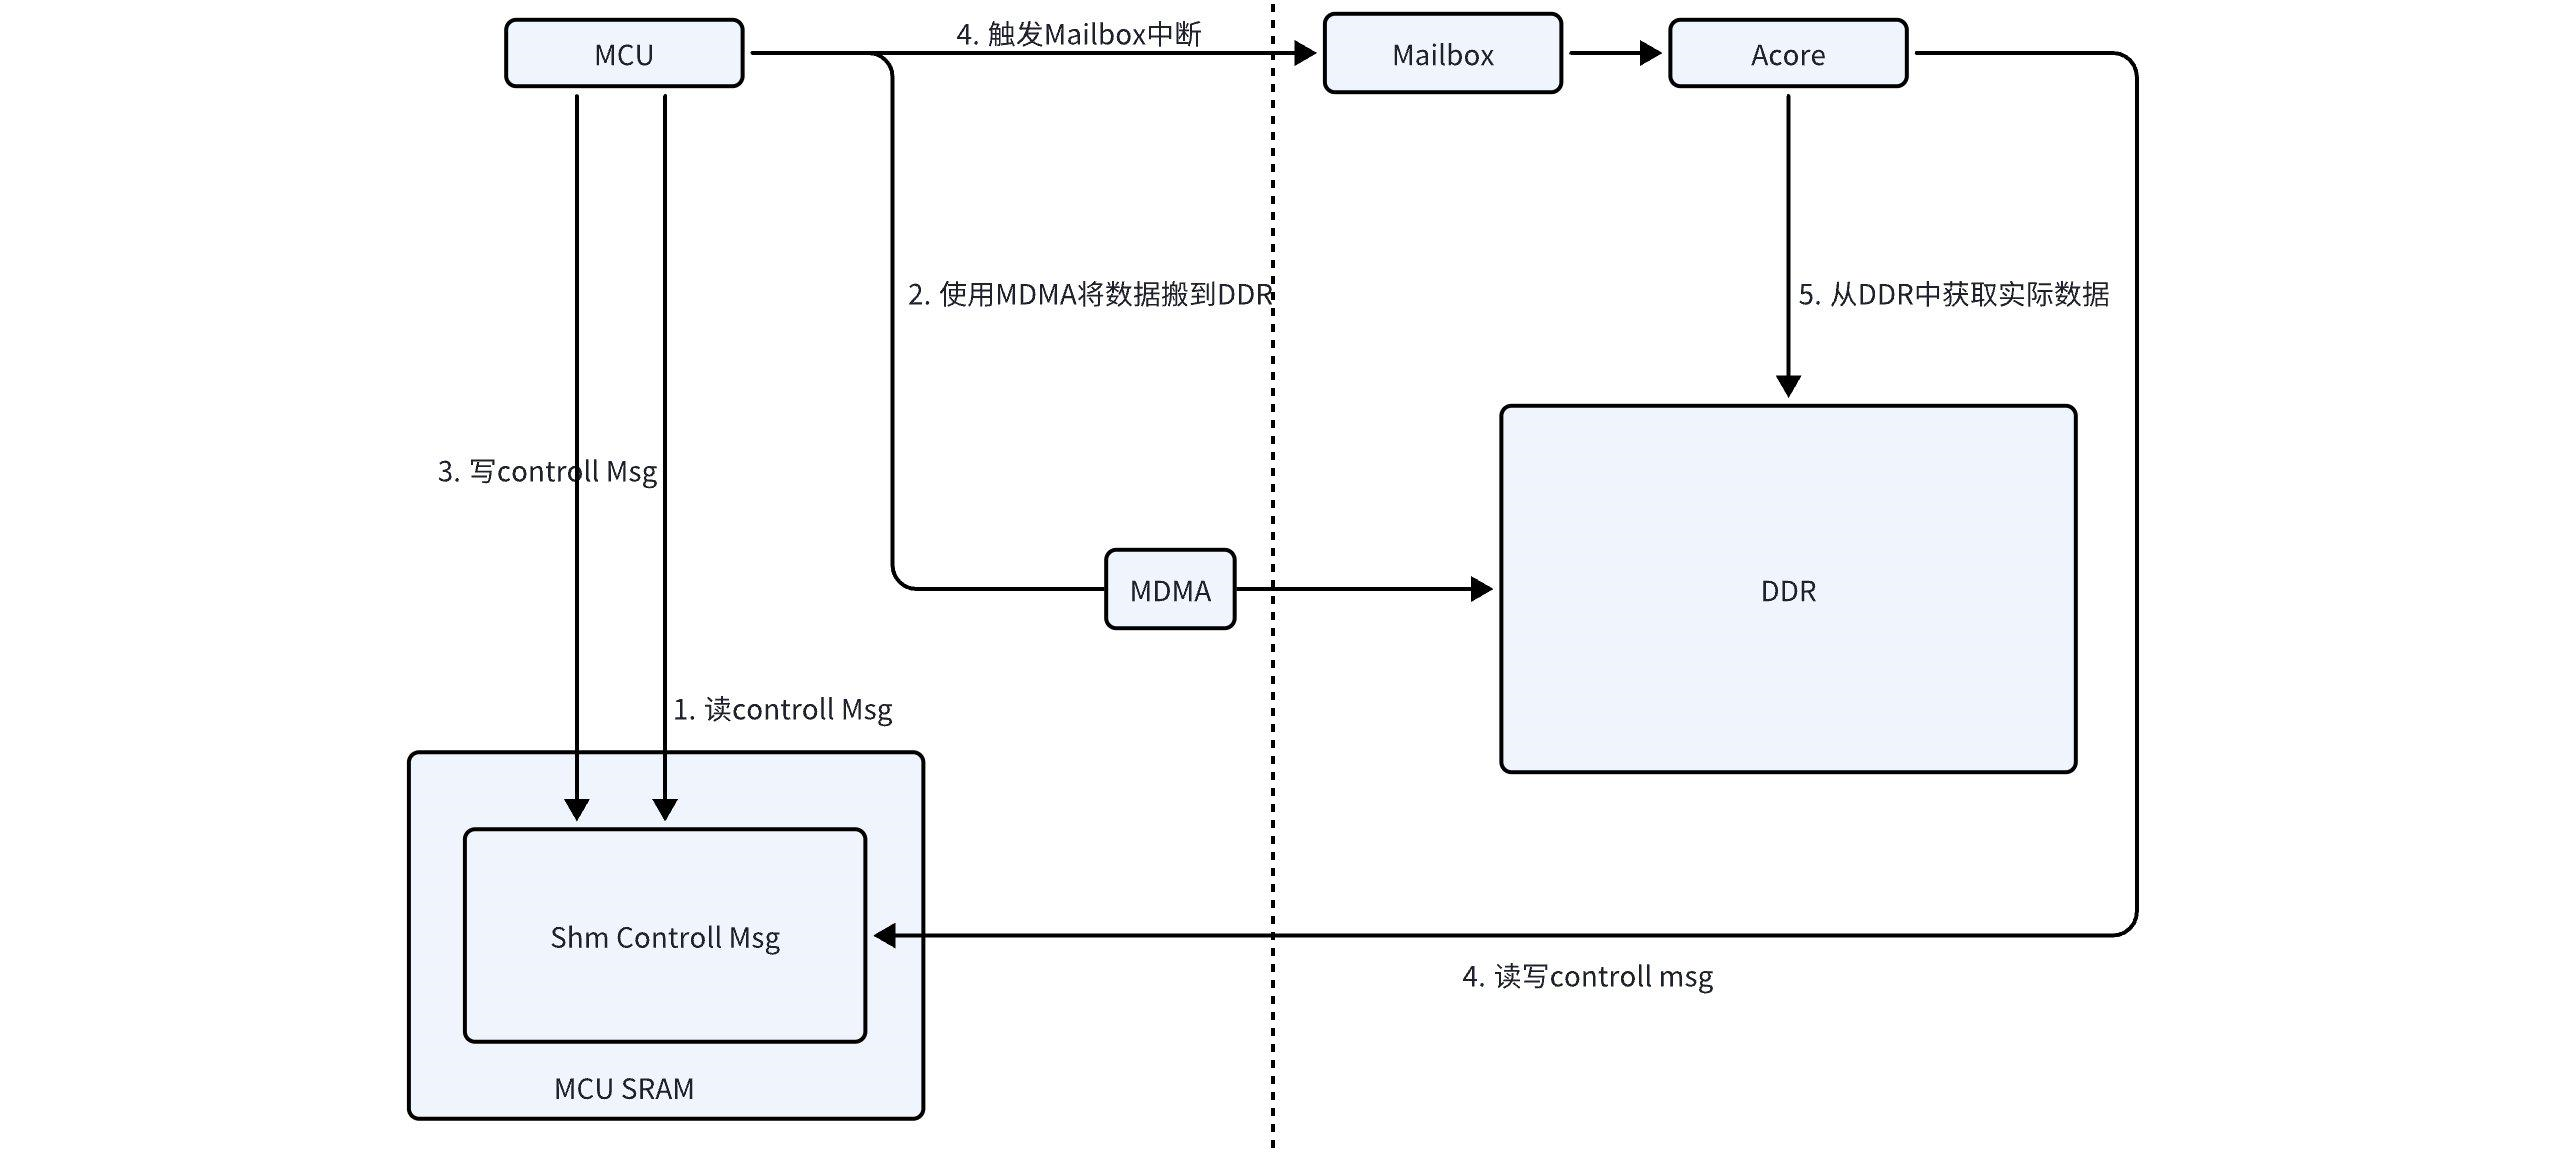
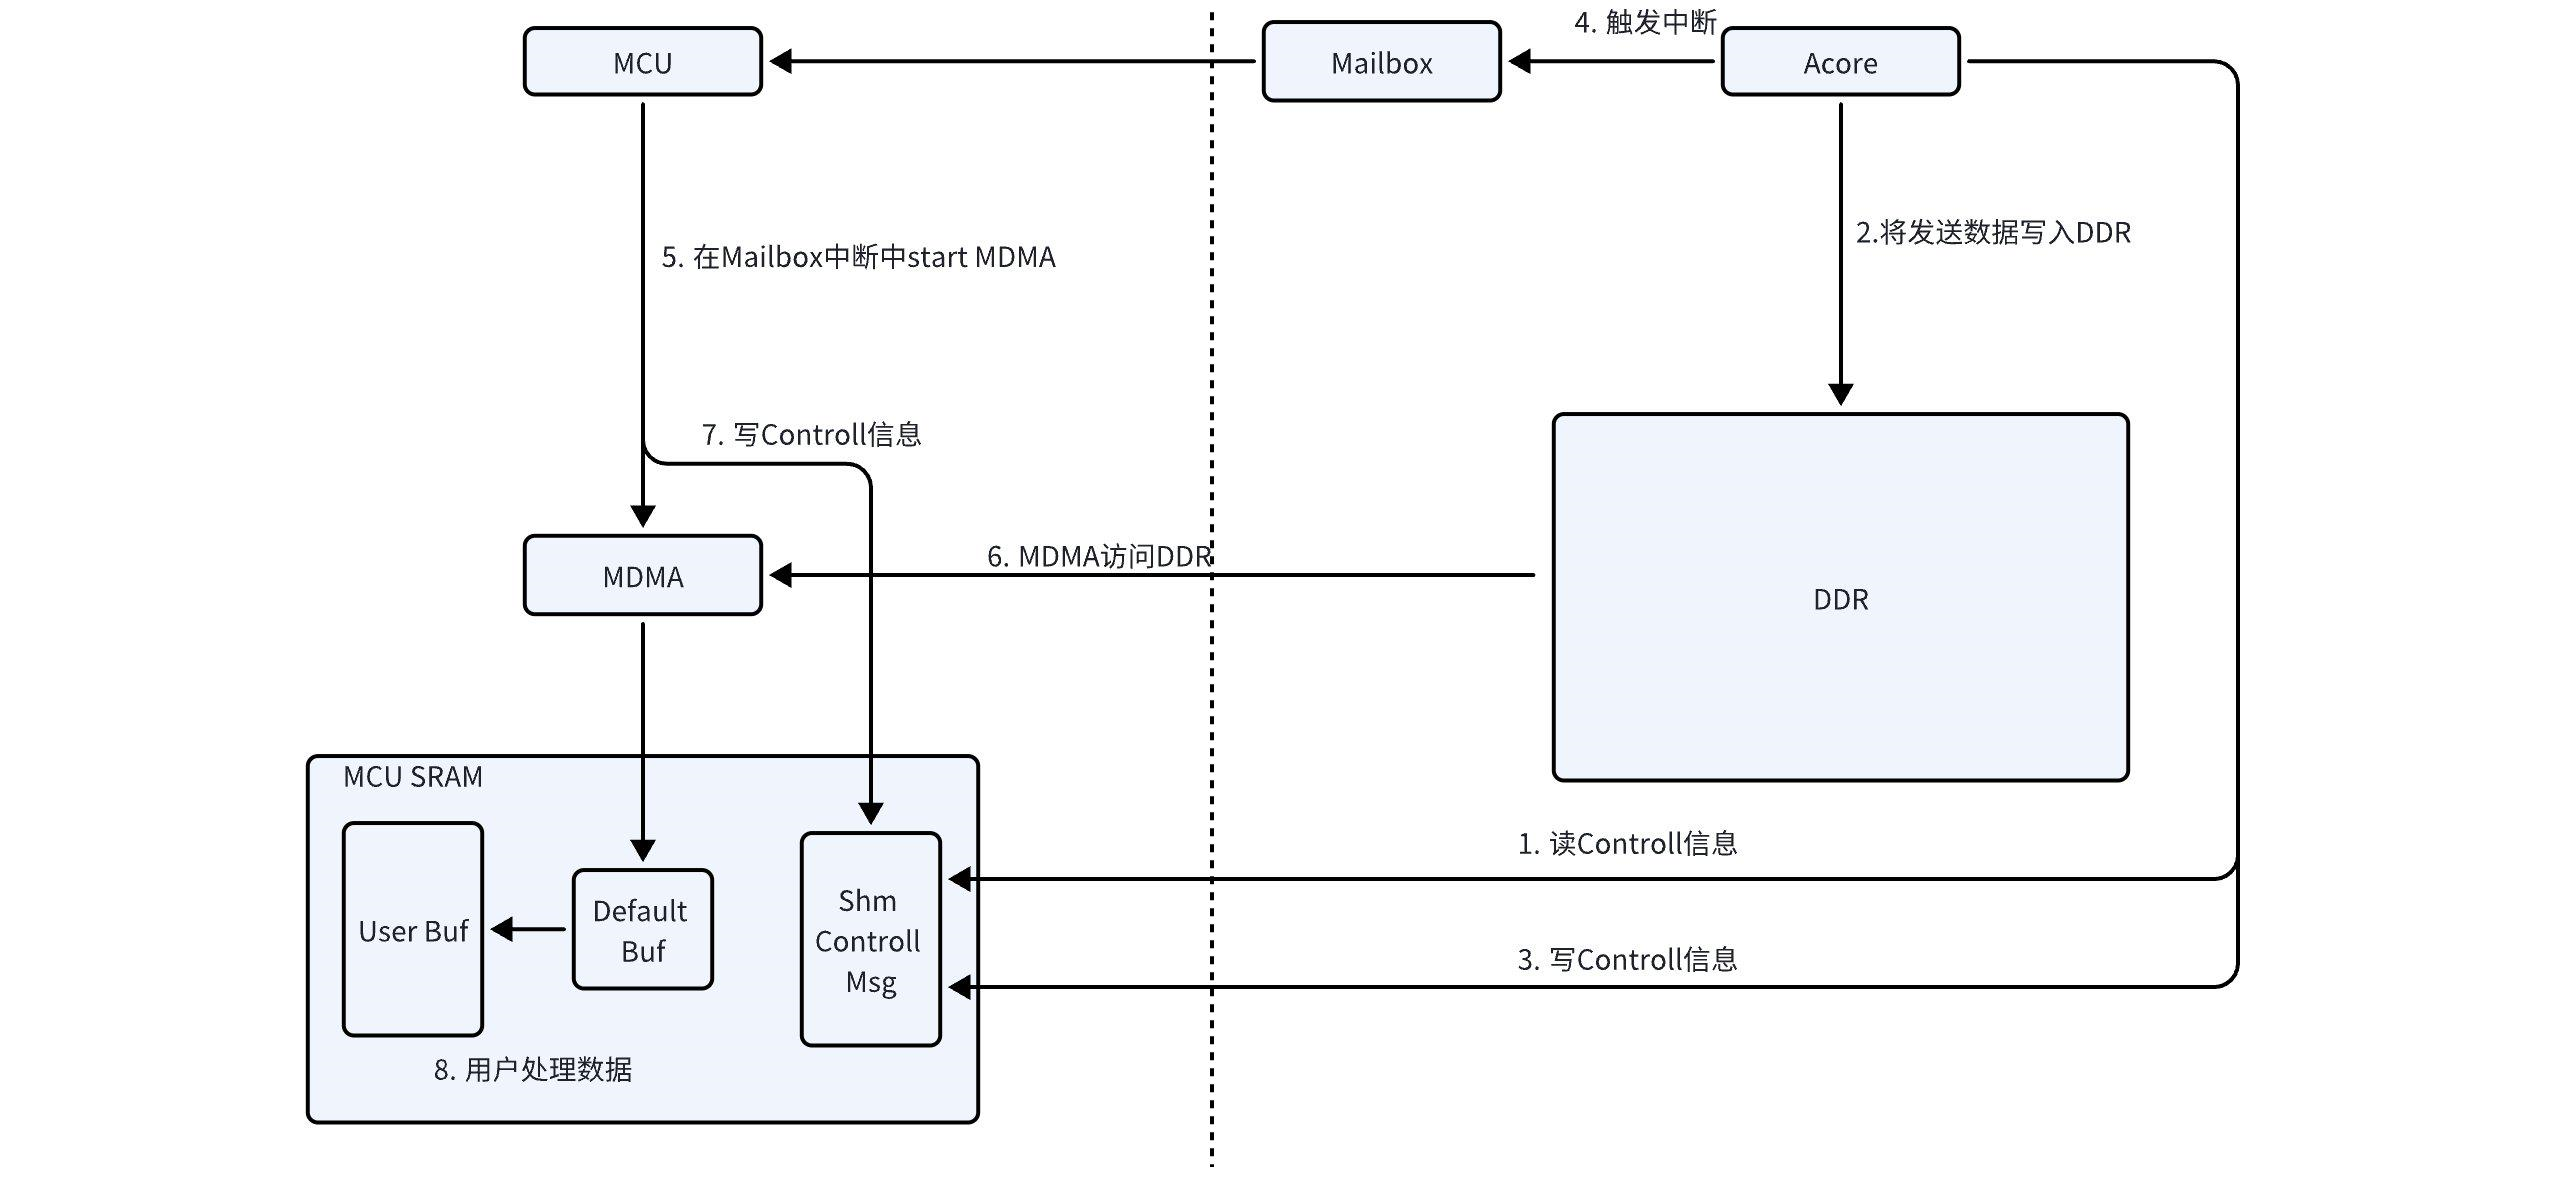
Acore 与 MCU IPC 通信使用 MCU MDMA 将数据在 DDR 与 MCU SRAM 之间搬运,MCU 发送数据到 Acore 的流程中,MCU 先使用 MDMA 将数据从 SRAM 搬运到 DDR,再发送中断通知, Acore 发送数据到 MCU 的流程中,MCU 收到中断通知后,使用 MDMA 将数据从 DDR 搬运到 SRAM。
MCU 发送数据到 Acore
Acore 发送数据到 MCU
IPCFHAL 接口使用序列
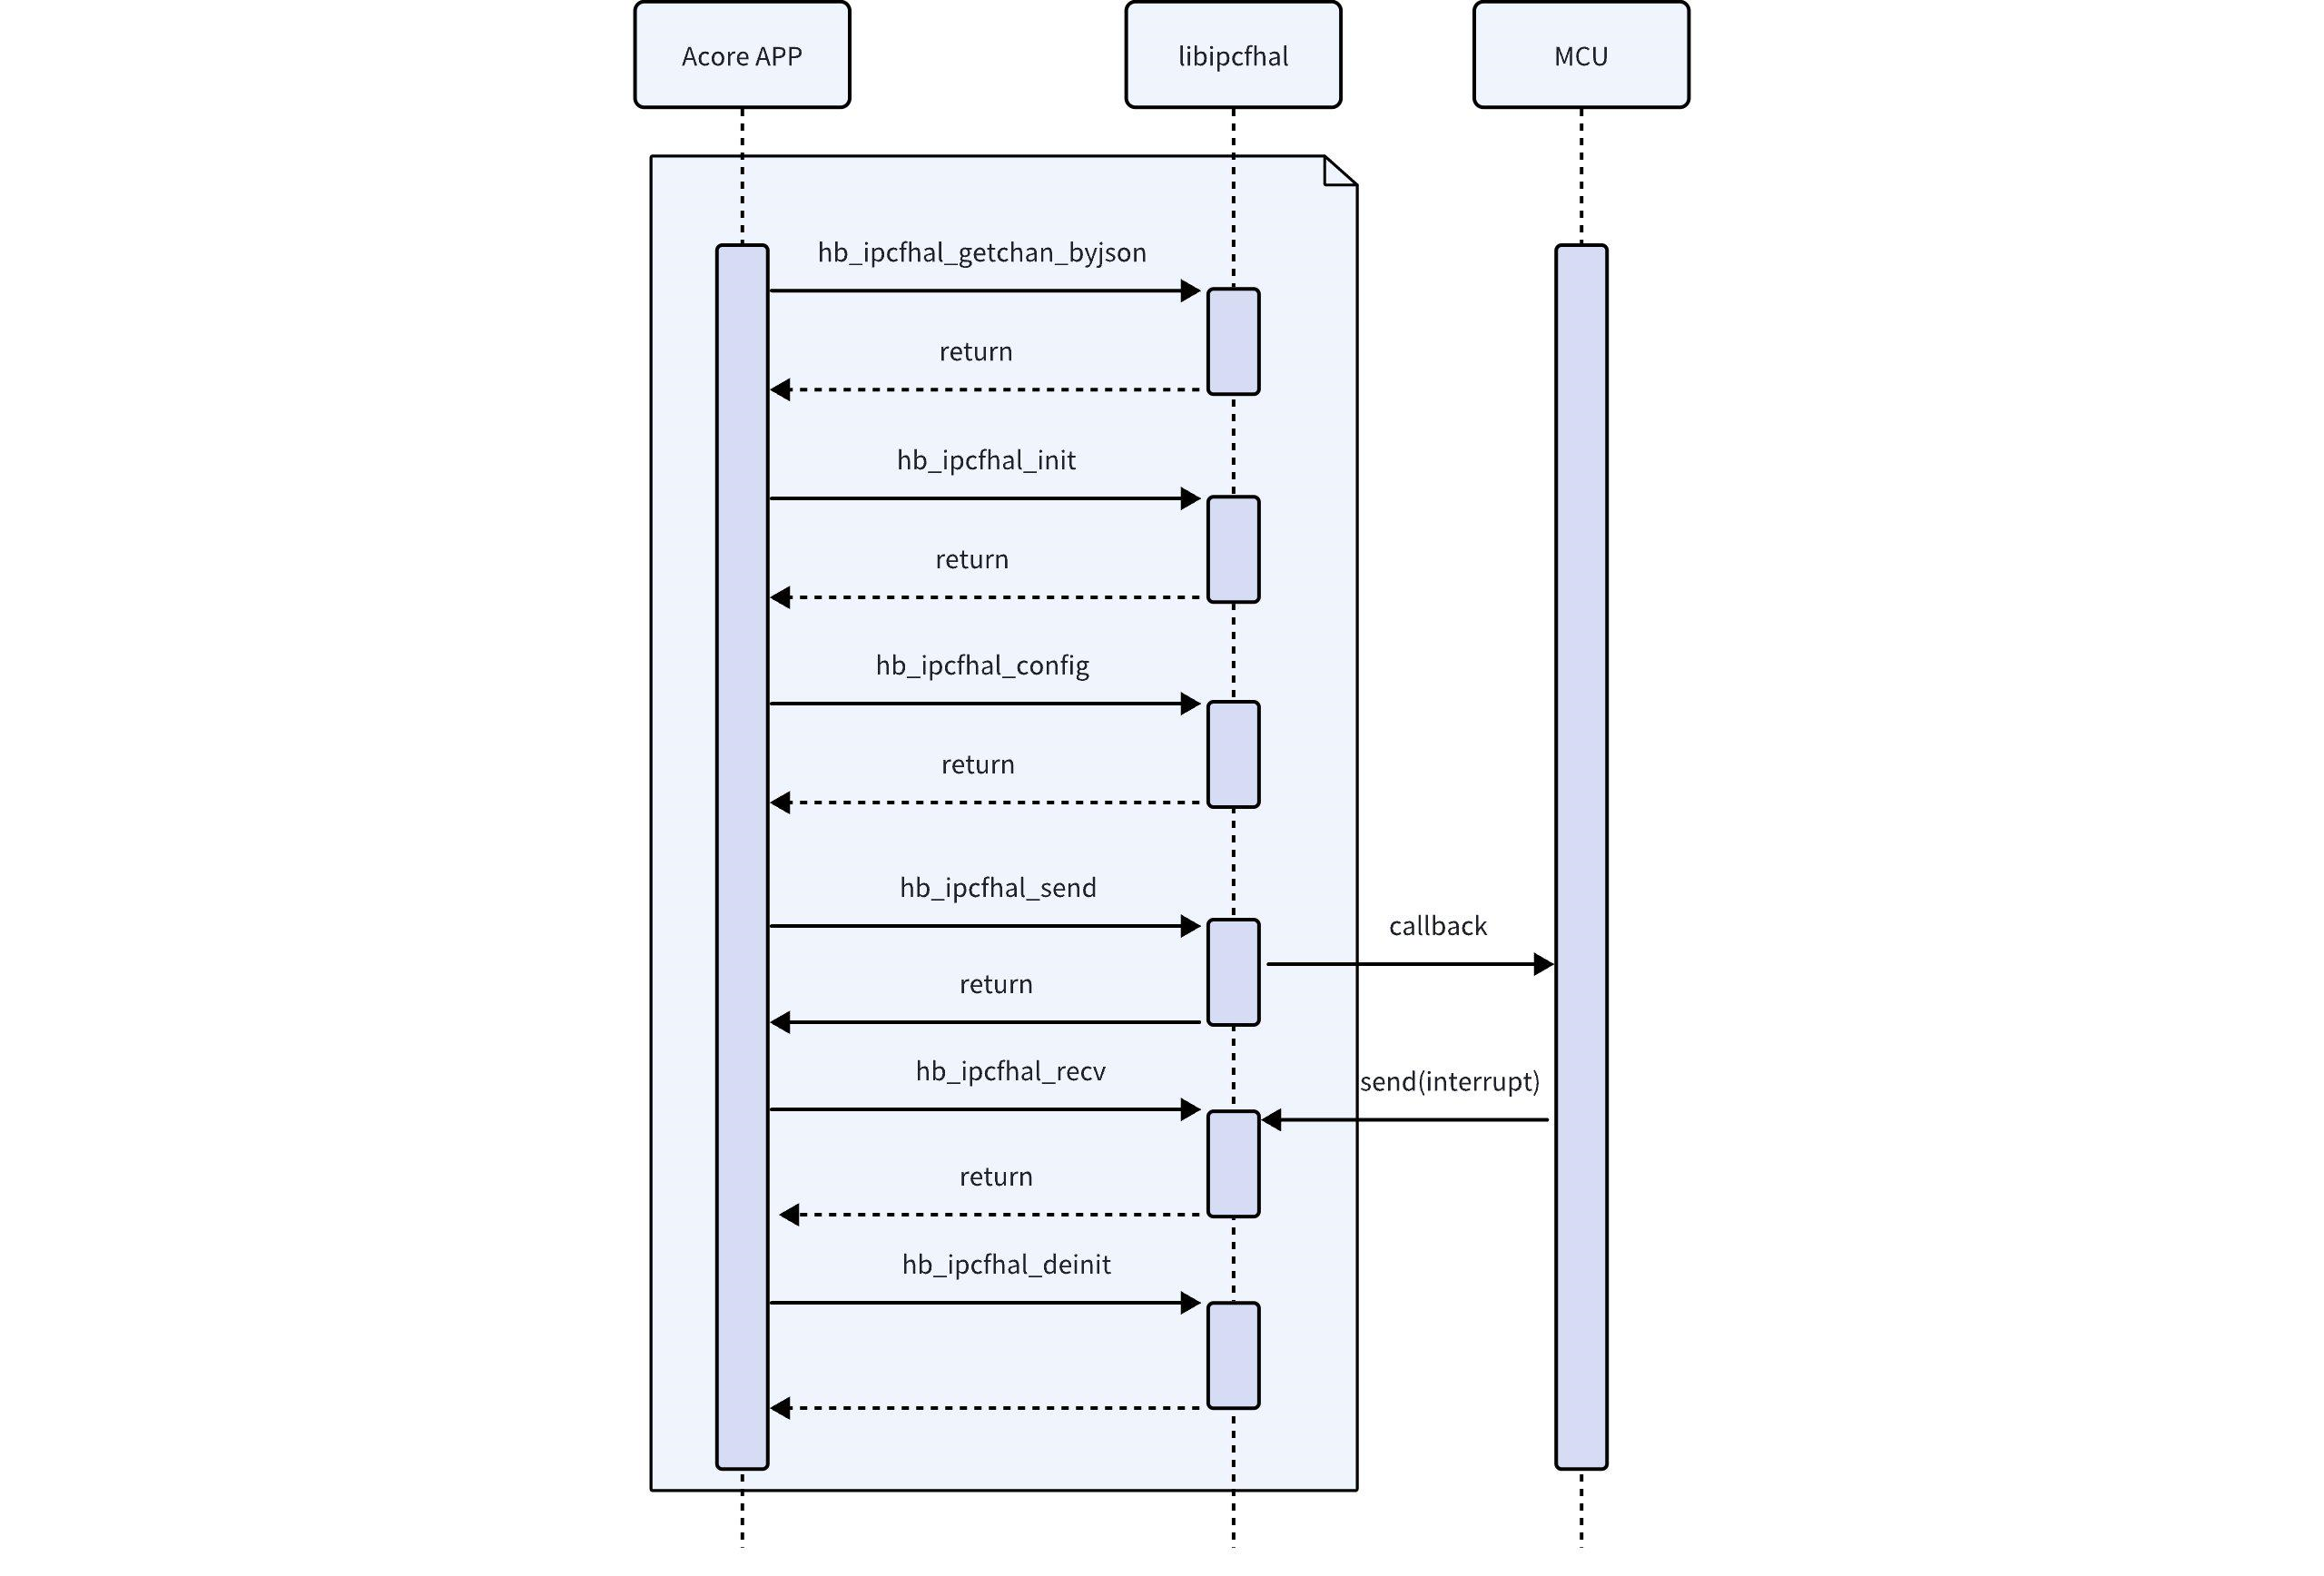
IPCFHAL 在 Acore 与 MCU 通信时,MCU 侧用户使用 IPCF 接口。
IPCFHAL 使用注意事项
- ipcfhal 同一个通道不支持多进程;若使用多线程收发,收发时序和逻辑需要用户保障。
- MCU 侧 SRAM fifo 太小仅用于内部使用。出于节省 SRAM 的角度,客户可以使用 DDR 方案。
- Acore 侧每个实例的中断对应的优先级不可配置,MCU 可配置。
- 若应用对系统调度延时的波动比较敏感,可调整应用程序的调度策略为 SCHED_FIFO。
IPCFHAL 调试方法
调试日志
IPCFHAL 及底层的 IPCF、Mailbox 驱动都提供了较完整的 log 信息,若有调试问题,可查看 log 输出,帮助定位问题。
error code (api 返回值)
IPCFHAL 定义了一些 error code,覆盖了常见的错误类型,可使用接口:hb_ipcfhal_trans_err 将 error code 转换为错误描述。
sysfs 调试节点(Acore 侧)
statistic 调试节点
打印统计的通信信息,包括 pkg,pkg_len,err_acq,err_shm_tx,err_cb。
【节点路径】
//ins-X表示insid,若insid是5,则为ins-5
/sys/kernel/debug/ipcdrv-ins-5/statistic
【节点作用】
//以instance为单位,统计所有channel接收&发送的count
struct ipc_statistic_t {
        uint32_t acq_cnt;/**< tx: acquire buf count*/
        uint32_t shm_tx_cnt;/**< tx: send count*/
        uint32_t cb_cnt;/**< rx: callback count*/
        uint32_t err_acq;/**< tx: error acquire buf count*/
        uint32_t err_shm_tx;/**< tx: error send count*/
        uint32_t err_cb;/**< rx: error callback count*/

        uint32_t packages;/**< tx/rx: packages count*/
        uint64_t datalen;/**< tx/rx: datalen*/
};
【节点使用】
//方法一:直接操作sys节点
//通道完成初始化,未收发数据时, enable
echo 0 > /sys/kernel/debug/ipcdrv-ins-5/statistic
//收发数据结束,且通道未去初始化时,get
cat /sys/kernel/debug/ipcdrv-ins-5/statistic


//方法二:使用open/write/read/close操作
fd= open(/sys/kernel/debug/ipcdrv-ins-5/statistic, O_RDWR);
write(fd, buf, 1024);
//tx/rx,收发数据
read(fd, buf, 1024);
close(fd);
【log】
DataLink:
                                pkg              pkg_len    err_acq err_shm_tx     err_cb
        INS5CH0 TX:              1                   32          0          0          0
        INS5CH0 RX:              1                   32          0          0          0
        INS5CH1 TX:              0                    0          0          0          0
        INS5CH1 RX:              0                    0          0          0          0
        INS5CH2 TX:              0                    0          0          0          0
        INS5CH2 RX:              0                    0          0          0          0
        INS5CH3 TX:              0                    0          0          0          0
        INS5CH3 RX:              0                    0          0          0          0
        INS5CH4 TX:              0                    0          0          0          0
        INS5CH4 RX:              0                    0          0          0          0
        INS5CH5 TX:              0                    0          0          0          0
        INS5CH5 RX:              0                    0          0          0          0
        INS5CH6 TX:              0                    0          0          0          0
        INS5CH6 RX:              0                    0          0          0          0
        INS5CH7 TX:              0                    0          0          0          0
        INS5CH7 RX:              0                    0          0          0          0
tsdump 调试节点
以 channel 为单位,收发数据时打印时间戳。
【节点路径】
//ins-X表示insid,若insid是5,则为ins-5
/sys/kernel/debug/ipcdrv-ins-5/tsdump
【节点作用】
//以channel为单位,使能收发数据时,打印时间戳log
int32_t tsdump;/**< >=0, 使能指定channel的时间戳打印log, <0, 关闭时间戳log*/
【节点使用】
//方法一:直接操作sys节点
//通道完成初始化,未收发数据时, enable
echo 0 > /sys/kernel/debug/ipcdrv-ins-5/tsdump
//收发数据过程中,会打印时间戳log
//收发数据结束,且通道未去初始化时,get
cat /sys/kernel/debug/ipcdrv-ins-5/tsdump


//方法二:使用open/write/read/close操作
fd= open(/sys/kernel/debug/ipcdrv-ins-5/tsdump, O_RDWR);
write(fd, buf, 1024);
//tx/rx,打印时间戳log
read(fd, buf, 1024);
close(fd);
【log】
[ 1173.246630] ipc-shm-hal: dev_print_timestamp()[515]: [5][0] tx wt sta: 1717558158.887241446
[ 1173.246642] ipc-shm-hal: dev_print_timestamp()[515]: [5][0] tx wt end: 1717558158.887253646
[ 1173.246717] ipc-shm-hal: dev_print_timestamp()[515]: [5][0] rx cb sta: 1717558158.887327971
[ 1173.246723] ipc-shm-hal: dev_print_timestamp()[515]: [5][0] rx cb end: 1717558158.887334796
[ 1173.246725] ipc-shm-hal: dev_print_timestamp()[515]: [5][0] rx rd sta: 1717558158.887336446
[ 1173.246727] ipc-shm-hal: dev_print_timestamp()[515]: [5][0] rx sm sta: 1717558158.887338496
[ 1173.246729] ipc-shm-hal: dev_print_timestamp()[515]: [5][0] rx sm end: 1717558158.887340121
[ 1173.246730] ipc-shm-hal: dev_print_timestamp()[515]: [5][0] rx rd end: 1717558158.887341646
libipcfhal-test: TestBody() [2328] info :
tsdump: 0

libipcfhal-test: TestBody() [2329] info :
tsdump: 0
wdump 调试节点
以 channel 为单位,打印发送的数据。
【节点路径】
//ins-X表示insid,若insid是5,则为ins-5
/sys/kernel/debug/ipcdrv-ins-5/wdump
【节点作用】
//以channel为单位,使能发送数据dump,打印发送的数据
//打印的长度取决于dumplen,若未配置dumplen,则默认打印全部
int32_t wdump;/**< =chan_id, 使能发送dump, 否则, 关闭发送dump*/
【节点使用】
//方法一:直接操作sys节点
//通道完成初始化,未发送数据时, enable
echo 0 > /sys/kernel/debug/ipcdrv-ins-5/wdump
//发送数据过程中,会打印发送的数据
//收发数据结束,且通道未去初始化时,get
cat /sys/kernel/debug/ipcdrv-ins-5/wdump


//方法二:使用open/write/read/close操作
fd= open(/sys/kernel/debug/ipcdrv-ins-5/wdump, O_RDWR);
write(fd, buf, 1024);
//tx/rx,打印发送的数据
read(fd, buf, 1024);
close(fd);
【log】
[ 1022.271650] ipc-shm-hal: hal_ipc_shm_write()[926]: [5][0] tx size 32
[ 1022.271666] ipc-shm-hal: ipcf_dump_data()[519]: dump info: tx data len[32] mul[1] remain[0]
[ 1022.271700] ipc-shm-hal: ipcf_dump_data()[522]: 0x0000: 00 01 02 03 04 05 06 07 00 00 00 00 00 00 00 00 00 00 00 00 00 00 00 00 00 00 00 00 00 00 00 00
[ 1022.273489] ipc-shm-hal: hal_ipc_shm_write()[926]: [6][0] tx size 32
[ 1022.273505] ipc-shm-hal: ipcf_dump_data()[519]: dump info: tx data len[32] mul[1] remain[0]
[ 1022.273733] ipc-shm-hal: ipcf_dump_data()[522]: 0x0000: 00 01 02 03 04 05 06 07 00 00 00 00 00 00 00 00 00 00 00 00 00 00 00 00 00 00 00 00 00 00 00 00
libipcfhal-test: TestBody() [2403] info :
wdump: 0

libipcfhal-test: TestBody() [2404] info :
wdump: 0
rdump 调试节点
以 channel 为单位,打印接收的数据。
【节点路径】
//ins-X表示insid,若insid是5,则为ins-5
/sys/kernel/debug/ipcdrv-ins-5/rdump
【节点作用】
//以channel为单位,使能接收数据dump,打印接收的数据
//打印的长度取决于dumplen,若未配置dumplen,则默认打印全部
uint32_t rdump;/**< =chan_id, 使能接收dump,否则,关闭接收dump*/
【节点使用】
//方法一:直接操作sys节点
//通道完成初始化,未收发数据时, enable
echo 0 > /sys/kernel/debug/ipcdrv-ins-5/rdump
//发送数据过程中,会打印接收的数据
//收发数据结束,且通道未去初始化时,get
cat /sys/kernel/debug/ipcdrv-ins-5/rdump


//方法二:使用open/write/read/close操作
fd= open(/sys/kernel/debug/ipcdrv-ins-5/rdump, O_RDWR);
write(fd, buf, DEV_README_BUFSIZE);
//tx/rx,打印接收的数据
read(fd, buf, DEV_README_BUFSIZE);
close(fd);
【log】
[  983.730497] ipc-shm-hal: data_callback()[803]: [6][0] callback size 32
[  983.730524] ipc-shm-hal: ipcf_dump_data()[519]: dump info: callback rx len[32] mul[1] remain[0]
[  983.730540] ipc-shm-hal: ipcf_dump_data()[522]: 0x0000: 00 01 02 03 04 05 06 07 00 00 00 00 00 00 00 00 00 00 00 00 00 00 00 00 00 00 00 00 00 00 00 00
[  983.731415] ipc-shm-hal: data_callback()[803]: [5][0] callback size 32
[  983.731431] ipc-shm-hal: ipcf_dump_data()[519]: dump info: callback rx len[32] mul[1] remain[0]
[  983.731443] ipc-shm-hal: ipcf_dump_data()[522]: 0x0000: 00 01 02 03 04 05 06 07 00 00 00 00 00 00 00 00 00 00 00 00 00 00 00 00 00 00 00 00 00 00 00 00
libipcfhal-test: TestBody() [2478] info :
rdump: 0

libipcfhal-test: TestBody() [2479] info :
rdump: 0
dumplen 调试节点
以 channel 为单位,配置 dump 数据长度。 【节点路径】
//ins-X表示insid,若insid是5,则为ins-5
/sys/kernel/debug/ipcdrv-ins-5/dumplen
【节点作用】
//以channel为单位,配置dump数据的长度
//dumplen>0且dumplen<data_len时有效
//前提条件是使能wdump或rdump
uint32_t dumplen;/**< dump数据时,打印数据的字节数*/
【节点使用】
//方法一:直接操作sys节点
//通道完成初始化,未发送数据时, enable
echo 0 > /sys/kernel/debug/ipcdrv-ins-5/dumplen
//发送数据过程中,会打印发送的数据
//收发数据结束,且通道未去初始化时,get
cat /sys/kernel/debug/ipcdrv-ins-5/dumplen


//方法二:使用open/write/read/close操作
fd= open(/sys/kernel/debug/ipcdrv-ins-5/dumplen, O_RDWR);
write(fd, buf, DEV_README_BUFSIZE);
//tx/rx,打印发送的数据
read(fd, buf, DEV_README_BUFSIZE);
close(fd);
【log】
[  852.898250] ipc-shm-hal: hal_ipc_shm_write()[926]: [5][0] tx size 32
[  852.898283] ipc-shm-hal: ipcf_dump_data()[519]: dump info: tx data len[16] mul[0] remain[16]
[  852.898315] ipc-shm-hal: ipcf_dump_data()[539]: 0x0000: 00 01 02 03 04 05 06 07 00 00 00 00 00 00 00 00
[  852.898519] ipc-shm-hal: data_callback()[803]: [6][0] callback size 32
[  852.898542] ipc-shm-hal: ipcf_dump_data()[519]: dump info: callback rx len[16] mul[0] remain[16]
[  852.898571] ipc-shm-hal: ipcf_dump_data()[539]: 0x0000: 00 01 02 03 04 05 06 07 00 00 00 00 00 00 00 00
[  853.900076] ipc-shm-hal: hal_ipc_shm_write()[926]: [6][0] tx size 32
[  853.900112] ipc-shm-hal: ipcf_dump_data()[519]: dump info: tx data len[16] mul[0] remain[16]
[  853.900143] ipc-shm-hal: ipcf_dump_data()[539]: 0x0000: 00 01 02 03 04 05 06 07 00 00 00 00 00 00 00 00
[  853.900359] ipc-shm-hal: data_callback()[803]: [5][0] callback size 32
[  853.900373] ipc-shm-hal: ipcf_dump_data()[519]: dump info: callback rx len[16] mul[0] remain[16]
[  853.900401] ipc-shm-hal: ipcf_dump_data()[539]: 0x0000: 00 01 02 03 04 05 06 07 00 00 00 00 00 00 00 00
libipcfhal-test: TestBody() [2576] info :
dumplen: 16

libipcfhal-test: TestBody() [2577] info :
dumplen: 16

libipcfhal-test: TestBody() [2584] info :
rdump: 0

libipcfhal-test: TestBody() [2585] info :
rdump: 0

libipcfhal-test: TestBody() [2592] info :
wdump: 0

libipcfhal-test: TestBody() [2593] info :
wdump: 0