RDK S100 Series
- Do not plug or unplug any devices while powered on, except for USB, HDMI, and Ethernet cables.
- Use a power adapter from a reputable brand; otherwise, abnormal power supply may cause unexpected system shutdowns.
- It is recommended to use the onboard POWER ON/OFF button to power the mainboard on/off, and plug/unplug the DC jack only when the adapter is disconnected from power.
Preparation for Flashing
Power Supply
The RDK S100 development board is powered via a DC jack. It is recommended to use the power adapter included in the kit.
Storage
The RDK S100 uses eMMC as the system boot medium.
Display
The RDK S100 development board supports an HDMI display interface. Connect the board to a monitor using an appropriate cable to enable graphical desktop display.
Network Connection
The RDK S100 development board supports both Ethernet and Wi-Fi network interfaces. Users can connect to the network through either interface.
Driver Installation
Install USB Driver (Windows Only)
Before using the flashing tool, Windows users need to confirm if drivers are installed.
1. Enter Fastboot Mode
First, the development board needs to enter Fastboot mode for the PC to recognize the device:
- Connect the development board to the computer with a serial cable (refer to Hardware Introduction - Serial Login section).
- Power on the development board, and immediately long press the space bar to enter the Uboot command line.
- In the command line, enter
fastboot 0and press Enter:
Warning: eth1 (eth0) using random MAC address - 9a:07:de:92:a2:c5
eth0: eth1
system_slot: 0 adc_boardinfo: 6a84
strap_pin = 0x45bc0 bootinfo = 0x0 bootcount = 0x1
boot_block_device [1]
flash boot
success!
Hit any key to stop autoboot:  0
Hobot$
Hobot$
Hobot$ fastboot 0
2. Check and Install Drivers
Now, open the computer's Device Manager:
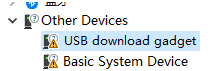
- If drivers are not installed: An unknown device named
USB download gadgetwill be displayed (as shown below). Drivers need to be installed at this point.
-
Driver Download and Installation:
- Click here to download the
sunrise5_winusb.ziparchive. - Extract the archive. Navigate into the extracted directory, right-click
install_driver.bat, and select "Run as administrator".
- Click here to download the
-
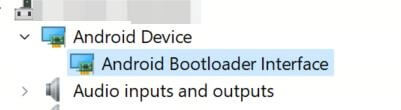
After successful installation: Device Manager will display
Android Device(as shown below).
System Flashing
The RDK S100 kit currently provides an Ubuntu 22.04 system image that supports a Desktop graphical user interface.
The RDK S100 comes pre-flashed with a test version of the system image. To ensure you are using the latest system version, it is recommended to follow this guide to flash the latest system image.
Image Download
Refer to section 1.6 Resource Summary.
Full System Flashing
Currently, SW3 must be set to the ↑ position to boot from the onboard eMMC. Booting from an M.2 NVMe SSD is not supported at this time.
The RDK S100 development kit uses the PC-based tool D-Navigation to flash the Ubuntu system. This flashing process currently supports two USB download modes, which can be selected in the “Download Mode” option under the “Download Selection” interface of the flashing tool. The differences between these two modes are as follows:
- Uboot Flashing Mode: This mode requires the RDK S100 to enter Uboot’s flashing mode (i.e., fastboot mode). It is commonly used in everyday flashing scenarios and meets most standard system flashing requirements.
- USB Flashing Mode: This mode is based on the DFU protocol and is used when the RDK S100 cannot enter Uboot mode or when the system is corrupted (e.g., “bricked” device), helping to recover the system.
Below are the detailed steps for flashing using the PC tool D-Navigation.
On Windows PCs, D-Navigation requires successful driver installation before use. Please ensure the driver is properly installed before proceeding.
Before flashing the Ubuntu system image, prepare the following:
-
A Type-C data cable: connect one end to the board’s Type-C port and the other end to your PC.
-
Please ensure the Type-C data cable is a high-quality data cable: 1. It has a shielding layer 2. The shorter, the better 3. High data transmission quality, to ensure flashing stability.
-
Download the image flashing tool D-Navigation (click here to download). Depending on your operating system, there are three ways to launch the D-Navigation tool:
-
Windows version:
Double-click to run D-Navigation.exe
-
Ubuntu version:
xhost + sudo ./D-Navigation --no-sandbox
-
MacOS version (currently supports Apple Silicon M-series chips):
xattr -cr D-navigation.app # Remove app quarantine (run in terminal) Double-click to open D-Navigation.app
-
Uboot Flashing
-
Prepare the RDK S100 image package:
- Download the image package from the website.

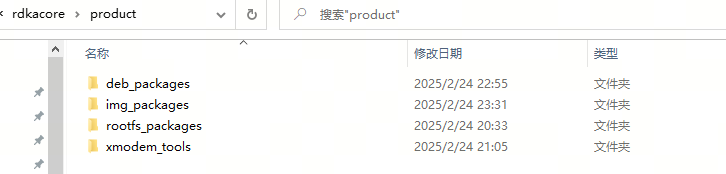
- After extraction, you will get a
productfolder with the following structure. Ensure that both theimg_packagesfolder and thexmodem_toolsfile are in the same directory.
- Download the image package from the website.
-
Power on the development board.
tipThe Uboot method requires exclusive access to the serial port. Ensure the serial port is not occupied by other devices or applications.
-
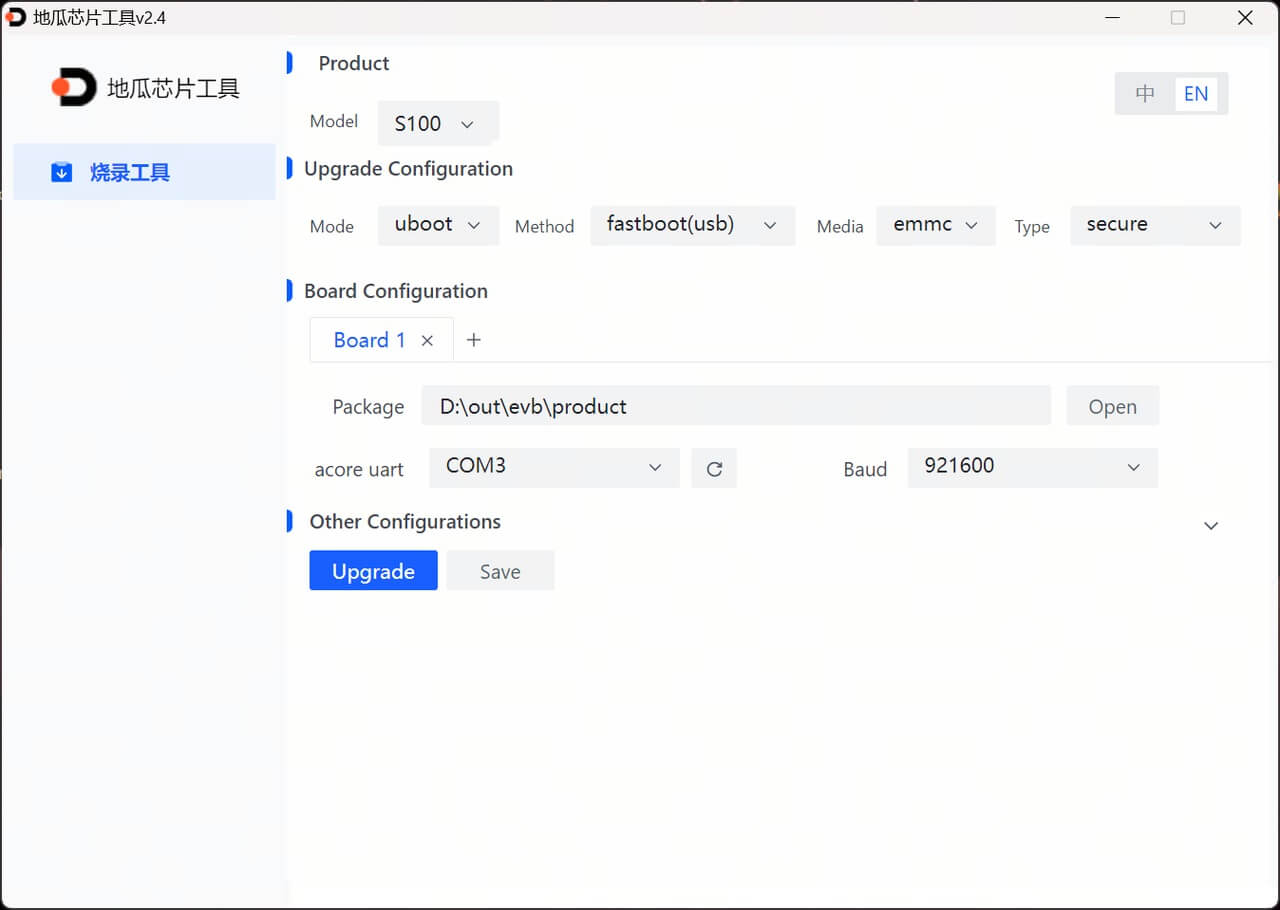
Open the D-Navigation tool and perform the following operations:
- Select product model: S100
- Download mode: uboot; Storage medium: emmc; Type: secure
- Click Browse and select the
productfolder containing the firmware - Select the serial port connected to the RDK S100 (baud rate: 921600)
- Click Start Upgrade (if a "Need manual reset" prompt appears during the upgrade, power-cycle the board)
-
After the upgrade completes, power-cycle the board.
USB Flashing (for blank chips or recovery after failed flashing)
For descriptions of SW1, SW2, etc., refer to section 1.1.1 Switches, Buttons, and LED Indicators.
-
Prepare the RDK S100 image package:
- Download the image package from the website.
- After extraction, you will get a
productfolder with the following structure. Ensure that both theimg_packagesfolder and thexmodem_toolsfile are in the same directory.
- Download the image package from the website.
-
Switch the device to DFU mode by following these steps:
- Set SW1 to ↑ and turn off power.
- Set SW2 to ↑ to enter Download mode.
- Set SW1 to ▽ and turn on power.
- If the
DOWNLOADLED lights up, the board has entered DFU mode. Otherwise, press theK1button to reset the system.

-
Open the D-Navigation tool and perform the following operations:
- Select product model: S100
- Download mode: usb; Storage medium: emmc; Type: secure
- Click Browse and select the
productfolder containing the firmware - Power-cycle the device, click Start Upgrade, and wait for the process to complete

-
After the upgrade completes, power off the device, switch the flashing jumper back down (to exit DFU mode), and then power on again.
Miniboot and File System Upgrade
The D-Navigation tool supports updating the Miniboot image for the S100. If users need to preserve modifications to the root file system (e.g., custom-installed Python or .deb packages), they can first run sudo apt update && sudo apt upgrade on the board to upgrade the file system, then use D-Navigation to update only the Miniboot image.
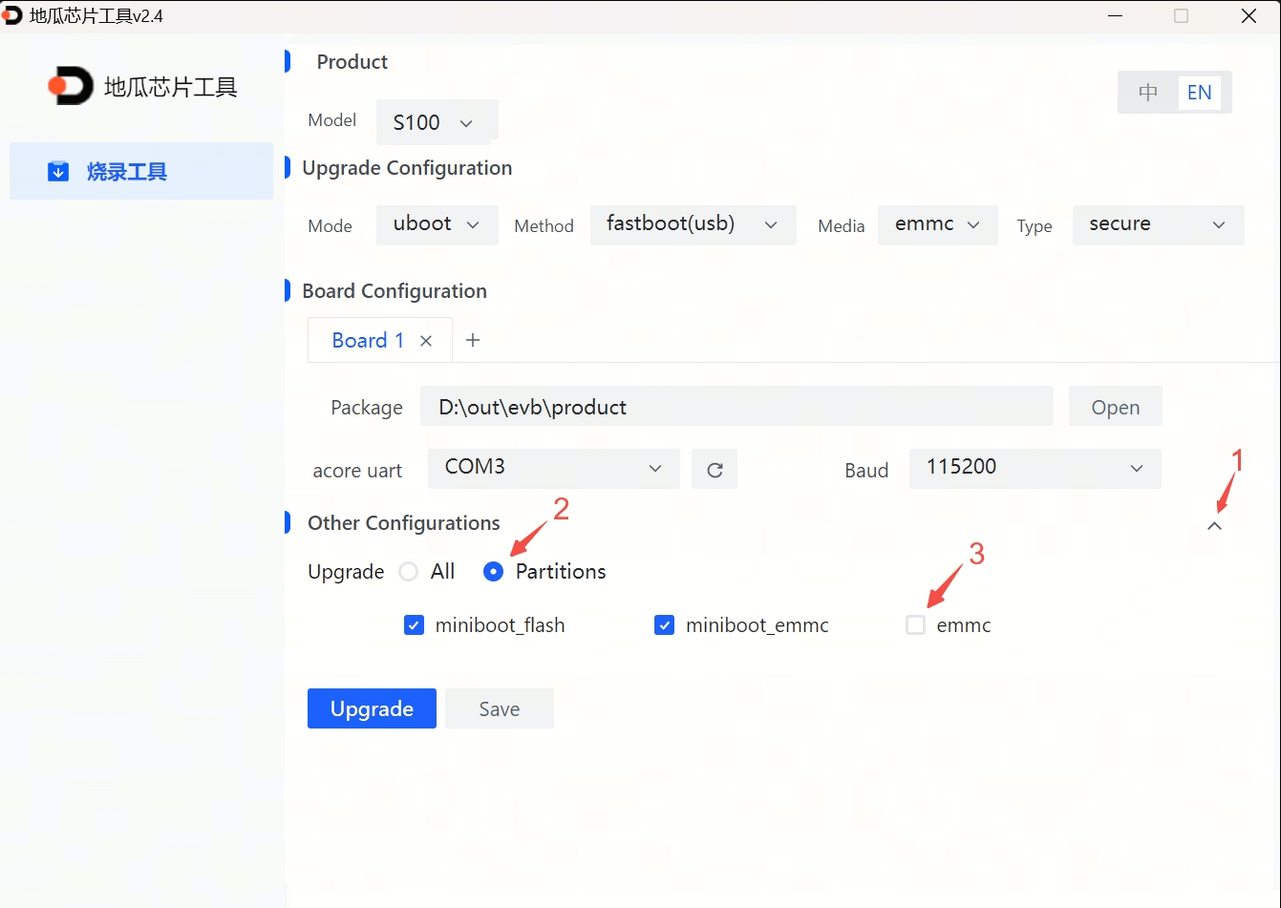
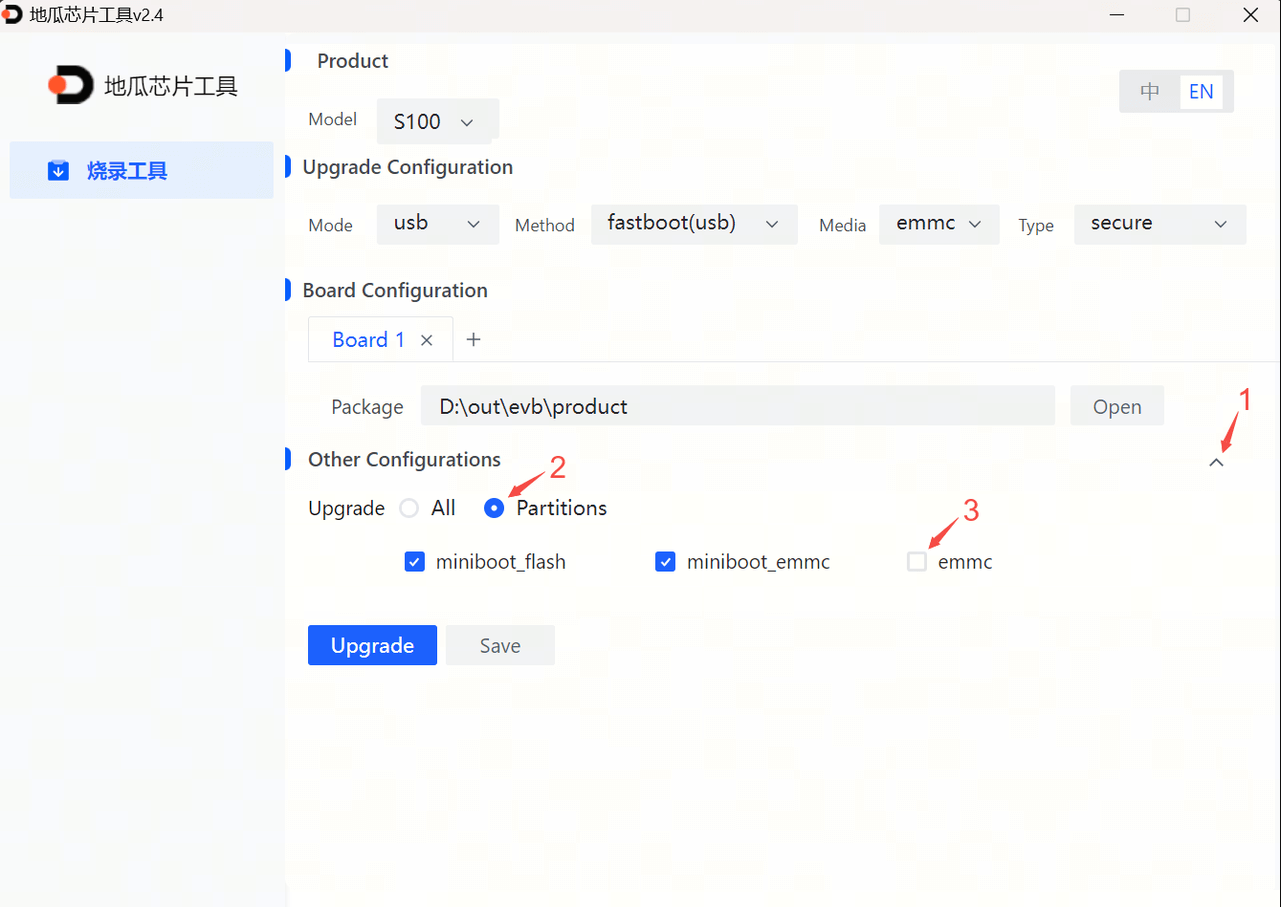
The Miniboot flashing process is identical to the Full System Flashing procedure, with the following additional configuration:
- Click the rightmost arrow in “Other Settings.”
- Click and enable “Partition Selection.”
- Uncheck “emmc.”
- Example of Uboot flashing configuration is shown below:
- An example USB flashing configuration is shown in the figure below:
Booting the System
First, ensure the development board is powered off. Connect the board to a monitor using an HDMI cable, then power on the development board.
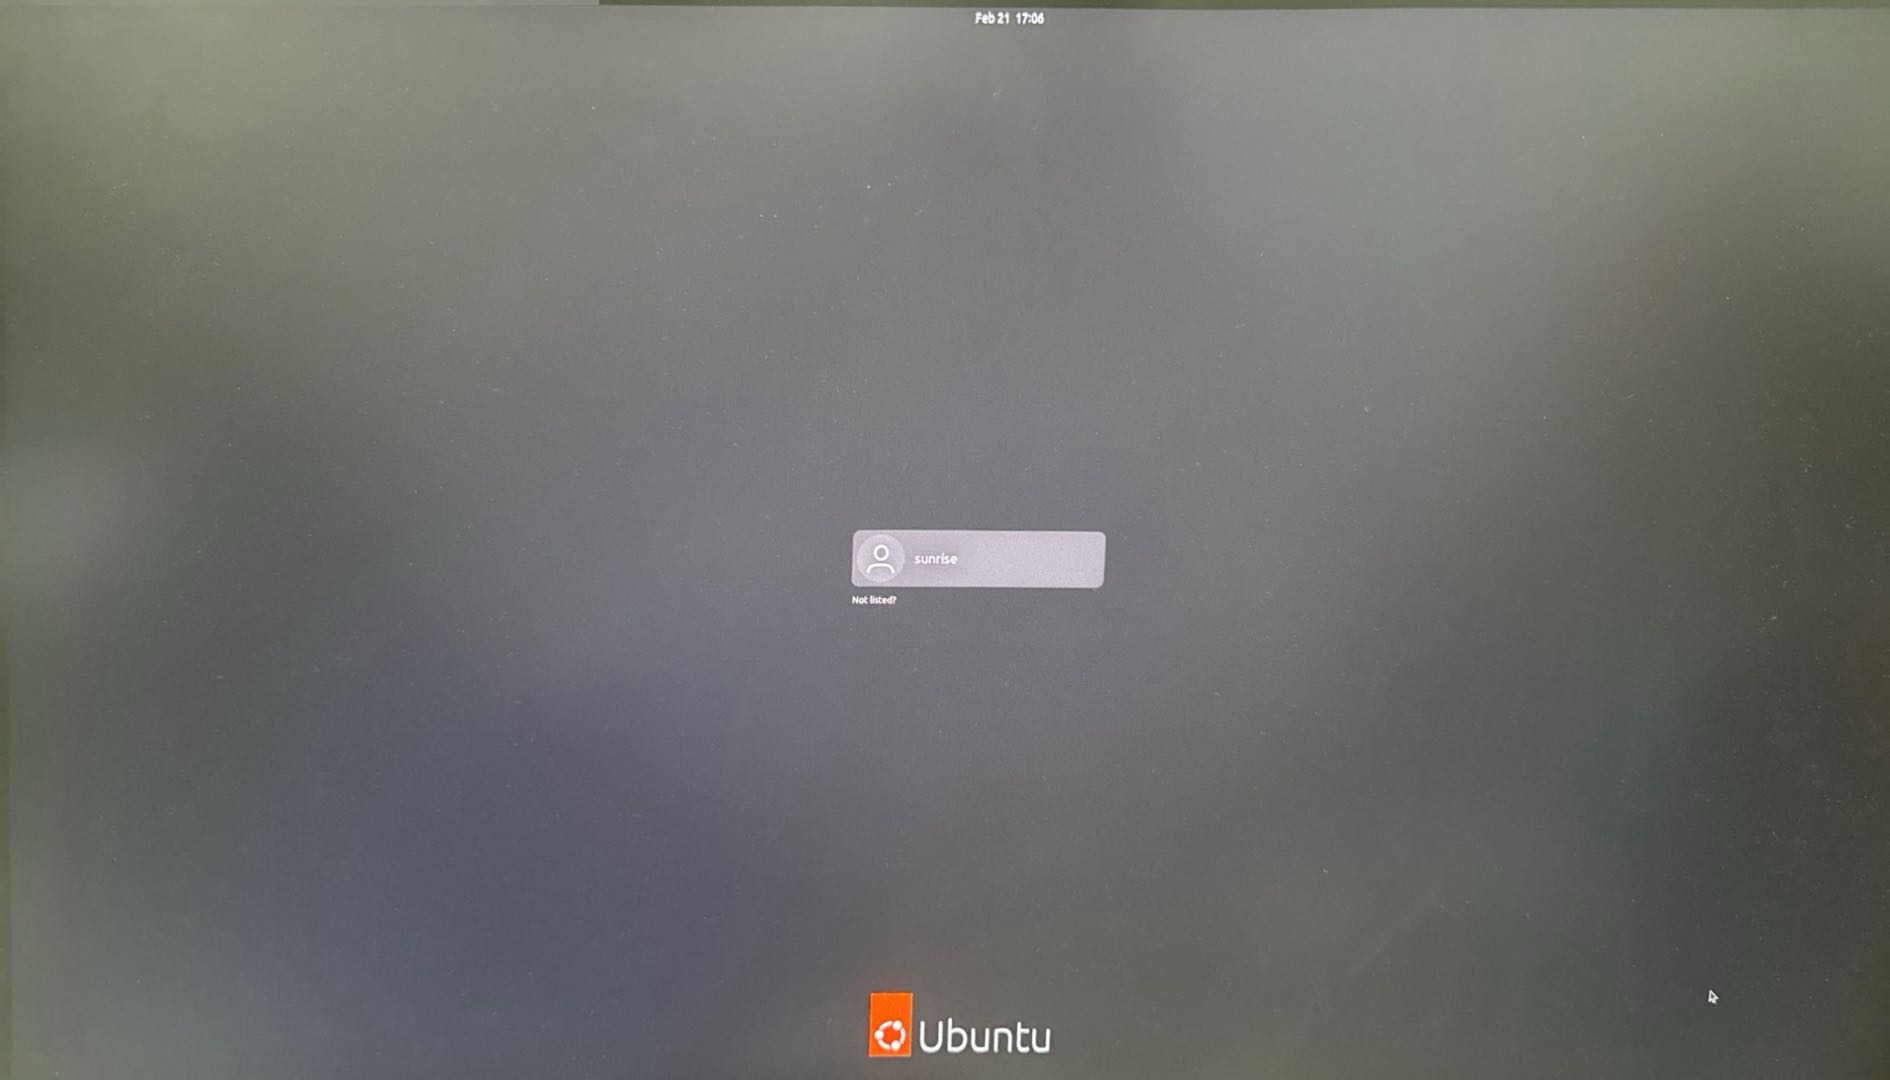
During the first boot, the system performs default environment configuration, which takes approximately 45 seconds. Once complete, the Ubuntu desktop will appear on the monitor.
- Green LED: Illuminated indicates normal hardware power-up.
If there is no display output after powering on the board for more than 2 minutes, the board has failed to boot properly. In this case, connect via a serial cable for debugging to verify whether the board is functioning correctly.
After the Ubuntu Desktop system finishes booting, it outputs the desktop interface to the monitor via the Display interface, as shown below:
Issues Encountered When Using an Ubuntu-Based Laptop
-
Garbled characters appear in the serial terminal after connecting the development board to an Ubuntu laptop
- Download the official serial driver: CH340N Driver
- Modify
ch341_tty_driver->name = "ttyUSB"; - Recompile and reinstall the driver.
-
Ubuntu 24.04 requires additional driver setup
- Run the following script:
#!/bin/bash

set -e

echo "[INFO] Updating APT package list..."
sudo apt update

echo "[INFO] Installing required packages..."
sudo apt install -y dfu-util libusb-1.0-0-dev

echo "[INFO] Writing udev rules to /etc/udev/rules.d/99-drobotics.rules..."

sudo tee /etc/udev/rules.d/99-drobotics.rules > /dev/null <<EOF
SUBSYSTEM=="usb", ATTR{idVendor}=="3652", ATTR{idProduct}=="6610", MODE="0666"
SUBSYSTEM=="usb", ATTR{idVendor}=="3652", ATTR{idProduct}=="6615", MODE="0666"
SUBSYSTEM=="usb", ATTR{idVendor}=="3652", ATTR{idProduct}=="6620", MODE="0666"
SUBSYSTEM=="usb", ATTR{idVendor}=="3652", ATTR{idProduct}=="6625", MODE="0666"
SUBSYSTEM=="usb", ATTR{idVendor}=="18d1", ATTR{idProduct}=="6631", MODE="0666"
SUBSYSTEM=="tty", ATTRS{idVendor}=="1a86", ATTRS{idProduct}=="7523", MODE="0666"
EOF

echo "[INFO] Reloading and triggering udev rules..."
sudo udevadm control --reload
sudo udevadm trigger

echo "[INFO] Setup complete. Please replug your devices or reboot if necessary."- Alternatively, execute the following commands one by one:
# Update APT sources
sudo apt update

# Install DFU utilities and libusb
sudo apt install -y dfu-util libusb-1.0-0-dev

# Set permissions for development board interfaces
sudo tee /etc/udev/rules.d/99-drobotics.rules > /dev/null <<EOF
SUBSYSTEM=="usb", ATTR{idVendor}=="3652", ATTR{idProduct}=="6610", MODE="0666"
SUBSYSTEM=="usb", ATTR{idVendor}=="3652", ATTR{idProduct}=="6615", MODE="0666"
SUBSYSTEM=="usb", ATTR{idVendor}=="3652", ATTR{idProduct}=="6620", MODE="0666"
SUBSYSTEM=="usb", ATTR{idVendor}=="3652", ATTR{idProduct}=="6625", MODE="0666"
SUBSYSTEM=="usb", ATTR{idVendor}=="18d1", ATTR{idProduct}=="6631", MODE="0666"
SUBSYSTEM=="tty", ATTRS{idVendor}=="1a86", ATTRS{idProduct}=="7523", MODE="0666"
EOF

# Reload udev rules
sudo udevadm control --reload
sudo udevadm trigger- Connect your computer to the development board using a Type-C cable (plug into the Type-C port near the DC power jack).
- Click here to download the latest D-Navigation tool, e.g.,
D-navigation-linux-x64-v2.4.tar.gz. - Extract the archive and open a
Terminalinside the extracted folder. - Run
sudo ./D-navigation --no-sandboxto launch the flashing tool.
Garbled Serial Output on MacOS-Based Laptops
Taking MacOS version 15.0 (M3 chip) as an example: the default MacOS serial driver connects to the CH340N at 921600 baud rate but produces garbled output. You must install the latest CH340N driver as follows:
-
With the default CH340N driver, the connected device appears as
tty.usbserial*, indicating MacOS is using its built-in driver. This driver must be updated:
-
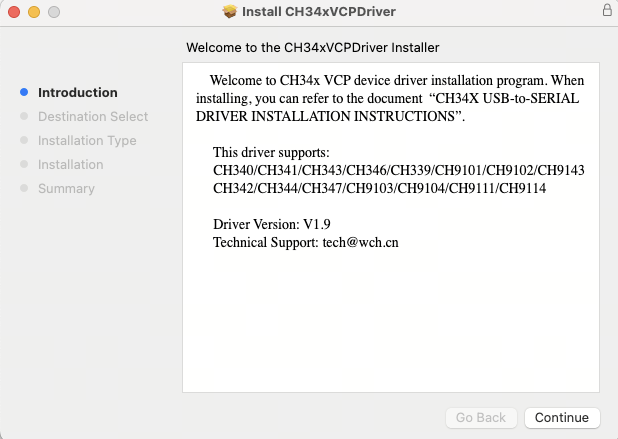
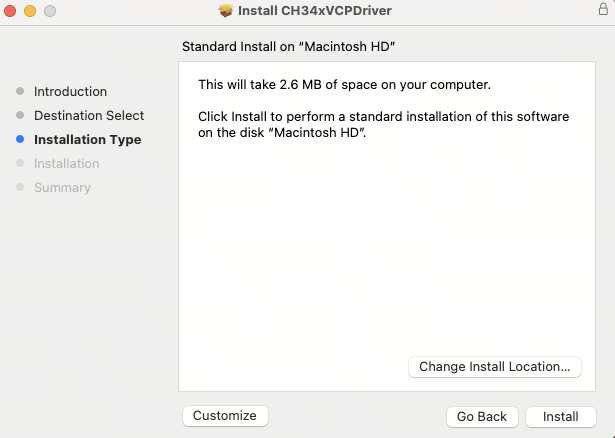
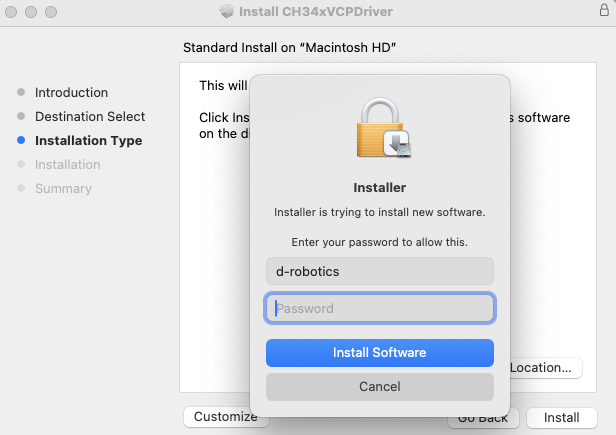
Installation procedure (based on the README.md from the CH340N Latest Driver Release Page):
- Download the driver package from the CH340N Latest Driver Release Page:
- Extract the archive and install the driver using the provided
.pkginstaller: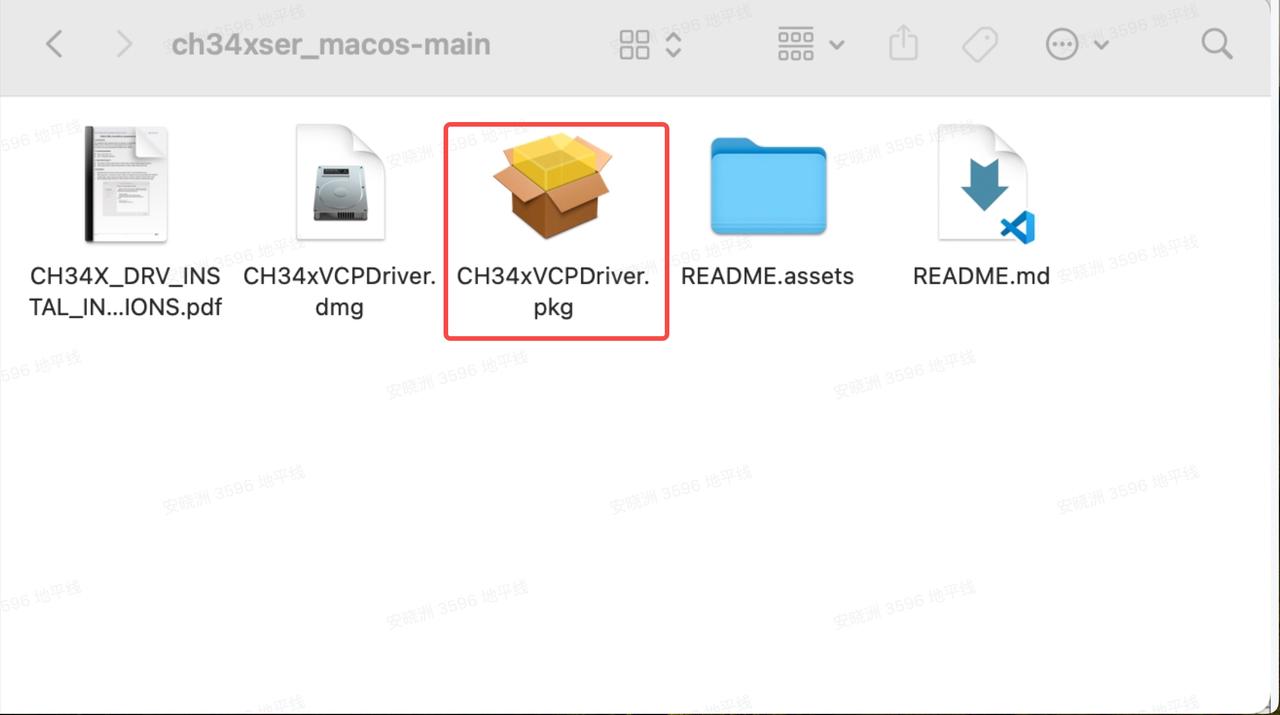
- Click "Continue":
- Click "Install" and enter your password:
- Click "Install" and open System Settings:
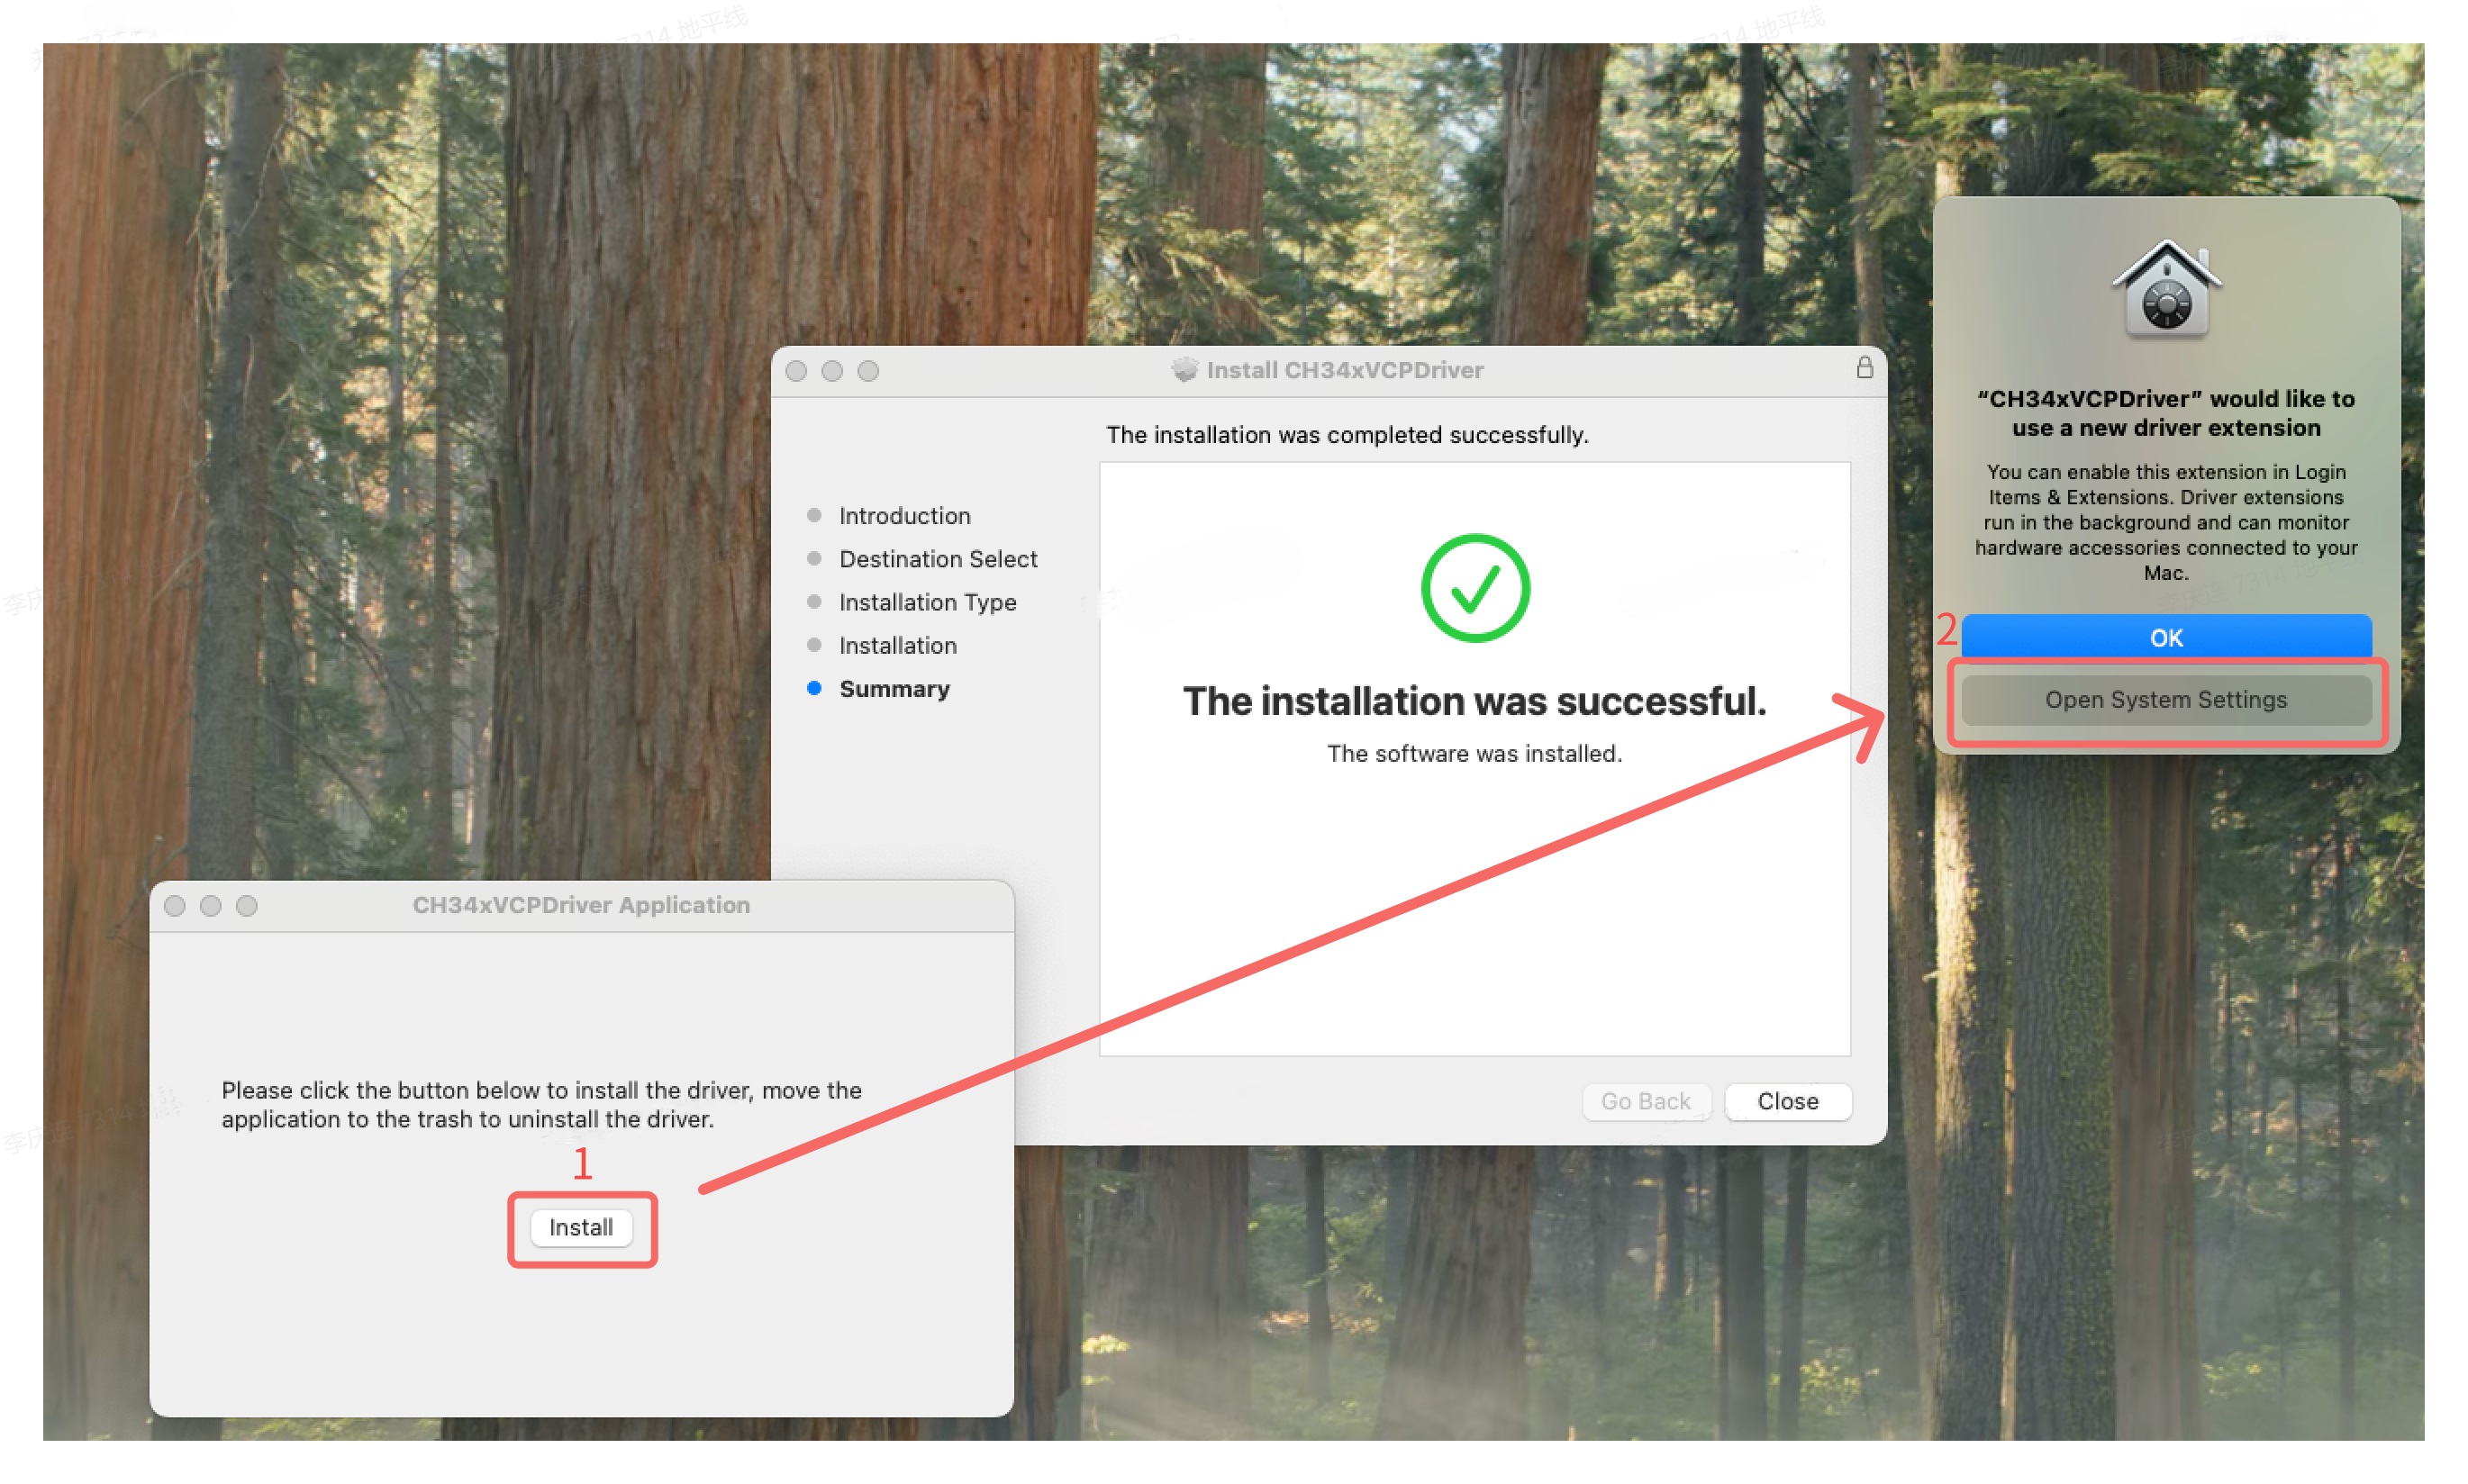
- Authorize the installation and enter your password:

- A dialog will confirm successful installation:

- Restart your computer
- Verify successful installation: if the device appears as
tty.wch*, the driver is installed correctly:
- Download the driver package from the CH340N Latest Driver Release Page:
-
Device connection verification:
NoteEven with the latest official CH340N driver, MacOS’s built-in
screenutility still cannot communicate at 921600 baud rate. You must use theminicomtool instead.- As shown in the figure above, typically the port with the smaller number is the ACore serial port, and the one with the larger number is the MCU serial port. For example,
/dev/tty.wchusbserial1220is the ACore port, and/dev/tty.wchusbserial1230is the MCU port. To connect to the ACore port, run:
minicom -D /dev/tty.wchusbserial1220 -b 921600 -8;
to connect to the MCU port, run:
minicom -D /dev/tty.wchusbserial1230 -b 921600 -8.
Replace the device path/dev/tty.wchusbserial...in the command according to your actual device enumeration. - Example command to connect to the ACore serial port using
minicom(minicom -D /dev/tty.wchusbserial1220 -b 921600 -8):
- Successful connection to the development board:
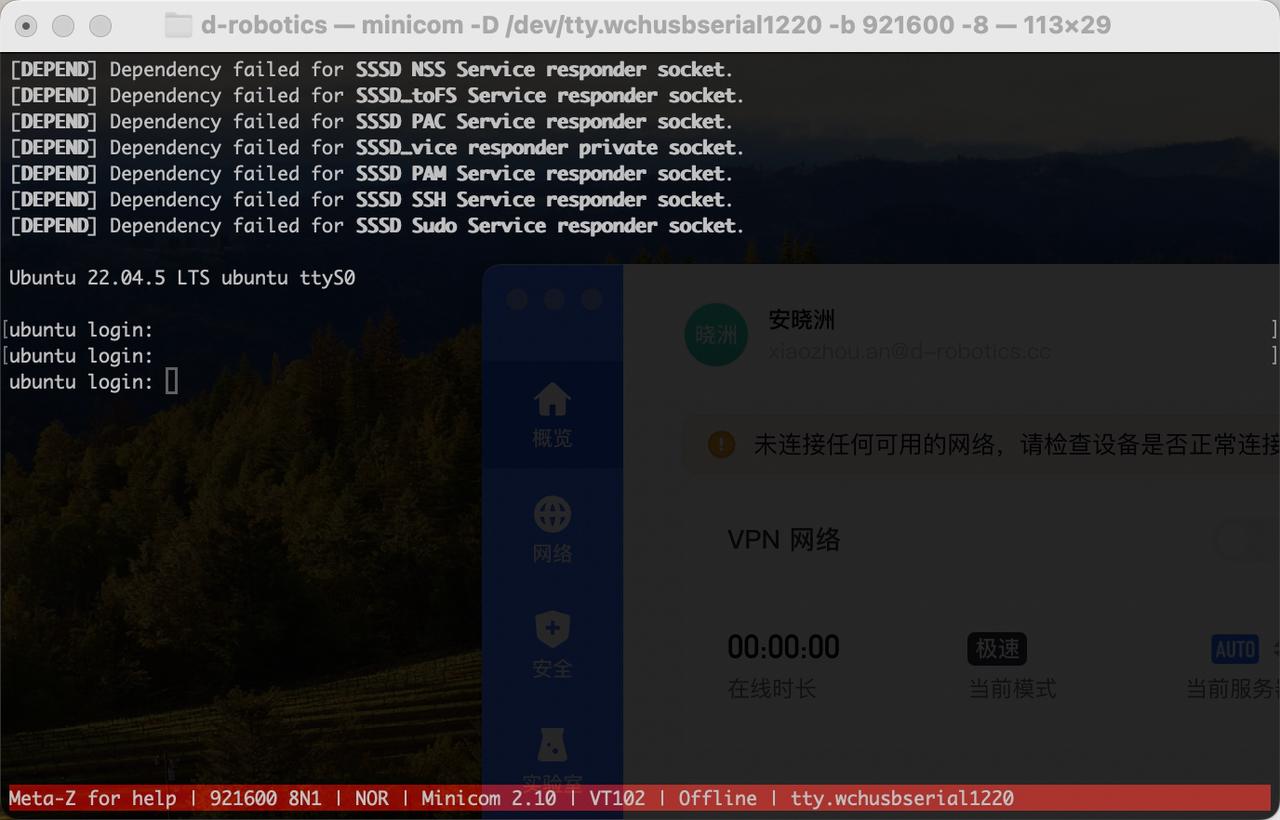
- As shown in the figure above, typically the port with the smaller number is the ACore serial port, and the one with the larger number is the MCU serial port. For example,
-
FAQ
- Q1: I previously installed the CH340N driver from the official website, but the serial output is still garbled.
- A: If you’ve already installed the driver from the official site but the device still shows up as
tty.usbserial*, move theCH34xVCPDriverAppto the Trash, empty the Trash, restart your computer, and reinstall the driver following the steps above.
- A: If you’ve already installed the driver from the official site but the device still shows up as
- Q1: I previously installed the CH340N driver from the official website, but the serial output is still garbled.
Common Issues
For solutions to additional problems, please refer to the Common Issues section. You can also visit the D-Robotics Developer Official Forum for support.