rtsp2display 示例介绍
示例简介
rtsp2display 是一个位于 /app/cdev_demo 中的 C 语言接口 开发代码示例,用于演示如何从 RTSP 视频流获取 H.264 码流,通过硬件解码( SP_Decoder)、视频处理( SP_VPS)和显示模块( SP_Display),实现实时视频在嵌入式设备屏幕上的播放。核心功能包括:
- RTSP 流媒体协议解析
- H.264 硬件解码
- 视频缩放与格式转换
- 多模块协同渲染到显示屏
效果展示
硬件准备
准备一个 RDK 开发板,通过 HDMI 或者 VNC 登录桌面
硬件连接
该示例不需要鼠标和键盘,所以这里连接了 HDMI 显示屏,网线接口,电源线

快速开始
代码以及板端位置
进入到 /app/cdev_demo/rtsp2display 位置,可以看到 rtsp2display 示例里面包含了 2 个文件
root@ubuntu:/app/cdev_demo/rtsp2display# tree
.
├── Makefile
├── live555MediaServer
└── rtsp2display.c
编译以及运行
我们直接在该目录下使用 make 即可编译出 rtsp2display 可执行文件。
root@ubuntu:/app/cdev_demo/rtsp2display# tree
.
├── Makefile
├── live555MediaServer
├── rtsp2display
├── rtsp2display.c
└── rtsp2display.o
执行效果
-
首先 我们先要准备好输入数据,这里我们可以将板端已有的数据,比如 /opt/tros/humble/lib/hobot_codec/config/1920x1080.h264 目录下的 1920x1080.h264 文件拷贝到当前目录,单独操作,不影响原始数据。
-
其次 我们使用 systemctl stop lightdm 来关闭显示服务。
-
然后 打开当前目录下的 live555MediaServer ,在后台运行。
-
接着 我们使用 sudo ./rtsp2display -i rtsp://127.0.0.1/1920x1080.h264 -t tcp 命令,默认的执行结果是将 rtsp 传输过来的 h264 文件,进行解码,然后显示到连接的显示器上
-
最后 使用 ./decoder2display 命令,默认的执行结果是将 1920x1080.h264 的文件,解码之后给到显示器进行显示。
root@ubuntu:/app/cdev_demo/rtsp2display# cp /opt/tros/humble/lib/hobot_codec/config/1920x1080.h264 ./
root@ubuntu:/app/cdev_demo/rtsp2display# ./live555MediaServer &
        version 1.01 (LIVE555 Streaming Media library version 2020.07.09).
Play streams from this server using the URL
        rtsp://192.168.127.10/<filename>
where <filename> is a file present in the current directory.
Each file's type is inferred from its name suffix:
        ".264" => a H.264 Video Elementary Stream file
        ".265" => a H.265 Video Elementary Stream file
        ".aac" => an AAC Audio (ADTS format) file
        ".ac3" => an AC-3 Audio file
        ".amr" => an AMR Audio file
        ".dv" => a DV Video file
        ".m4e" => a MPEG-4 Video Elementary Stream file
        ".mkv" => a Matroska audio+video+(optional)subtitles file
        ".mp3" => a MPEG-1 or 2 Audio file
        ".mpg" => a MPEG-1 or 2 Program Stream (audio+video) file
        ".ogg" or ".ogv" or ".opus" => an Ogg audio and/or video file
        ".ts" => a MPEG Transport Stream file
                (a ".tsx" index file - if present - provides server 'trick play' support)
        ".vob" => a VOB (MPEG-2 video with AC-3 audio) file
        ".wav" => a WAV Audio file
        ".webm" => a WebM audio(Vorbis)+video(VP8) file
See http://www.live555.com/mediaServer/ for additional documentation.
(We use port 80 for optional RTSP-over-HTTP tunneling, or for HTTP live streaming (for indexed Transport Stream files only).)
root@ubuntu:/app/cdev_demo/rtsp2display#
执行上述命令后,我们相当于打开了流媒体服务器,接下来就是通过 rtsp2display 来获取通过 rtsp 传输过来的 h264 文件。
同样的,我们还是要 通过 systemctl stop lightdm 命令来关闭显示服务,达到最佳显示效果。
然后我们使用 sudo ./rtsp2display -i rtsp://127.0.0.1/1920x1080.h264 -t tcp 命令,将通过 rtsp 传输过来的 h264 文件,进行解码,然后显示到连接的显示器上。执行效果如下:
root@ubuntu:/app/cdev_demo/rtsp2display# systemctl stop lightdm
root@ubuntu:/app/cdev_demo/rtsp2display# sudo ./rtsp2display -i rtsp://127.0.0.1/1920x1080.h264 -t tcp
avformat_open_input ok!
avformat_find_stream_info ok!
Input #0, rtsp, from 'rtsp://127.0.0.1/1920x1080.h264':
  Metadata:
    title           : H.264 Video, streamed by the LIVE555 Media Server
    comment         : 1920x1080.h264
  Duration: N/A, start: 0.041667, bitrate: N/A
  Stream #0:0: Video: h264 (High), yuv420p(progressive), 1920x1080 [SAR 1:1 DAR 16:9], 24 fps, 24 tbr, 90k tbn, 48 tbc
av_dump_format ok!
Opened DRM device: /dev/dri/card0
1920x1080
1360x768
1280x1024
1280x720
1024x768
800x600
720x576
720x480
640x480
rtsp_w:1920,rtsp_h:1080
display_w:1920,dispaly_h:1080
Opened DRM device: /dev/dri/card0
DRM is available, using libdrm for rendering.
------------------------------------------------------
Plane 0:
  Plane ID: 41
  Src W: 1920
  Src H: 1080
  CRTC X: 0
  CRTC Y: 0
  CRTC W: 1920
  CRTC H: 1080
  Format: NV12
  Z Pos: 0
  Alpha: 65535
  Pixel Blend Mode: 1
  Rotation: -1
  Color Encoding: -1
  Color Range: -1
------------------------------------------------------
Setting DRM client capabilities...
Setting up KMS...
CRTC ID: 31
CRTC ID: 63
Number of connectors: 1
Connector ID: 74
    Type: 11
    Type Name: HDMI-A
    Connection: Connected
    Modes: 32
    Subpixel: 1
    Mode 0: 1920x1080 @ 60Hz
    Mode 1: 1920x1080 @ 60Hz
    Mode 2: 1920x1080 @ 60Hz
    Mode 3: 1920x1080i @ 60Hz
    Mode 4: 1920x1080i @ 60Hz
    Mode 5: 1920x1080 @ 50Hz
    Mode 6: 1920x1080i @ 50Hz
    Mode 7: 1280x1024 @ 60Hz
    Mode 8: 1440x900 @ 60Hz
    Mode 9: 1360x768 @ 60Hz
    Mode 10: 1280x720 @ 60Hz
    Mode 11: 1280x720 @ 60Hz
    Mode 12: 1280x720 @ 50Hz
    Mode 13: 1024x768 @ 60Hz
    Mode 14: 800x600 @ 60Hz
    Mode 15: 720x576 @ 50Hz
    Mode 16: 720x576 @ 50Hz
    Mode 17: 720x576 @ 50Hz
    Mode 18: 720x576i @ 50Hz
    Mode 19: 720x576i @ 50Hz
    Mode 20: 720x480 @ 60Hz
    Mode 21: 720x480 @ 60Hz
    Mode 22: 720x480 @ 60Hz
    Mode 23: 720x480 @ 60Hz
    Mode 24: 720x480 @ 60Hz
    Mode 25: 720x480i @ 60Hz
    Mode 26: 720x480i @ 60Hz
    Mode 27: 720x480i @ 60Hz
    Mode 28: 720x480i @ 60Hz
    Mode 29: 640x480 @ 60Hz
    Mode 30: 640x480 @ 60Hz
    Mode 31: 640x480 @ 60Hz
2000/01/01 12:19:07.245 !INFO [CamInitVseParam][0418]Setting VSE channel-0: input_width:1920, input_height:1080, dst_w:1920, dst_h:1080
================= VP Modules Status ====================
======================== VFLOW =========================
(active)[S0] vse0_C0
========================= SIF ==========================
========================= ISP ==========================
========================= VSE ==========================
------------------- flow0 info -------------------
input_fps:0/0
input_width:1920
input_height:1080
input_format:2
input_bitwidth:8
dns0 channel: roi [0][0][1920][1080], target [1920][1080], fps [0/0]
========================= VENC =========================
========================= VDEC =========================
----decode param----
dec_idx  dec_id feed_mode pix_fmt bitstream_buf_size bitstream_buf_count frame_buf_count
      0    h264         1       1            3110912                   6               6
----h264 decode param----
dec_idx  dec_id reorder_enable skip_mode bandwidth_Opt
      0    h264              1         0             1

----decode frameinfo----
dec_idx  dec_id display_width display_height
      0    h264             0              0
----decode status----
dec_idx  dec_id cur_input_buf_cnt cur_output_buf_cnt total_input_buf_cnt total_output_buf_cnt     fps
      0    h264                 0                  0                   0                    0       0
========================= JENC =========================
======================= Buffer =========================
----------------------------------------------
flowid module cid chn FREE  REQ  PRO  COM USED
----------------------------------------------
0      vse0   0   0     16    0    0    0    0
0      vse0   0   8      0    3    0    0    0

----------------------------------------------
flowid module cid chn FREE  REQ  PRO  COM USED
----------------------------------------------
0      vse0   0   0     16    0    0    0    0
0      vse0   0   8      0    3    0    0    0

========================= END ===========================
sp_open_vps success!
2000/01/01 12:19:07.254 !INFO [BindTo][0088]BindTo_CHN:-1

2000/01/01 12:19:07.254 !INFO [BindTo][0093]m_prev_module_chn:0

2000/01/01 12:19:07.254 !INFO [BindTo][0088]BindTo_CHN:-1

2000/01/01 12:19:07.254 !INFO [BindTo][0093]m_prev_module_chn:0

2000/01/01 12:19:07.291 !INFO [SetImageFrame][0495]N2D init done!

Created new framebuffer: fb_id=78 for dma_buf_fd=21
add mapping dma_buf_fd:21 fb_id:78, mapping_count: 1
Created new framebuffer: fb_id=79 for dma_buf_fd=22
add mapping dma_buf_fd:22 fb_id:79, mapping_count: 2
Could not read frame ---(error 'End of file')
在屏幕上显示的内容如下

详细介绍
示例程序参数选项说明
我们可以直接执行目标文件来确认参数选项说明
root@ubuntu:/app/cdev_demo/rtsp2display# ./rtsp2display
Usage: rtsp2display [OPTION...]
decode2display sample -- An example of streaming video decoding to the display

  -i, --input=path           rtsp url
  -t, --type=type            tcp or udp
  -?, --help                 Give this help list
      --usage                Give a short usage message

Mandatory or optional arguments to long options are also mandatory or optional
for any corresponding short options.
其中
-i 是必填选项,代表输入视频的文件路径
-t 是必填选项,代表使用 tcp 还是 udp 的网络传输协议
软件架构说明
我们结合示例介绍来理解软件架构说明,首先是通过 ffmpeg 的 libavformat 接口来解析和校验包头等,初始化解码器、 VPS、显示等相关模块之后,
进行 decoder->vps->display 通路的绑定,然后将 libavformat 解析出来的 data 通过 sp_decoder_set_img 传输到解码器中,解码器通过已经绑定的通路
将数据通过 vps 给到了显示器做显示。

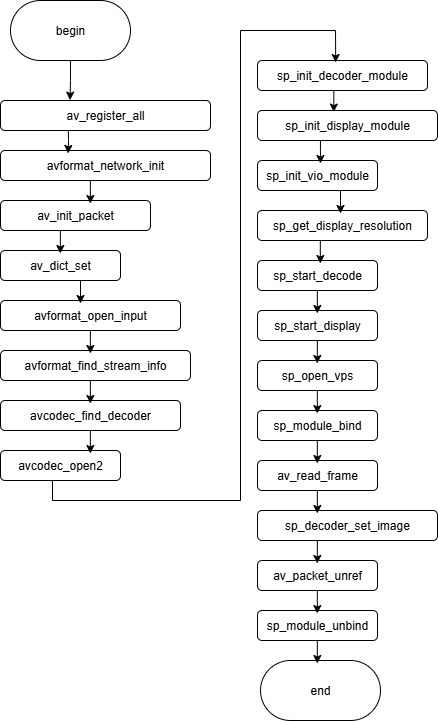
API 流程说明
FAQ
Q: 示例为什么要使用 live555MediaServer ?
A: 为了建立流媒体通路,首先我们要对数据流有一个认识,数据流大概是这样的:"H.264文件 → live555MediaServer → 网络RTSP流 → rtsp2display → 解码 → 处理 → 显示
" , live555MediaServer 将静态的 H.264 文件转换成动态的 RTSP 视频流 ,rtsp2display 拿到网络 RTSP 流才能进行解码处理。
Q: live555MediaServer 可以更换吗?
A: 可以,流媒体服务器可以有多种方式,云端的,比如阿里云,AWS;自己搭建的就有多种选择,处理 live555 ,还有 SRS, Nginx-rtmp, MediaSoup、等等。