1.5.1 显示屏使用
RDK X5 支持 HDMI 和 MIPI DSI 两种显示输出方式,不能同时使用,系统默认采用 HDMI 输出。
HDMI
RDK X5 提供一路 HDMI 接口,支持的最大分辨率为 1080P60。
HDMI 切换
系统默认采用 HDMI 输出,不需要额外配置。如果您已经切换到 MIPI DSI 输出,可以使用srpi-config工具来切换回 HDMI 输出,重启设备生效。
2 Display Options > D1 Dsiplay Choice > 2 HDMI

如果您不想使用 srpi-config 工具,可以按照以下命令行方法进行配置。
mv /etc/X11/xorg.conf.d/xorg_hdmi_ignore.conf /etc/X11/xorg.conf.d/xorg_hdmi_ignore.conf.disable
mv /etc/X11/xorg.conf.d/xorg_dsi_ignore.conf.disable /etc/X11/xorg.conf.d/xorg_dsi_ignore.conf
默认分辨率
默认分辨率可以通过修改/etc/X11/xorg.conf.d/1-resolution.conf文件来实现:
Section "Screen"
    Identifier "Screen0"
    Device "Device0"
    Monitor "Monitor0"
    DefaultDepth 24
    SubSection "Display"
        Depth 24
        Modes "1280x720"
    EndSubSection
EndSection
MIPI DSI
2.8inch DSI LCD
硬件连接
使用DSI-Cable-12cm排线,将显示屏 DSI 接口连接到 X5 rdk 主板的 22PIN DSI 接口,用接口的卡扣把没有触点的背面压紧。
安装效果如下:

软件配置
使用srpi-config工具来选择2.8inch DSI LCD,重启后生效。
2 Display Options > D3 MIPI LCD Choice > 2.8inch DSI LCD

效果演示

3.4inch DSI LCD
硬件连接
使用DSI-Cable-12cm排线,将显示屏 DSI 接口连接到 X5 rdk 主板的 22PIN DSI 接口,用接口的卡扣把没有触点的背面压紧。
通过 4PIN 顶针连通 5V 供电,包括 5V 和 GND。在 RDK X5 主板的 40 PIN 接口上,第 4 脚为 5 V,第 6 脚为 GND。
安装效果如下:


软件配置
使用srpi-config工具来选择3.4inch DSI LCD (C),重启后生效。
2 Display Options > D3 MIPI LCD Choice > 3.4inch DSI LCD (C)
效果演示

4.3inch DSI LCD
硬件连接
使用DSI-Cable-12cm排线,将显示屏 DSI 接口连接到 X5 rdk 主板的 22PIN DSI 接口,用接口的卡扣把没有触点的背面压紧。
安装效果如下:

软件配置
使用srpi-config工具来选择4.3inch DSI LCD,重启后生效。
2 Display Options > D3 MIPI LCD Choice > 4.3inch DSI LCD
效果演示

7inchC DSI LCD
硬件连接
使用DSI-Cable-12cm排线,将显示屏 DSI 接口连接到 X5 rdk 主板的 22PIN DSI 接口,用接口的卡扣把没有触点的背面压紧。
通过 4PIN 顶针连通 5V 供电,包括 5V 和 GND。在 RDK X5 主板的 40 PIN 接口上,第 4 脚为 5 V,第 6 脚为 GND。
通过 4PIN 顶针连通 I2C 通信,接到 X5 rdk 主板 40PIN I2C5 接口上。在 RDK X5 主板的 40 PIN 接口上,第 3 脚为 SDA5,第 5 脚为 SCL5。
安装效果如下:


软件配置
使用srpi-config工具来选择7inch DSI LCD (C),重启后生效。
2 Display Options > D3 MIPI LCD Choice > 7inch DSI LCD (C)
效果演示

7.9inch DSI LCD
硬件连接
使用DSI-Cable-12cm排线,将显示屏 DSI 接口连接到 X5 rdk 主板的 22PIN DSI 接口,用接口的卡扣把没有触点的背面压紧。
使用 5V/3A 的 type-C 接口电源为屏幕供电。
安装效果如下:

软件配置
使用srpi-config工具来选择7.9inch DSI LCD,重启后生效。
2 Display Options > D3 MIPI LCD Choice > 7.9inch DSI LCD
效果演示

8inch DSI LCD
硬件连接
使用DSI-Cable-12cm排线,将显示屏 DSI 接口连接到 X5 rdk 主板的 22PIN DSI 接口,用接口的卡扣把没有触点的背面压紧。
使用 5V/3A 的 type-C 接口电源为屏幕供电。
安装效果如下:

软件配置
使用srpi-config工具来选择8inch DSI LCD (C),重启后生效。
2 Display Options > D3 MIPI LCD Choice > 8inch DSI LCD (C)
效果演示

10.1inch DSI LCD
硬件连接
使用DSI-Cable-12cm排线,将显示屏 DSI 接口连接到 X5 rdk 主板的 22PIN DSI 接口,用接口的卡扣把没有触点的背面压紧。
使用 5V/3A 的 type-C 接口电源为屏幕供电。
安装效果如下:

软件配置
使用srpi-config工具来选择10.1inch DSI LCD (C),重启后生效。
2 Display Options > D3 MIPI LCD Choice > 10.1inch DSI LCD (C)
效果演示

11.9inch DSI LCD
硬件连接
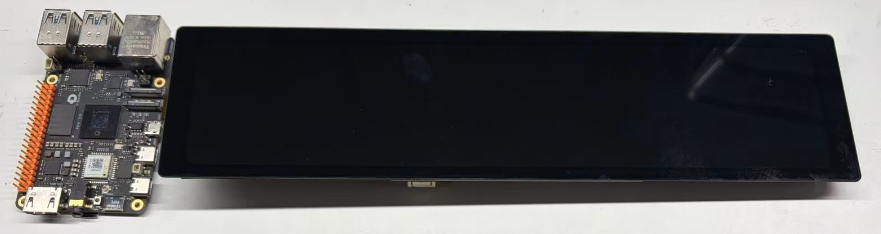
使用DSI-Cable-12cm排线,将显示屏 DSI 接口连接到 X5 rdk 主板的 22PIN DSI 接口,用接口的卡扣把没有触点的背面压紧。
使用 5V/3A 的 type-C 接口电源为屏幕供电。
安装效果如下:
软件配置
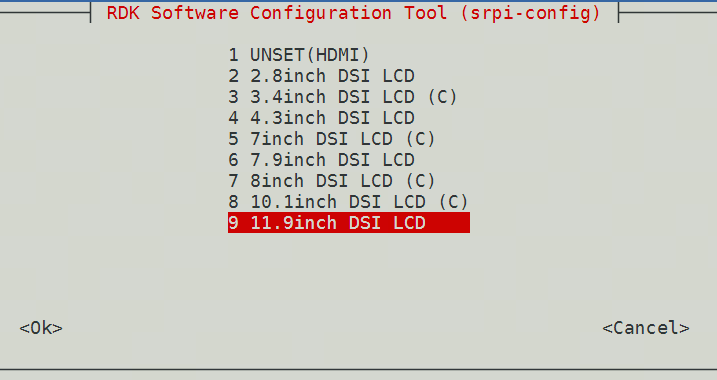
使用srpi-config工具来选择11.9inch DSI LCD,重启后生效。
2 Display Options > D3 MIPI LCD Choice > 11.9inch DSI LCD
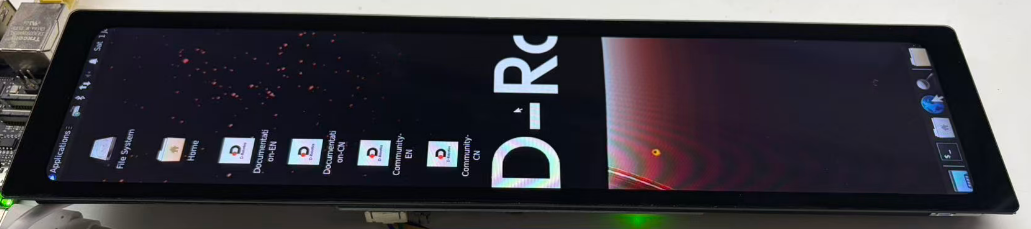
效果演示
旧版本方法
如果您系统中 srpi-config 工具版本较低,没有D3 MIPI LCD Choice选项,可以使用以下方法升级工具。

或者您不想使用 srpi-config 工具,可以按照以下命令行方法进行配置。
1,通过命令切换到 MIPI DSI 显示方式。
mv /etc/X11/xorg.conf.d/xorg_dsi_ignore.conf /etc/X11/xorg.conf.d/xorg_dsi_ignore.conf.disable
mv /etc/X11/xorg.conf.d/xorg_hdmi_ignore.conf.disable /etc/X11/xorg.conf.d/xorg_hdmi_ignore.conf
2,打开/boot/config.txt文件,以2.8inch DSI LCD为例,在 config.txt 最后加入以下代码,保存,退出,重启系统。
dtoverlay=dsi-waveshare-panel-overlay-2_8_inch
所有版本的显示屏配置方法相同,只需修改dtoverlay参数即可。可以参考下表
| 屏幕类型 | dtoverlay 参数 |
|---|---|
| 2.8inch DSI LCD | dsi-waveshare-panel-overlay-2_8_inch |
| 3.4inch DSI LCD (C) | dsi-waveshare-panel-overlay-3_4_inch |
| 4.3inch DSI LCD | dsi-waveshare-panel-overlay-4_3_inch |
| 7inch DSI LCD (C) | dsi-waveshare-panel-overlay-7_0_inchC |
| 7.9inch DSI LCD | dsi-waveshare-panel-overlay-7_9_inch |
| 8inch DSI LCD | dsi-waveshare-panel-overlay-8_0_inch |
| 10.1inch DSI LCD | dsi-waveshare-panel-overlay-10_1_inch |