双目深度算法
1. 功能介绍
地瓜双目深度估计算法输入为双目图像数据,输出为左视图对应的视差图和深度图。算法借鉴IGEV网络,采用了GRU架构,具有较好的数据泛化性和较高的推理效率。
双目算法代码仓库:https://github.com/D-Robotics/hobot_stereonet
mipi相机代码仓库:https://github.com/D-Robotics/hobot_mipi_cam
zed相机代码仓库:https://github.com/D-Robotics/hobot_zed_cam
双目算法讲解:直播回放 | 基于RDK X5的AI双目算法部署实战
2. 支持平台
| 平台 | 系统支持 | 示例功能 |
|---|---|---|
| RDK X5, RDK X5 Module | Ubuntu 22.04 (Humble) | 启动双目相机,推理出深度结果,并在Web端显示 |
| RDK S100, RDK S100P | Ubuntu 22.04 (Humble) | 启动双目相机,推理出深度结果,并在Web端显示 |
3. 模型版本
| 平台 | 算法版本 | 量化方式 | 输入尺寸 | 最高推理帧率(fps) | 模型说明 |
|---|---|---|---|---|---|
| X5 | V2.0 | int16 | 640x352x3x2 | 15 | 历史版本 |
| X5 | V2.1 | int16 | 640x352x3x2 | 15 | 历史版本,带置信度输出 |
| X5 | V2.2 | int8 | 640x352x3x2 | 23 | 历史版本 |
| X5 | V2.3 | int8 | 640x352x3x2 | 27 | 历史版本,最高帧率 |
| X5 | V2.4_int16 | int16 | 640x352x3x2 | 15 | 当前主版本,高精度深度估计 |
| X5 | V2.4_int8 | int8 | 640x352x3x2 | 23 | 当前主版本,高帧率深度估计 |
| X5 | V2.5_int16 | int16 | 640x352x3x2 | 16 | 最新版本,高精度深度估计 |
| X5 | V2.5_int16_96 | int16 | 640x352x3x2 | 18 | 最新版本,最大搜索视差96视差 |
| X5 | V2.5_int16_544_448 | int16 | 544x448x3x2 | 15 | 最新版本,544*448分辨率 |
| X5 | V2.5_int16_544_448_96 | int16 | 544x448x3x2 | 17 | 最新版本,544*448分辨率,最大搜索视差96视差 |
| S100 | V2.1 | int16 | 640x352x3x2 | 53 | 历史版本,带置信度输出 |
| S100 | V2.4 | int16 | 640x352x3x2 | 53 | 当前主版本,带置信度输出 |
4. 准备工作
4.1. RDK平台
- RDK已烧录好RDK OS系统
- RDK已成功安装TogetheROS.Bot
- 如果需要在线推理,请准备好双目相机,目前支持多款MIPI相机、ZED mini/2i USB相机
- 如果需要离线推理,请准备好双目图像数据
- 确认PC机能够通过网络访问RDK
4.2. 系统和功能包版本
| 版本 | 查询方法 | |
|---|---|---|
| RDK X5系统镜像版本 | 3.3.3及以上 | cat /etc/version |
| RDK S100系统镜像版本 | 4.0.2-Beta及以上 | cat /etc/version |
| tros-humble-hobot-stereonet功能包版本 | 2.5.0及以上 | apt list | grep tros-humble-hobot-stereonet/ |
| tros-humble-mipi-cam功能包版本 | 2.3.13及以上 | apt list | grep tros-humble-mipi-cam/ |
| tros-humble-hobot-zed-cam功能包版本 | 2.3.3及以上 | apt list | grep tros-humble-hobot-zed-cam/ |
- 如果系统镜像版本不符合要求,请参考文档对应章节进行镜像烧录
- 如果功能包版本不符合要求,请执行以下指令进行更新:
sudo apt update
sudo apt install --only-upgrade tros-humble-hobot-stereonet
sudo apt install --only-upgrade tros-humble-mipi-cam
sudo apt install --only-upgrade tros-humble-hobot-zed-cam
- 如果以上指令无法将程序更新到最新版本,则需要将apt源文件修改为beta源:
# 修改为beta源,执行以下命令:
sudo echo 'deb [signed-by=/usr/share/keyrings/sunrise.gpg] http://archive.d-robotics.cc/ubuntu-rdk-x5-beta  jammy main' | sudo tee /etc/apt/sources.list.d/sunrise.list
apt update

# 如果需要重新改回为正式源,则执行以下命令:
sudo echo 'deb [signed-by=/usr/share/keyrings/sunrise.gpg] http://archive.d-robotics.cc/ubuntu-rdk-x5  jammy main' | sudo tee /etc/apt/sources.list.d/sunrise.list
apt update
如果sudo apt update命令执行失败或报错,请查看常见问题章节的Q10: apt update 命令执行失败或报错如何处理?解决。
5. 算法启动
5.1. 注意事项(必看!!!)
请用root用户执行文档中的命令,其他用户执行可能权限不够,造成一些不必要的错误。

5.2. MIPI双目相机安装
(1) 230AI MIPI双目相机
- RDK官方230AI MIPI双目相机如图所示:
注意:请检查相机背面丝印印有CDPxxx-V3/V4,确认相机是V3或V4版本
- RDK X5安装方式如图所示:

- RDK S100安装方式如图所示,注意S100的CAM子板拨码开关要拨到
LPWM和3.3V:

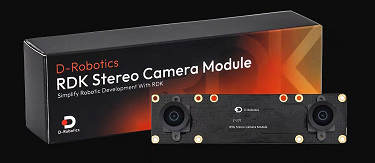
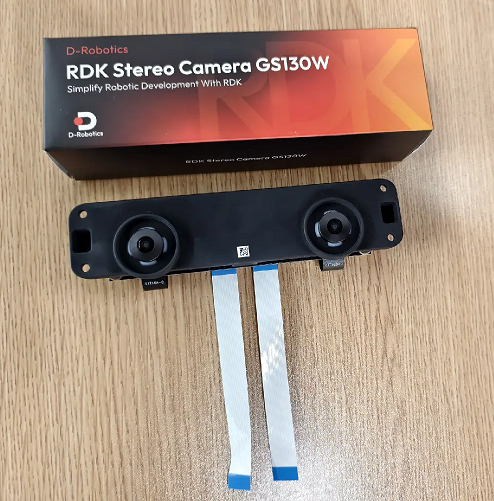
(2) 132GS MIPI双目相机
- RDK官方132GS MIPI双目相机如图所示:
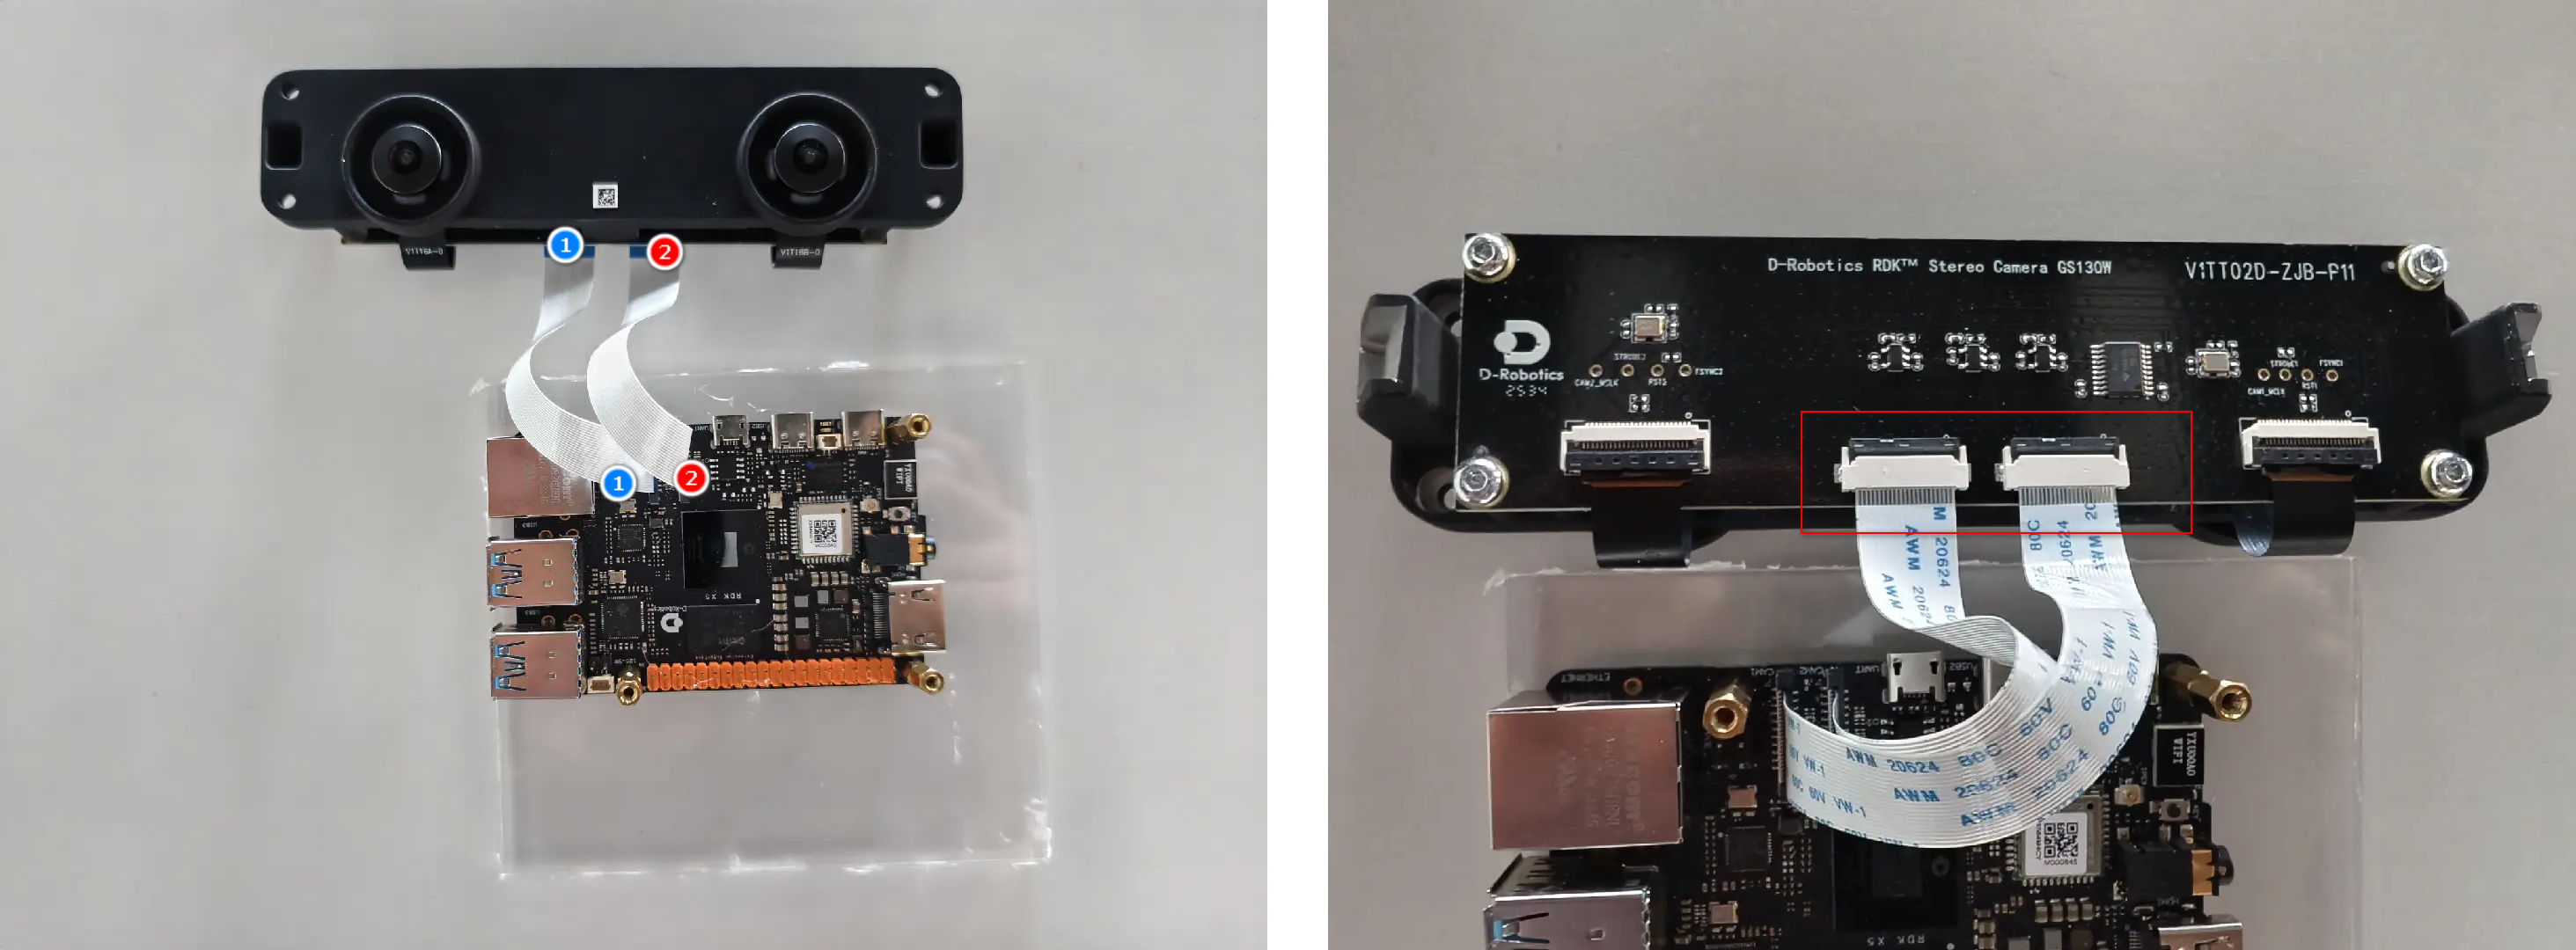
- RDK X5安装方式如图所示:
- 最新线材做了升级,注意线材是带有方向的,CAM端接入相机,RDK端接入开发板。(白色和黑色线材均能正常使用,两种线材随机发货)

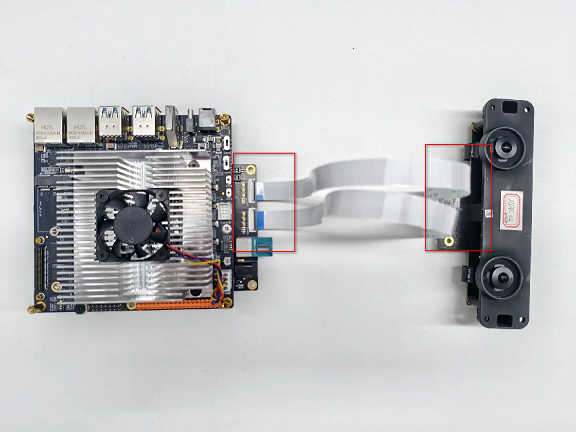
- RDK S100安装方式如图所示,注意S100的CAM子板拨码开关要拨到
LPWM和3.3V:
5.3. 在线启动指令
(1) 确认双目相机I2C信号正常
- 确认230AI双目相机I2C信号是否正常,通过ssh连接RDK,执行以下命令,如果输出0x30、0x32、0x50等地址,则代表相机连接正常:
# RDK X5
i2cdetect -r -y 4
i2cdetect -r -y 6

# RDK S100
i2cdetect -r -y 1
i2cdetect -r -y 2
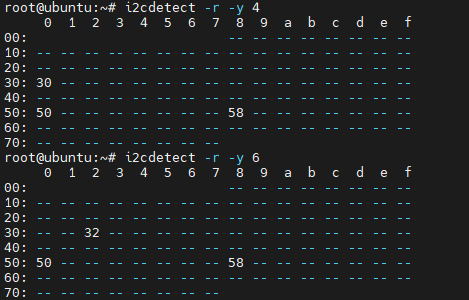
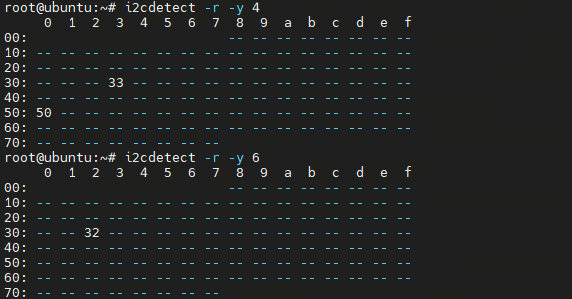
- 确认132GS双目相机I2C信号是否正常,通过ssh连接RDK,执行以下命令,如果输出0x32、0x33、0x50等地址,则代表相机连接正常:
# RDK X5
i2cdetect -r -y 4
i2cdetect -r -y 6

# RDK S100
i2cdetect -r -y 1
i2cdetect -r -y 2
如果I2C信号检测不到,相机无法正常工作
(2) 确认相机出流正常
- 方法1:如果已经安装tros-humble-hobot-stereonet功能包,则可以直接复制
cp -rv /opt/tros/humble/share/hobot_stereonet/script/run_cam.sh ./
- 方法2:手动创建启动脚本
run_cam.sh,写入以下内容
#!/bin/bash
source /opt/tros/humble/setup.bash

ros2 pkg prefix mipi_cam

image_width=1280
image_height=1088
framerate=30.0
rotation=90.0
gdc_enable=False
cal_rotation=90.0
lpwm_enable=True
frame_ts_type=realtime
out_format=nv12
channel=2
channel2=0
log_level=ERROR

while [[ $# -gt 0 ]]; do
  case $1 in
    --image_width) image_width=$2; shift 2 ;;
    --image_height) image_height=$2; shift 2 ;;
    --framerate) framerate=$2; shift 2 ;;
    --rotation) rotation=$2; shift 2 ;;
    --gdc_enable) gdc_enable=$2; shift 2 ;;
    --cal_rotation) cal_rotation=$2; shift 2 ;;
    --lpwm_enable) lpwm_enable=$2; shift 2 ;;
    --frame_ts_type) frame_ts_type=$2; shift 2 ;;
    --out_format) out_format=$2; shift 2 ;;
    --channel) channel=$2; shift 2 ;;
    --channel2) channel2=$2; shift 2 ;;
    --log_level) log_level=$2; shift 2 ;;
    *) echo "unknown param: $1"; exit 1 ;;
  esac
done

ros2 run mipi_cam mipi_cam --ros-args \
-p device_mode:=dual -p dual_combine:=1 \
-p image_width:=$image_width -p image_height:=$image_height \
-p framerate:=$framerate -p rotation:=$rotation \
-p gdc_enable:=$gdc_enable -p cal_rotation:=$cal_rotation \
-p lpwm_enable:=$lpwm_enable \
-p frame_ts_type:=$frame_ts_type \
-p out_format:=$out_format \
-p channel:=$channel -p channel2:=$channel2 \
--log-level $log_level
- 执行如下指令:
- 230AI
- 132GS
bash run_cam.sh --image_width 1920 --image_height 1080 --rotation 0.0 --cal_rotation 0.0 --log_level INFO
bash run_cam.sh --rotation 90.0 --log_level INFO
- 以X5上接入132GS相机为例,正确启动相机会打印如下日志(S100或不同型号相机接入会打印不同的日志):

- 日志解析:
I2C bus是控制通道编号,可以用于配置传感器寄存器,例如设置分辨率、设置帧率、启动 streaming,图像数据不走I2C,I2C只负责控制。
程序会检测X5的第4路和第6路I2C控制器,是否能扫到sensor地址。日志中检测到0x32、0x30两个地址,对应I2C bus-4和I2C bus-6,也可以使用上文提到的i2cdetect -r -y 4指令扫描sensor地址。
mipi rx phy是图像数据通道编号,相机采集的图像数据会走该高速通道传输到芯片。
日志显示X5有两个mipi phy,分别是编号0和编号2,对应左右目相机。该编号可以设置到下文提到的channel和mipi_channel参数,��用于改变左右目图像的拼接顺序。
(3) 创建双目算法启动脚本
- 方法1:如果已经安装tros-humble-hobot-stereonet功能包,则可以直接复制
cp -rv /opt/tros/humble/share/hobot_stereonet/script/run_stereo.sh ./
- 方法2:手动创建启动脚本
run_stereo.sh,写入以下内容
#!/bin/bash
source /opt/tros/humble/setup.bash

ros2 pkg prefix mipi_cam
ros2 pkg prefix hobot_stereonet

rm -rfv performance_*.txt

# stereonet version
stereonet_version=v2.4_int16

# node name
stereo_node_name=StereoNetNode

# uncertainty
uncertainty_th=-0.10

# topic
stereo_image_topic=/image_combine_raw
camera_info_topic=/image_combine_raw/right/camera_info
left_camera_info_topic=/image_combine_raw/left/camera_info
depth_image_topic="~/stereonet_depth"
depth_camera_info_topic="~/stereonet_depth/camera_info"
rectify_left_camera_info_topic="~/rectify_left_image/camera_info"
rectify_right_camera_info_topic="~/rectify_right_image/camera_info"
pointcloud2_topic="~/stereonet_pointcloud2"
publish_pcd_enabled=True
rectify_left_image_topic="~/rectify_left_image"
rectify_right_image_topic="~/rectify_right_image"
publish_rectify_bgr=False
origin_left_image_topic="~/origin_left_image"
origin_right_image_topic="~/origin_right_image"
publish_origin_enable=True
visual_image_topic="~/stereonet_visual"
publish_visual_enabled=True
stereonet_frame_id="camera_link"

# mipi cam
use_mipi_cam=True
mipi_image_width=640
mipi_image_height=352
mipi_image_framerate=30.0
mipi_frame_ts_type=realtime
mipi_gdc_enable=True
mipi_lpwm_enable=True
mipi_rotation=90.0
mipi_channel=2
mipi_channel2=0
mipi_cal_rotation=0.0

# calib
calib_method=none
stereo_calib_file_path=calib.yaml

# render
render_type=distance
render_perf=True
render_max_disp=80
render_z_near=-1.0
render_z_range=3.0

# speckle filter
speckle_filter_enable=False
max_speckle_size=100
max_disp_diff=1.0

# pointcloud
pointcloud_height_min=-5.0
pointcloud_height_max=5.0
pointcloud_depth_max=5.0

# pcl filter
pcl_filter_enable=False
grid_size=0.1
grid_min_point_count=5

# thread
infer_thread_num=2
save_thread_num=4
max_save_task=50

# save
save_result_flag=False
save_dir=./result
save_freq=1
save_total=-1
save_stereo_flag=True
save_origin_flag=False
save_disp_flag=True
save_uncert_flag=False
save_depth_flag=True
save_visual_flag=True
save_pcd_flag=False

# local image
use_local_image_flag=False
local_image_dir=./offline
image_sleep=0

# camera intrinsic
camera_cx=0.0
camera_cy=0.0
camera_fx=0.0
camera_fy=0.0
baseline=0.0
doffs=0.0

# mask
left_img_mask_enable=False

# epipolar
epipolar_mode=False
epipolar_img=rect
chessboard_per_rows=20
chessboard_per_cols=11
chessboard_square_size=0.06
feature_epipolar_mode=False

# web
stereonet_pub_web=True
codec_sub_topic=/$stereo_node_name/stereonet_visual
codec_in_format=bgr8
codec_pub_topic=/image_jpeg
websocket_image_topic=/image_jpeg
websocket_channel=0

while [[ $# -gt 0 ]]; do
  case $1 in
    # stereonet version
    --stereonet_version) stereonet_version=$2; shift 2 ;;

    # node name
    --stereo_node_name) stereo_node_name=$2; shift 2 ;;

    # uncertainty
    --uncertainty_th) uncertainty_th=$2; shift 2 ;;

    # topic
    --stereo_image_topic) stereo_image_topic=$2; shift 2 ;;
    --camera_info_topic) camera_info_topic=$2; shift 2 ;;
    --left_camera_info_topic) left_camera_info_topic=$2; shift 2 ;;
    --depth_image_topic) depth_image_topic=$2; shift 2 ;;
    --rectify_left_camera_info_topic) rectify_left_camera_info_topic=$2; shift 2 ;;
    --rectify_right_camera_info_topic) rectify_right_camera_info_topic=$2; shift 2 ;;
    --depth_camera_info_topic) depth_camera_info_topic=$2; shift 2 ;;
    --pointcloud2_topic) pointcloud2_topic=$2; shift 2 ;;
    --publish_pcd_enabled) publish_pcd_enabled=$2; shift 2 ;;
    --rectify_left_image_topic) rectify_left_image_topic=$2; shift 2 ;;
    --rectify_right_image_topic) rectify_right_image_topic=$2; shift 2 ;;
    --publish_rectify_bgr) publish_rectify_bgr=$2; shift 2 ;;
    --origin_left_image_topic) origin_left_image_topic=$2; shift 2 ;;
    --origin_right_image_topic) origin_right_image_topic=$2; shift 2 ;;
    --publish_origin_enable) publish_origin_enable=$2; shift 2 ;;
    --visual_image_topic) visual_image_topic=$2; shift 2 ;;
    --publish_visual_enabled) publish_visual_enabled=$2; shift 2 ;;
    --stereonet_frame_id) stereonet_frame_id=$2; shift 2 ;;

    # mipi cam
    --use_mipi_cam) use_mipi_cam=$2; shift 2 ;;
    --mipi_image_width) mipi_image_width=$2; shift 2 ;;
    --mipi_image_height) mipi_image_height=$2; shift 2 ;;
    --mipi_image_framerate) mipi_image_framerate=$2; shift 2 ;;
    --mipi_frame_ts_type) mipi_frame_ts_type=$2; shift 2 ;;
    --mipi_gdc_enable) mipi_gdc_enable=$2; shift 2 ;;
    --mipi_lpwm_enable) mipi_lpwm_enable=$2; shift 2 ;;
    --mipi_rotation) mipi_rotation=$2; shift 2 ;;
    --mipi_channel) mipi_channel=$2; shift 2 ;;
    --mipi_channel2) mipi_channel2=$2; shift 2 ;;
    --mipi_cal_rotation) mipi_cal_rotation=$2; shift 2 ;;

    # calib
    --calib_method) calib_method=$2; shift 2 ;;
    --stereo_calib_file_path) stereo_calib_file_path=$2; shift 2 ;;

    # render
    --render_type) render_type=$2; shift 2 ;;
    --render_perf) render_perf=$2; shift 2 ;;
    --render_max_disp) render_max_disp=$2; shift 2 ;;
    --render_z_near) render_z_near=$2; shift 2 ;;
    --render_z_range) render_z_range=$2; shift 2 ;;

    # speckle filter
    --speckle_filter_enable) speckle_filter_enable=$2; shift 2 ;;
    --max_speckle_size) max_speckle_size=$2; shift 2 ;;
    --max_disp_diff) max_disp_diff=$2; shift 2 ;;

    # pointcloud
    --pointcloud_height_min) pointcloud_height_min=$2; shift 2 ;;
    --pointcloud_height_max) pointcloud_height_max=$2; shift 2 ;;
    --pointcloud_depth_max) pointcloud_depth_max=$2; shift 2 ;;

    # pcl filter
    --pcl_filter_enable) pcl_filter_enable=$2; shift 2 ;;
    --grid_size) grid_size=$2; shift 2 ;;
    --grid_min_point_count) grid_min_point_count=$2; shift 2 ;;

    # thread
    --infer_thread_num) infer_thread_num=$2; shift 2 ;;
    --save_thread_num) save_thread_num=$2; shift 2 ;;
    --max_save_task) max_save_task=$2; shift 2 ;;

    # save
    --save_result_flag) save_result_flag=$2; shift 2 ;;
    --save_dir) save_dir=$2; shift 2 ;;
    --save_freq) save_freq=$2; shift 2 ;;
    --save_total) save_total=$2; shift 2 ;;
    --save_stereo_flag) save_stereo_flag=$2; shift 2 ;;
    --save_origin_flag) save_origin_flag=$2; shift 2 ;;
    --save_disp_flag) save_disp_flag=$2; shift 2 ;;
    --save_uncert_flag) save_uncert_flag=$2; shift 2 ;;
    --save_depth_flag) save_depth_flag=$2; shift 2 ;;
    --save_visual_flag) save_visual_flag=$2; shift 2 ;;
    --save_pcd_flag) save_pcd_flag=$2; shift 2 ;;

    # local image
    --use_local_image_flag) use_local_image_flag=$2; shift 2 ;;
    --local_image_dir) local_image_dir=$2; shift 2 ;;
    --image_sleep) image_sleep=$2; shift 2 ;;

    # camera intrinsic
    --camera_cx) camera_cx=$2; shift 2 ;;
    --camera_cy) camera_cy=$2; shift 2 ;;
    --camera_fx) camera_fx=$2; shift 2 ;;
    --camera_fy) camera_fy=$2; shift 2 ;;
    --baseline) baseline=$2; shift 2 ;;
    --doffs) doffs=$2; shift 2 ;;

    # mask
    --left_img_mask_enable) left_img_mask_enable=$2; shift 2 ;;

    # epipolar
    --epipolar_mode) epipolar_mode=$2; shift 2 ;;
    --epipolar_img) epipolar_img=$2; shift 2 ;;
    --chessboard_per_rows) chessboard_per_rows=$2; shift 2 ;;
    --chessboard_per_cols) chessboard_per_cols=$2; shift 2 ;;
    --chessboard_square_size) chessboard_square_size=$2; shift 2 ;;

    # web
    --stereonet_pub_web) stereonet_pub_web=$2; shift 2 ;;
    --codec_sub_topic) codec_sub_topic=$2; shift 2 ;;
    --codec_in_format) codec_in_format=$2; shift 2 ;;
    --codec_pub_topic) codec_pub_topic=$2; shift 2 ;;
    --websocket_image_topic) websocket_image_topic=$2; shift 2 ;;
    --websocket_channel) websocket_channel=$2; shift 2 ;;

    *) echo "unknown param: $1"; exit 1 ;;
  esac
done

ros2 launch hobot_stereonet stereonet_model_web_visual_$stereonet_version.launch.py \
stereo_node_name:=$stereo_node_name \
uncertainty_th:=$uncertainty_th \
stereo_image_topic:=$stereo_image_topic camera_info_topic:=$camera_info_topic left_camera_info_topic:=$left_camera_info_topic \
depth_image_topic:=$depth_image_topic depth_camera_info_topic:=$depth_camera_info_topic \
rectify_left_camera_info_topic:=$rectify_left_camera_info_topic rectify_right_camera_info_topic:=$rectify_right_camera_info_topic \
pointcloud2_topic:=$pointcloud2_topic publish_pcd_enabled:=$publish_pcd_enabled \
rectify_left_image_topic:=$rectify_left_image_topic rectify_right_image_topic:=$rectify_right_image_topic publish_rectify_bgr:=$publish_rectify_bgr \
origin_left_image_topic:=$origin_left_image_topic origin_right_image_topic:=$origin_right_image_topic publish_origin_enable:=$publish_origin_enable \
visual_image_topic:=$visual_image_topic publish_visual_enabled:=$publish_visual_enabled \
use_mipi_cam:=$use_mipi_cam mipi_image_width:=$mipi_image_width mipi_image_height:=$mipi_image_height \
mipi_image_framerate:=$mipi_image_framerate mipi_frame_ts_type:=$mipi_frame_ts_type \
mipi_gdc_enable:=$mipi_gdc_enable mipi_lpwm_enable:=$mipi_lpwm_enable mipi_rotation:=$mipi_rotation \
mipi_channel:=$mipi_channel mipi_channel2:=$mipi_channel2 mipi_cal_rotation:=$mipi_cal_rotation \
calib_method:=$calib_method stereo_calib_file_path:=$stereo_calib_file_path \
render_type:=$render_type render_perf:=$render_perf render_max_disp:=$render_max_disp render_z_near:=$render_z_near render_z_range:=$render_z_range \
speckle_filter_enable:=$speckle_filter_enable max_speckle_size:=$max_speckle_size max_disp_diff:=$max_disp_diff \
pointcloud_height_min:=$pointcloud_height_min pointcloud_height_max:=$pointcloud_height_max pointcloud_depth_max:=$pointcloud_depth_max \
pcl_filter_enable:=$pcl_filter_enable grid_size:=$grid_size grid_min_point_count:=$grid_min_point_count \
infer_thread_num:=$infer_thread_num save_thread_num:=$save_thread_num max_save_task:=$max_save_task \
use_local_image_flag:=$use_local_image_flag local_image_dir:=$local_image_dir image_sleep:=$image_sleep \
save_result_flag:=$save_result_flag save_dir:=$save_dir save_freq:=$save_freq save_total:=$save_total save_stereo_flag:=$save_stereo_flag \
save_origin_flag:=$save_origin_flag save_disp_flag:=$save_disp_flag save_uncert_flag:=$save_uncert_flag save_depth_flag:=$save_depth_flag \
save_visual_flag:=$save_visual_flag save_pcd_flag:=$save_pcd_flag \
use_local_image_flag:=$use_local_image_flag local_image_dir:=$local_image_dir image_sleep:=$image_sleep \
camera_cx:=$camera_cx camera_cy:=$camera_cy camera_fx:=$camera_fx camera_fy:=$camera_fy baseline:=$baseline doffs:=$doffs \
left_img_mask_enable:=$left_img_mask_enable \
epipolar_mode:=$epipolar_mode epipolar_img:=$epipolar_img \
chessboard_per_rows:=$chessboard_per_rows chessboard_per_cols:=$chessboard_per_cols chessboard_square_size:=$chessboard_square_size \
feature_epipolar_mode:=$feature_epipolar_mode \
stereonet_pub_web:=$stereonet_pub_web codec_sub_topic:=$codec_sub_topic codec_in_format:=$codec_in_format \
codec_pub_topic:=$codec_pub_topic websocket_image_topic:=$websocket_image_topic websocket_channel:=$websocket_channel
(4) 执行双目算法启动指令
- 通过ssh连接RDK,执行以下命令,则可以启动算法:
- RDK X5
- RDK S100
# 搭配230AI相机
bash run_stereo.sh --mipi_rotation 0.0

# 搭配132GS相机
bash run_stereo.sh

# 注意:
# 需要观察网页端图像RGB图是否是左目相机采集的图像,可以用镜头盖遮挡一下左目相机确认
# 如果左右目相机顺序不正确,有两个方法调整:
# 方法1:交换MIPI线
# 方法2:在上面的运行指令上,加入参数:--mipi_channel 0 --mipi_channel2 2 或 --mipi_channel 2 --mipi_channel2 0,看看哪种情况能输出正确的结果
# 搭配230AI相机
bash run_stereo.sh --stereonet_version v2.4 --mipi_rotation 0.0

# 搭配132GS相机
bash run_stereo.sh --stereonet_version v2.4

# S100还支持大分辨率模型,以132GS相机为例,启动指令如下
bash run_stereo.sh --stereonet_version v2.4_1280_704 --mipi_image_width 1280 --mipi_image_height 704

# 注意:
# 需要观察网页端图像RGB图是否是左目相机采集的图像,可以用镜头盖遮挡一下左目相机确认
# 如果左右目相机顺序不正确,有两个方法调整:
# 方法1:交换MIPI线
# 方法2:在上面的运行指令上,加入参数:--mipi_channel 0 --mipi_channel2 1 或 --mipi_channel 1 --mipi_channel2 0,看看哪种情况能输出正确的结果
如果程序没有正确启动,可以通过ros2 topic list -v检查一下是否存在stereo_image_topic�和camera_info_topic对应的话题
如果程序正确启动,但深度效果不好,要确认:1.左右目图像的拼接顺序为左上右下; 2.参考下文确认左右图是否满足极线对齐要求
- 左右目相机定义, 需要确认下文网页端显示的RGB图像是否是左相机拍摄的图像 :

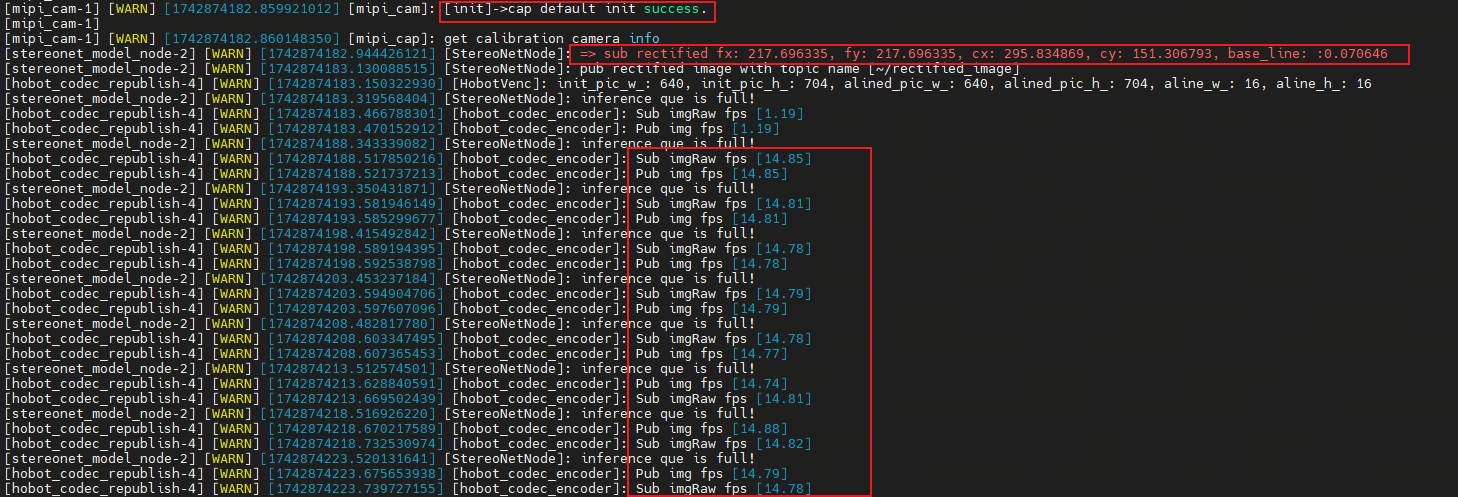
- 双目算法启动成功后会打印如下日志,
fx/fy/cx/cy/baseline是相机内参,fps是算法运行的帧率:
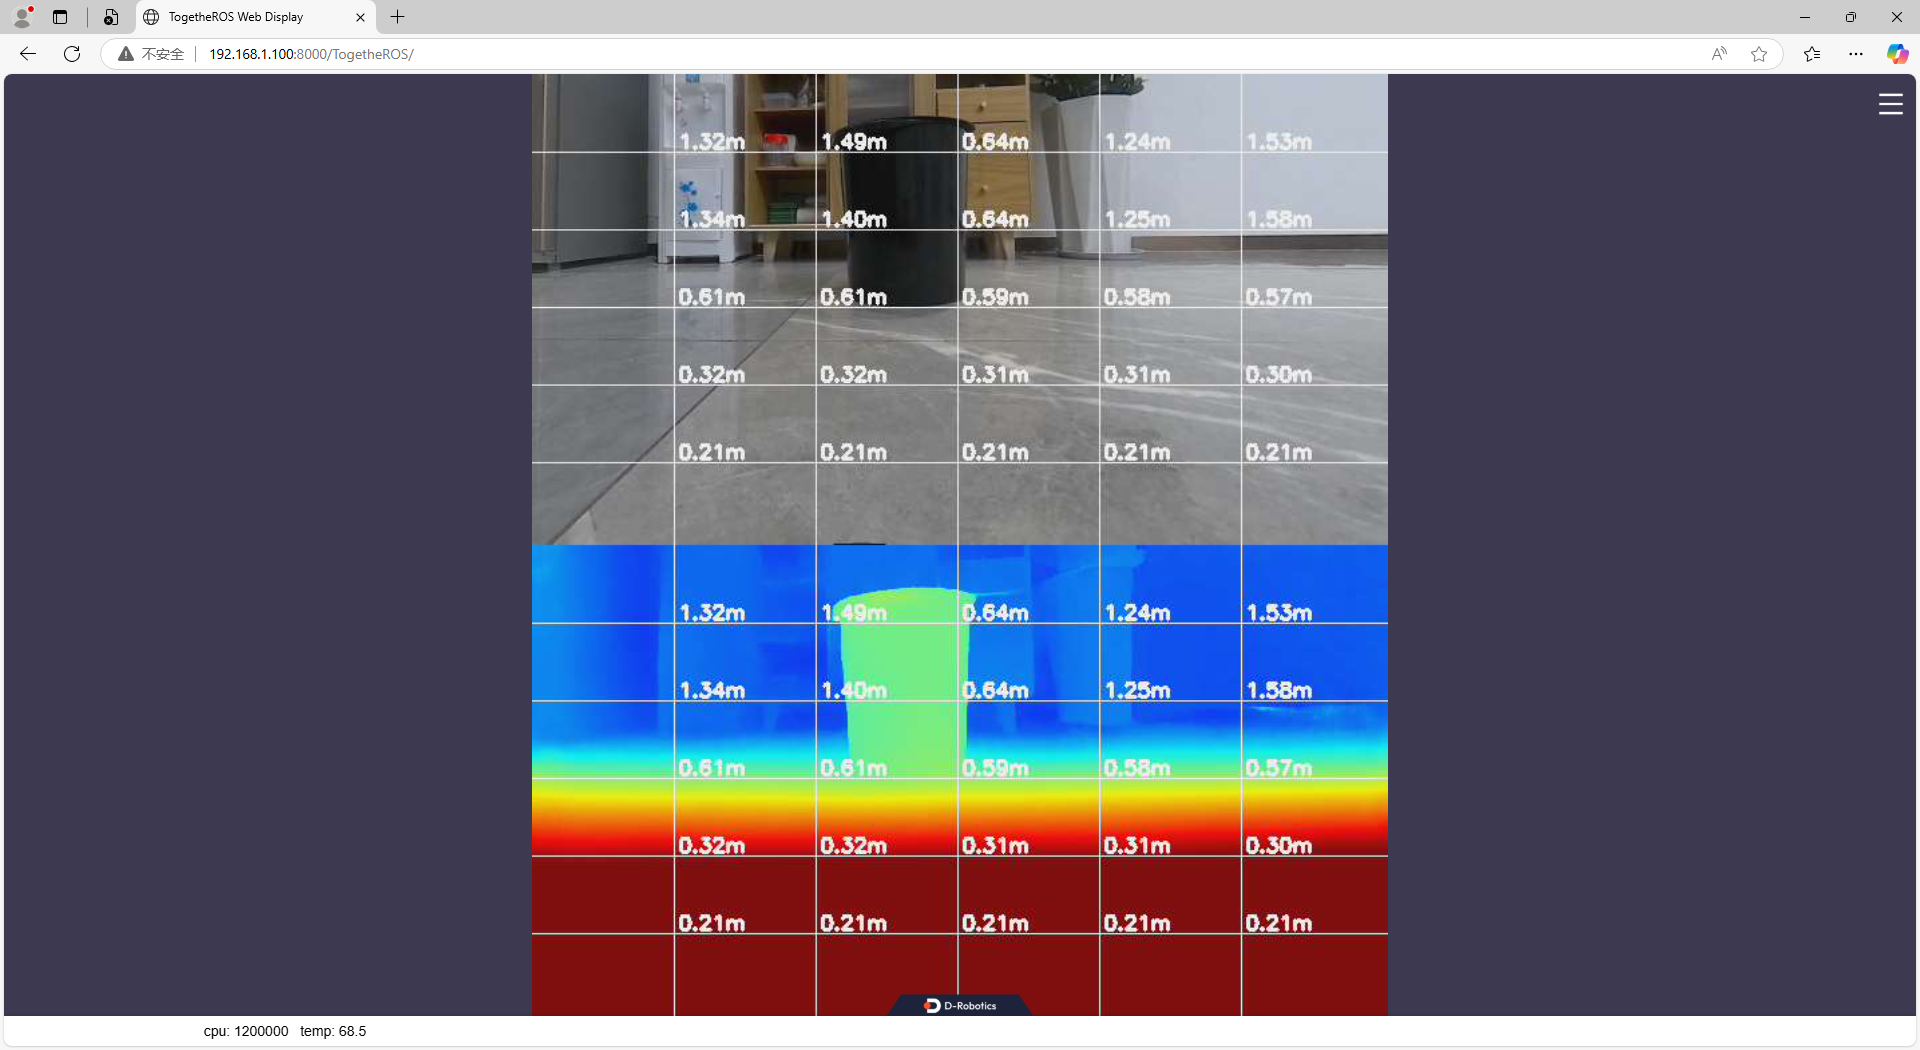
- 通过网页端查看RGB图和深度图,在浏览器输入 http://ip:8000 (图中RDK ip是192.168.1.100):
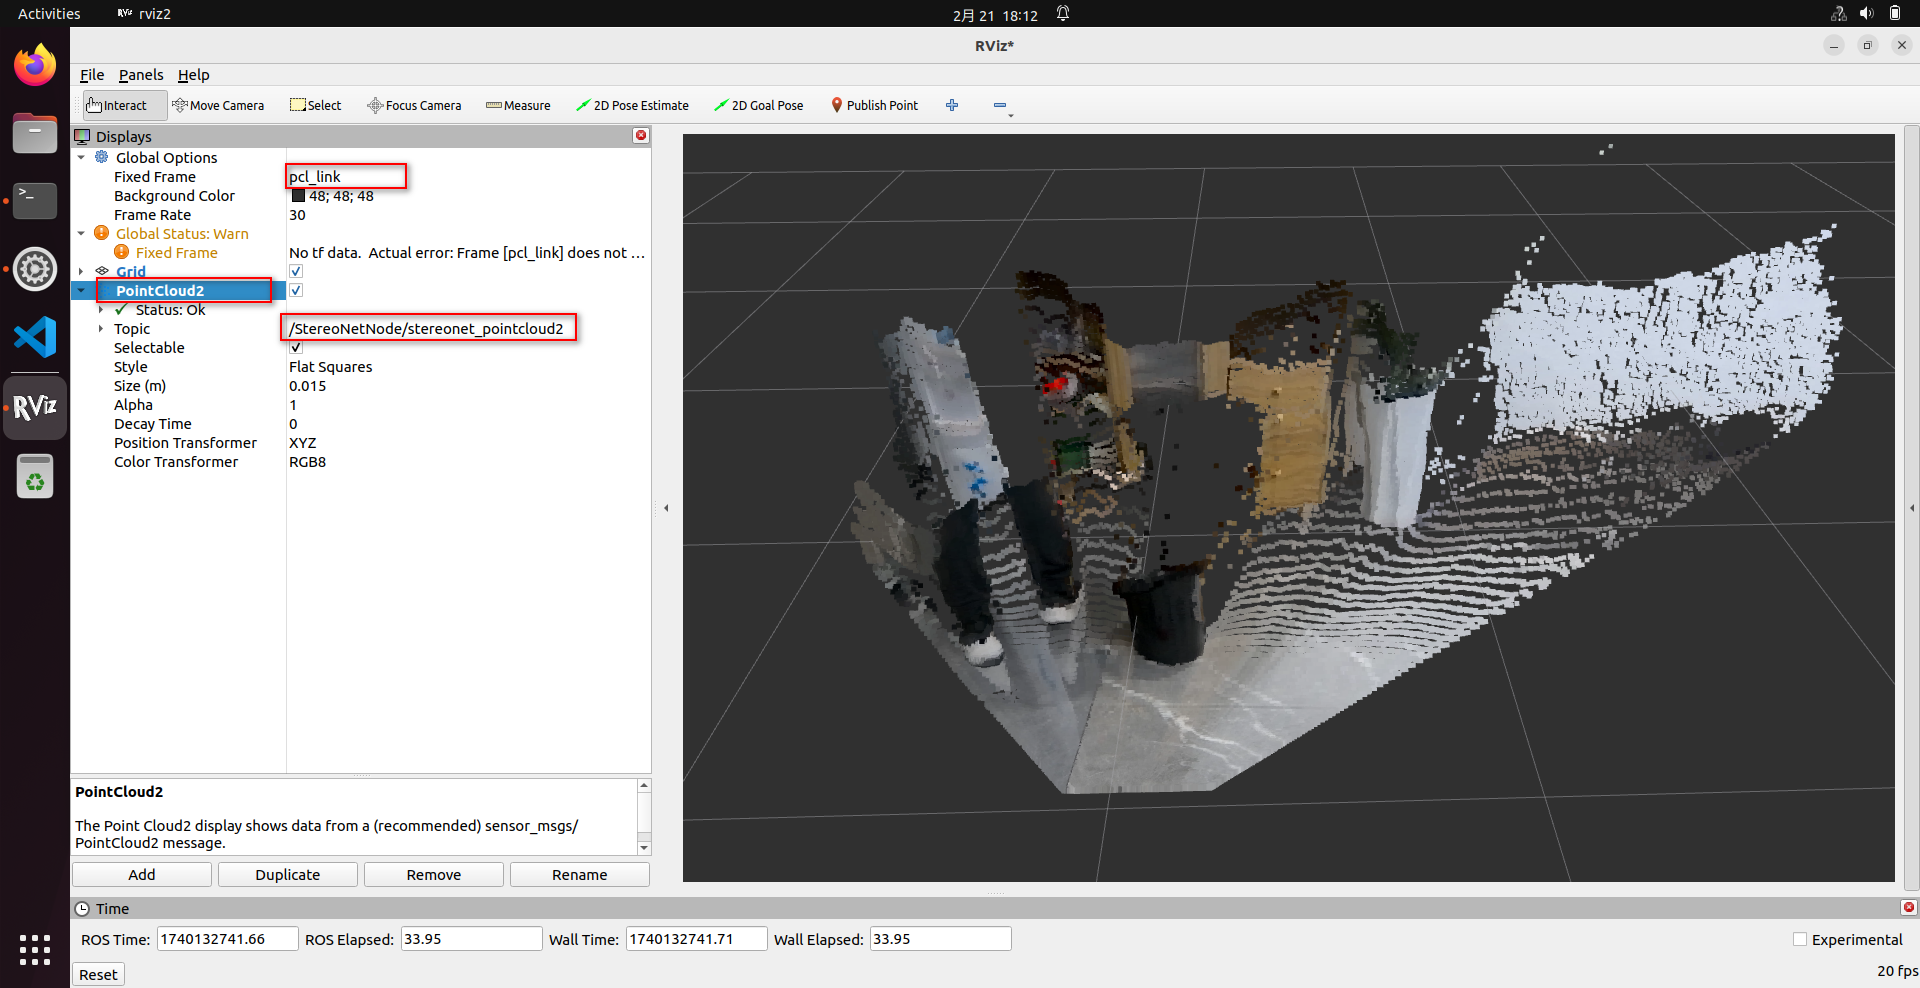
- 通过rviz2查看点云,RDK可直接安装rviz2查看,注意rviz2中需要做如下配置:
# 安装rviz2
sudo apt install ros-humble-rviz2
# 启动rviz2
source /opt/tros/humble/setup.bash
rviz2
(5) 参数定义
run_stereo.sh脚本有很多可设置参数,下面介绍一些常用参数的定义,其它参数请参考源码中的解释:
-
stereonet_version控制启动不同版本的算法
- RDK X5可以设置为
v2.0、v2.1、v2.2、v2.3、v2.4_int16、v2.4_int8、v2.5_int16、v2.5_int16_96、v2.5_int16_544_448、v2.5_int16_544_448_96 - RDK S100可以设置为
v2.1、v2.4、v2.4_1280_704
- RDK X5可以设置为
-
stereo_node_name控制ros节点的名称
-
uncertainty_th为置信度阈值,只有带置信度的模型并且设置为正数时才会生效,如果需要开启,建议设置为
0.10 -
stereo_image_topic/camera_info_topic为ros节点需要接收的话题名称,分别为双目图像和对应的相机参数
-
depth_image_topic/pointcloud2_topic/visual_image_topic等控制ros节点发布的话题名称
-
mipi_image_width、mipi_image_height、mipi_image_framerate控制相机的分辨率和帧率
-
mipi_gdc_enable控制相机开启GDC矫正,相机会读取EEPROM存储的参数进行图像的畸变矫正,目前生成的相机都带有出厂标定参数
-
mipi_lpwm_enable控制相机开启硬件同步,使得双目相机获取的左右图像时间戳是一致的,如果设置为False,则使用软同步,同步误差较大
-
mipi_rotation控制图像是否进行旋转,目前132GS相机CMOS安装时有90°旋转,需要设置该参数为
90.0 -
mipi_channel、mipi_channel2用于调换左右图输出顺序
-
calib_method控制矫正方式
- 当
mipi_gdc_enable:=True时,代表hobot_mipi_cam功能包已经对图像经过矫正,hobot_stereonet功能包不需要再进行矫正,calib_method设置为none即可 - 当
mipi_gdc_enable:=False时,或者相机无法对图像进行矫正时,需要将calib_method设置为custom,并且需要指定stereo_calib_file_path
- 当
-
stereo_calib_file_path控制自定义标定参数的路径
-
render_type控制渲染方式,默认是
distance,会自动根据深度图距离自动渲染伪彩色图像用于网页端显示,可以设置为indoor、outdoor,不建议设置为indoor -
render_perf控制渲染图像上是否展示CPU、BPU占用率、Latency、FPS信息,可以设置为
True、False -
speckle_filter_enable控制是否开启speckle filter滤波,可以设置为
True、False -
max_speckle_size控制speckle的大小,小于该大小的speckle将会被滤除,设置越大,滤波效果更强
-
max_disp_diff控制speckle中视差的差异阈值,邻域小于该阈值的像素点将划分为同一个speckle,设置越小,滤波效果更强
-
pointcloud_height_min/pointcloud_height_max/pointcloud_depth_max控制点云的显示范围,单位是m
-
pcl_filter_enable控制是否开启点云滤波,可以设置为
True、False -
grid_size控制点云滤波时的网格大小,单位m
-
grid_min_point_count控制点云滤波时的网格最小点数,小于该数量的点会被滤除
-
save_result_flag控制是否保存结果,如果开启保存则会保存相机参数、原始左右图、矫正后左右图、视差图、深度图、点云
-
save_dir控制保存的目录,目录不存在会自动创建,请确保该目录下有足够空间,否则会保存失败
-
save_freq控制保存的频率,例如设置为4代表每隔4帧保存一次
-
save_total控制保存的总数,设置为-1代表一直保存,设置为100代表保存100帧则不再保存
-
use_local_image_flag控制是否开启离线推理
-
local_image_dir控制本地图像目录,离线推理时使用
-
epipolar_mode控制是否开启基于棋盘格的极线对齐检测
-
epipolar_img控制使用
origin原图还是使用rect图 -
chessboard_per_rows/chessboard_per_cols/chessboard_square_size控制棋盘格内点数和棋盘格方块大小(单位m)
-
feature_epipolar_mode控制是否开启基于ORB特征点的极线对齐检测
-
infer_thread_num控制推理线程数,默认是2个推理线程,多线程推理帧率高,但latency较大。可以改为1,单线程推理帧率稍低,但latency也低
-
stereonet_pub_web控制是否开启web端发布可视化图像
(6) 保存一帧图像
- 程序运行成功后,可以开启另一个终端,执行如下指令保存一帧数据:
source /opt/tros/humble/setup.bash

# 首先查看一下节点是否正常运行,注意一下是否设置了ROS_DOMAIN_ID或者改变了节点名称
ros2 node list

# 如果/StereoNetNode节点正常运行,运行如下指令可以保存一帧数据
# 设置保存目录,建议设置绝对路径,如果保存目录不存在会自动创建
ros2 param set /StereoNetNode save_dir /root/online_once
# 保存一帧数据,可重复执行
ros2 param set /StereoNetNode save_result_once true
(7) 保存批量数据
- 方法1:在启动时指定参数保存
# 搭配230AI相机
bash run_stereo.sh --mipi_rotation 0.0 \
--save_result_flag True --save_dir /root/online_batch \
--save_freq 1 --save_total -1 \
--save_stereo_flag True --save_origin_flag False \
--save_disp_flag True --save_uncert_flag False \
--save_depth_flag True --save_visual_flag True \
--save_pcd_flag False

# 搭配132GS相机
bash run_stereo.sh \
--save_result_flag True --save_dir /root/online_batch \
--save_freq 1 --save_total -1 \
--save_stereo_flag True --save_origin_flag False \
--save_disp_flag True --save_uncert_flag False \
--save_depth_flag True --save_visual_flag True \
--save_pcd_flag False

# S100需要指定模型版本,例如增加参数--stereonet_version v2.4
# save_stereo_flag    保存双目图像,该图像会输入算法进行推理
# save_origin_flag    保存双目原始图像,该图像不会最终输入算法推理,比如没有矫正的图、和算法模型分辨率不匹配的图,会进行预处理,得到最终可以输入算法的图像
# save_disp_flag      保存视差图
# save_uncert_flag    保存置信度图,只有带置信度的模型支持
# save_depth_flag     保存深度图
# save_visual_flag    保存web端渲染的可视化图
# save_pcd_flag       保存点云数据
- 方法2:程序运行成功后,可以开启另一个终端,执行如下指令保存数据
source /opt/tros/humble/setup.bash

# 首先查看一下节点是否正常运行,注意一下是否设置了ROS_DOMAIN_ID或者改变了节点名称
ros2 node list

# 如果/StereoNetNode节点正常运行,运行如下指令可以保存数据
# 设置保存目录,建议设置绝对路径,如果保存目录不存在会自动创建
ros2 param set /StereoNetNode save_dir /root/online_batch
# 设置保存总数
ros2 param set /StereoNetNode save_total 10
# 设置保存频率
ros2 param set /StereoNetNode save_freq 1

# 设置保存内容,按需要设置
ros2 param set /StereoNetNode save_stereo_flag true   # 保存双目图像,该图像会输入算法进行推理
ros2 param set /StereoNetNode save_origin_flag true   # 保存双目原始图像,该图像不会最终输入算法推理,比如没有矫正的图、和算法模型分辨率不匹配的图,会进行预处理,得到最终可以输入算法的图像
ros2 param set /StereoNetNode save_disp_flag true     # 保存视差图
ros2 param set /StereoNetNode save_uncert_flag true   # 保存置信度图,只有带置信度的模型支持
ros2 param set /StereoNetNode save_depth_flag true    # 保存深度图
ros2 param set /StereoNetNode save_visual_flag true   # 保存web端渲染的可视化图
ros2 param set /StereoNetNode save_pcd_flag true      # 保存点云数据

# 执行保存命令
ros2 param set /StereoNetNode save_result_flag true

# 如果保存完毕后,还需要继续保存,需要再执行一下下面两条指令
# 重新设置保存总数
ros2 param set /StereoNetNode save_total 10
# 执行保存命令
ros2 param set /StereoNetNode save_result_flag true
(8) 开启极线对齐检测模式
如果出现深度图较差的情况,除了可能是左右图的拼接顺序错误之外,还有可能是左右目图像没有�达到极线对齐状态。
双目算法对极线对齐的要求很高,一般要求左右图的极线对齐误差小于1 pixel。
本程序开发了两种极线对齐检测方式:一种是基于棋盘格标定板的方式,这种方式比较严格,推荐使用; 另一种是基于ORB特征点的方式,这种方式不需要标定板,只需要在纹理丰富的场景运行即可,但计算出来的极线对齐误差可能偏大。
- 基于棋盘格标定板极线对齐检测程序启动指令(以X5搭配132GS相机为例):
# X5搭配132GS相机,S100或其它相机注意参考上文参数的设置
# 注意棋盘格参数的设置,例子中使用每行内角点20、每列内角度11、方格大小为0.06m的棋盘格
bash run_stereo.sh --epipolar_mode True \
--chessboard_per_rows 20 --chessboard_per_cols 11 --chessboard_square_size 0.06
运行成功后,可以在web端看到如下图像:

基于棋盘格的极线对齐检测,极线对齐误差和重投影误差都应该在1 pixel内,双目图像才是合格图像�,否则使用的标定参数是错误的
- 基于ORB特征点极线对齐检测程序启动指令(以X5搭配132GS相机为例):
# X5搭配132GS相机,S100或其它相机注意参考上文参数的设置
bash run_stereo.sh --feature_epipolar_mode True
运行成功后,可以在web端看到如下图像:
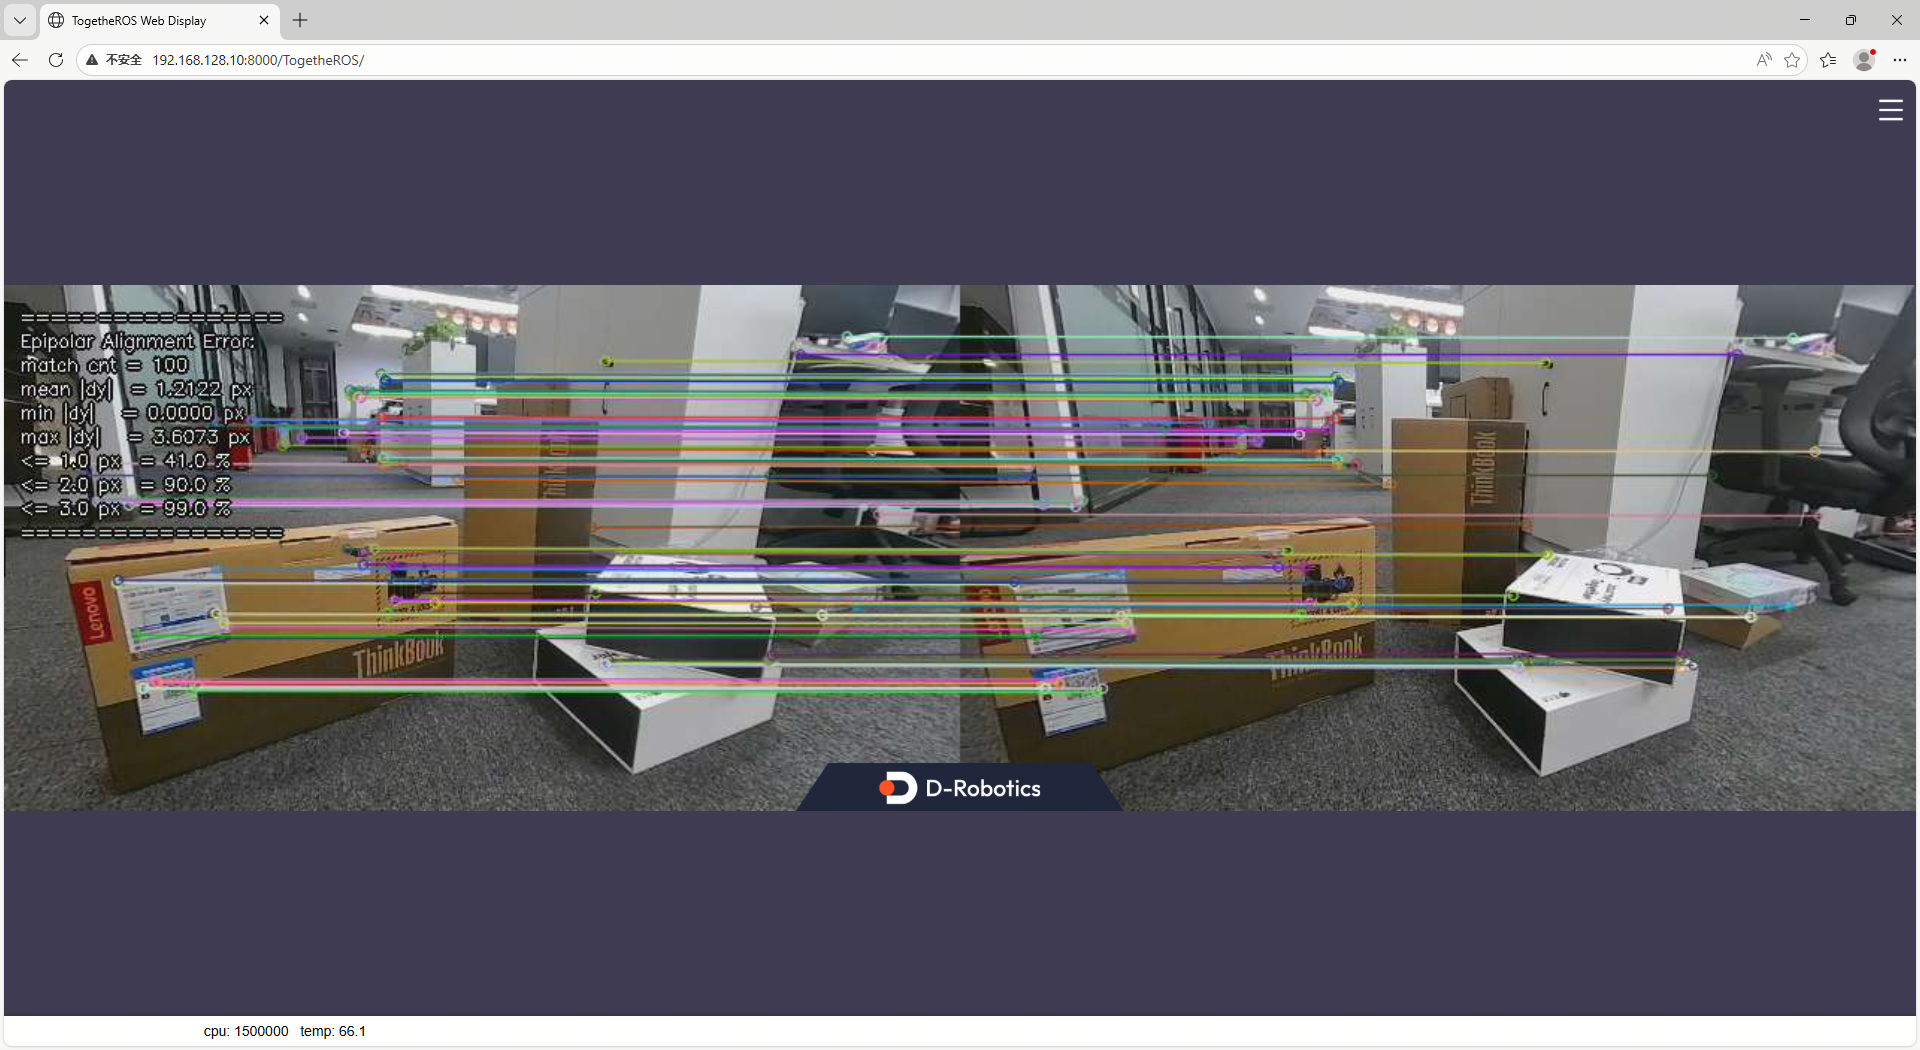
基于ORB特征点的极线对齐检测没有那么严格,根据经验值,如果是640×352分辨率的图像,极线对齐误差要小于1 pixel,如果是1280×1088分辨率的图像,极线对齐误差要小于2 pixel,双目图像才是合格图像
5.4. 离线启动指令
(1) 准备离线图像
- 如果想利用本地图像评估算法效果,需要准备如下数据并上传到RDK:
- ��去畸变、极线对齐的左右目图像,png或者jpg格式,图片需要按照规则命名,左目图像需要带有
left字段,右目图像需要带有right字段,算法按序号遍历图像,直至图像全部计算完毕:

- 相机内参文件,保存在图像目录下,命名为
camera_intrinsic.txt,参考内容如下:
# fx fy cx cy baseline(m)
215.762581 215.762581 325.490113 173.881556 0.079957
(2) 执行启动指令
- 通过ssh连接RDK,执行以下命令:
- RDK X5
- RDK S100
bash run_stereo.sh \
--use_local_image_flag True --local_image_dir <离线图像路径> \
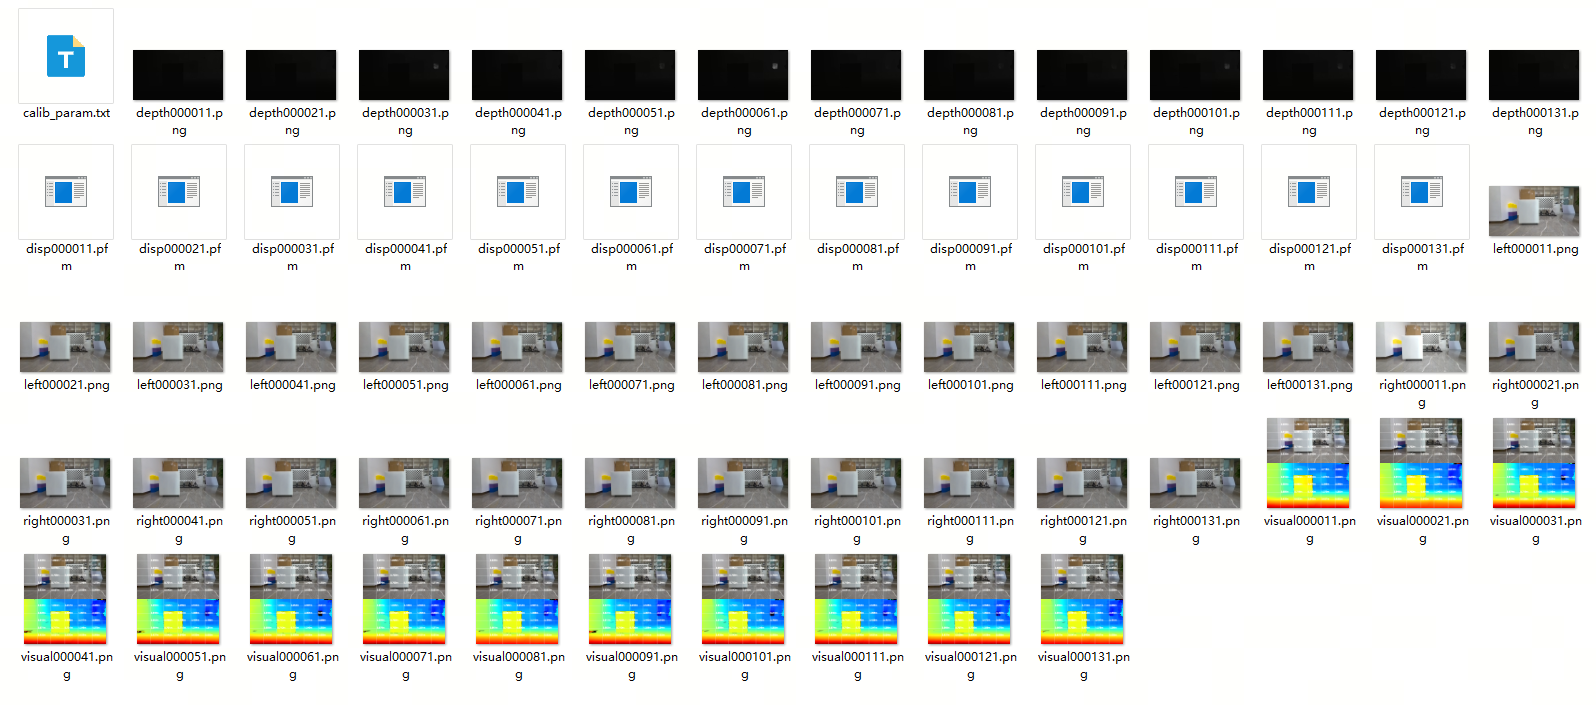
--save_result_flag True --save_dir <结果保存路径> \
--save_stereo_flag True --save_origin_flag False \
--save_disp_flag True --save_uncert_flag False \
--save_depth_flag True --save_visual_flag True \
--save_pcd_flag True
# 如果网页端显示太快,可以加入参数控制一下停顿时间:--image_sleep 2000
bash run_stereo.sh --stereonet_version v2.4 \
--use_local_image_flag True --local_image_dir <离线图像路径> \
--save_result_flag True --save_dir <结果保存路径> \
--save_stereo_flag True --save_origin_flag False \
--save_disp_flag True --save_uncert_flag False \
--save_depth_flag True --save_visual_flag True \
--save_pcd_flag True

# 如果网页端显示太快,可以加入参数控制一下停顿时间:--image_sleep 2000
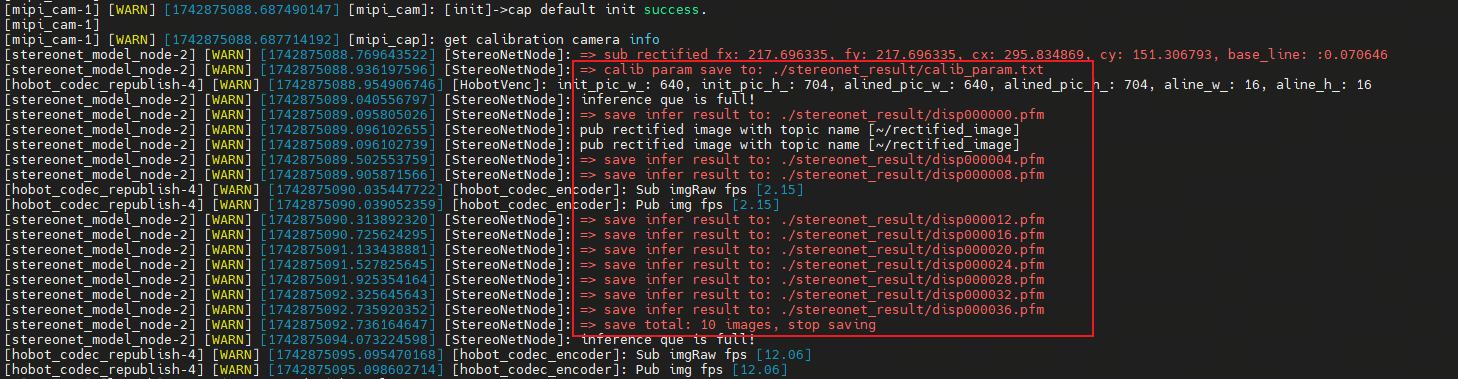
- 运行成功后,会打印如下日志
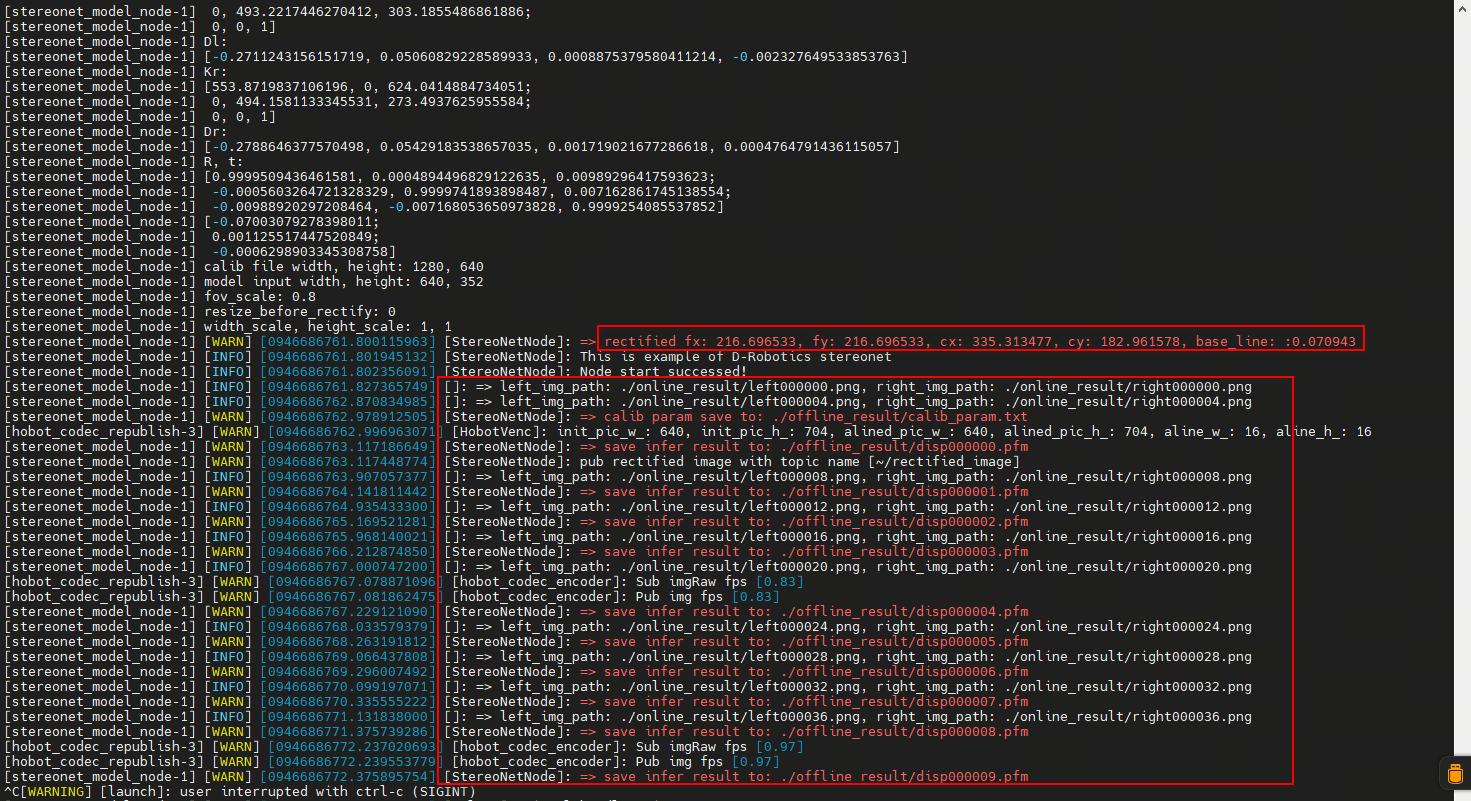
- 通过网页端查看RGB图和深度图,在浏览器输入 http://ip:8000 (图中RDK ip是192.168.128.10):

5.5. 搭配ZED相机运行
(1) ZED相机安装
- ZED双目摄像头如图所示:
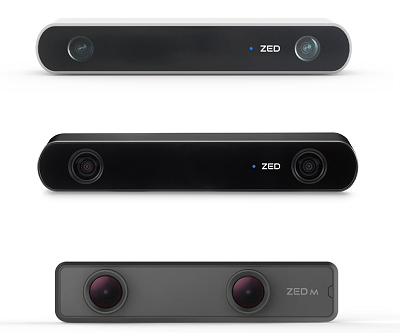
- 将ZED相机通过USB连接到RDK即可
(2) 启动指令
- 首先,启动ZED相机,通过ssh连接RDK,X5和S100执行相同指令:
source /opt/tros/humble/setup.bash

ros2 launch hobot_zed_cam zed_cam_node.launch.py \
resolution:=720p \
need_rectify:=true dst_width:=640 dst_height:=352
参数解释:
| 参数 | 定义 |
|---|---|
| resolution | zed原始输出分辨率,带畸变,720p表示1280*720的分辨率,可设置为1080p |
| need_rectify | 表示最终输出的图像是否需要矫正 |
| dst_width | 最终输出的矫正后图像分辨率为640*352 |
| dst_height | 最终输出的矫正后图像分辨率为640*352 |
注意:运行ZED相机RDK一定要联网,因为ZED需要联网下载标定文件
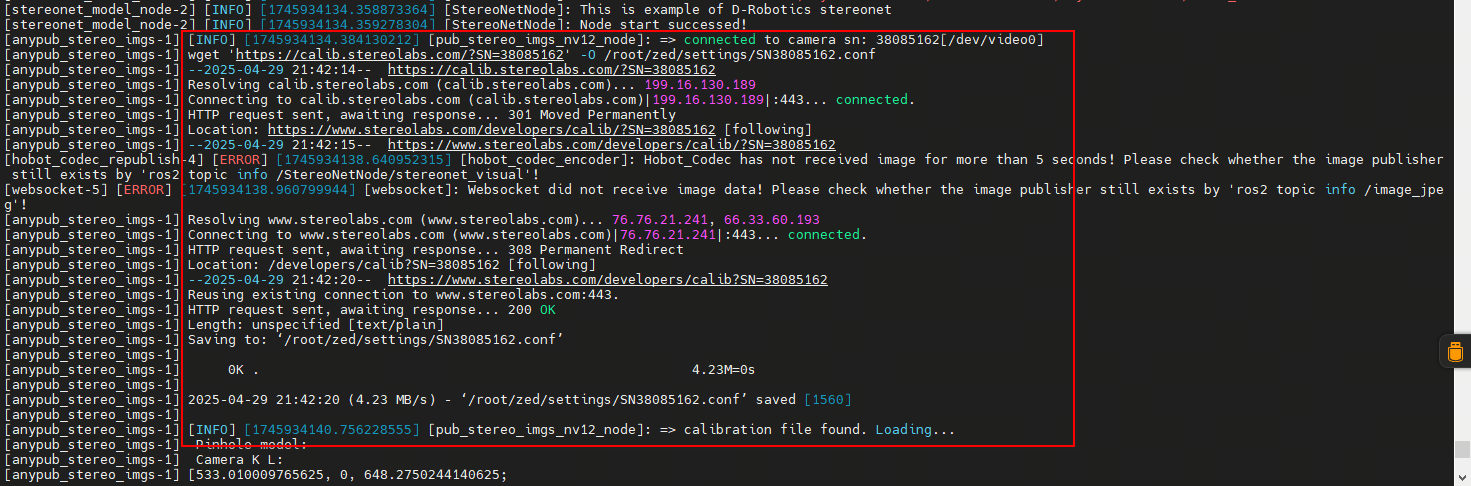
联网的情况下程序会自动下载标定文件,如果RDK没有联网,可以手动下载标定文件然后上传到RDK。
根据log信息,在PC端打开浏览器,输入(https://calib.stereolabs.com/?SN=38085162) ,即可下载标定文件SN38085162.conf。
注意每台ZED的SN码是不一样的,使用时请根据报错信息下载对应的标定文件,将标定文件上传到/root/zed/settings/目录下,如果目录不存在则手动创建。
- 然后,启动双目算法,开启另一个终端执行:
bash run_stereo.sh --use_mipi_cam False --camera_info_topic /image_combine_raw/camera_info
- 通过网页端查看深度图,在浏览器输入 http://ip:8000 (ip为RDK对应的ip地址),如需查看点云和保存图像请参考上文对应的设置
6. 功能包话题说明
6.1. 订阅话题
| 默认名称(参数可调) | 消息类型 | 说明 |
|---|---|---|
| /image_combine_raw | sensor_msgs::msg::Image | 左右目上下拼接的图像,用于模型推理 |
| /image_combine_raw/right/camera_info(可选) | sensor_msgs::msg::CameraInfo | 相机标定参数,用于视差图和深度图之间的转换 |
6.2. 发布话题
| 默认名称(参数可调) | 消息类型 | 说明 |
|---|---|---|
| /StereoNetNode/stereonet_depth | sensor_msgs::msg::Image | 深度图像,单位为毫米 |
| /StereoNetNode/stereonet_visual | sensor_msgs::msg::Image | 可视化渲染图像 |
| /StereoNetNode/stereonet_pointcloud2 | sensor_msgs::msg::PointCloud2 | 点云,单位为m |
| /StereoNetNode/rectify_left_image | sensor_msgs::msg::Image | 矫正后左图,输入算法 |
| /StereoNetNode/rectify_right_image | sensor_msgs::msg::Image | 矫正后右图,输入算法 |
| /StereoNetNode/origin_left_image | sensor_msgs::msg::Image | 原始左图,不输入算法 |
| /StereoNetNode/origin_right_image | sensor_msgs::msg::Image | 原始右图,不输入算法 |