YOLO
Feature Overview
The YOLO object detection algorithm example takes images as input, leverages the BPU for inference, and publishes algorithm messages containing detected object classes and bounding boxes. Currently supported versions include YOLOv2, YOLOv3, Ultralytics YOLOv5, YOLOv5x, Ultralytics YOLOv8, YOLOv10, YOLOv11, and YOLOv12.
The models are trained on the COCO dataset and support detection of 80 object categories, including people, animals, fruits, vehicles, and more.
You can also use the Ultralytics package to train models on custom datasets. (https://docs.ultralytics.com/modes/train)
Code repository: (https://github.com/D-Robotics/hobot_dnn)
Application scenarios: As a representative single-stage object detection algorithm, the YOLO series offers advantages such as high speed and strong generalization capability. It enables applications like garbage recognition and vehicle detection, and is widely used in autonomous driving, smart homes, and similar fields.
Vehicle detection example: (https://github.com/JunshengFu/vehicle-detection)
Fall detection example: (https://github.com/xiaobin1231/Fall-Detection-By-YOLOV3-and-LiteFlowNet)
Supported Platforms
| Platform | OS/Runtime Environment | Supported Algorithms | Example Features |
|---|---|---|---|
| RDK X3, RDK X3 Module | Ubuntu 20.04 (Foxy), Ubuntu 22.04 (Humble) | yolov2/yolov3/yolov5 | · Launch MIPI/USB camera and display inference results via web · Use local image/video replay; rendered results saved locally |
| RDK X5, RDK X5 Module | Ubuntu 22.04 (Humble) | yolov2/yolov3/yolov5/yolov8/yolov10/yolov11/yolov12/yolo26 | · Launch MIPI/USB camera and display inference results via web · Use local image/video replay; rendered results saved locally |
| RDK Ultra | Ubuntu 20.04 (Foxy) | yolov5x | · Launch MIPI/USB camera and display inference results via web · Use local image/video replay; rendered results saved locally |
| RDK S100, RDK S100P | Ubuntu 22.04 (Humble) | yolov2/yolov3/yolov5/yolov8/yolov10/yolov11/yolov12 | · Launch MIPI/USB camera and display inference results via web · Use local image/video replay; rendered results saved locally |
| X86 | Ubuntu 20.04 (Foxy) | yolov2/yolov3 | · Use local image/video replay; rendered results saved locally |
Algorithm Performance
| Model | Platform | Input Size | Inference FPS |
|---|---|---|---|
| yolov2 | X3 | 1x608x608x3 | 12.60 |
| yolov3 | X3 | 1x416x416x3 | 11.71 |
| yolov5 | X3 | 1x512x512x3 | 32.62 |
| yolov2 | X5 | 1x608x608x3 | 38.33 |
| yolov3 | X5 | 1x416x416x3 | 31.28 |
| yolov5 | X5 | 1x512x512x3 | 10.37 |
| yolov8n | X5 | 1x3x640x640 | 140.46 |
| yolov10n | X5 | 1x3x640x640 | 36.47 |
| yolov11m | X5 | 1x3x640x640 | 28.95 |
| yolov12m | X5 | 1x3x640x640 | 74 |
| yolo26n | X5 | 1x3x640x640 | 67.48 |
| yolov2 | S100 | 1x3x608x608 | 226.19 |
| yolov3 | S100 | 1x3x416x416 | 212.55 |
| yolov5 | S100 | 1x3x672x672 | 62.24 |
| yolov8n | S100 | 1x3x640x640 | 506.57 |
| yolov10n | S100 | 1x3x640x640 | 494.10 |
| yolov11m | S100 | 1x3x640x640 | 162.46 |
| yolo12n | S100 | 1x3x640x640 | 42.66 |
Prerequisites
RDK Platforms
- The RDK has been flashed with Ubuntu 20.04 or Ubuntu 22.04 system image.
- TogetheROS.Bot has been successfully installed on the RDK.
- An MIPI or USB camera is installed on the RDK. If no camera is available, you can evaluate the algorithm using local JPEG/PNG images or MP4/H.264/H.265 video files via replay.
- Ensure your PC can access the RDK over the network.
X86 Platform
- The X86 environment has been set up with Ubuntu 20.04 system image.
- tros.b has been successfully installed on the X86 system.
Usage Guide
RDK Platforms
Using MIPI Camera for Image Publishing
The YOLOv2 object detection example subscribes to images published by the MIPI camera, performs inference, and publishes algorithm messages. Results—including annotated images—are rendered and displayed in a web browser on the PC via the websocket package.
- Foxy
- Humble
# Set up tros.b environment
source /opt/tros/setup.bash
# Set up tros.b environment
source /opt/tros/humble/setup.bash
# Configure MIPI camera
export CAM_TYPE=mipi

# Launch the launch file
ros2 launch dnn_node_example dnn_node_example.launch.py dnn_example_config_file:=config/yolov2workconfig.json dnn_example_image_width:=1920 dnn_example_image_height:=1080
Using USB Camera for Image Publishing
The YOLOv2 object detection example subscribes to images published by the USB camera, performs inference, and publishes algorithm messages. Results—including annotated images—are rendered and displayed in a web browser on the PC via the websocket package.
- Foxy
- Humble
# Set up tros.b environment
source /opt/tros/setup.bash
# Set up tros.b environment
source /opt/tros/humble/setup.bash
# Configure USB camera
export CAM_TYPE=usb

# Launch the launch file
ros2 launch dnn_node_example dnn_node_example.launch.py dnn_example_config_file:=config/yolov2workconfig.json dnn_example_image_width:=1920 dnn_example_image_height:=1080
Using Local Image Replay
The YOLOv2 object detection example uses local JPEG/PNG images for replay. After inference, the annotated results are saved as images in the current working directory.
- Foxy
- Humble
# Set up tros.b environment
source /opt/tros/setup.bash
# Set up tros.b environment
source /opt/tros/humble/setup.bash
# Launch the launch file
ros2 launch dnn_node_example dnn_node_example_feedback.launch.py dnn_example_config_file:=config/yolov2workconfig.json dnn_example_image:=config/target.jpg
In addition to YOLOv2, other YOLO-series algorithms are also supported. You can switch algorithms by specifying the config_file parameter in the launch command. For example:
- To use YOLOv3:
dnn_example_config_file:="config/yolov3workconfig.json" - To use YOLOv5:
dnn_example_config_file:="config/yolov5workconfig.json" - To use YOLOv8:
dnn_example_config_file:="config/yolov8workconfig.json" - To use YOLOv10:
dnn_example_config_file:="config/yolov10workconfig.json" - To use YOLOv11:
dnn_example_config_file:="config/yolov11workconfig.json" - To use YOLOv12:
dnn_example_config_file:="config/yolov12workconfig.json" - To use YOLOv26:
dnn_example_config_file:="config/yolo26workconfig.json"
RDK Ultra Platform
Using MIPI Camera for Image Publishing
The YOLOv5x object detection example subscribes to images published by the MIPI camera, performs inference, and publishes algorithm messages. Results—including annotated images—are rendered and displayed in a web browser on the PC via the websocket package.
- Foxy
- Humble
# Set up tros.b environment
source /opt/tros/setup.bash
# Configure tros.b environment
source /opt/tros/humble/setup.bash
# Configure MIPI camera
export CAM_TYPE=mipi

# Launch the launch file
ros2 launch dnn_node_example dnn_node_example.launch.py dnn_example_config_file:=config/yolov5xworkconfig.json dnn_example_image_width:=672 dnn_example_image_height:=672
Publish images using a USB camera
The YOLOv5x object detection algorithm example subscribes to images published by a USB camera. After inference, it publishes algorithm messages, and renders both the published images and corresponding algorithm results in a web browser on a PC via the websocket package.
- Foxy
- Humble
# Configure tros.b environment
source /opt/tros/setup.bash
# Configure tros.b environment
source /opt/tros/humble/setup.bash
# Configure USB camera
export CAM_TYPE=usb

# Launch the launch file
ros2 launch dnn_node_example dnn_node_example.launch.py dnn_example_config_file:=config/yolov5xworkconfig.json dnn_example_image_width:=672 dnn_example_image_height:=672
Feed local images
The YOLOv5x object detection algorithm example feeds local JPEG/PNG images, performs inference, and saves the rendered result image (with detection overlays) to the current working directory.
- Foxy
- Humble
# Configure tros.b environment
source /opt/tros/setup.bash
# Configure tros.b environment
source /opt/tros/humble/setup.bash
# Launch the launch file
ros2 launch dnn_node_example dnn_node_example_feedback.launch.py dnn_example_config_file:=config/yolov5xworkconfig.json dnn_example_image:=config/target.jpg
X86 Platform
Feed local images
The YOLOv2 object detection algorithm example feeds local JPEG/PNG images, performs inference, and saves the rendered result image (with detection overlays) to the current working directory.
# Configure tros.b environment
source /opt/tros/setup.bash

# Launch the launch file
ros2 launch dnn_node_example dnn_node_example_feedback.launch.py dnn_example_config_file:=config/yolov2workconfig.json dnn_example_image:=config/target.jpg
In addition to YOLOv2, YOLOv3 is also supported; YOLOv5 is not currently supported. Use the config_file parameter in the launch command to switch algorithms—for example, to use YOLOv3, specify dnn_example_config_file:="config/yolov3workconfig.json".
Result Analysis
Publishing images from a camera
The following output appears in the terminal:
[example-3] [WARN] [1655095347.608475236] [example]: Create ai msg publisher with topic_name: hobot_dnn_detection
[example-3] [WARN] [1655095347.608640353] [example]: Create img hbmem_subscription with topic_name: /hbmem_img
[example-3] [WARN] [1655095348.709411619] [img_sub]: Sub img fps 12.95
[example-3] [WARN] [1655095348.887570945] [example]: Smart fps 12.10
[example-3] [WARN] [1655095349.772225728] [img_sub]: Sub img fps 11.30
[example-3] [WARN] [1655095349.948913662] [example]: Smart fps 11.31
[example-3] [WARN] [1655095350.834951431] [img_sub]: Sub img fps 11.30
[example-3] [WARN] [1655095351.011915729] [example]: Smart fps 11.30
The log shows that the topic for publishing inference results is hobot_dnn_detection, and the subscribed image topic is /hbmem_img.
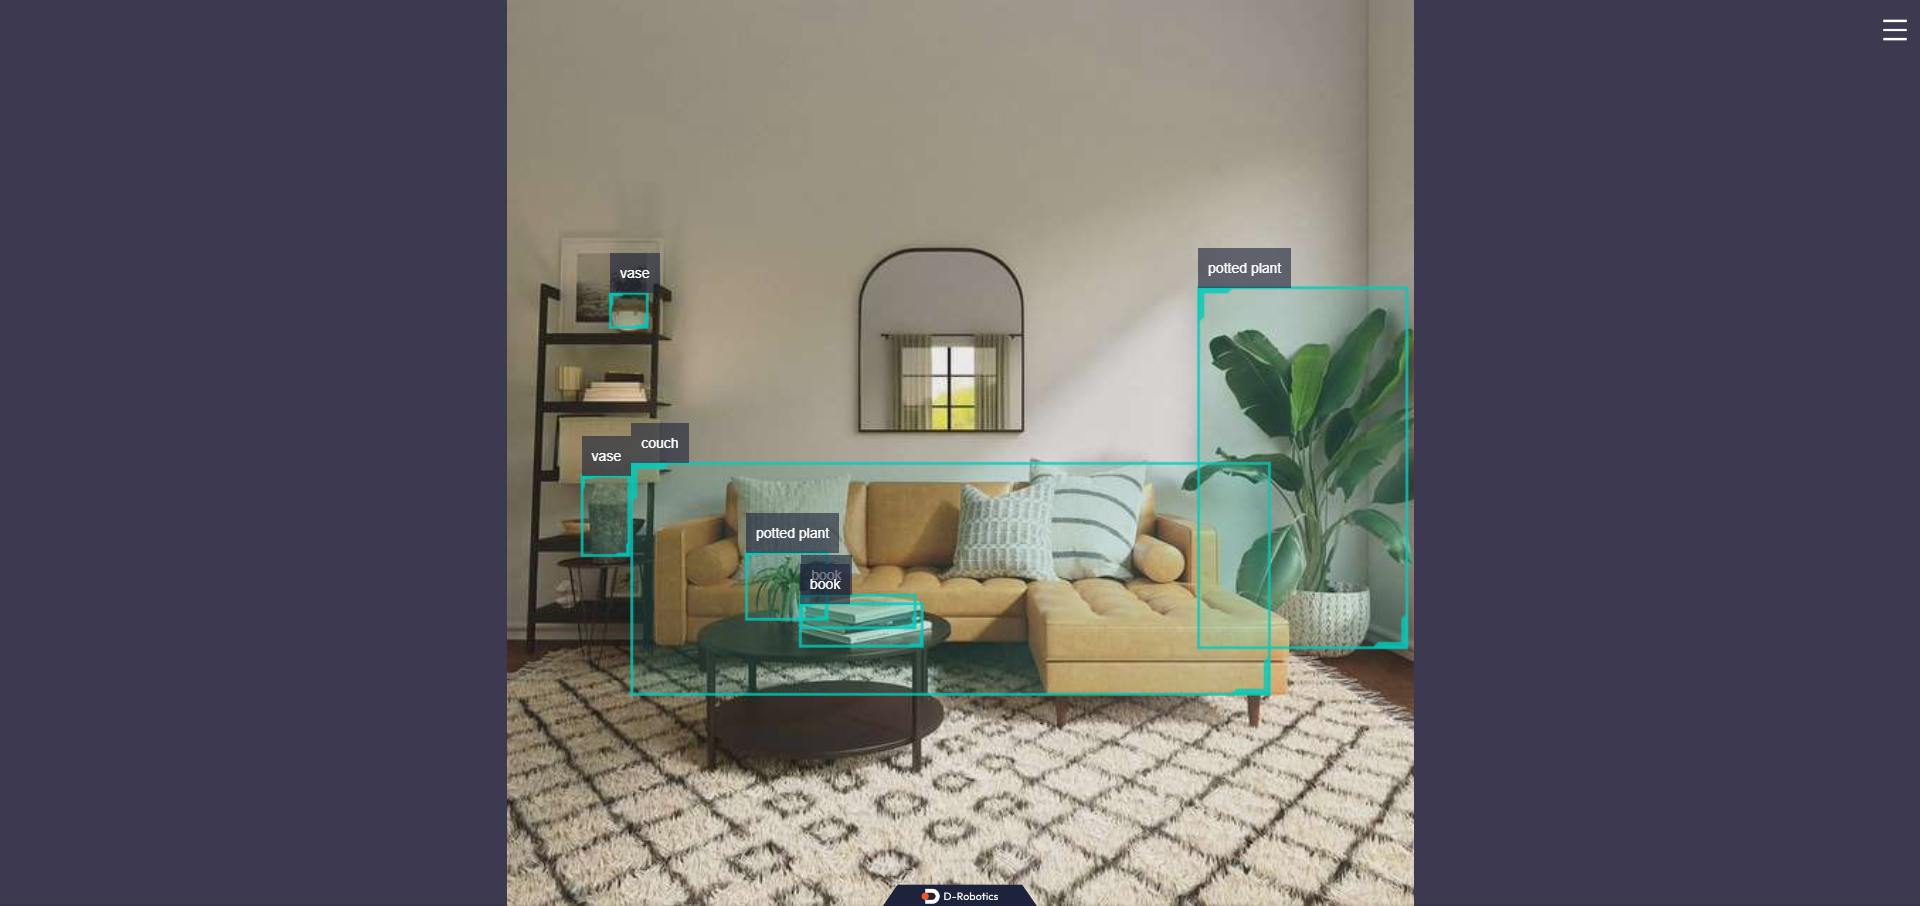
Enter http://IP:8000 in a web browser on your PC to view the rendered image and algorithm results (replace IP with the RDK's IP address):
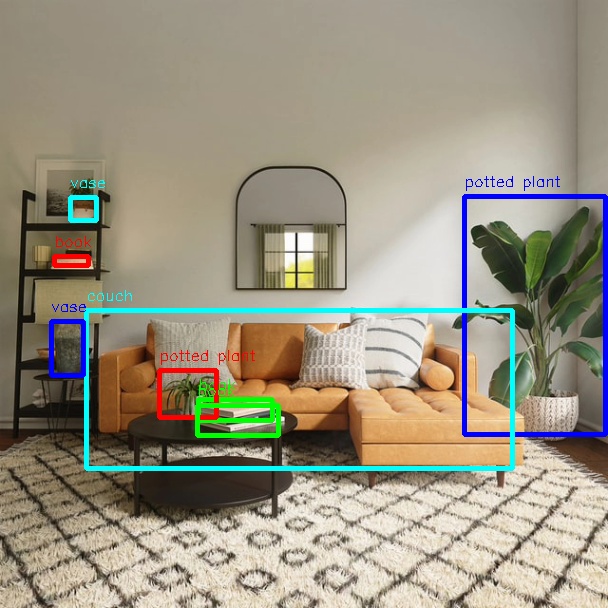
Feeding local images
The following output appears in the terminal:
[example-1] [INFO] [1654925067.952159234] [PostProcessBase]: out box size: 8
[example-1] [INFO] [1654925067.952227232] [PostProcessBase]: det rect: 464.03 196.145 605.525 434.865, det type: potted plant, score:0.813219
[example-1] [INFO] [1654925067.952319229] [PostProcessBase]: det rect: 86.5421 310.158 512.542 468.201, det type: couch, score:0.669208
[example-1] [INFO] [1654925067.952392268] [PostProcessBase]: det rect: 198.968 399.91 273.841 421.767, det type: book, score:0.539755
[example-1] [INFO] [1654925067.952465182] [PostProcessBase]: det rect: 159.861 370.656 217.685 417.746, det type: potted plant, score:0.480698
[example-1] [INFO] [1654925067.952533221] [PostProcessBase]: det rect: 51.2147 321.047 84.0969 375.842, det type: vase, score:0.433644
[example-1] [INFO] [1654925067.952607802] [PostProcessBase]: det rect: 70.0548 197.381 96.1826 221.062, det type: vase, score:0.399885
[example-1] [INFO] [1654925067.952675924] [PostProcessBase]: det rect: 197.706 405.271 278.929 435.743, det type: book, score:0.384268
[example-1] [INFO] [1654925067.952743463] [PostProcessBase]: det rect: 54.0955 256.68 88.6269 266.159, det type: book, score:0.307426
The log indicates that the algorithm detected 8 objects from the input image and output their bounding box coordinates (in the order of top-left x, top-left y, bottom-right x, bottom-right y) along with their class labels. The rendered image is saved as render_feedback_0_0.jpeg. Rendered image result: