3.2.1 RDK X3 Series Audio Board User Guide
Video: https://www.bilibili.com/video/BV1rm4y1E73q/?p=10
The RDK X3 currently supports two types of audio adapter boards, the Audio Driver HAT and the WM8960 Audio HAT, designed to meet the functional needs of various voice scenarios. Below is a detailed introduction to the usage of these two audio boards.
If after installing the drivers, you get a message that the Miniboot version is not the latest, please go to 1 System Options -> S7 Update Miniboot to update Miniboot.
Audio Driver HAT REV2
Product Introduction
The Audio Driver HAT REV2 is an audio adapter board produced by Waveshare Electronics, featuring an ES7210+ES8156 dual Codec scheme. It enables circular 4-microphone recording, dual-channel audio playback, and audio signal reacquisition. Below is an image of the adapter board:
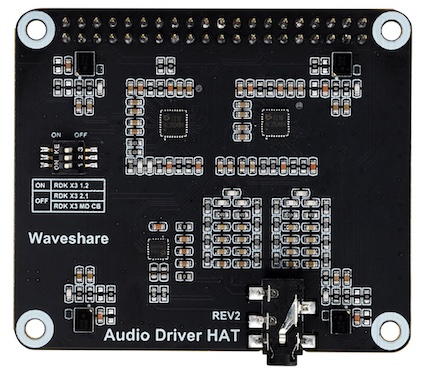
For a detailed introduction to the audio sub-board, please refer to Audio Driver HAT.
Installation Method
-
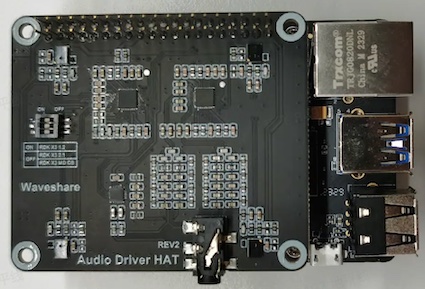
Connect the adapter board to the RDK X3's 40pin header as shown in the image below:
-
Use the command
cat /sys/class/socinfo/som_nameto query the type of development board and set the dip switch status of the audio sub-board according to the return value.- If the return value is 5 or 6, set all three dip switches to the
ONposition. - If the return value is 8, set all three dip switches to the
OFFposition.
- If the return value is 5 or 6, set all three dip switches to the
-
Use
srpi-configto configure the audio board
Go to3 Interface Options->I5 Audio
SelectAudio Driver HAT V2: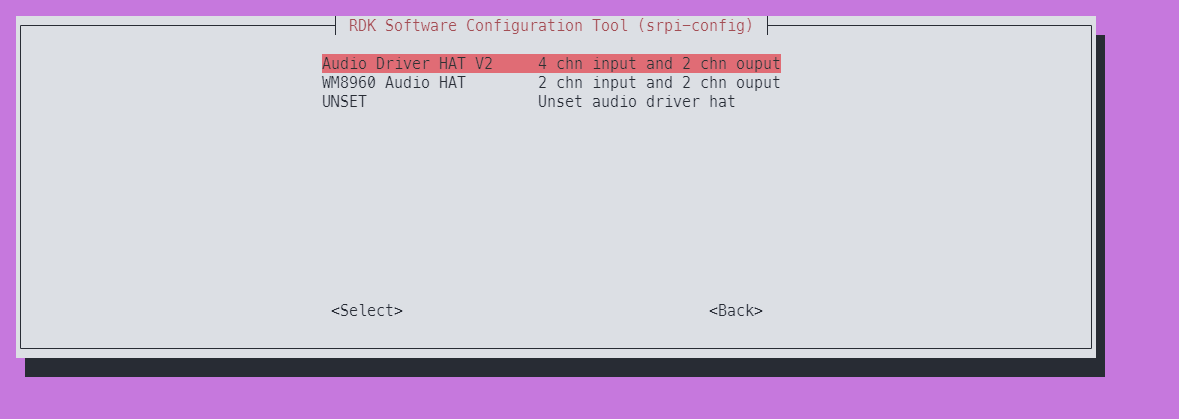
-
Run the command
sync && rebootto reboot the development board. If the following device nodes appear under /dev/snd, the adapter board has been successfully installed.root@ubuntu:/userdata# ls /dev/snd
by-path controlC0 pcmC0D0c pcmC0D1p timer
Uninstallation Method
- Use
srpi-configto configure the audio board
Go to3 Interface Options->I5 Audio
SelectUNSETto uninstall the audio drivers and related configurations.
Audio Nodes
On the RDK X3, the playback node for this audio board is pcmC0D0p, and the recording node is pcmC0D1c.
Recording and Playback Test
Tests use the tinyalsa library toolkit: tinycap for recording and tinyplay for playback.
tinycap usage instructions:
tinycap
Usage: tinycap {file.wav | --} [-D card] [-d device] [-c channels] [-r rate] [-b bits] [-p period_size] [-n n_periods] [-t time_in_seconds]

Use -- for filename to send raw PCM to stdout
tinyplayusage instructions:
tinyplay
usage: tinyplay file.wav [options]
options:
-D | --card   <card number>    The device to receive the audio
-d | --device <device number>  The card to receive the audio
-p | --period-size <size>      The size of the PCM's period
-n | --period-count <count>    The number of PCM periods
-i | --file-type <file-type >  The type of file to read (raw or wav)
-c | --channels <count>        The amount of channels per frame
-r | --rate <rate>             The amount of frames per second
-b | --bits <bit-count>        The number of bits in one sample
-M | --mmap                    Use memory mapped IO to play audio
For more information about the tinyalsa library, please refer to their repository.仓库地址
- 2-channel microphone recording:
tinycap ./2chn_test.wav -D 0 -d 1 -c 2 -b 16 -r 48000 -p 512 -n 4 -t 5
- 4-channel microphone recording:
tinycap ./4chn_test.wav -D 0 -d 1 -c 4 -b 16 -r 48000 -p 512 -n 4 -t 5
- Dual-channel audio playback:
tinyplay ./2chn_test.wav -D 0 -d 0
Audio Reacquisition Test
The audio board uses recording channels 7 & 8 for playback reacquisition, thus requiring the use of an 8-channel recording command for collection.
- Start 8-channel microphone recording
tinycap ./8chn_test.wav -D 0 -d 1 -c 8 -b 16 -r 48000 -p 512 -n 4 -t 5
- Start dual-channel audio playback
tinyplay ./2chn_test.wav -D 0 -d 0
After recording, the spectral information of channels 7 & 8 in the 2chn_test.wav file can be viewed using audio software.
Notes
Since the older Audio Driver HAT REV1 audio board has been discontinued, RDK X3 will gradually cease maintenance of this hardware. Users are recommended to upgrade to the REV2 version.
For instructions on using the Audio Driver HAT REV1 audio board, refer to the FAQ section.
WM8960 Audio HAT
Product Introduction
WM8960 Audio HAT is an audio adapter board produced by Waveshare, using the WM8960 Codec solution, and can achieve dual channel microphone recording and audio playback functions. The appearance of the adapter board is as shown in the figure below:
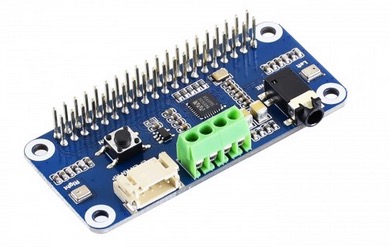
This audio sub-board is only compatible with RDK X3 version 2.0, and the version number can be queried as follows. The return value 8 indicates that the device is 2.0 version.
root@ubuntu:/userdata# cat /sys/class/socinfo/som_name
8
For a detailed introduction to the audio adapter board, please refer to WM8960 Audio HAT.
Installation Method
-
Connect the adapter board to the 40-pin header of RDK X3 as shown in the following picture

-
Configure the audio board using
srpi-config
Enter3 Interface Options->I5 Audio
SelectWM8960 Audio HAT: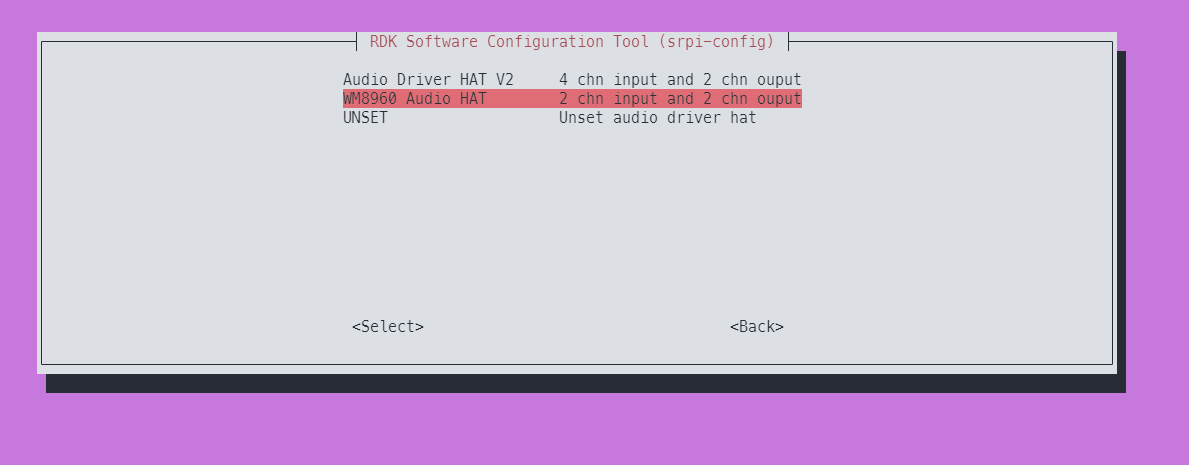
-
Run the command
sync && rebootto restart the development board. If the device nodes like the following appear under /dev/snd, it indicates that the adapter board is installed successfully.root@ubuntu:~# ls /dev/snd/
Playback controlC0 pcmC0D0c pcmC0D0p pcmC0D1c pcmC0D1p pcmC1D0c pcmC1D0p timer
```by-path controlC0 pcmC0D0c pcmC0D0p pcmC0D1c pcmC0D1p timer
Uninstalling Method
- Configure the audio board using
srpi-config
Go to3 Interface Options->I5 Audio
SelectUNSETto uninstall the audio driver and related configurations
Audio Nodes
The playback node for this audio board on the RDK X3 is pcmC0D1p, and the recording node is pcmC0D0c
Recording and Playback Test
The test uses the toolset of tinyalsa library: use tinycap for recording and tinyplay for playback
Usage of tinycap:
tinycap
Usage: tinycap {file.wav | --} [-D card] [-d device] [-c channels] [-r rate] [-b bits] [-p period_size] [-n n_periods] [-t time_in_seconds]

Use -- for filename to send raw PCM to stdout
Usage of tinyplay:
tinyplay
usage: tinyplay file.wav [options]
options:
-D | --card   <card number>    The device to receive the audio
-d | --device <device number>  The card to receive the audio
-p | --period-size <size>      The size of the PCM's period
-n | --period-count <count>    The number of PCM periods
-i | --file-type <file-type >  The type of file to read (raw or wav)
-c | --channels <count>        The amount of channels per frame
-r | --rate <rate>             The amount of frames per second
-b | --bits <bit-count>        The number of bits in one sample
-M | --mmap                    Use memory mapped IO to play audio
If you want to learn more about the tinyalsa library, please refer to their repository
- Recording with a 2-channel microphone:
tinycap ./2chn_test.wav -D 0 -d 0 -c 2 -b 16 -r 48000 -p 512 -n 4 -t 5
- Playback of stereo audio:
tinyplay ./2chn_test.wav -D 0 -d 1
Coexistence of Audio Subboard and USB Sound Card
If you have a USB sound card and want it to coexist with the above-mentioned audio subboard, please follow the steps below:
-
Make sure the audio subboard is functional according to the tutorial above.
-
Connect the USB sound card and observe the newly added nodes under
/dev/sndafter the driver is loaded. TakingWM8960+ USB full-duplex sound card as an example:
    root@ubuntu:~# ls /dev/snd/
    by-path  controlC0  pcmC0D0c  pcmC0D0p  pcmC0D1c  pcmC0D1p  pcmC1D0c  pcmC1D0p  timer
The pcmC1D0c pcmC1D0p nodes are for the USB sound card, and they share a full-duplex node.
- Modify
/etc/pulse/default.paand add the corresponding node information belowload-module module-alsa-source:
...

.ifexists module-udev-detect.so
load-module module-alsa-sink device=hw:0,1 mmap=false tsched=0 fragments=2 fragment_size=960 rate=48000 channels=2 rewind_safeguard=960
load-module module-alsa-source device=hw:0,0 mmap=false tsched=0 fragments=2 fragment_size=960 rate=48000 channels=2
load-module alsa device=hw:1,0 #corresponding to the above nodes
load-module module-alsa-source device=hw:1,0 #corresponding to the above nodes
.else

...
- Save the configuration and reboot the development board.