Flash the system image
This page describes system flashing for the RDK S600. Complete flashing preparation before you flash.
Download modes
Before you flash the system image to the RDK S600 with XBurn, select a download mode based on the device state, then enter that mode and start flashing.
| Download mode | Scenario | Prerequisite |
|---|---|---|
| DFU+Fastboot | Blank board or system corruption that bricks the device | Set the DIP switches to put the device into DFU boot mode |
| Fastboot | Update the system on a non-blank board | Requires a non-blank board whose system can enter U-Boot |
Enter DFU+Fastboot mode
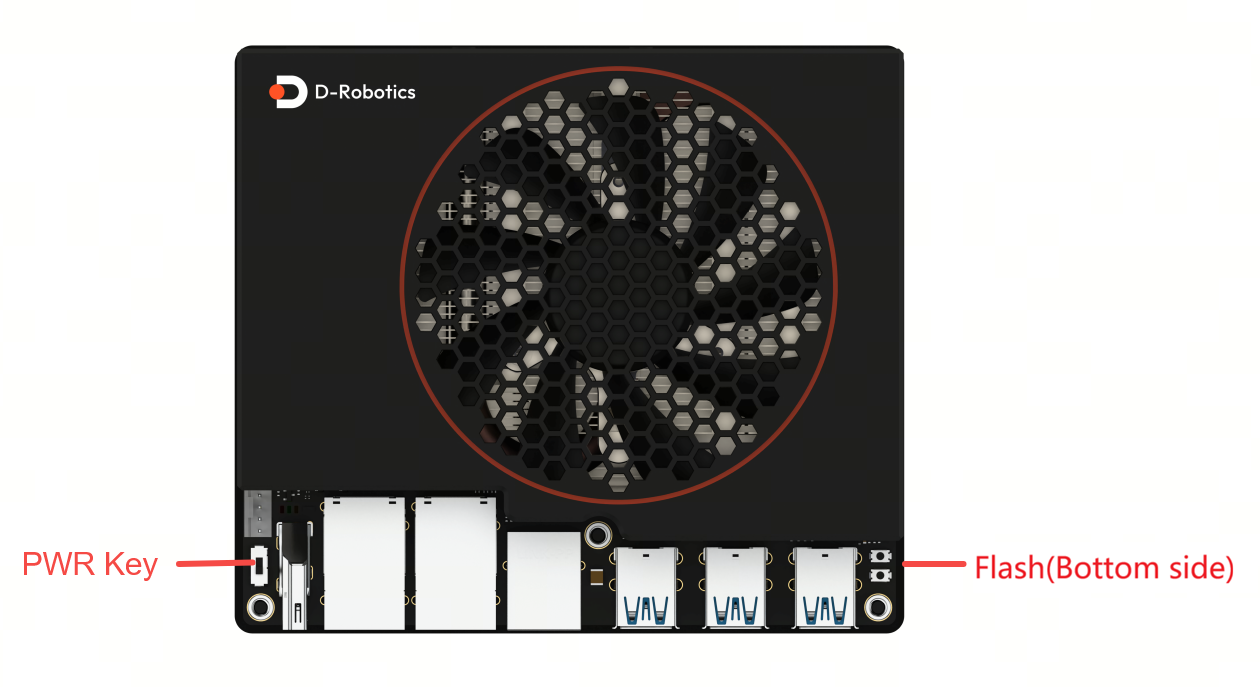
The RDK S600 currently on sale is V1P0. Enter DFU mode as follows:
V1P0 (current)
- Set the SW3 DIP switch to
OFF, and power off. - Set the SW2 DIP switch to
ONto enter DFU mode. - Set the SW3 DIP switch to
ON, and power on. - Check the D61 Flash LED: steady on means the device is in DFU mode.
Historical versions (V0P1, V0P2) DFU entry
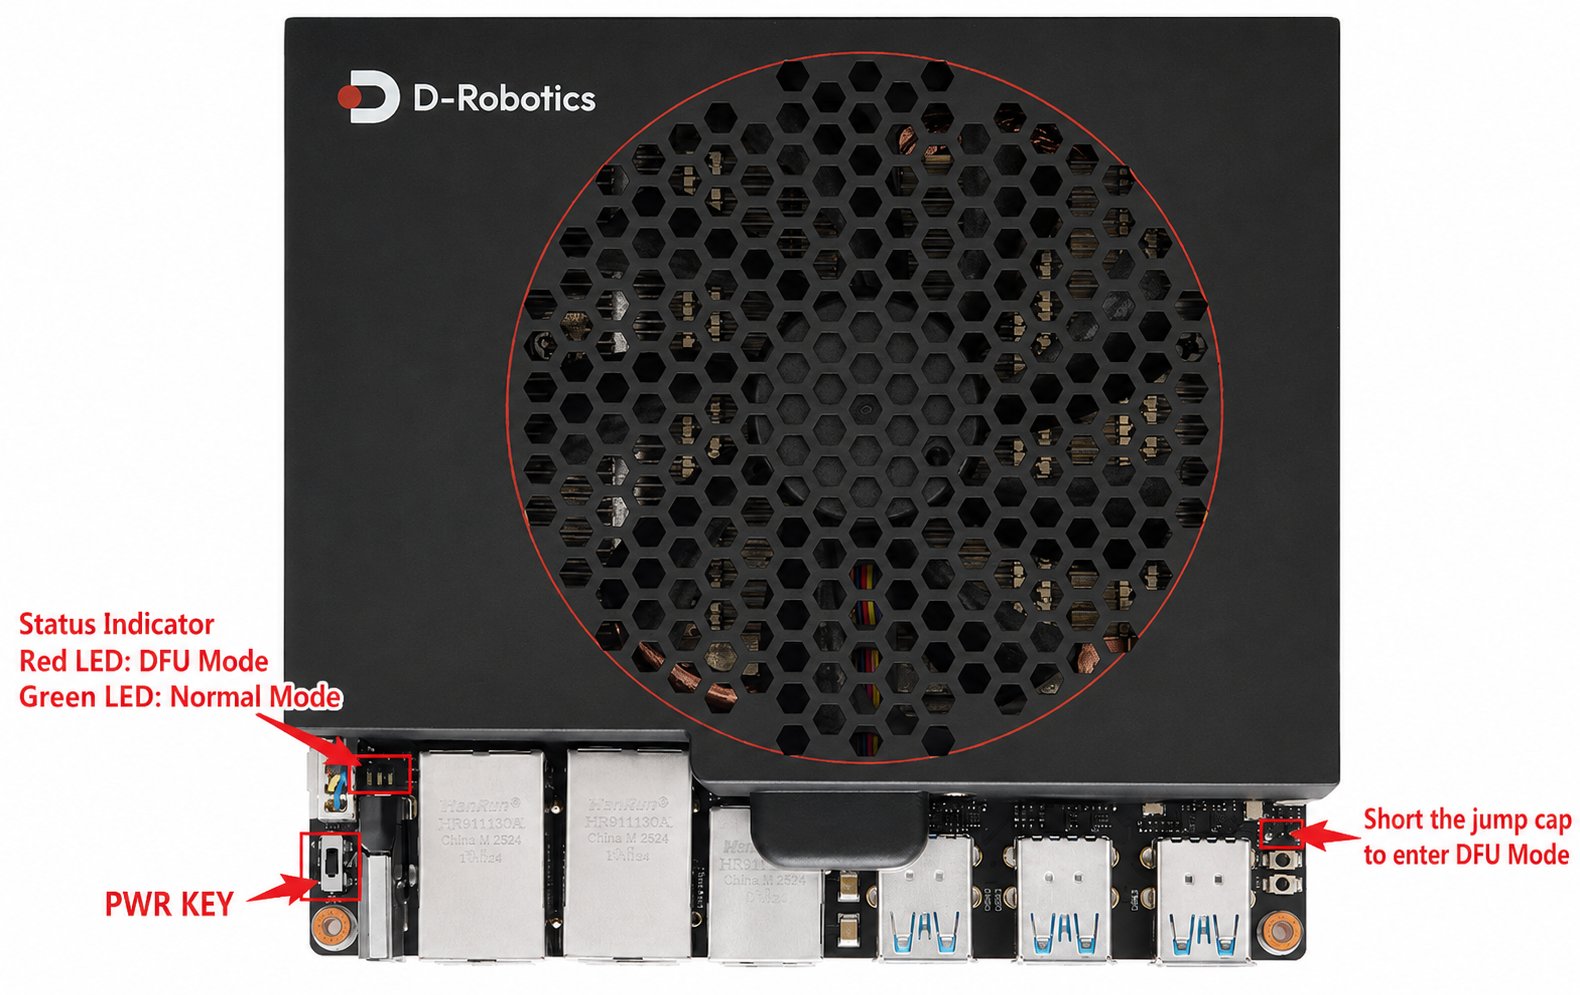
V0P1
- Set the SW3 DIP switch to
OFF, and power off. - Short the SW2 jumper cap to enter DFU mode.
- Set the SW3 DIP switch to
ON, and power on. - Check the D61 Flash LED: steady on means the device is in DFU mode.
V0P2
- Set the SW3 DIP switch to
OFF, and power off. - Set the SW2 DIP switch to
ONto enter DFU mode. - Set the SW3 DIP switch to
ON, and power on. - Check the D61 Flash LED: steady on means the device is in DFU mode.
V0P2 DFU entry is the same as the V1P0 version above.
Enter Fastboot mode
- Set the SW3 DIP switch to
OFF, and power off. - Set the SW2 DIP switch to
OFFto enter normal boot mode. - Set the SW3 DIP switch to
ON, and power on.
- Automatic entry: After the board system finishes booting, the ADB service starts automatically. XBurn detects the ADB device and sends a command to put the board into Fastboot.
- Manual entry: Right after power-on, press and hold the spacebar to enter the U-Boot command line, then enter
fastboot 0to enter Fastboot.
Flash the full image
Use this for a first-time flash or system recovery. It flashes the complete system image package. For Storage medium, select UFS (onboard) or NVMe (expansion) based on your setup.
The boot disk is determined by the SW8 BOOT DIP switch. Before flashing, set the SW8 DIP switch correctly for the target storage medium, and keep the switch position unchanged after flashing:
- Boot from UFS: Set SW8 to the UFS boot position (
D12=ON, D13=ONorD12=OFF, D13=OFF). - Boot from NVMe: Set SW8 to the NVMe boot position (
D12=OFF, D13=ON).
Flashing NVMe requires the NVMe version of the image. D-Robotics provides UFS images by default; the NVMe image must be compiled on your own (build config RDK_DISK_MEDIUM="nvme"). See Build system development guide · eMMC/UFS/NVMe image build notes.
-
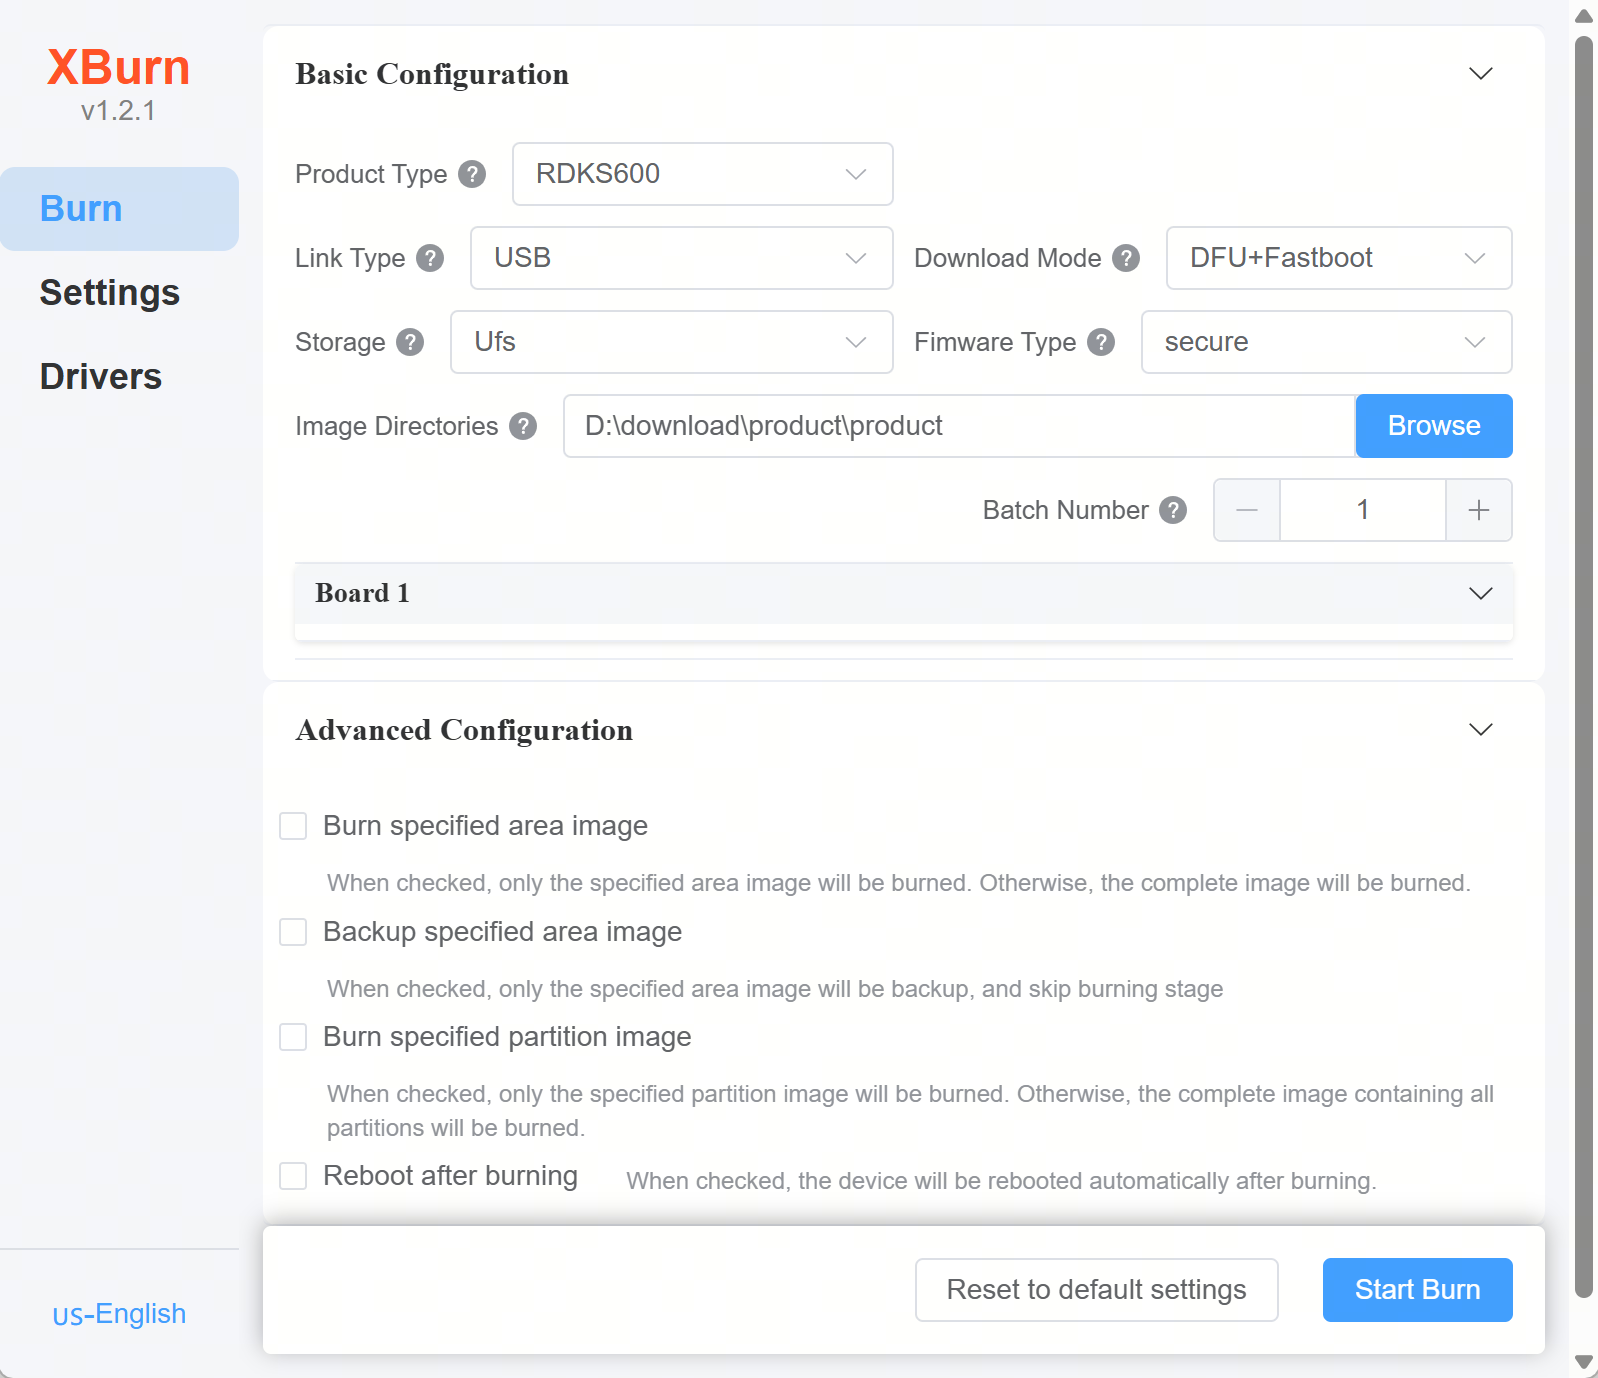
For Product type, select
RDK S600. -
For Connection type, select
USB. For Download mode, selectDFU+FastbootorFastboot. -
For Storage, select
UFSorNVMe. For Firmware type, selectsecure. -
To the right of Image directory, click Browse and select the product folder that contains the firmware.
-
(Optional) To flash multiple devices at once, see the XBurn Manual Batch flashing (software limit 8 devices, recommended ≤4; the more devices, the higher the failure rate, and stability depends on the cable, USB hub, power supply, and other hardware. The software provides no guarantee). For batch flashing, turn off Reboot after flashing so that one device rebooting does not affect the others.
-
(Optional) Expand Advanced configuration and select Reboot after flashing. After flashing, the device reboots automatically, so you do not need to power off, switch to normal boot mode, or power on again manually. For details, see the XBurn Manual Auto-reboot and boot check after flashing.
-
Click Start flashing. The device powers on and flashing starts. Wait for the progress to complete.
-
After the flashing completes, power off.
-
Verify the boot. Keep the device powered off, connect the device to a monitor with an HDMI cable, then power on the device. On first boot, the system performs default environment configuration that takes about 45 seconds, after which the Ubuntu desktop appears on the monitor.
LED indicators- Green LED: Lit means the hardware is powered on normally.
If the device produces no display output for a long time (over 2 minutes) after power-on, the boot failed and you need to debug over a serial cable. For boot failure troubleshooting, see the XBurn Manual Boot issues.
Advanced usage
- Use this for specific scenarios other than a first-time flash.
- In addition to flashing the full image, XBurn supports Flash specific regions, Back up specific regions, and Flash specific partition images.
Flash specific regions
- Flash only the selected regions, instead of the complete full-image package.
miniboot_flashis on NOR Flash and is independent of the selected medium; both UFS and NVMe can select it. Other regions correspond to the selected medium per the "Actual storage medium" column.
| Region | Actual storage medium | Firmware content | Image |
|---|---|---|---|
| miniboot_flash | NOR Flash | Basic boot image on NOR Flash, including images for HSM/MCU0 and other system components | img_packages/disk/miniboot_flash.img |
| miniboot_ufs | UFS | Basic boot image on UFS, including images for BL31/U-Boot and other system components | img_packages/disk/miniboot_ufs.img |
| ufs | UFS | Complete UFS image, already includes miniboot_ufs | img_packages/disk/ufs_disk.simg |
| miniboot_nvme | NVMe | Basic boot image on NVMe, including images for BL31/U-Boot and other system components | img_packages/disk/miniboot_nvme.img |
| nvme | NVMe | Complete NVMe image, already includes miniboot_nvme | img_packages/disk/nvme_disk.simg |
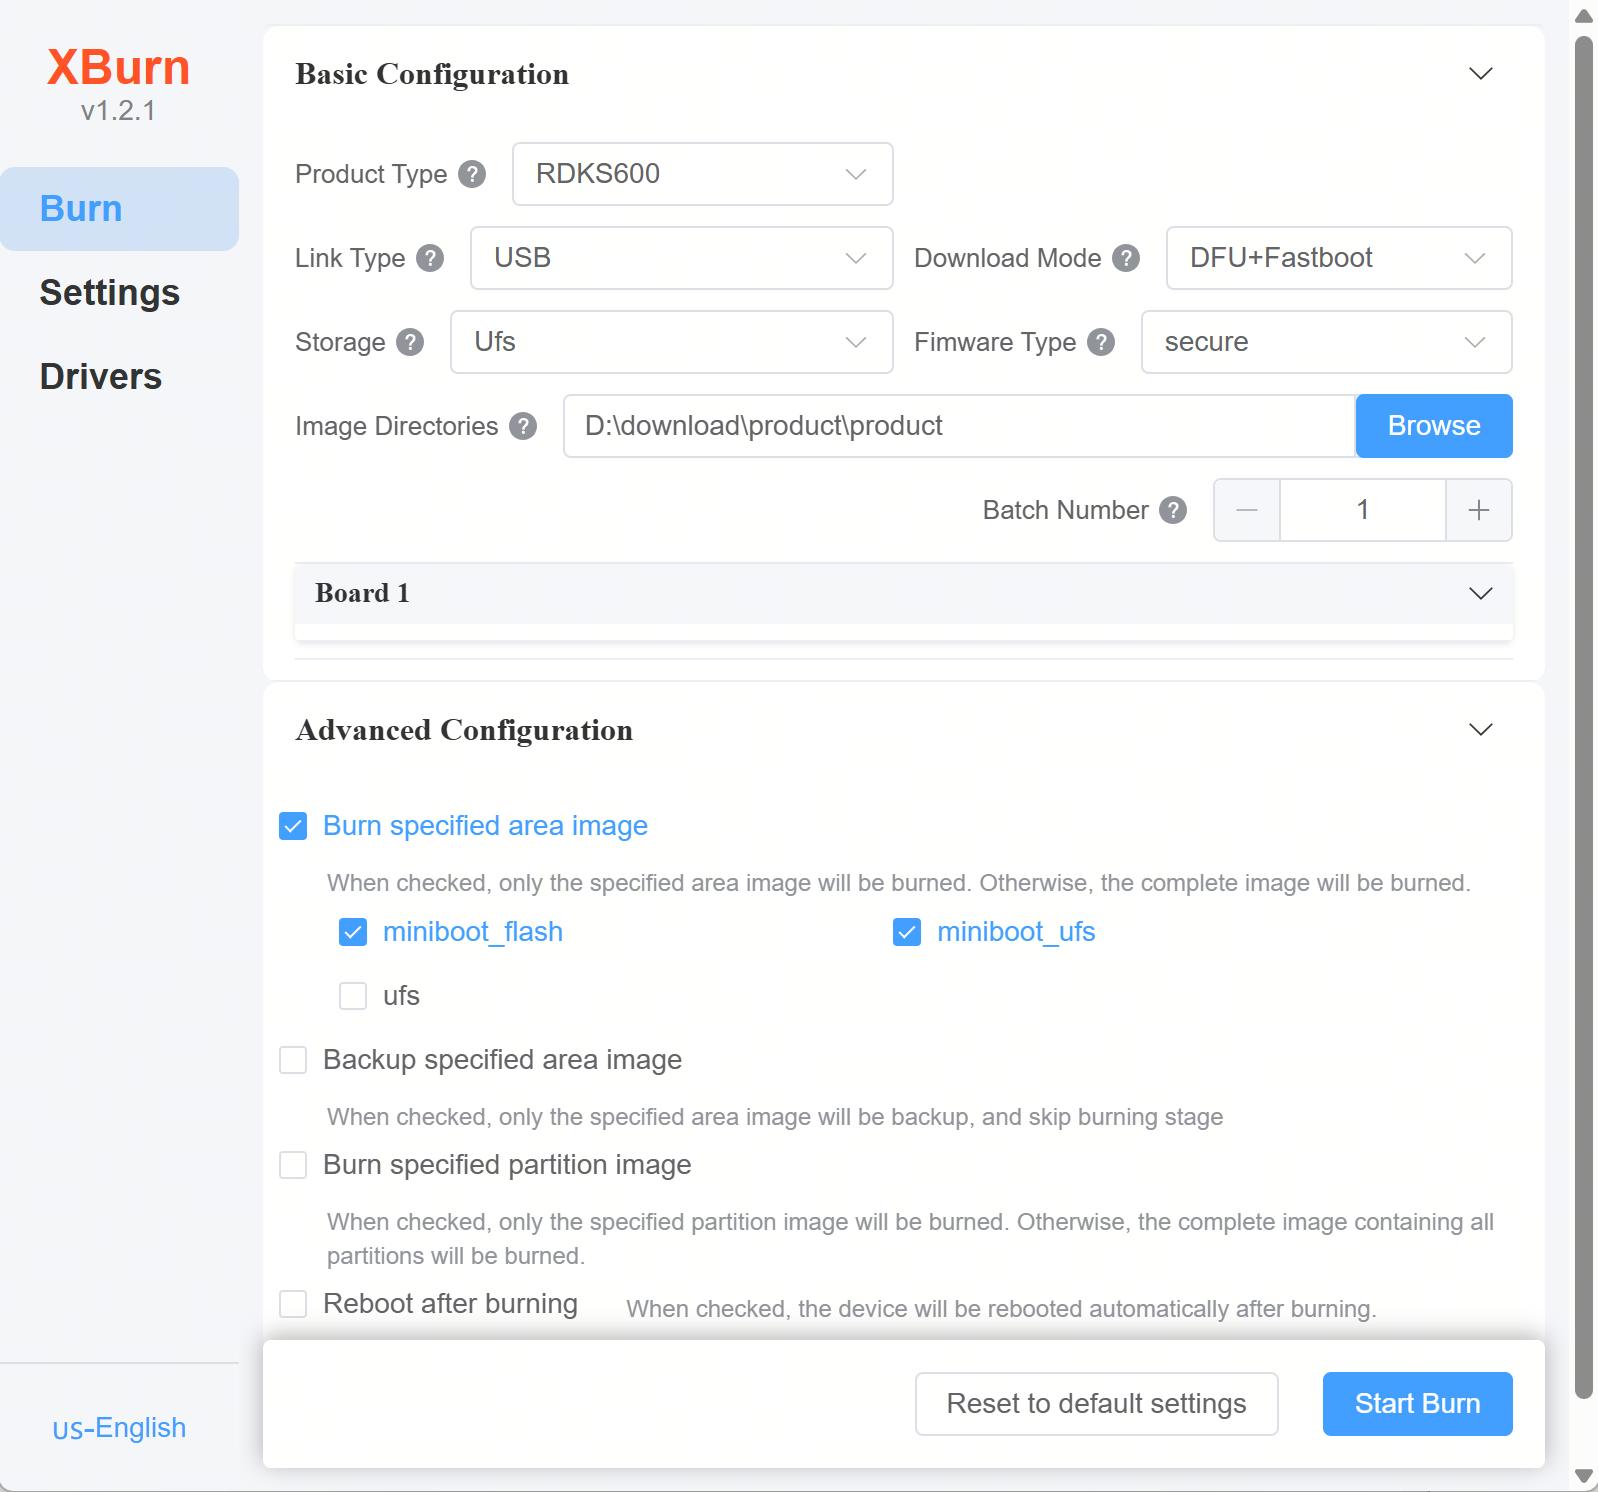
Starting from the steps in Flash the full image, expand Advanced configuration, select Flash specific regions, and select the target regions (such as miniboot_flash and miniboot_ufs). Complete the flash and verify the boot.
Back up specific regions
Back up the image of specific regions to your PC. miniboot_flash is on NOR Flash; both UFS and NVMe can back it up. Other regions correspond to the selected medium per the "Actual storage medium" column.
| Region | Actual storage medium | Firmware content | Backup image |
|---|---|---|---|
| miniboot_flash | NOR Flash | Complete NOR Flash image | img_packages/disk/miniboot_flash_backup.img |
| ufs | UFS | Complete UFS image | img_packages/disk/ufs_disk_backup.img |
| nvme | NVMe | Complete NVMe image | img_packages/disk/nvme_disk_backup.img |
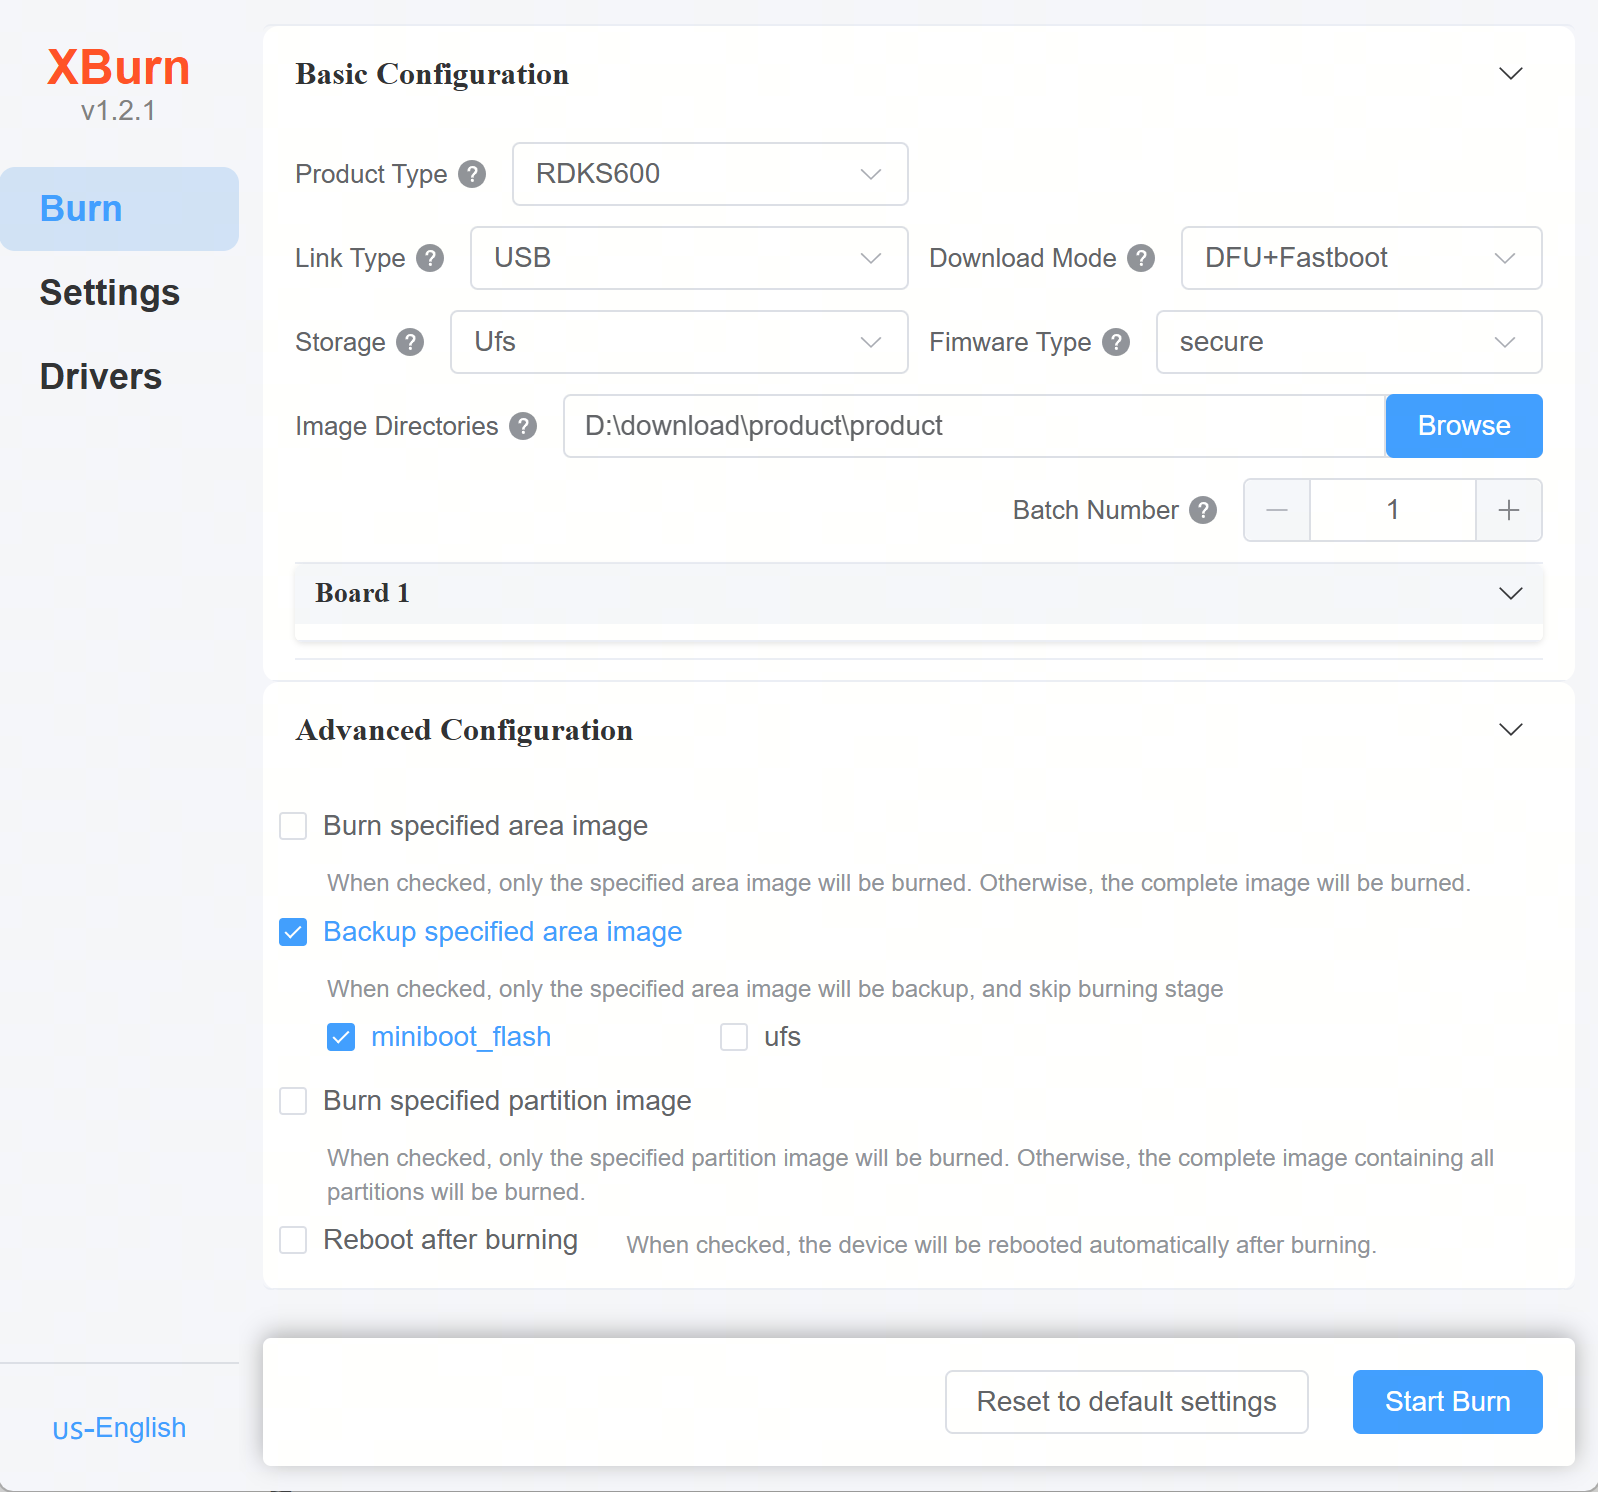
Starting from the steps in Flash the full image, expand Advanced configuration, select Back up specific regions, and select the target region (such as miniboot_flash). After flashing, open img_packages/disk/ and check the backup image file miniboot_flash_backup.img.
- Data backup takes a long time. Wait patiently.
- To flash a backup image, remove
_backupfrom the filename and change it to the same filename used for flashing a specific region (for example,ufs_disk_backup.img→ufs_disk.simg).
Flash specific partition images
Flash by individual system component partition, at a finer granularity than Flash specific regions. This is partition-level (a single component partition, such as uboot, boot, or system).
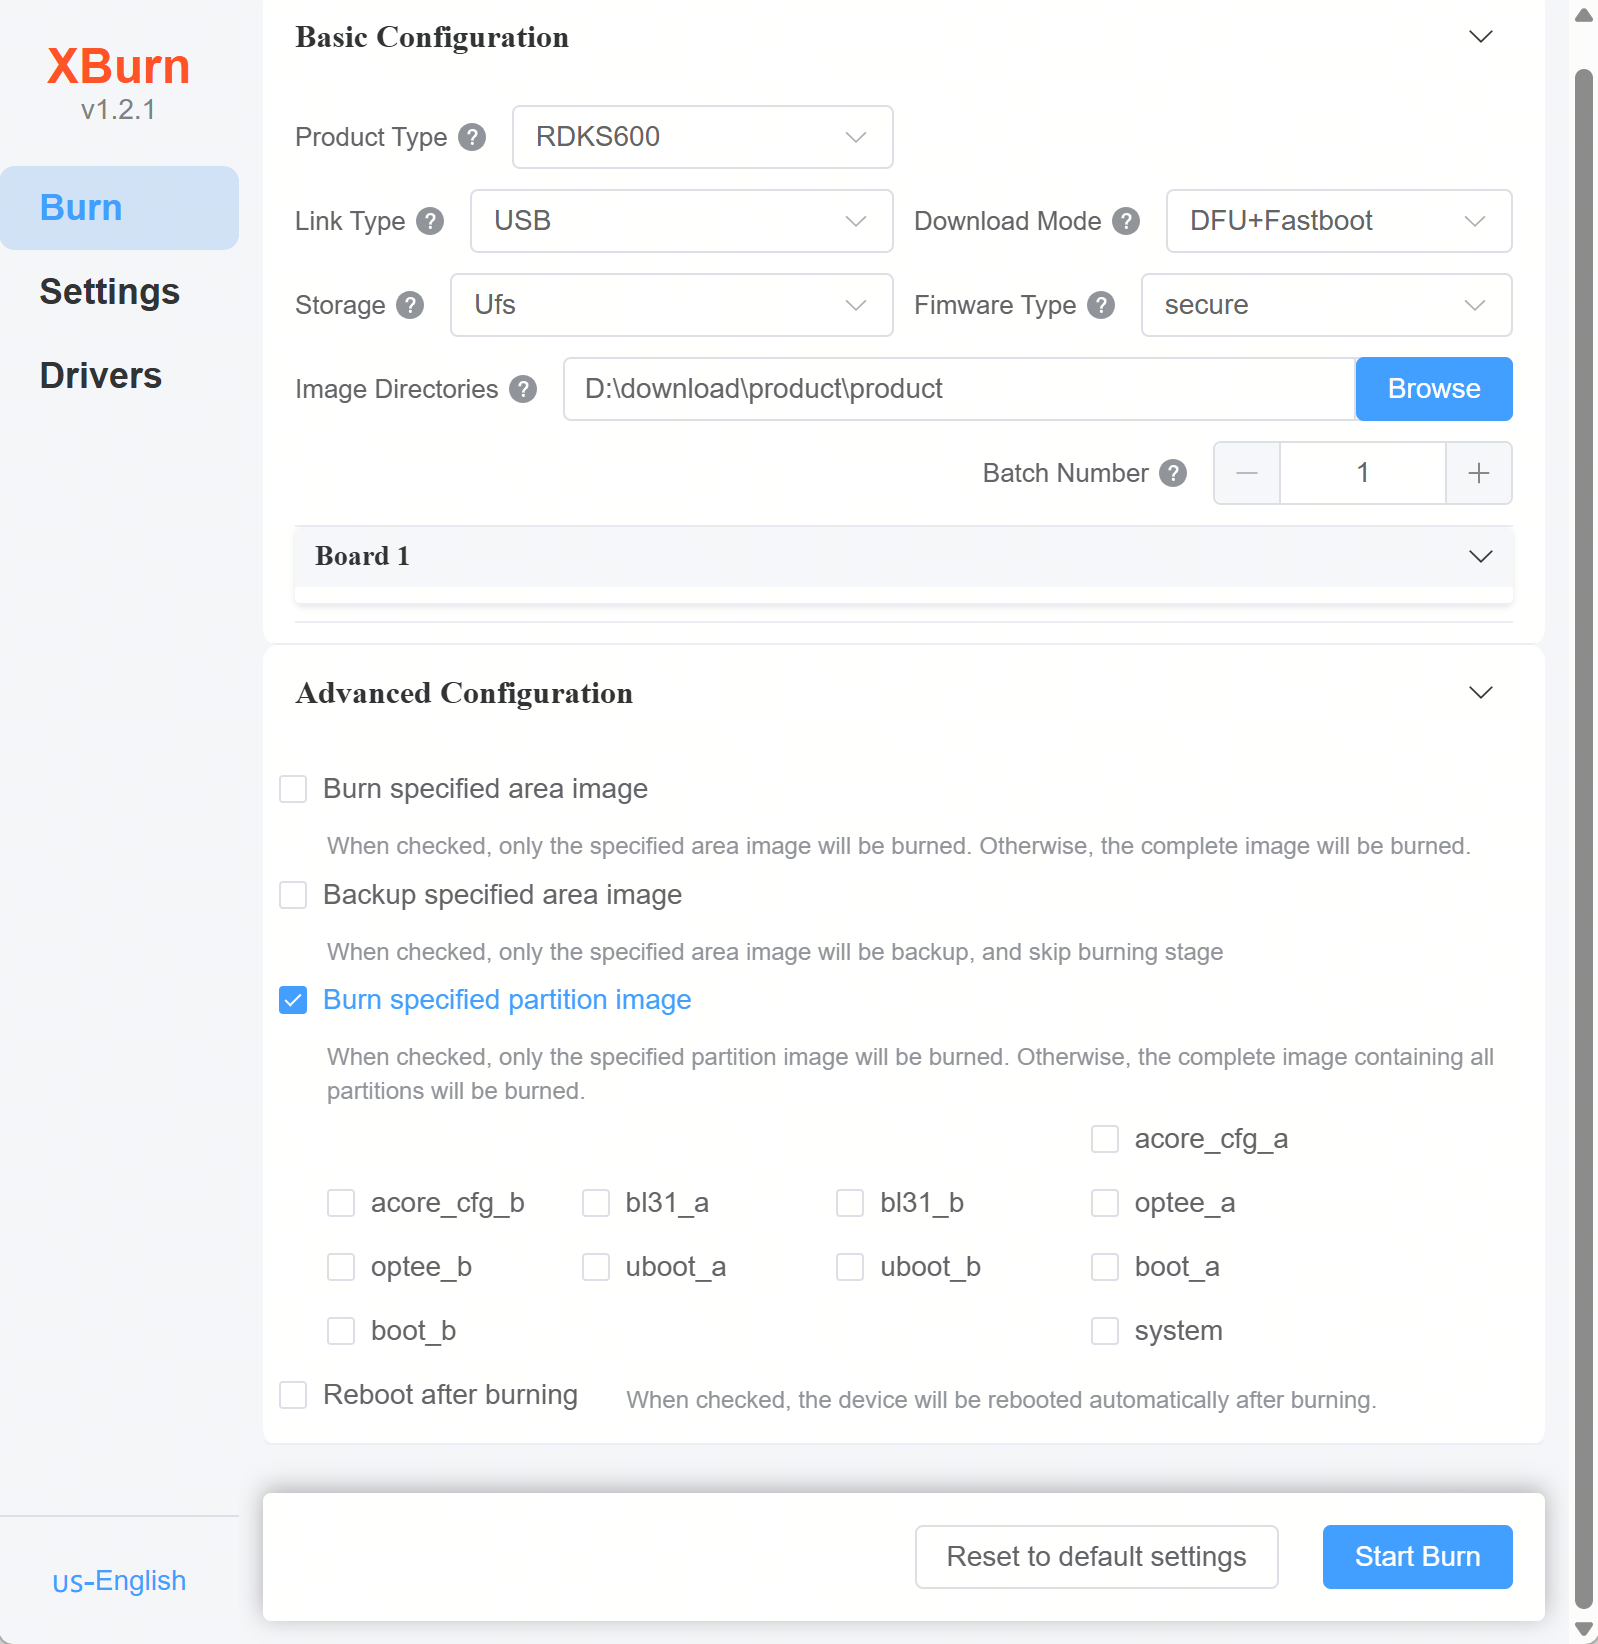
Starting from the parameters in Flash the full image, expand Advanced configuration, select Flash specific partition images, and select the target partitions. Complete the flash and verify the boot.
The partition options that appear after selection are: