sunrise camera User Guide
Feature Overview
sunrise camera is an official application developed to facilitate rapid evaluation of modules such as Camera, VIO, Codec, and BPU. Users can conveniently configure parameters and preview live video streams and algorithm rendering results in real time via a web browser on their PC. The main features of the application are as follows:
- Supports intelligent camera mode, with a maximum of 2 Camera Sensors supported.
- Supports intelligent multi-channel decoding and analysis box mode:
- Encoding/decoding capability: supports up to 12 channels of 1080p@30 video streams for encoding or decoding.
- In box mode, video files are first decoded and then re-encoded for transmission; therefore, box mode supports a maximum of 6 channels of 1080p@30.
- Allows parameter configuration via a PC web browser, including settings for Camera sensor, encoding bitrate, algorithm model, video source, etc.
- Supports previewing video output through multiple methods, including a PC web browser, VLC stream pulling, and HDMI output.
- Supports switching among multiple algorithm models, such as mobilenet_v2, yolov5s, fcos, etc.
Hardware Setup
- Before running sunrise camera, prepare the following components:
- Camera modules compatible with the development board, such as SC230AI, SC132GS, F37, etc.
- One Ethernet cable to ensure the PC and development board can ping each other.
- One Micro USB cable (used when no Ethernet port is available); the development board can communicate with the PC via a USB virtual network interface.
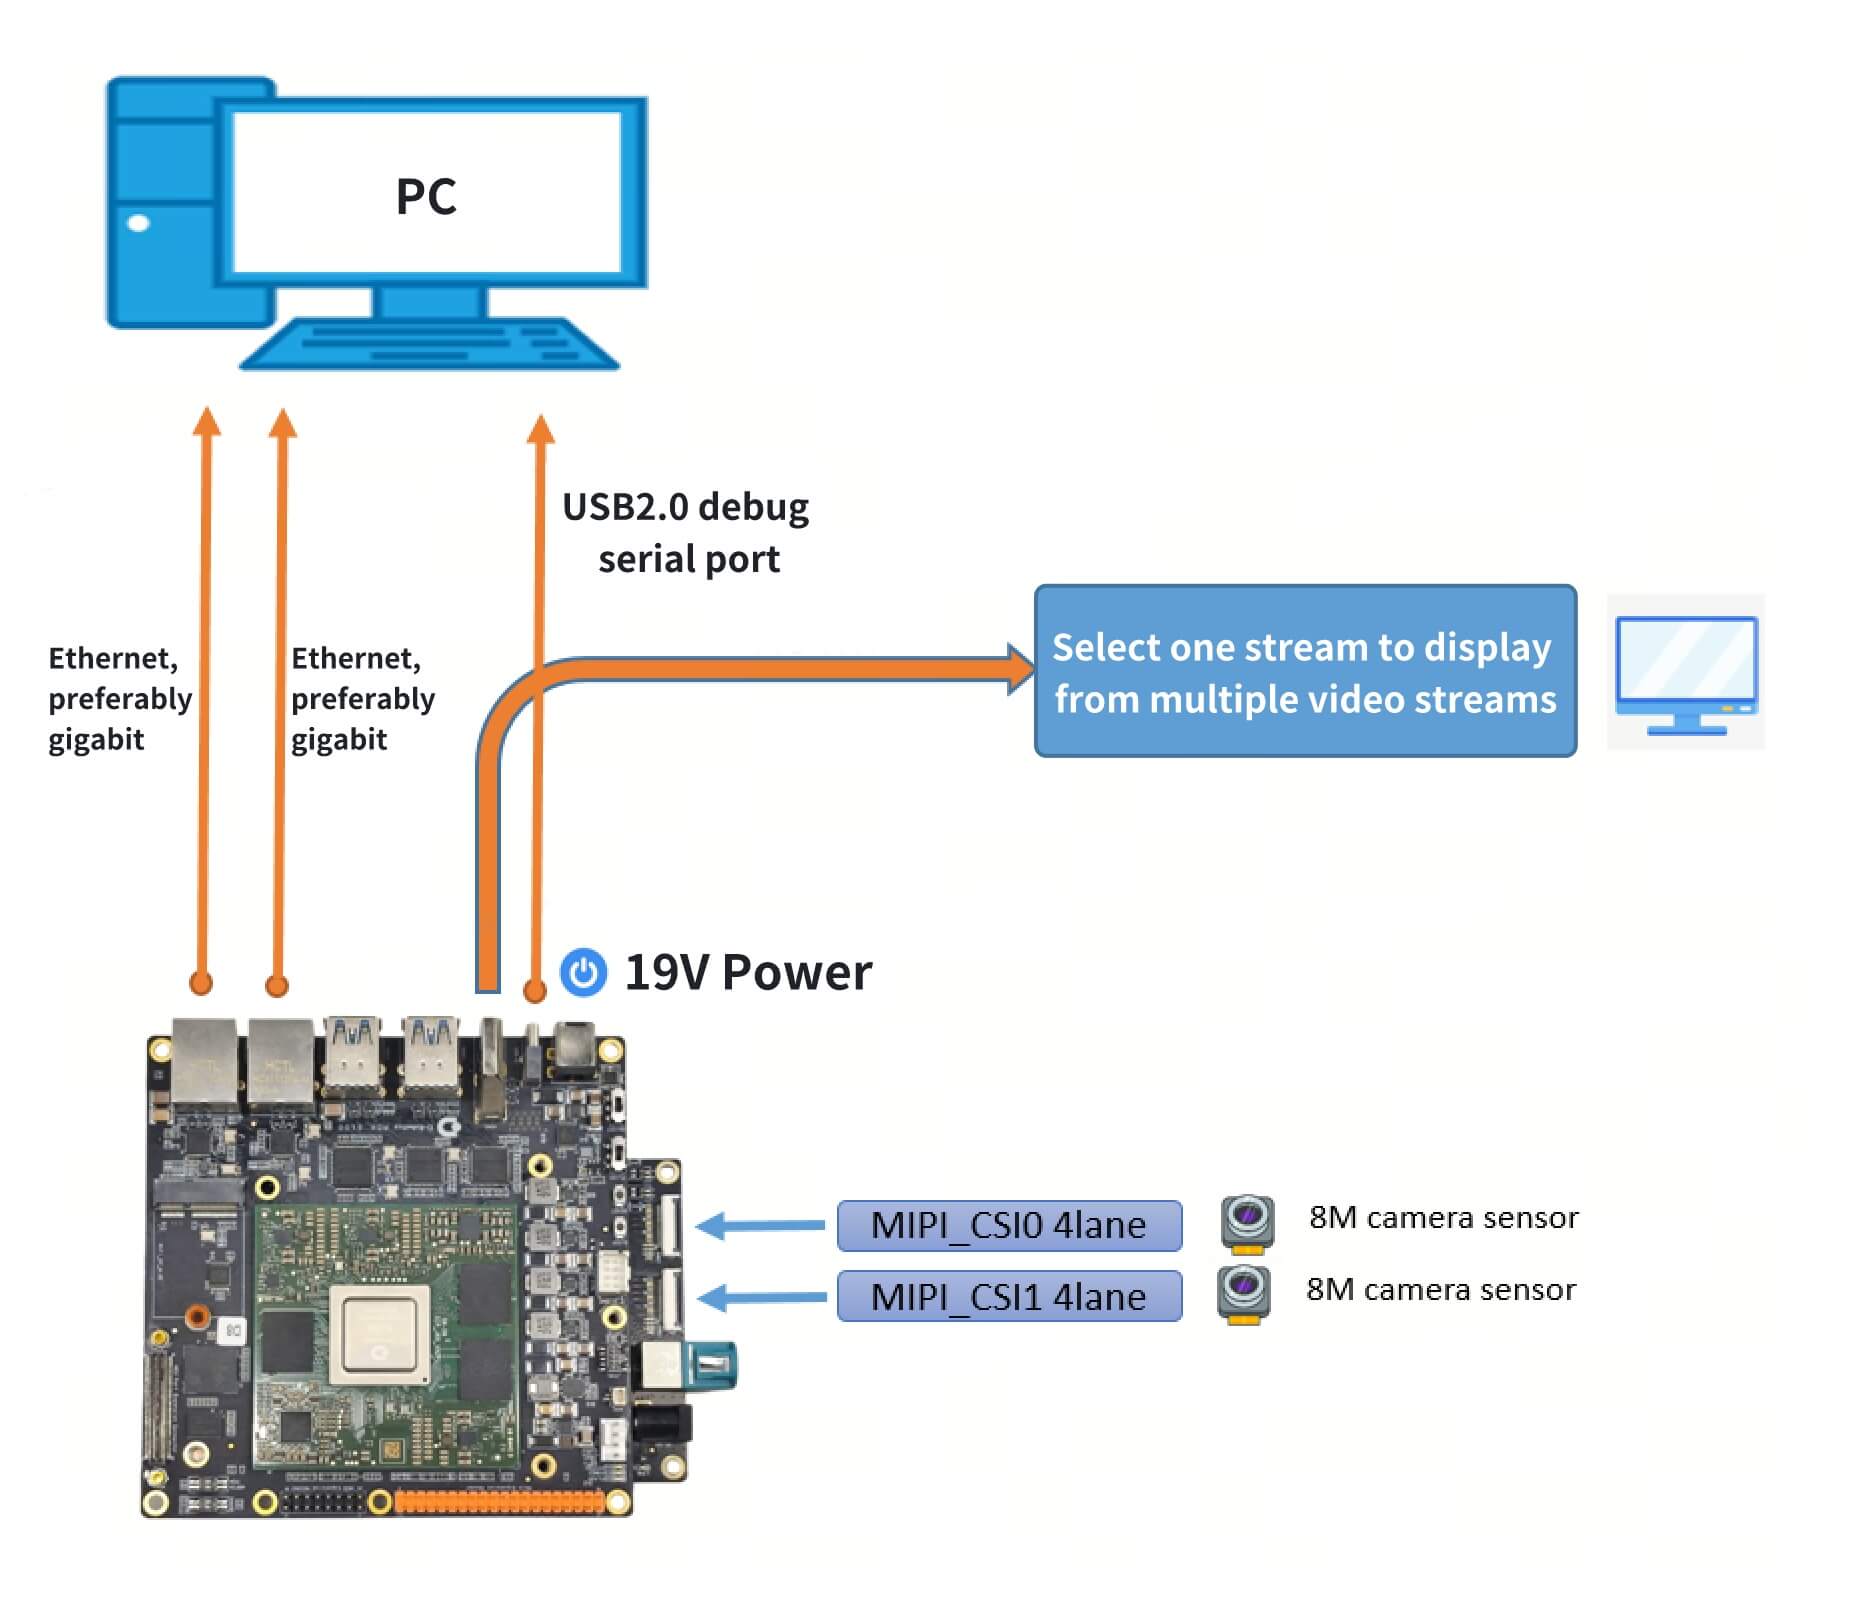
The overall connection diagram is shown below:
Network Connection Requirements
To ensure stability during 4K encoding and streaming, it is recommended to directly connect the development board and PC using Gigabit Ethernet ports.
Compilation and Execution
Compilation
Navigate to the directory: /app/multimedia_samples/sunrise_camera
Run the command: make
The generated executable file is: sunrise_camera
root@ubuntu:/app/multimedia_samples/sunrise_camera# ls sunrise_camera/bin/
log  sunrise_camera  www
Execution
sunrise camera can be launched in two ways:
- Manual startup: suitable for debugging.
- Auto-start on power-up: suitable for deployment in production scenarios after stable debugging.
Manual Startup:
After compiling sunrise camera, run sh ./start_app.sh to start the application.
Auto-start on Power-up:
- Deploy the auto-start service file (only required once):
cp sunrise_camera.service /etc/systemd/system/sunrise_camera.service
- Enable auto-start on boot:
# Reload systemd configuration
sudo systemctl daemon-reload

# Start the service in the background
sudo systemctl start sunrise_camera

# Check status: confirms successful background startup of sunrise_camera
sudo systemctl status sunrise_camera

# Enable auto-start on boot
sudo systemctl enable sunrise_camera

# Reboot
sync
reboot
- Other useful commands:
# Disable auto-start on boot
sudo systemctl disable sunrise_camera

# Stop the running sunrise_camera service
sudo systemctl stop sunrise_camera

# View logs after background startup
journalctl -u sunrise_camera.service -f --output=cat
Web Client User Guide
Main Interface
After successfully launching sunrise camera, open Chrome and enter the device’s IP address (default IP of the development board is 192.168.1.10) in the address bar to access the main control interface, e.g., http://192.168.1.10.

The interface after successful login appears as follows:
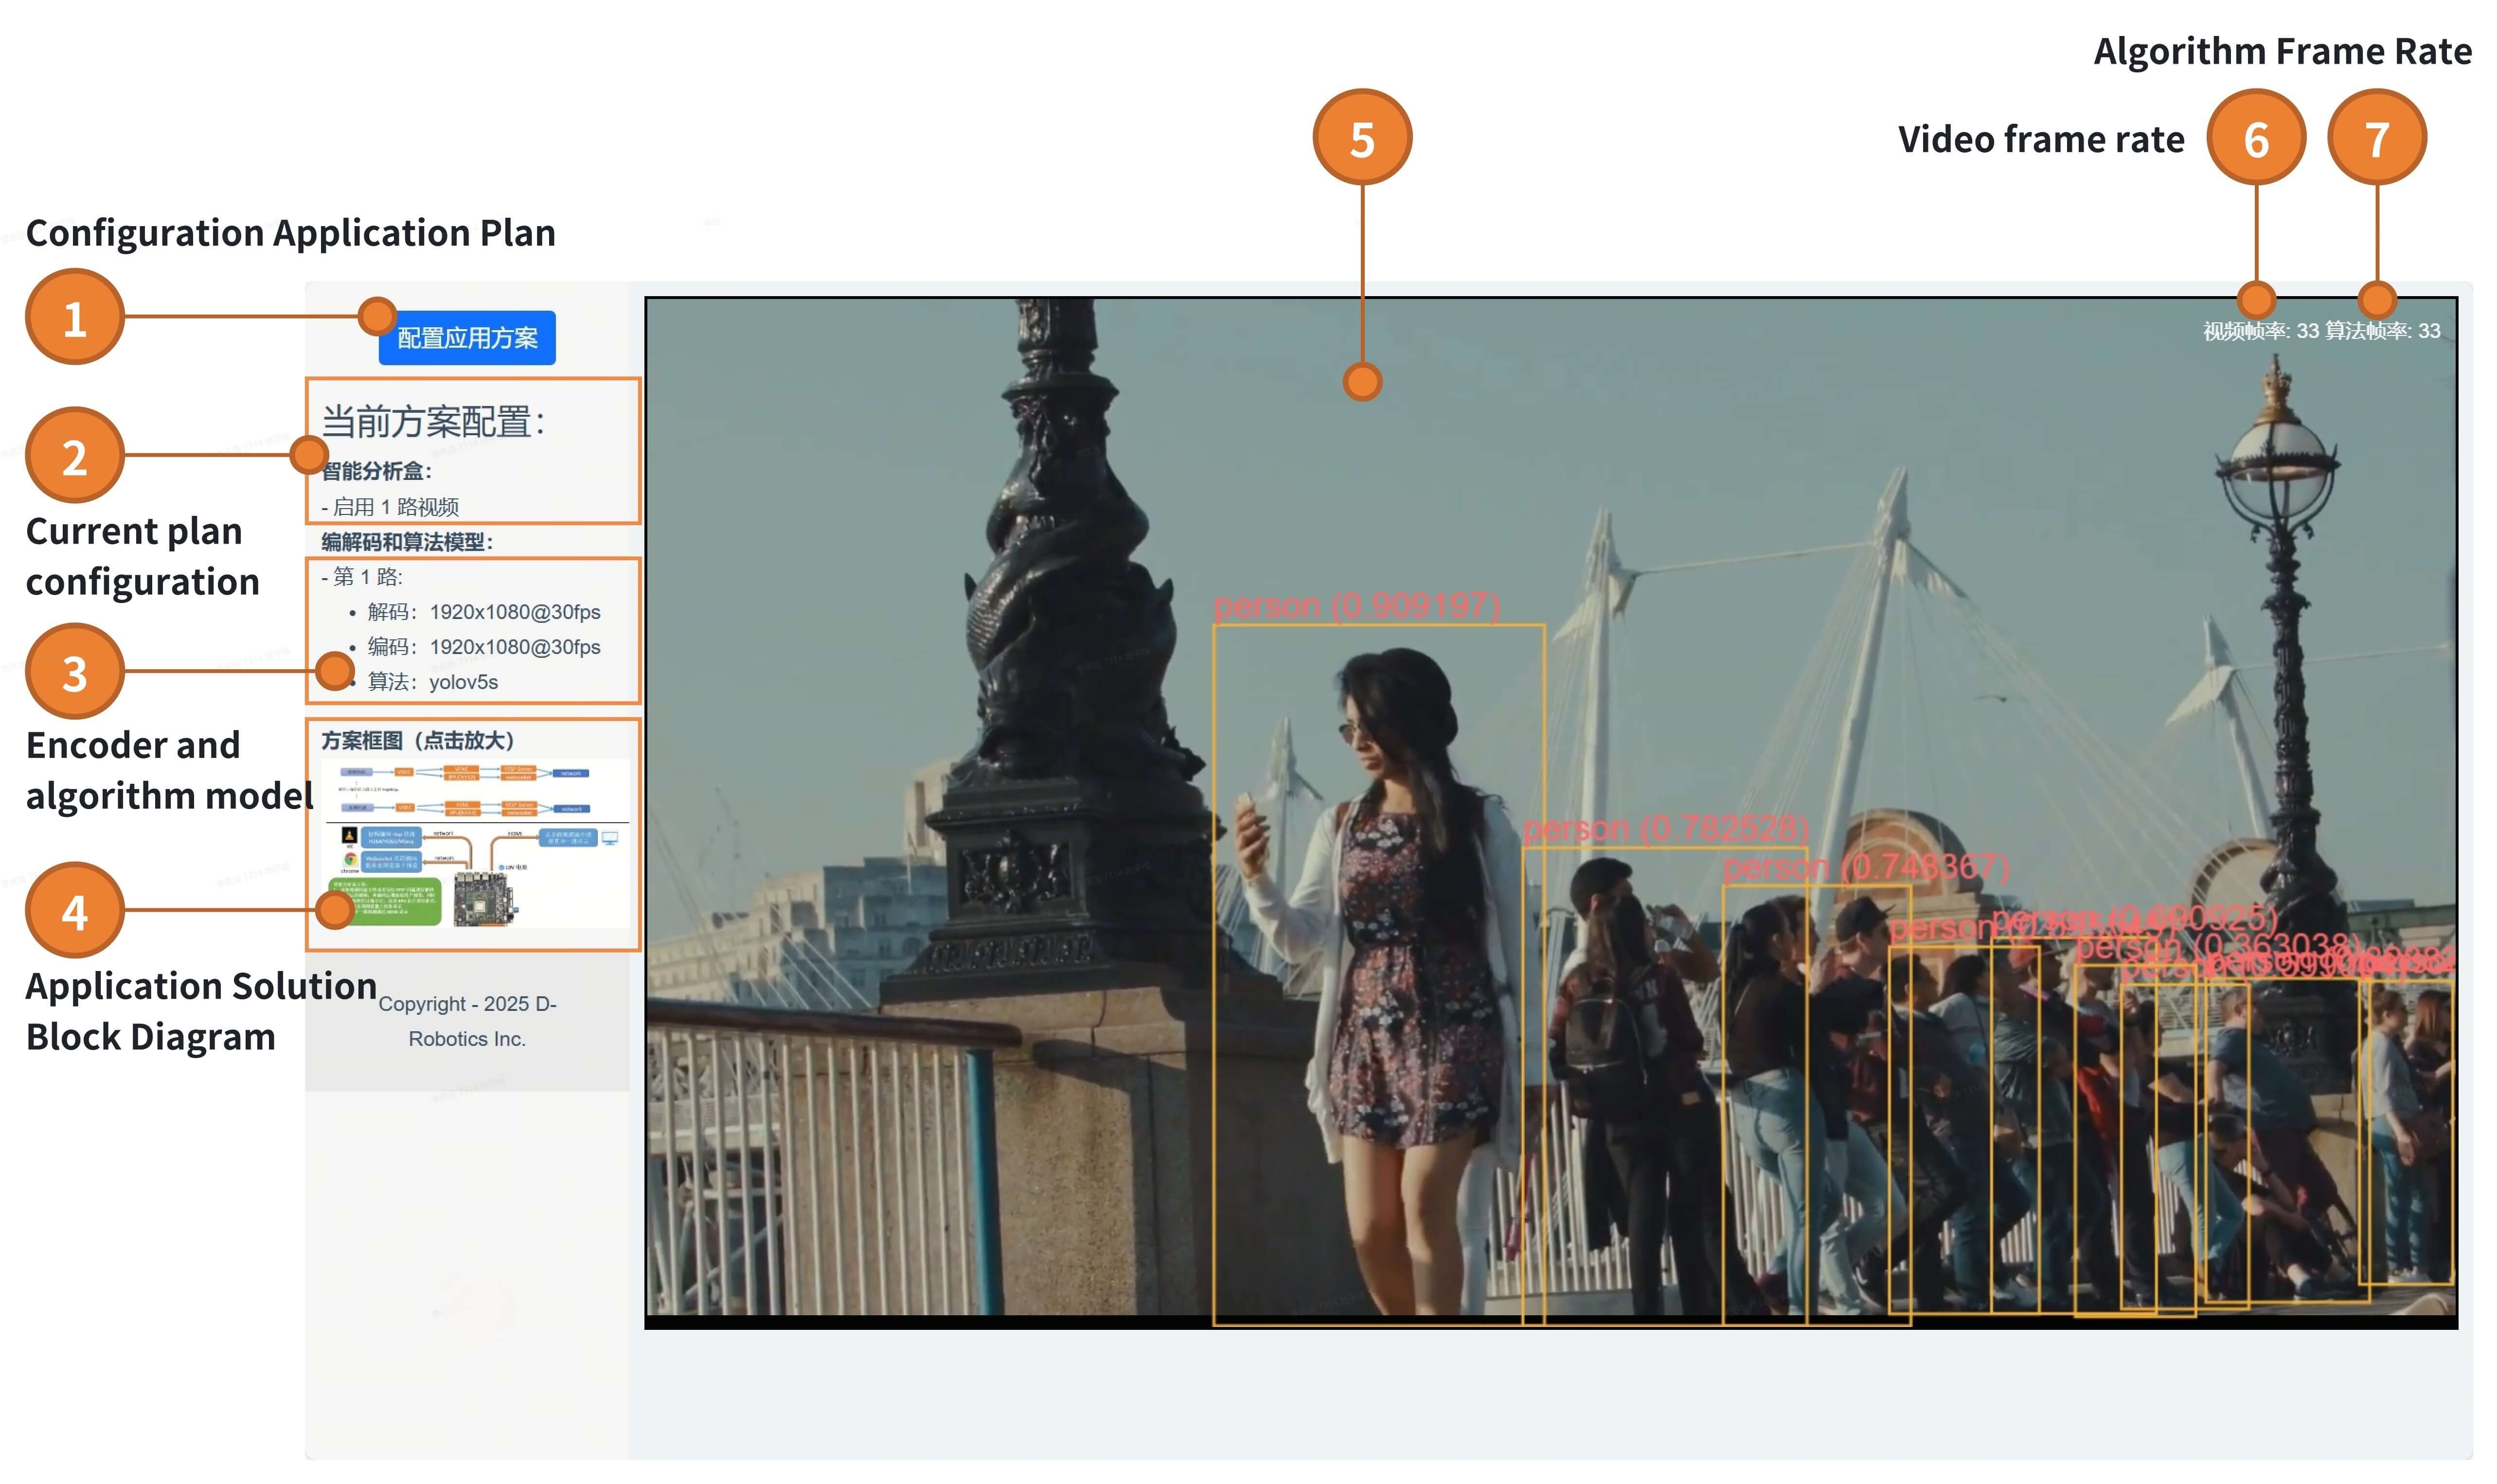
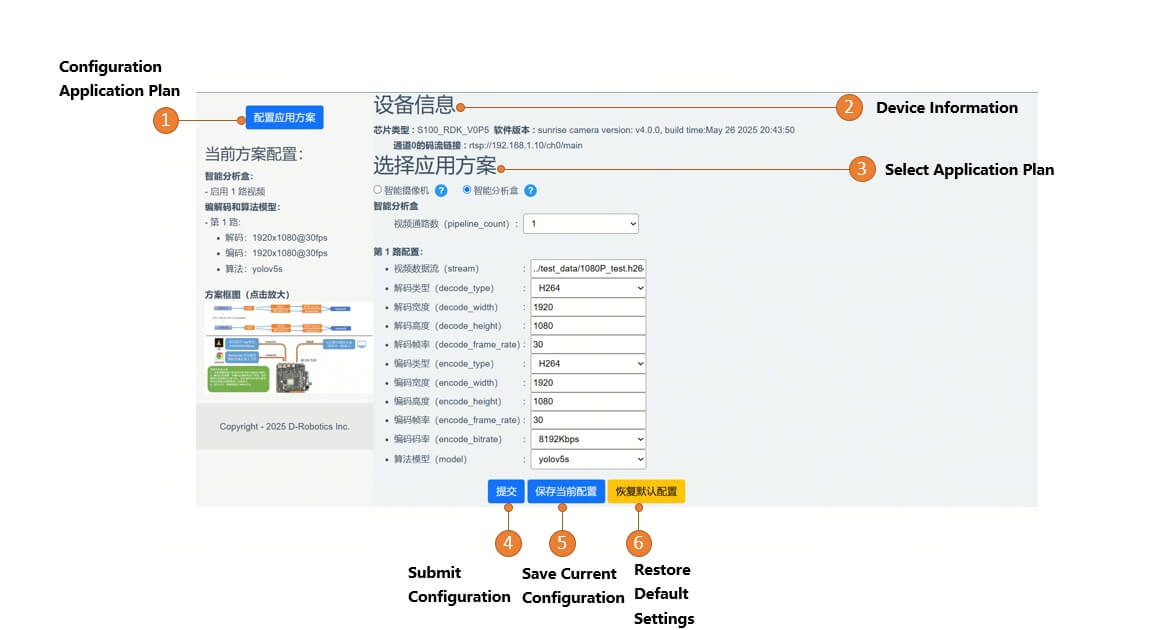
Detailed descriptions of the interface elements are as follows:
| Feature ID | Description |
|---|---|
| 1 | Configure application scheme; clicking opens the scheme selection and parameter configuration page. |
| 2 | Displays information about the currently running scenario. |
| 3 | Shows key details of the current application scheme, such as sensor model, codec parameters, and algorithm model. |
| 4 | Application scheme block diagram; click to enlarge and view the full data flow diagram. |
| 5 | Main video display area; automatically adjusts the number of displayed video channels based on the configured scheme. |
| 6 | Real-time frame rate of the preview video. |
| 7 | Real-time frame rate of algorithm processing. |
Parameter Configuration Methods
- sunrise camera supports two application schemes:
Intelligent CameraandIntelligent Analysis Box(default scheme isSingle-channel Video Analysis Box). - Parameters such as application scheme, camera sensor model, decoding/encoding settings, and algorithm model can be modified online via the web interface.
Intelligent Camera Configuration
Configuration steps:
- Start the sunrise_camera program and open Chrome, entering the device IP address (e.g., http://192.168.1.10).
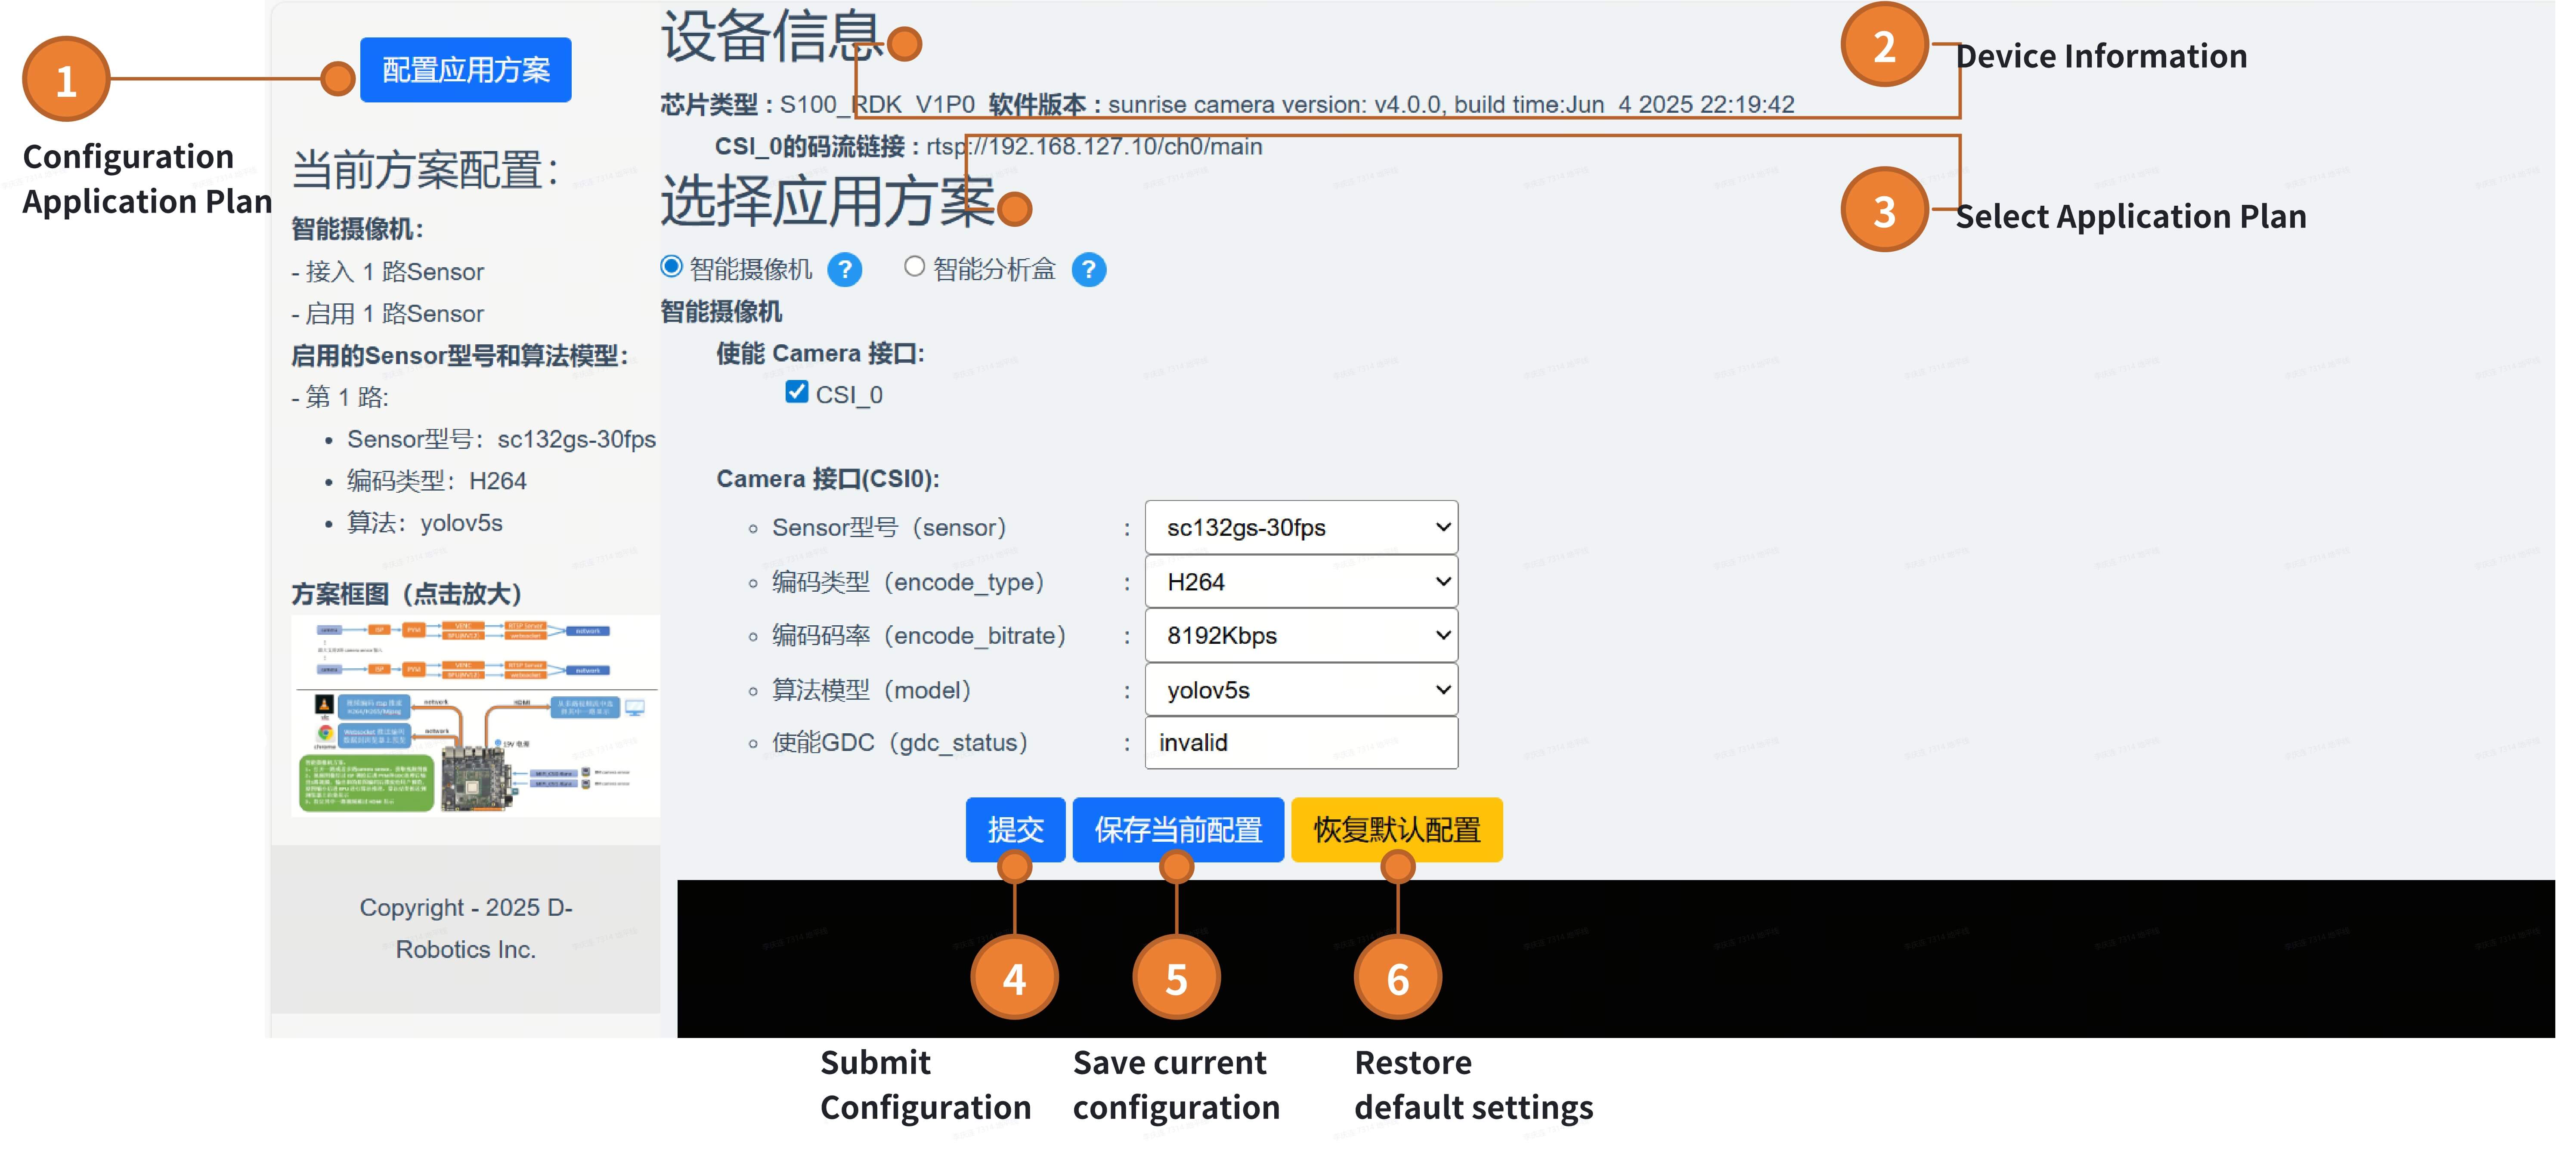
- Click the
Configure Application Schemebutton (labeled1in the image above). - View current device information, including chip type, software version, and RTSP stream URLs (these URLs can be used in VLC to pull streams, supporting recording, screenshots, etc.)—labeled
2. - Select an application scheme (labeled
3); click the?button for detailed parameter settings and notes for each scheme. - Click
Submitto immediately switch the application scheme. (Note: This only applies temporary changes for debugging and does not modify the configuration file on the development board.) - Click
Save Current Configurationto write the settings to the development board’s configuration file, which will be loaded on the next startup. - Click
Restore Default Configurationto reset user settings back to the defaultSingle-channel Video Analysis Boxconfiguration.
Notes:
- Camera interfaces correspond one-to-one with CSI ports on the board. Only cameras physically connected and properly supported will appear in the enabled Camera interface list.
- If
Save Current Configurationis clicked but a new camera is connected after power cycling, the newly inserted camera will be disabled by default.
Intelligent Analysis Box Configuration
Configuration steps:
- Start the sunrise_camera program and open Chrome, entering the device IP address (e.g., http://192.168.1.10).
- Click the
Configure Application Schemebutton (labeled1in the image above). - View current device information, including chip type, software version, and RTSP stream URLs (usable in VLC for stream pulling, recording, screenshots, etc.)—labeled
2. - Select an application scheme (labeled
3); click the?button for detailed parameter settings and notes. - Click
Submitto immediately switch the application scheme. (Note: This only applies temporary changes for debugging and does not modify the configuration file.) - Click
Save Current Configurationto persist settings to the development board’s configuration file for use on next startup. - Click
Restore Default Configurationto reset to the defaultSingle-channel Video Analysis Boxsettings.
Intelligent Camera Configuration
The Intelligent Camera scheme implements image capture, processing, encoding, RTSP streaming, and intelligent computation from Camera sensors, enabling users to quickly evaluate multimedia imaging and algorithm performance. The functional block diagram is shown below:
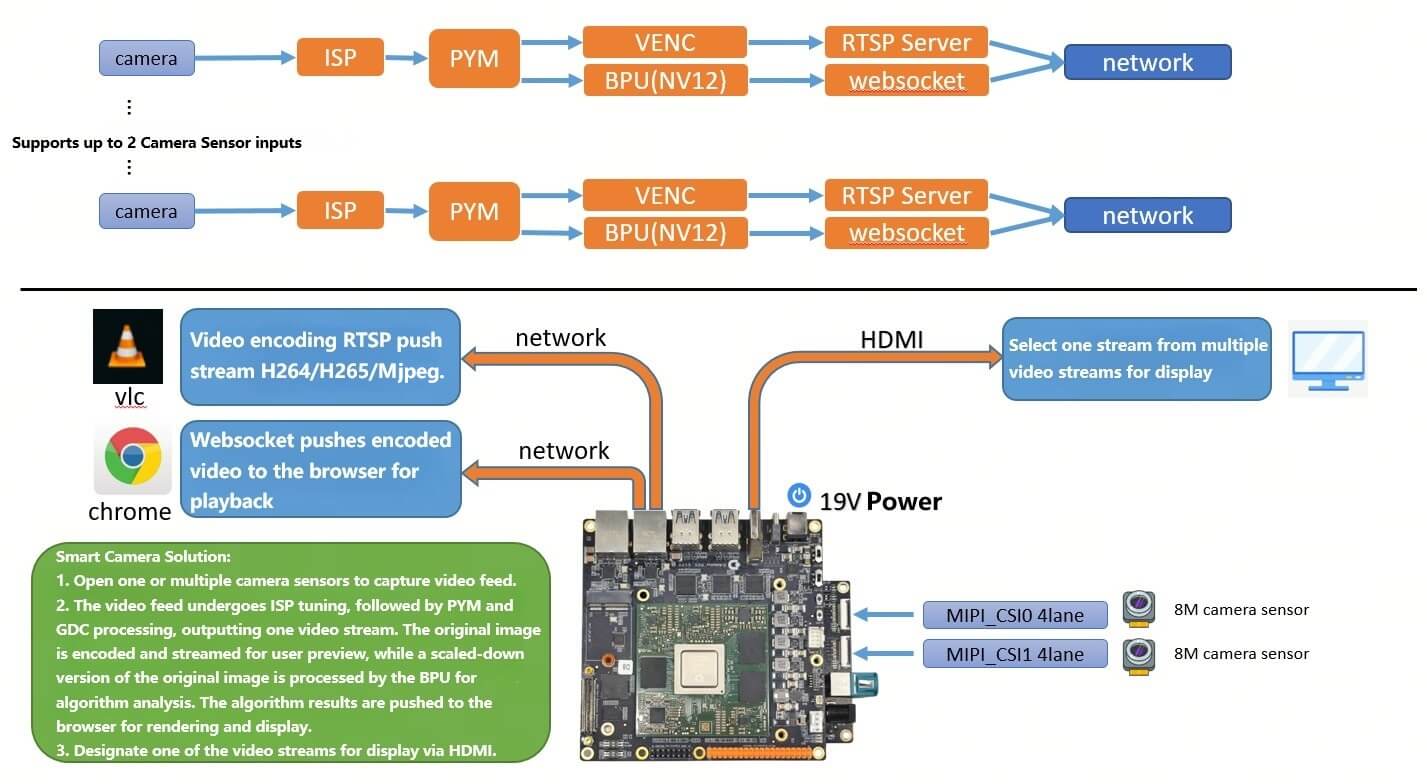
This scheme provides the following features:
- Real-time video monitoring
- Execution of specified algorithms
- Multi-channel video preview when multiple Camera Sensors are connected
Parameter Descriptions
Configurable parameters in the Intelligent Camera scheme include:
- Enable Camera Interface: Lists CSI interfaces with physically connected cameras; users can enable/disable specific interfaces as needed.
- Sensor Model: The program automatically detects compatible Camera Sensor models connected to the device for configuration.
- Encoding Type: Controls video encoding format; supports H264/H265/MJPEG (availability depends on hardware and software support).
- Encoding Bitrate: Controls video encoding bitrate. Recommended bitrates for different resolutions:
- SD (480p): 256, 512, 768, 1024, 1536, 2048
- HD (720p): 512, 1024, 2048, 3072, 4096, 6144
- Full HD (1080p): 1024, 2048, 4096, 6144, 8192, 12288
- 2K: 2048, 4096, 8192, 12288, 16384, 24576
- 4K: 4096, 8192, 16384, 24576, 32768, 49152
- Algorithm Model: Select the algorithm model to run.
Notes
When using the Intelligent Camera scheme, please note:
- Ensure stable physical connection between the Camera Sensor and the development board.
- Adjust encoding bitrate as needed to balance video quality and network bandwidth.
Intelligent Analysis Box Configuration
The Intelligent Analysis Box scheme supports decoding, stitching, encoding, RTSP streaming, and intelligent computation for single-channel or four-channel 1080p video. Users can preview results via the web interface, HDMI output, or stream pulling. The functional block diagram is shown below:
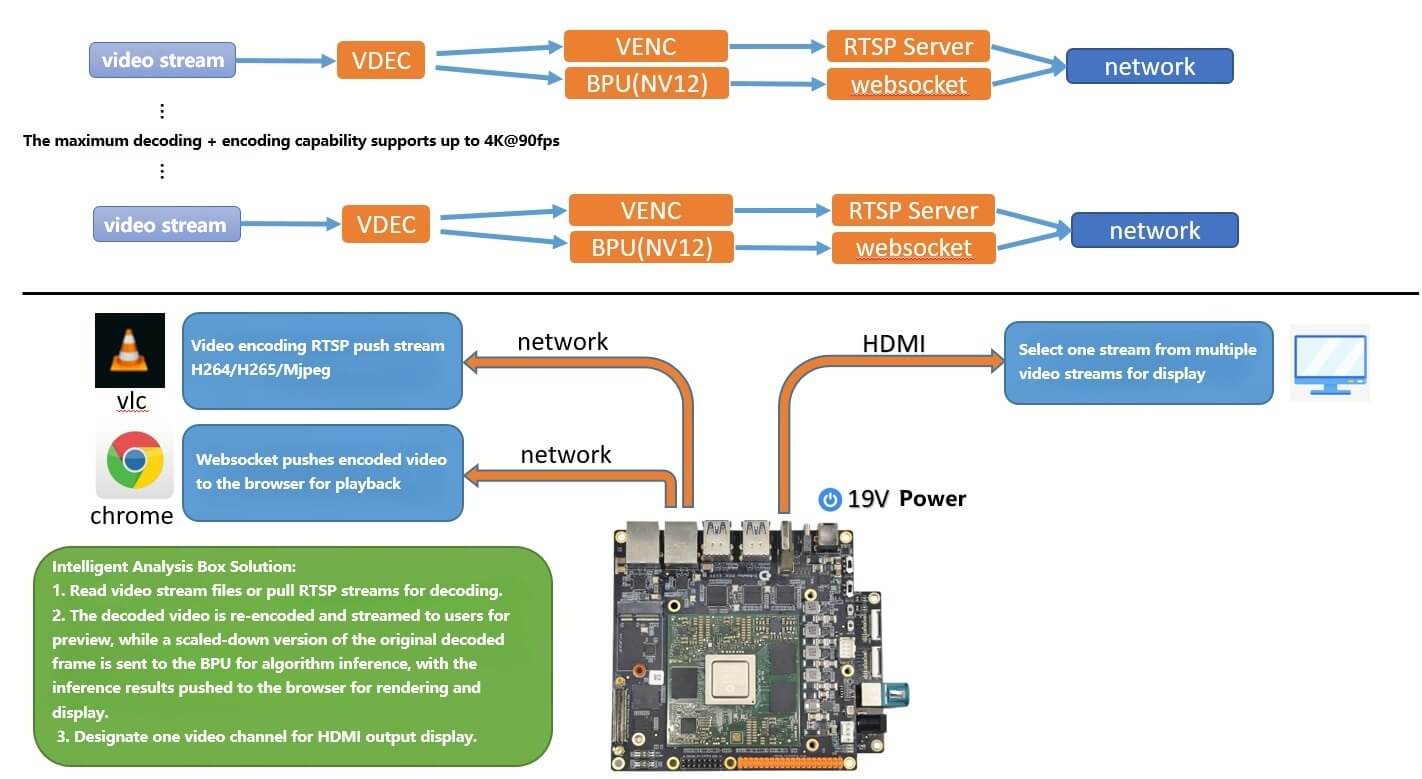
This scheme provides the following features:
- Decode video streams, run algorithms, and re-encode for streaming:
- Supports reading local video files stored on the development board.
- Supports RTSP streams as input.
- Supports scaling decoded video before re-encoding.
- Supports control over bitrate and frame rate.
- Execution of specified algorithms.
Parameter Description
The intelligent analytics box solution has the following adjustable parameters:
- Number of Video Channels: Select how many video analysis channels to enable.
- The combined decoding and encoding capability of the enabled channels must not exceed 4K@90fps (hardware limitation).
- By default, the device allocates 1408MB of ION memory for codec and algorithm operations. If too many channels are enabled, insufficient memory issues may occur, requiring adjustment of the ION memory size.
- Video Stream: Supports reading local video stream files on the development board and RTSP streams.
- Decode Type (
decode_type): Controls the video decoding format. Supports H264/H265/Mjpeg. - Decode Width (
decode_width): Controls the width of decoded video. - Decode Height (
decode_height): Controls the height of decoded video. - Decode Frame Rate (
decode_frame_rate): Controls the frame rate of decoded video. - Encode Type (
encode_type): Controls the video encoding format. Supports H264/H265/Mjpeg. - Encode Width (
encode_width): Controls the width of encoded video. - Encode Height (
encode_height): Controls the height of encoded video. - Encode Frame Rate (
encode_frame_rate): Controls the frame rate of encoded video. - Encode Bitrate (
encode_bitrate): Controls the bitrate of encoded video. Below are reference bitrates for different video resolutions:- SD Video (480p): 256, 512, 768, 1024, 1536, 2048
- HD Video (720p): 512, 1024, 2048, 3072, 4096, 6144
- Full HD Video (1080p): 1024, 2048, 4096, 6144, 8192, 12288
- 2K Video: 2048, 4096, 8192, 12288, 16384, 24576
- 4K Video: 4096, 8192, 16384, 24576, 32768, 49152
- Algorithm Model (
model): Select the algorithm model to run.
Notes
When using the intelligent analytics box solution, please note the following:
- Ensure stable network connectivity and sufficient network bandwidth to meet data transmission requirements.
- Adjust the number of analysis channels and the analysis algorithm according to your application needs.
- The combined decoding and encoding capability of the enabled channels must not exceed 4K@90fps (hardware limitation).
- By default, the device allocates 1GB of ION memory for codec and algorithm operations. If too many channels are enabled, insufficient memory issues may occur, requiring an increase in ION memory size.
Playing RTSP Streams Using VLC Player
When the sunrise camera program runs, it simultaneously pushes RTSP video streams. Users can play these RTSP streams using VLC player to preview video, record, take screenshots, and more.
Playback Method
Open VLC player, select the Media menu, then choose Open Network Stream.
In the Open Media dialog box, enter the URL address and click the Play button to start playback, as shown below:
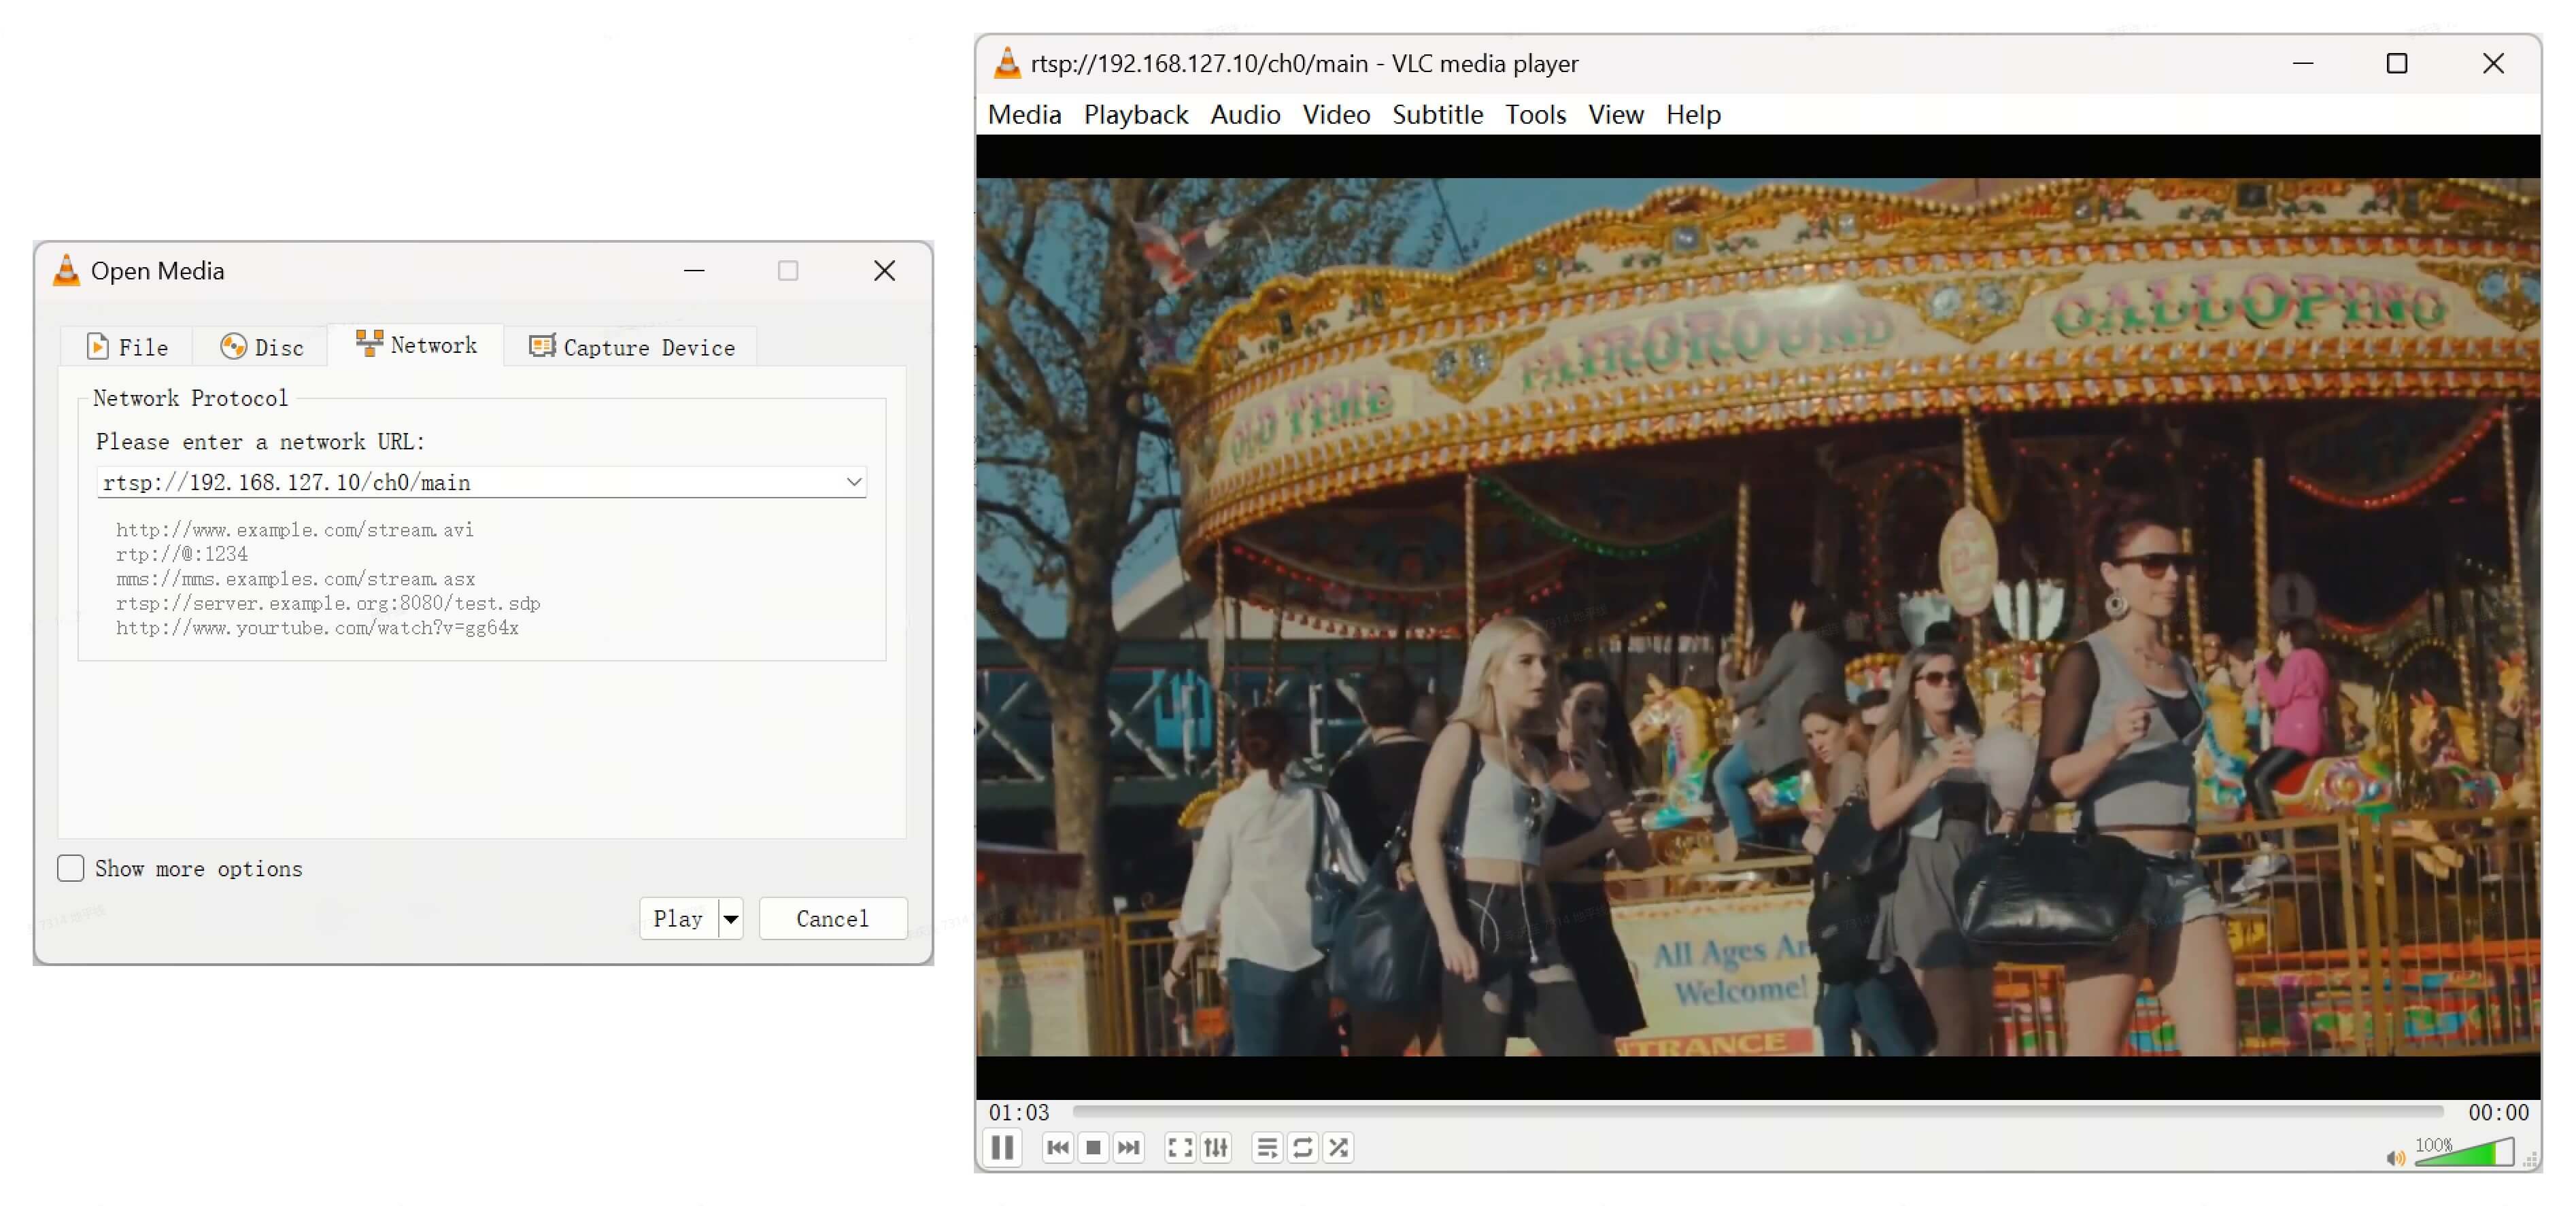
The RTSP stream URL can be found in the device information section of the web interface. The default supported stream URL is: rtsp://192.168.1.10/stream_chn0.h264
4K@30fps Streaming Configuration Notes
-
When streaming at 4K@30fps with a high bitrate (above 8192 Kbps), it is recommended to use a Gigabit network to ensure smooth playback without frame drops. Otherwise, video artifacts such as macroblocking or screen corruption may easily occur.
-
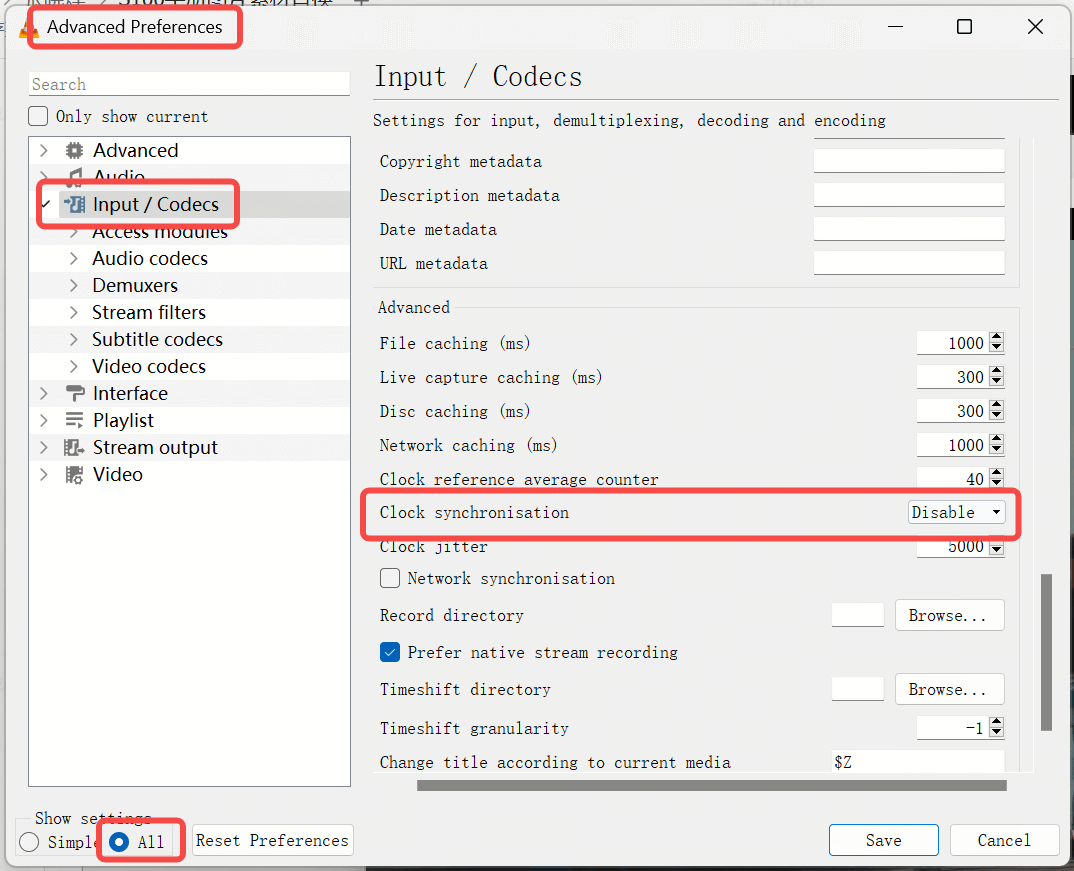
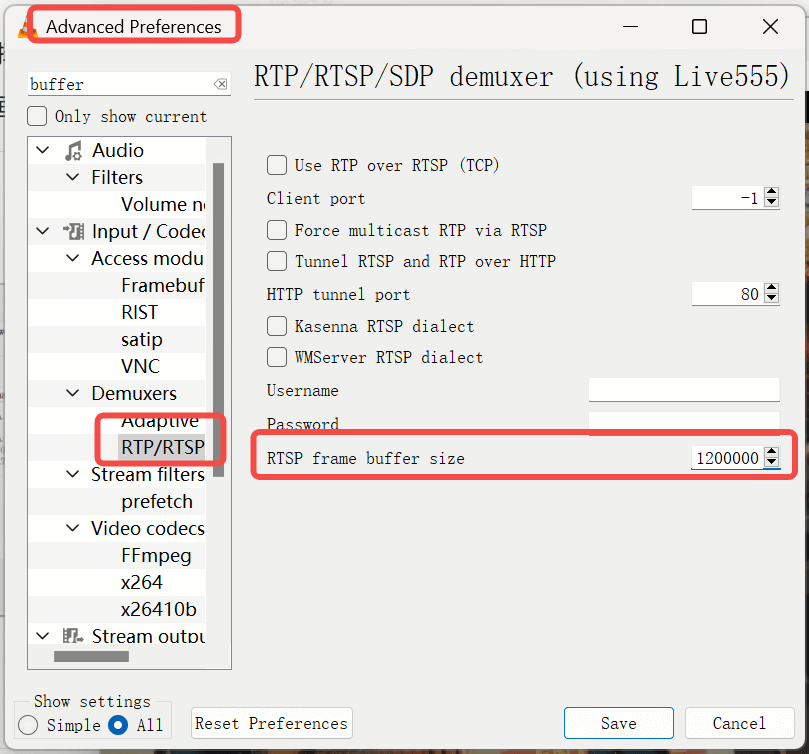
VLC buffer_size setting: Modify VLC’s receive buffer—default is 250000; it is recommended to increase it to 1200000.
- Using HTTP mode can effectively resolve screen corruption caused by frame drops during playback.

- Disable clock synchronization in advanced settings.